


moveit是经典的ros下的逆运动学解算器,通过使用这个工具我们可以深入体会原有的规划方法的一些数值计算的原理.
目标
我们安装ubuntu20,noetic版本进行测试,需要实现以下目标:
- 完成安装说明与可视化的测试
- 理解运算过程的原理
- 能够熟练使用它进行规划和控制
- 结合nav(move_base让agent的作业过程变得更加自然)
- 可以自己利用moveit工具来进行计算规划结果并执行
安装ros
首先安装ros-noetic,此处不需要过多赘述.
安装软件包
sudo apt update
sudo apt dist-upgrade
sudo apt install ros-noetic-catkin python3-catkin-tools -y
sudo apt install python3-wstool -y
这里着重说明一下wstool工具,这个wstool是管理ros工作空间的工具,通过.rosinstall中的配置来管理工作空间.与rosdep有点类似,不过这个是直接将功能包下载到源码空间的,比如
wstool merge -t src PATH_TO_ROSINSTALL_FILE.rosinstall
wstool merge https://raw.githubusercontent.com/swri-robotics/gilbreth/kinetic-devel/gilbreth.rosinstall
这样来使用这个工具.
工作空间配置
mkdir -p ~/ws_moveit/src
cd ~/ws_moveit/src
然后下载对应的源码,在src目录下通过wstool进行下载:
wstool init .
wstool merge -t . https://raw.githubusercontent.com/moveit/moveit/master/moveit.rosinstall
wstool remove moveit_tutorials  # this is cloned in the next section
wstool update -t .
这些就是moveit的整体源码了(包括他的示例的内容,主要部分就是moveit本体以及rviz的可视化部分内容.)
为了测试功能,我们在下载一个应用的包:
git clone https://github.com/moveit/panda_moveit_config.git -b noetic-devel
同样在src目录下,我们安装对应的依赖项的内容
rosdep install -y --from-paths . --ignore-src --rosdistro noetic
但是一般而言,noetic这样的老版本的ros是无法使用rosdep安装依赖的,我们手动进行安装即可.
sudo apt install ros-noetic-spacenav-node ros-noetic-code-coverage -y
sudo apt install ros-noetic-joy-teleop
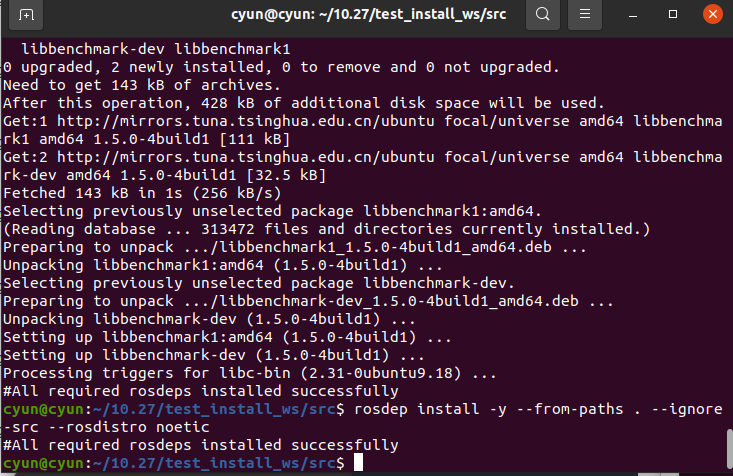
反复使用rosdep,直到完全安装完毕,即可完整安装对应的内容.
最后编译即可
catkin build
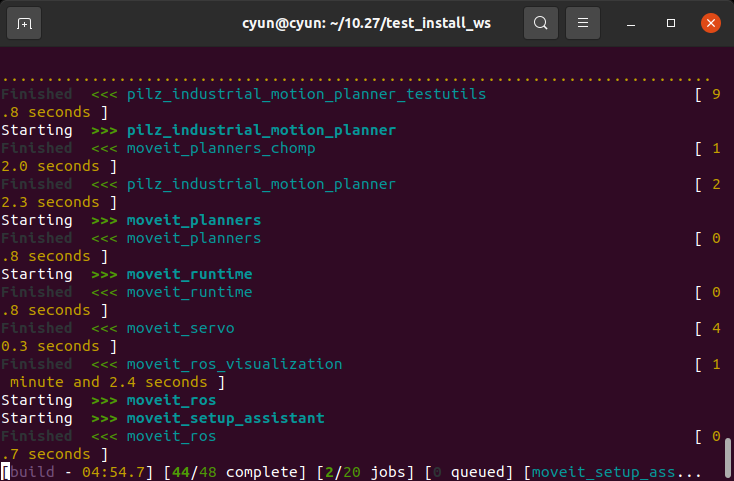
注意,这里的编译有可能因为电脑的性能失败,因为对于我的环境来说,是非常依赖于"编译时内存"的,所以如果出现异常情况可以尝试
catkin build -j1
从而减少编译压力.
rviz可视化与规划
接下来我们学习如何通过rviz与moveit进行可视化,交互的创建机器人的其实状态和目标状态,然后通过各种规划器,可视化输出结果.
首先启动示例
source devel/setup.bash
roslaunch panda_moveit_config demo.launch rviz_tutorial:=true
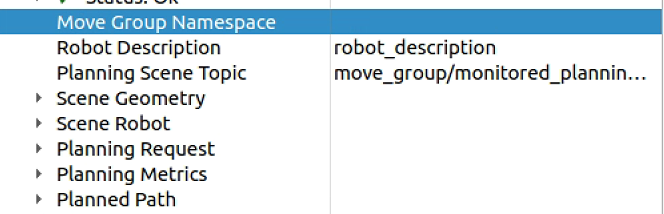
添加rviz中的插件

rviz固定帧设置为panda_link0:
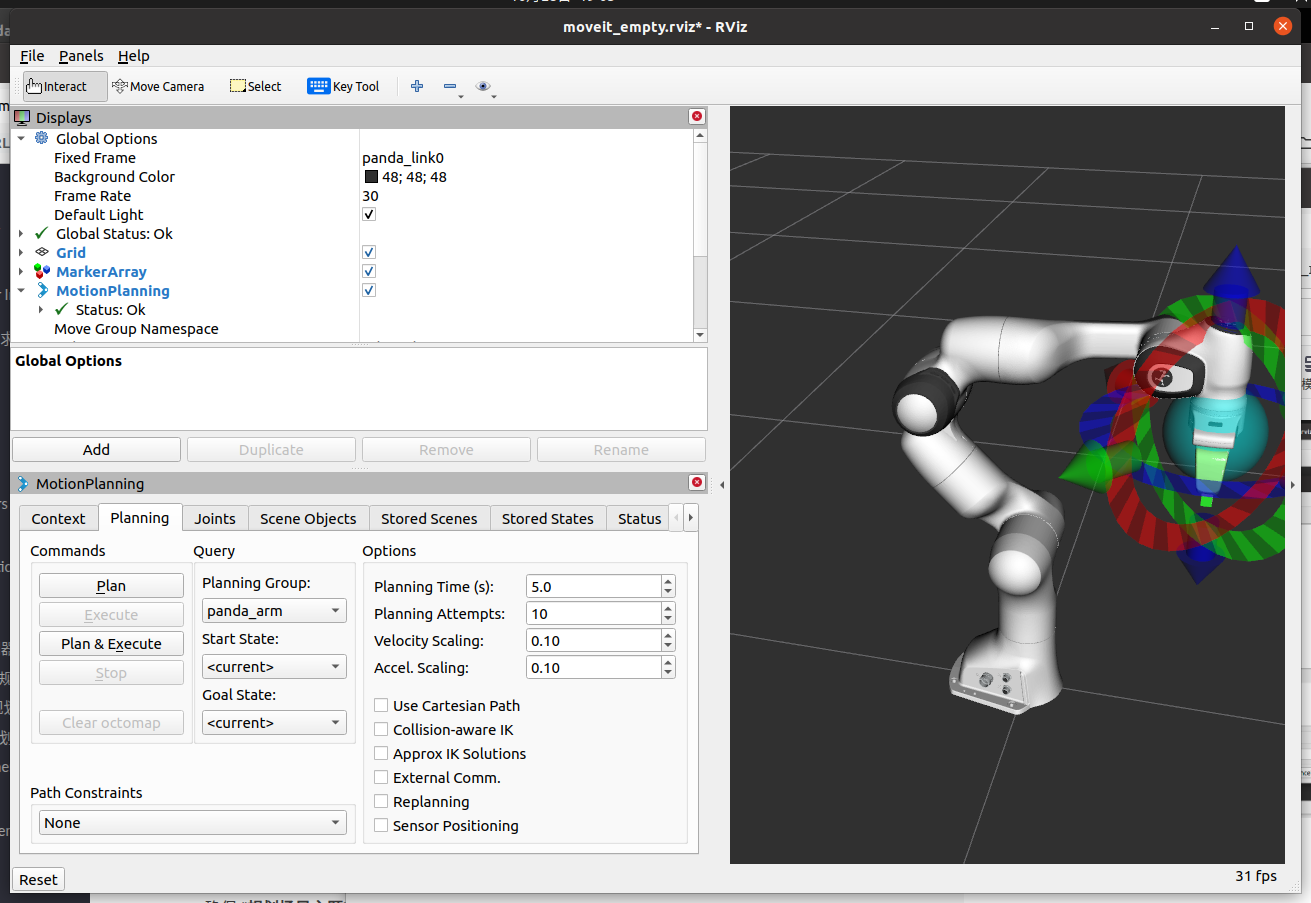
对于可视化插件,还有其他的一些配置信息如下:
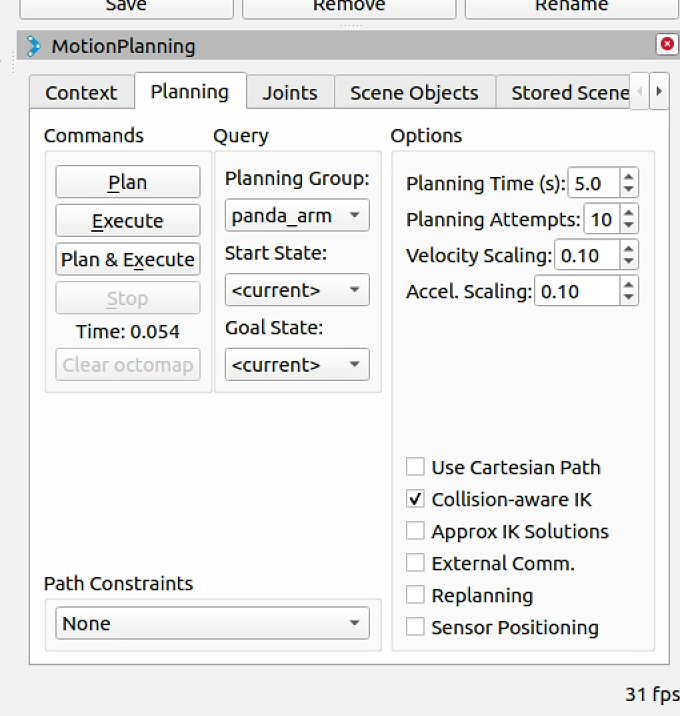
Robot Description应该与原始版本的description是一样的效果。这里用的话题是robot_description。确保规划的场景主题( Planning Scene Topic)是/move_group/display_planned_path,然后Planned Path里面的Trajectory Topic也是/move_group/display_planned_path,在Planning Request中,选择的group是机械臂的运动panda_arm,如下所示
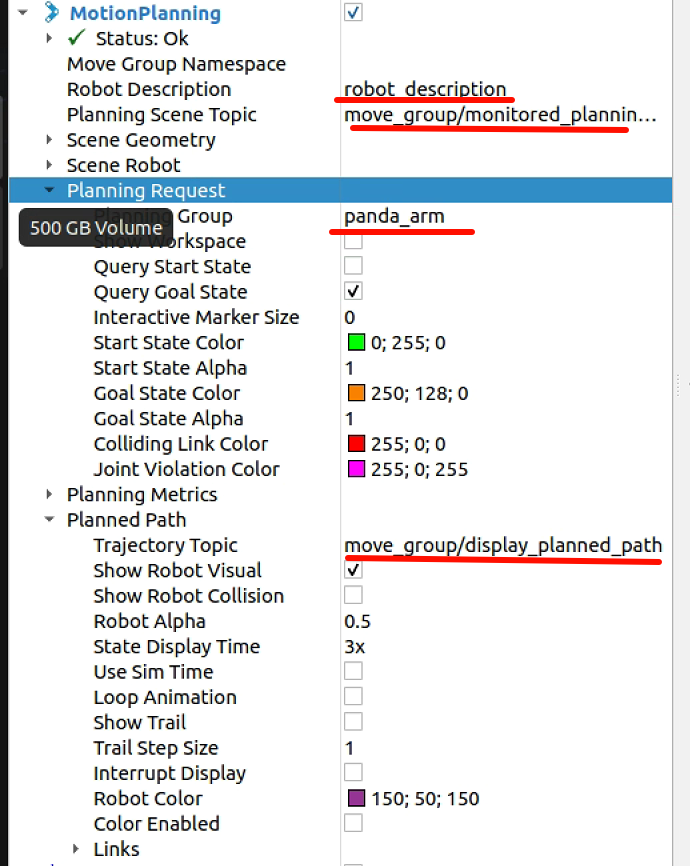
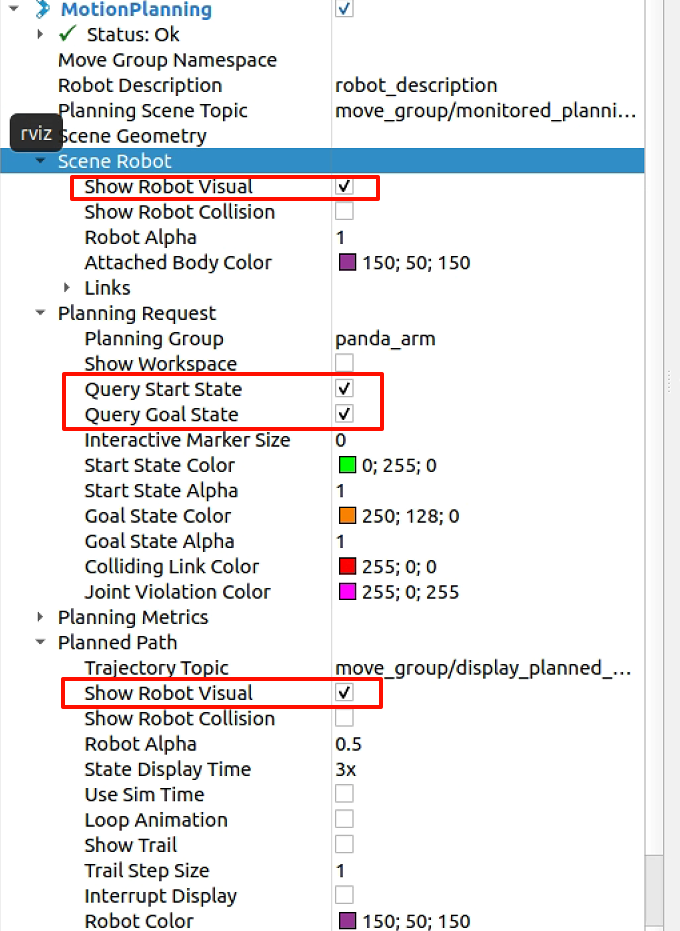
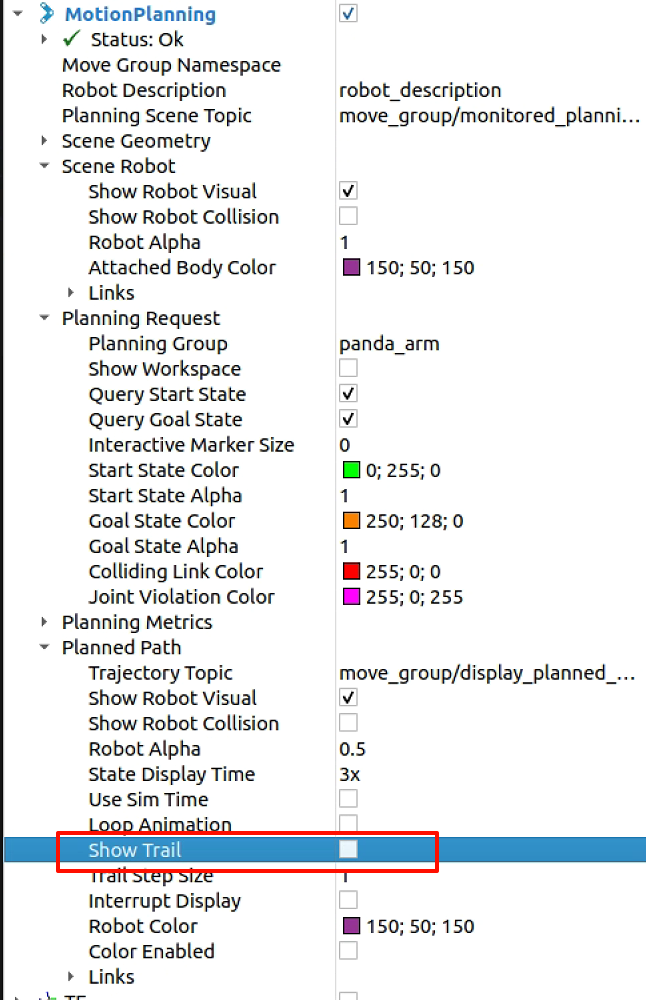
可视化的时候,是由六种效果的,分别是机器人在move_group/monitored_planning_scene计划环境中的配置,planned path的robot可视化,绿色的robot的开始状态,橙色的robot的目标状态,打开每个框的可视化信息如下:
Scene Robot:Show Robot Visual(展示当前robot的可视化、碰撞等)
Planned Path:Show Robot Visual (展示规划的路径)
Planning Request:Query Start State(展示起始状态)
Planning Request:Query Goal State(展示目标状态)
移动机械臂的目标位置,准备进行规划,如果有发生碰撞的部分,那么就会出现红色的部分:
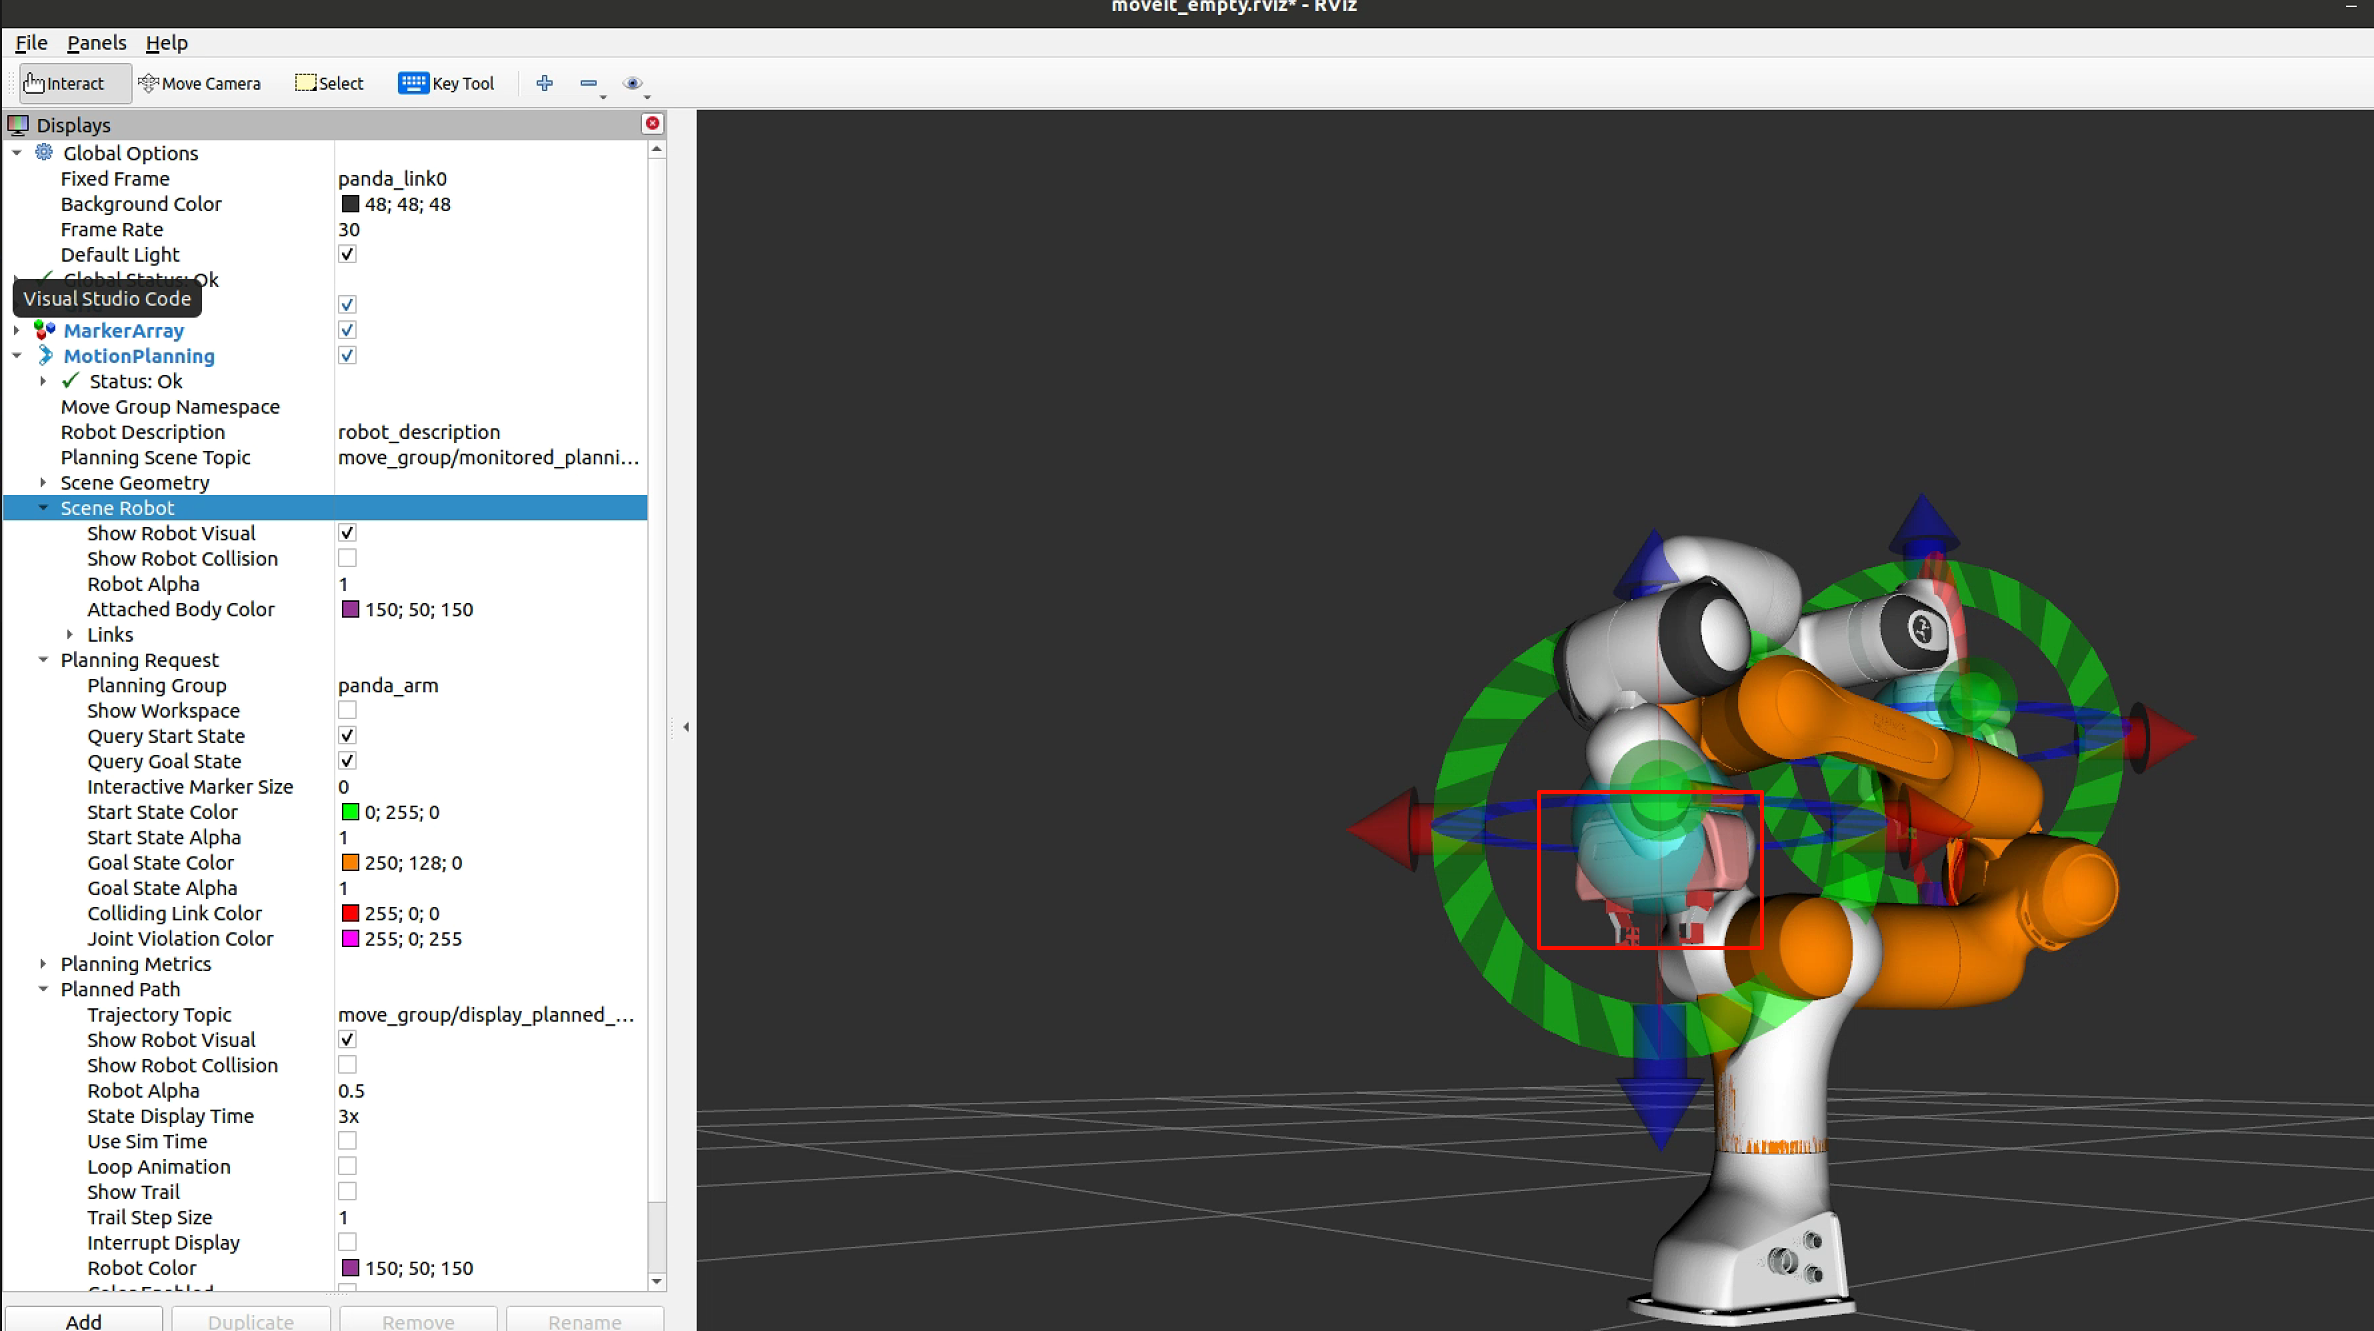
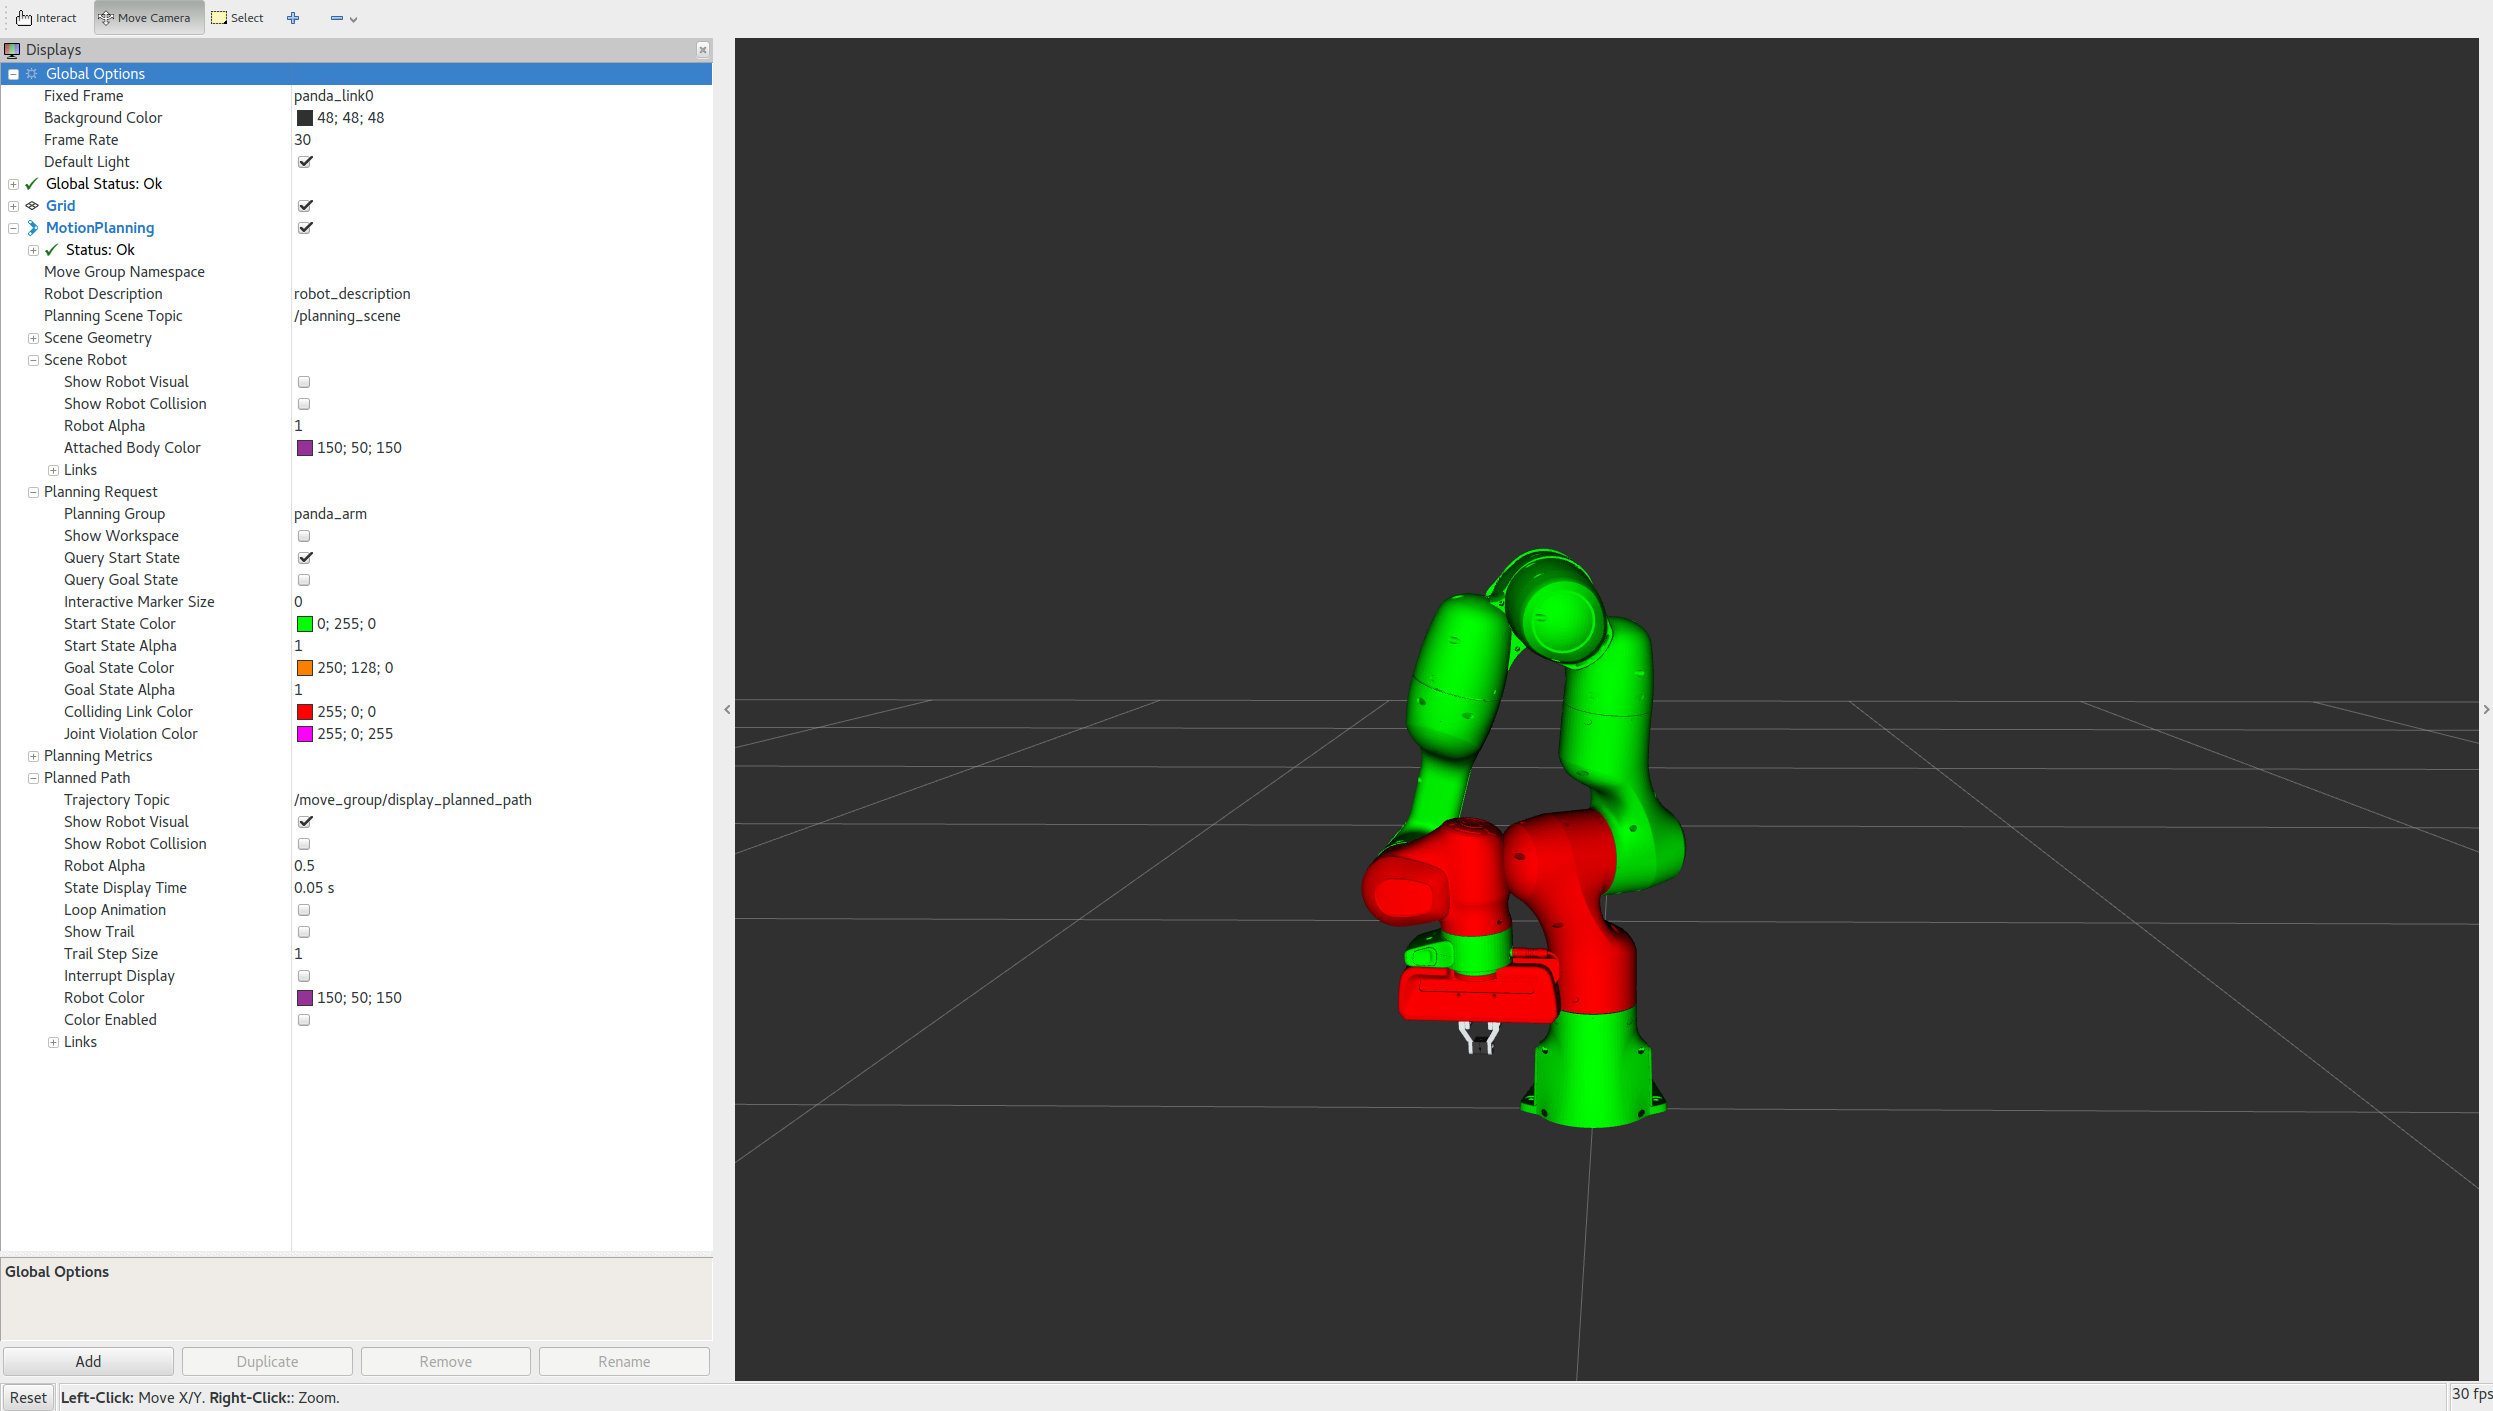
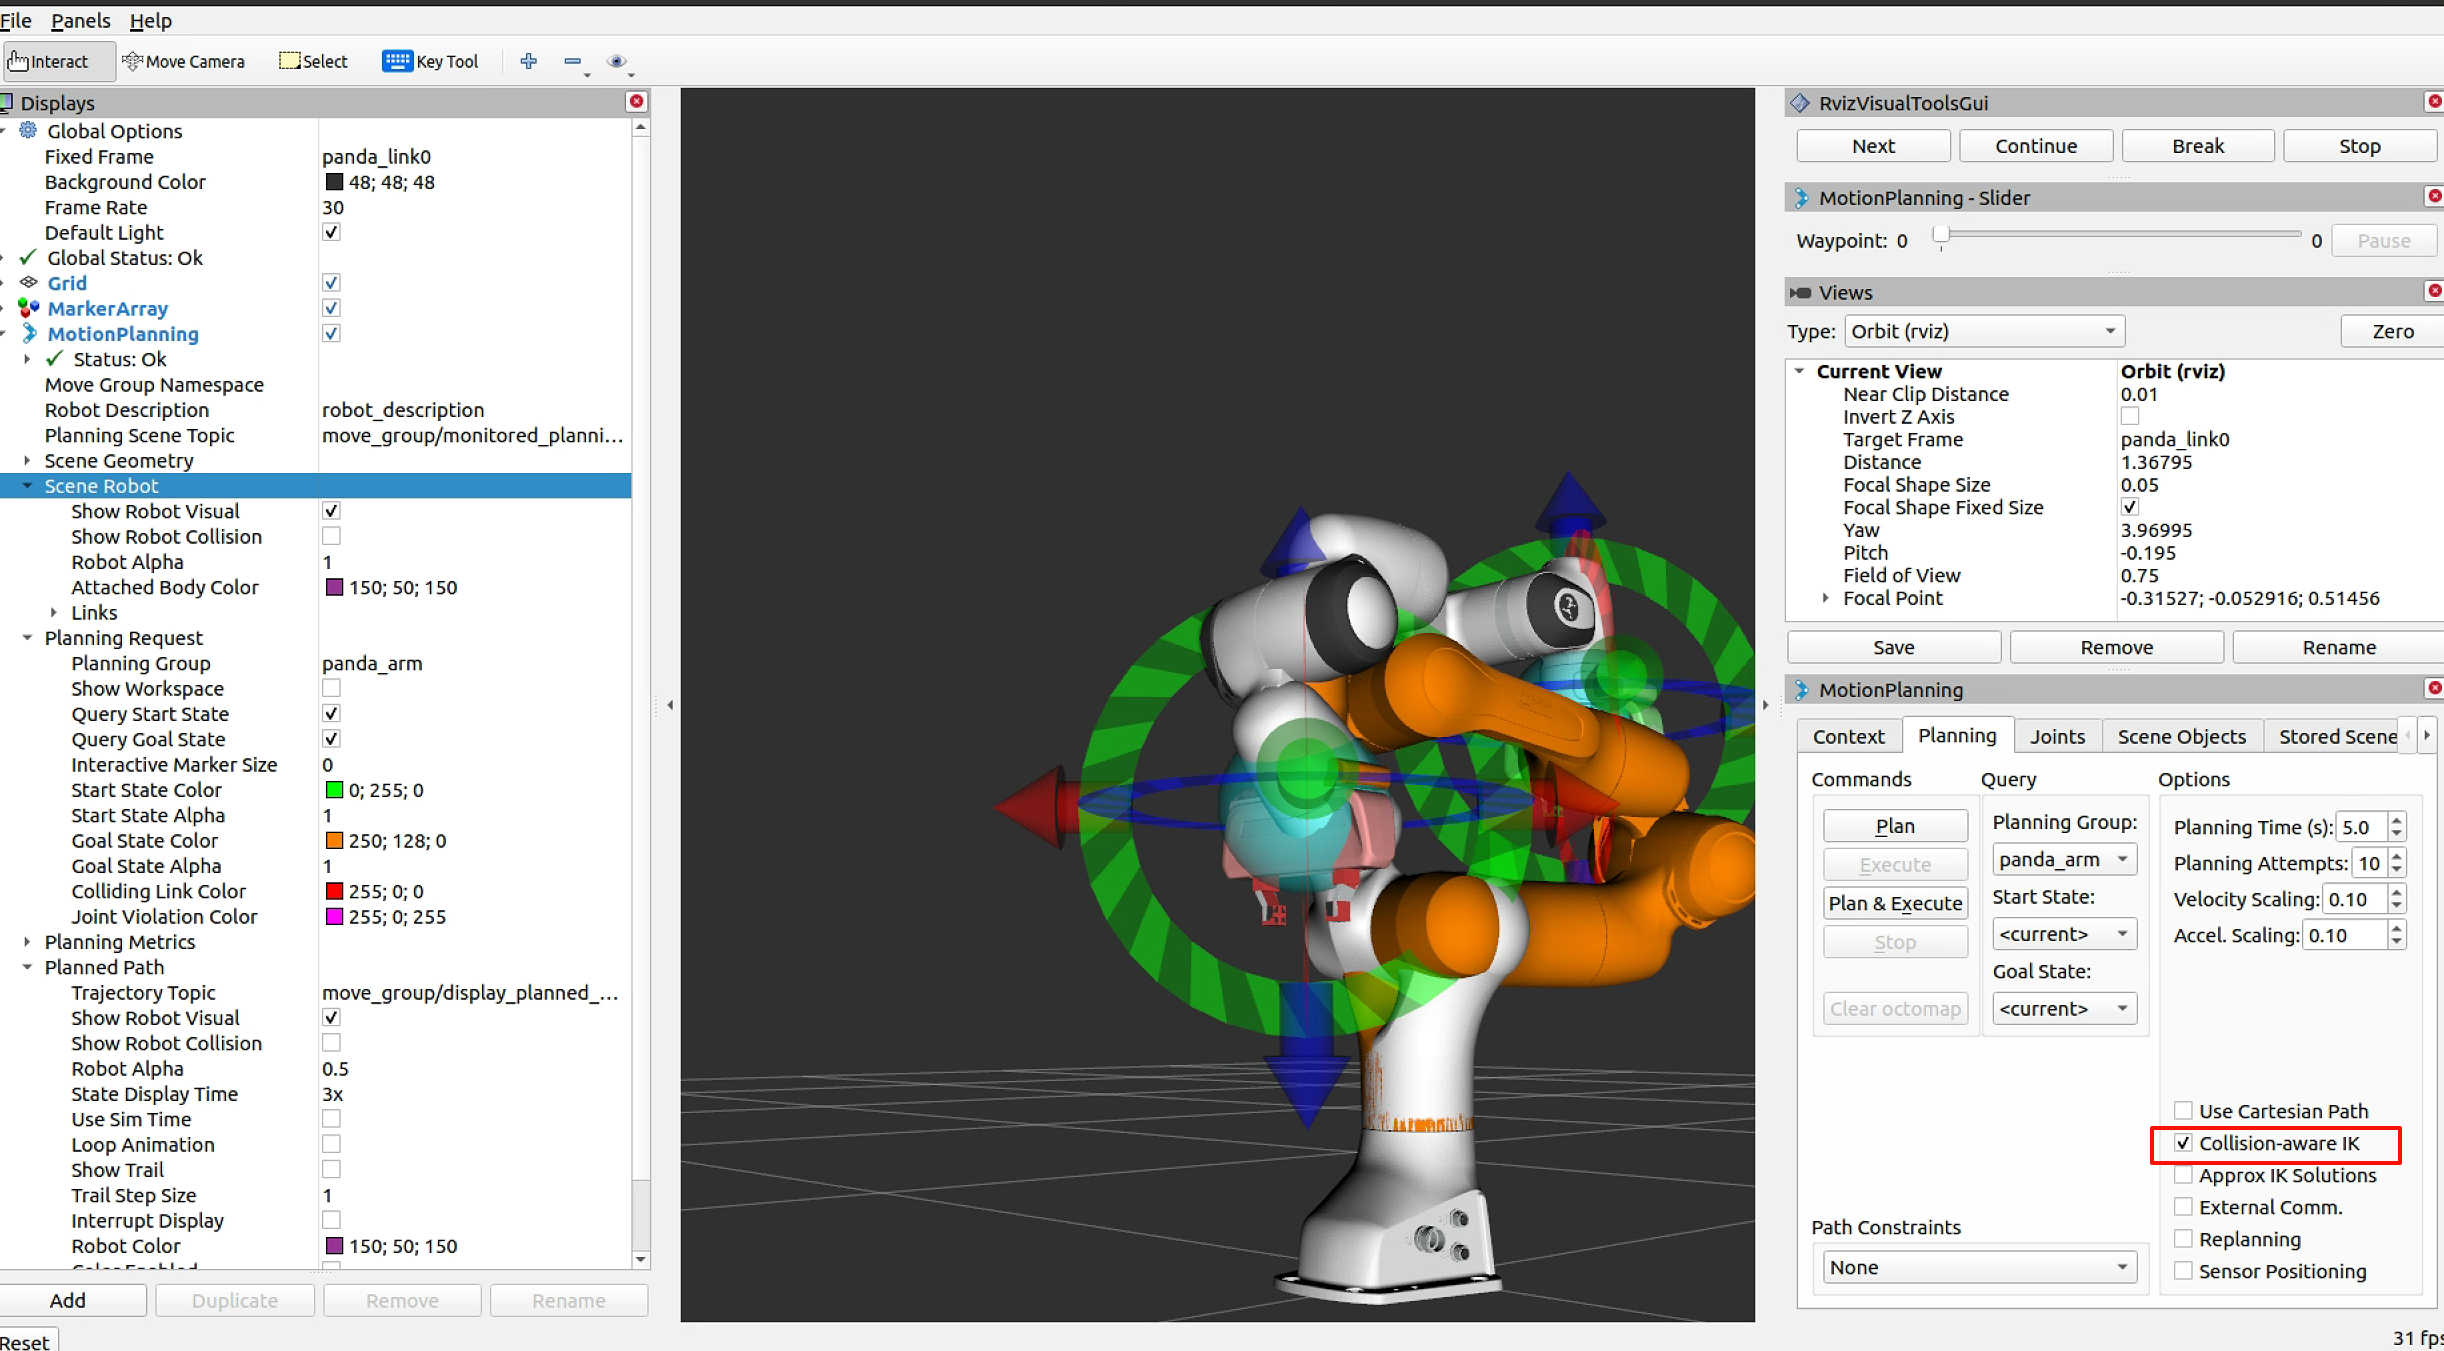
此时的规划是会有碰撞的,可以勾选使用碰撞感知IK来允许IK解算器的行为,解算器将继续尝试为所需的末端执行器姿势找到无碰撞解决方案。如果未选中,解算器将允许在解决方案中发生碰撞。无论复选框的状态如何,碰撞中的链接仍将始终以红色可视化。
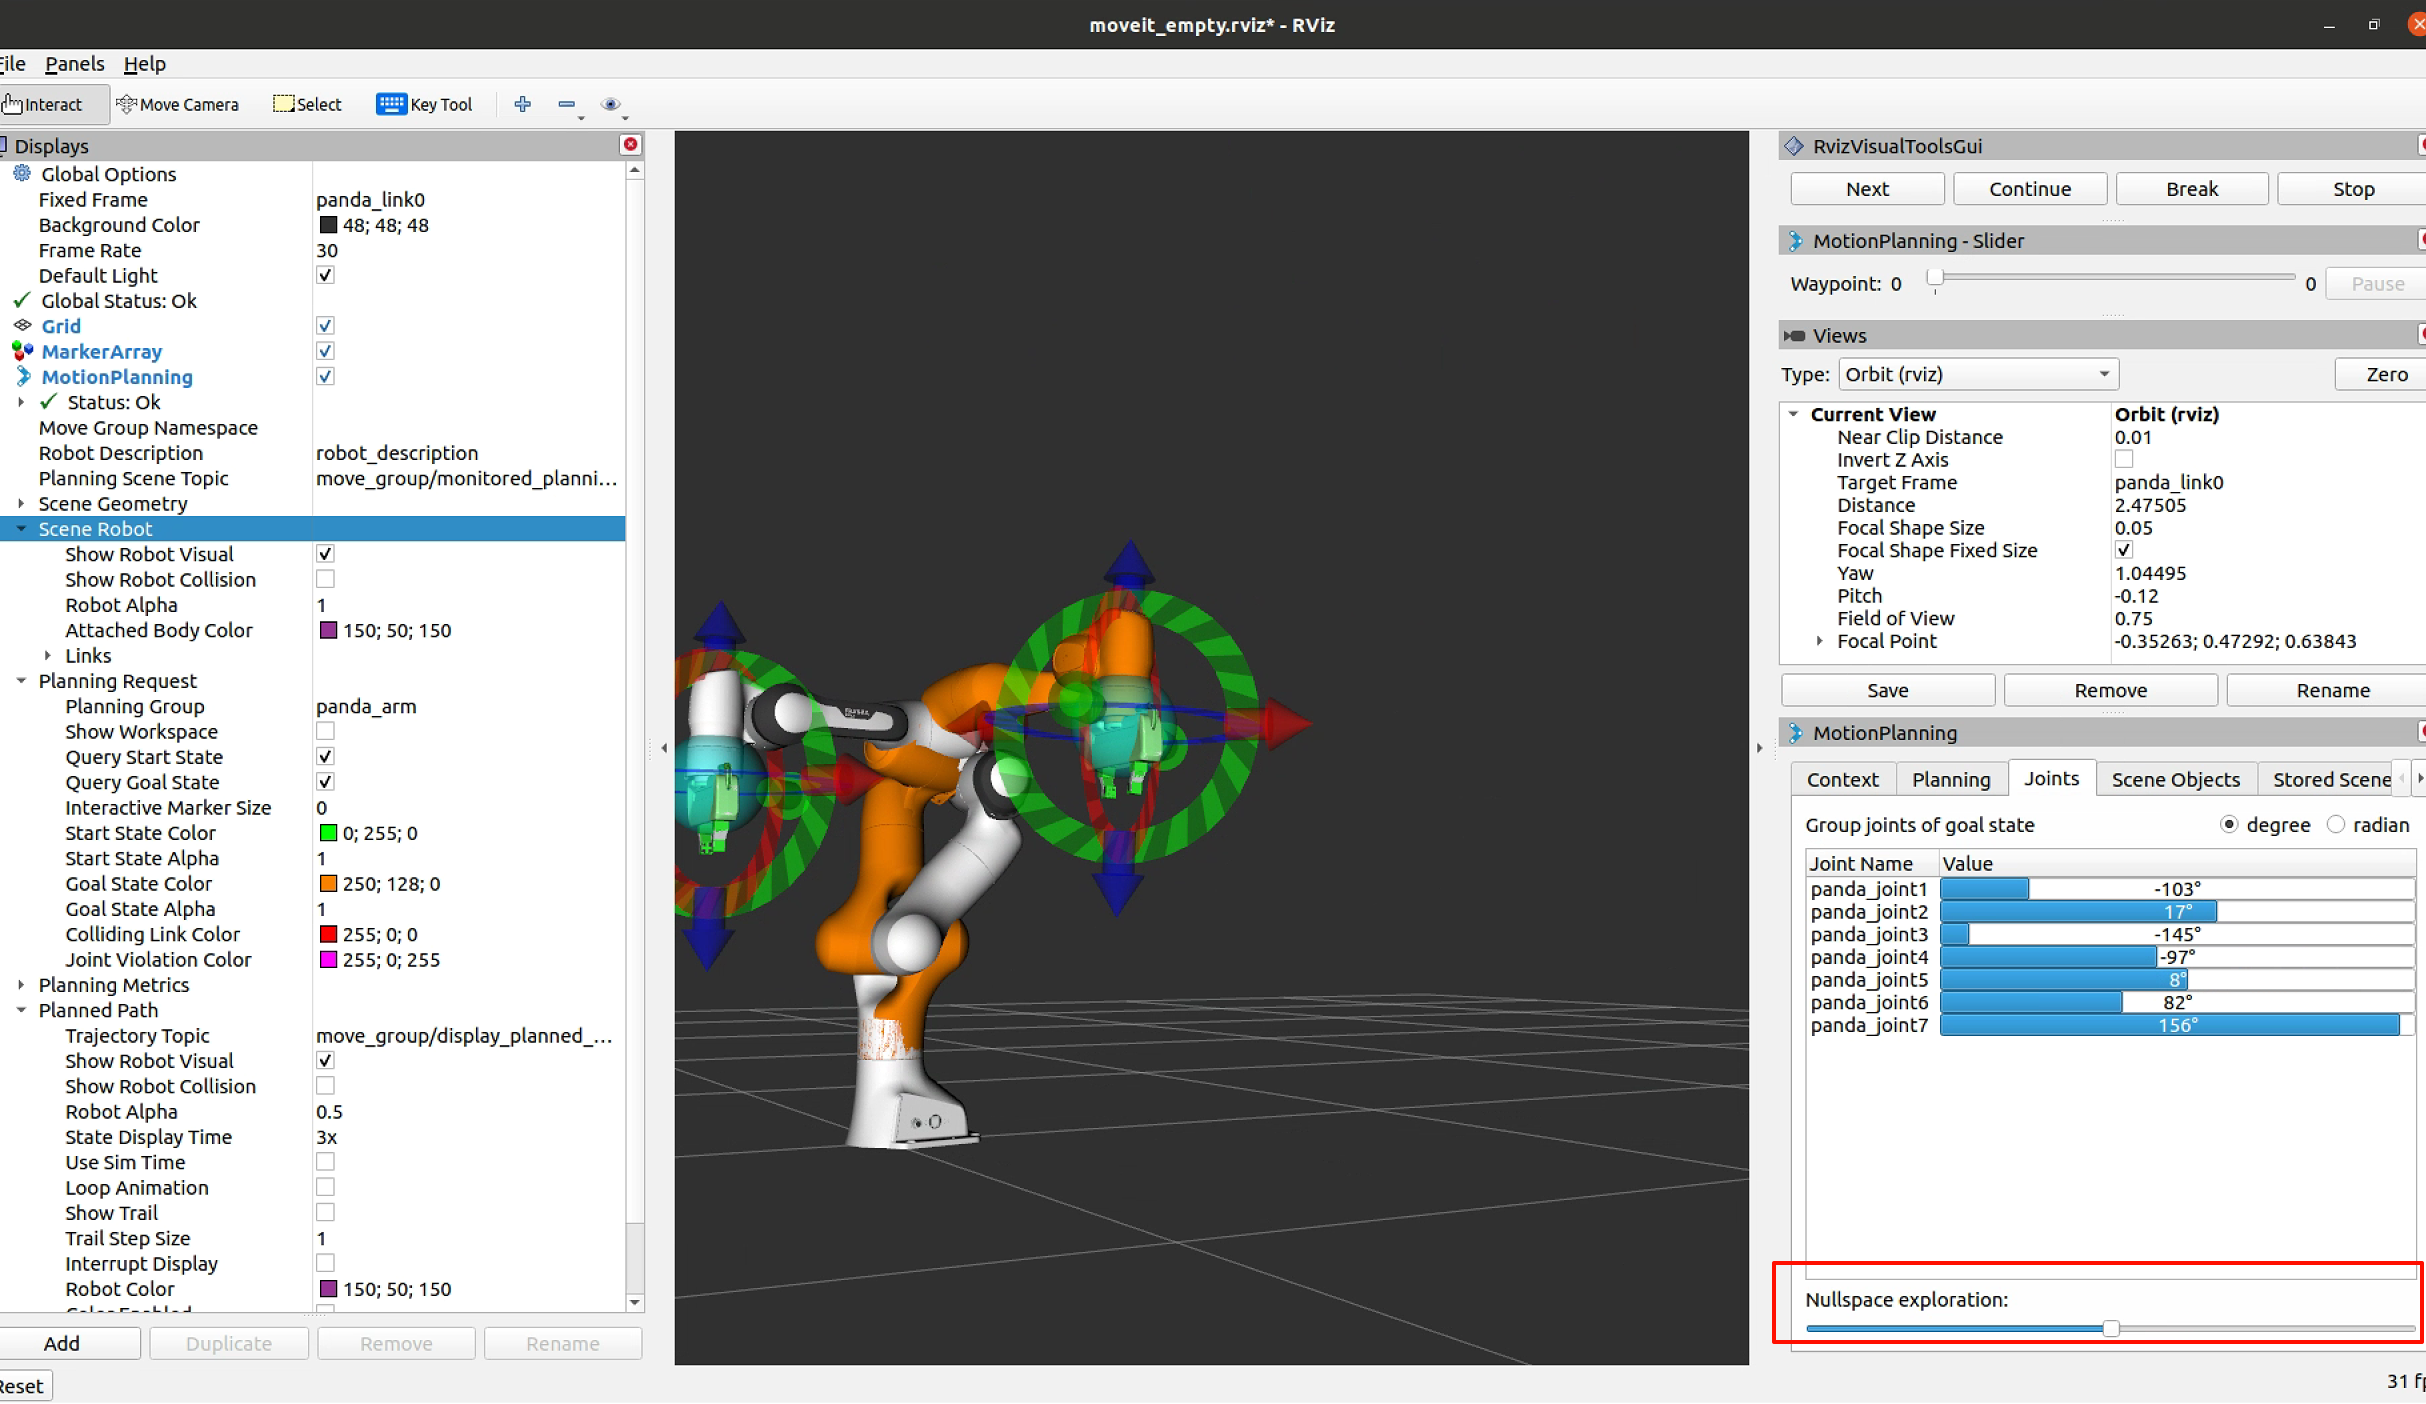
可以使用关节选项卡来移动7自由度的单个关节和冗余关节,尝试移动空空间探索模块:
现在选择一个目标位置,保证起始状态和目标状态不发生碰撞,然后将计划路径进行可视化,
规划结果为
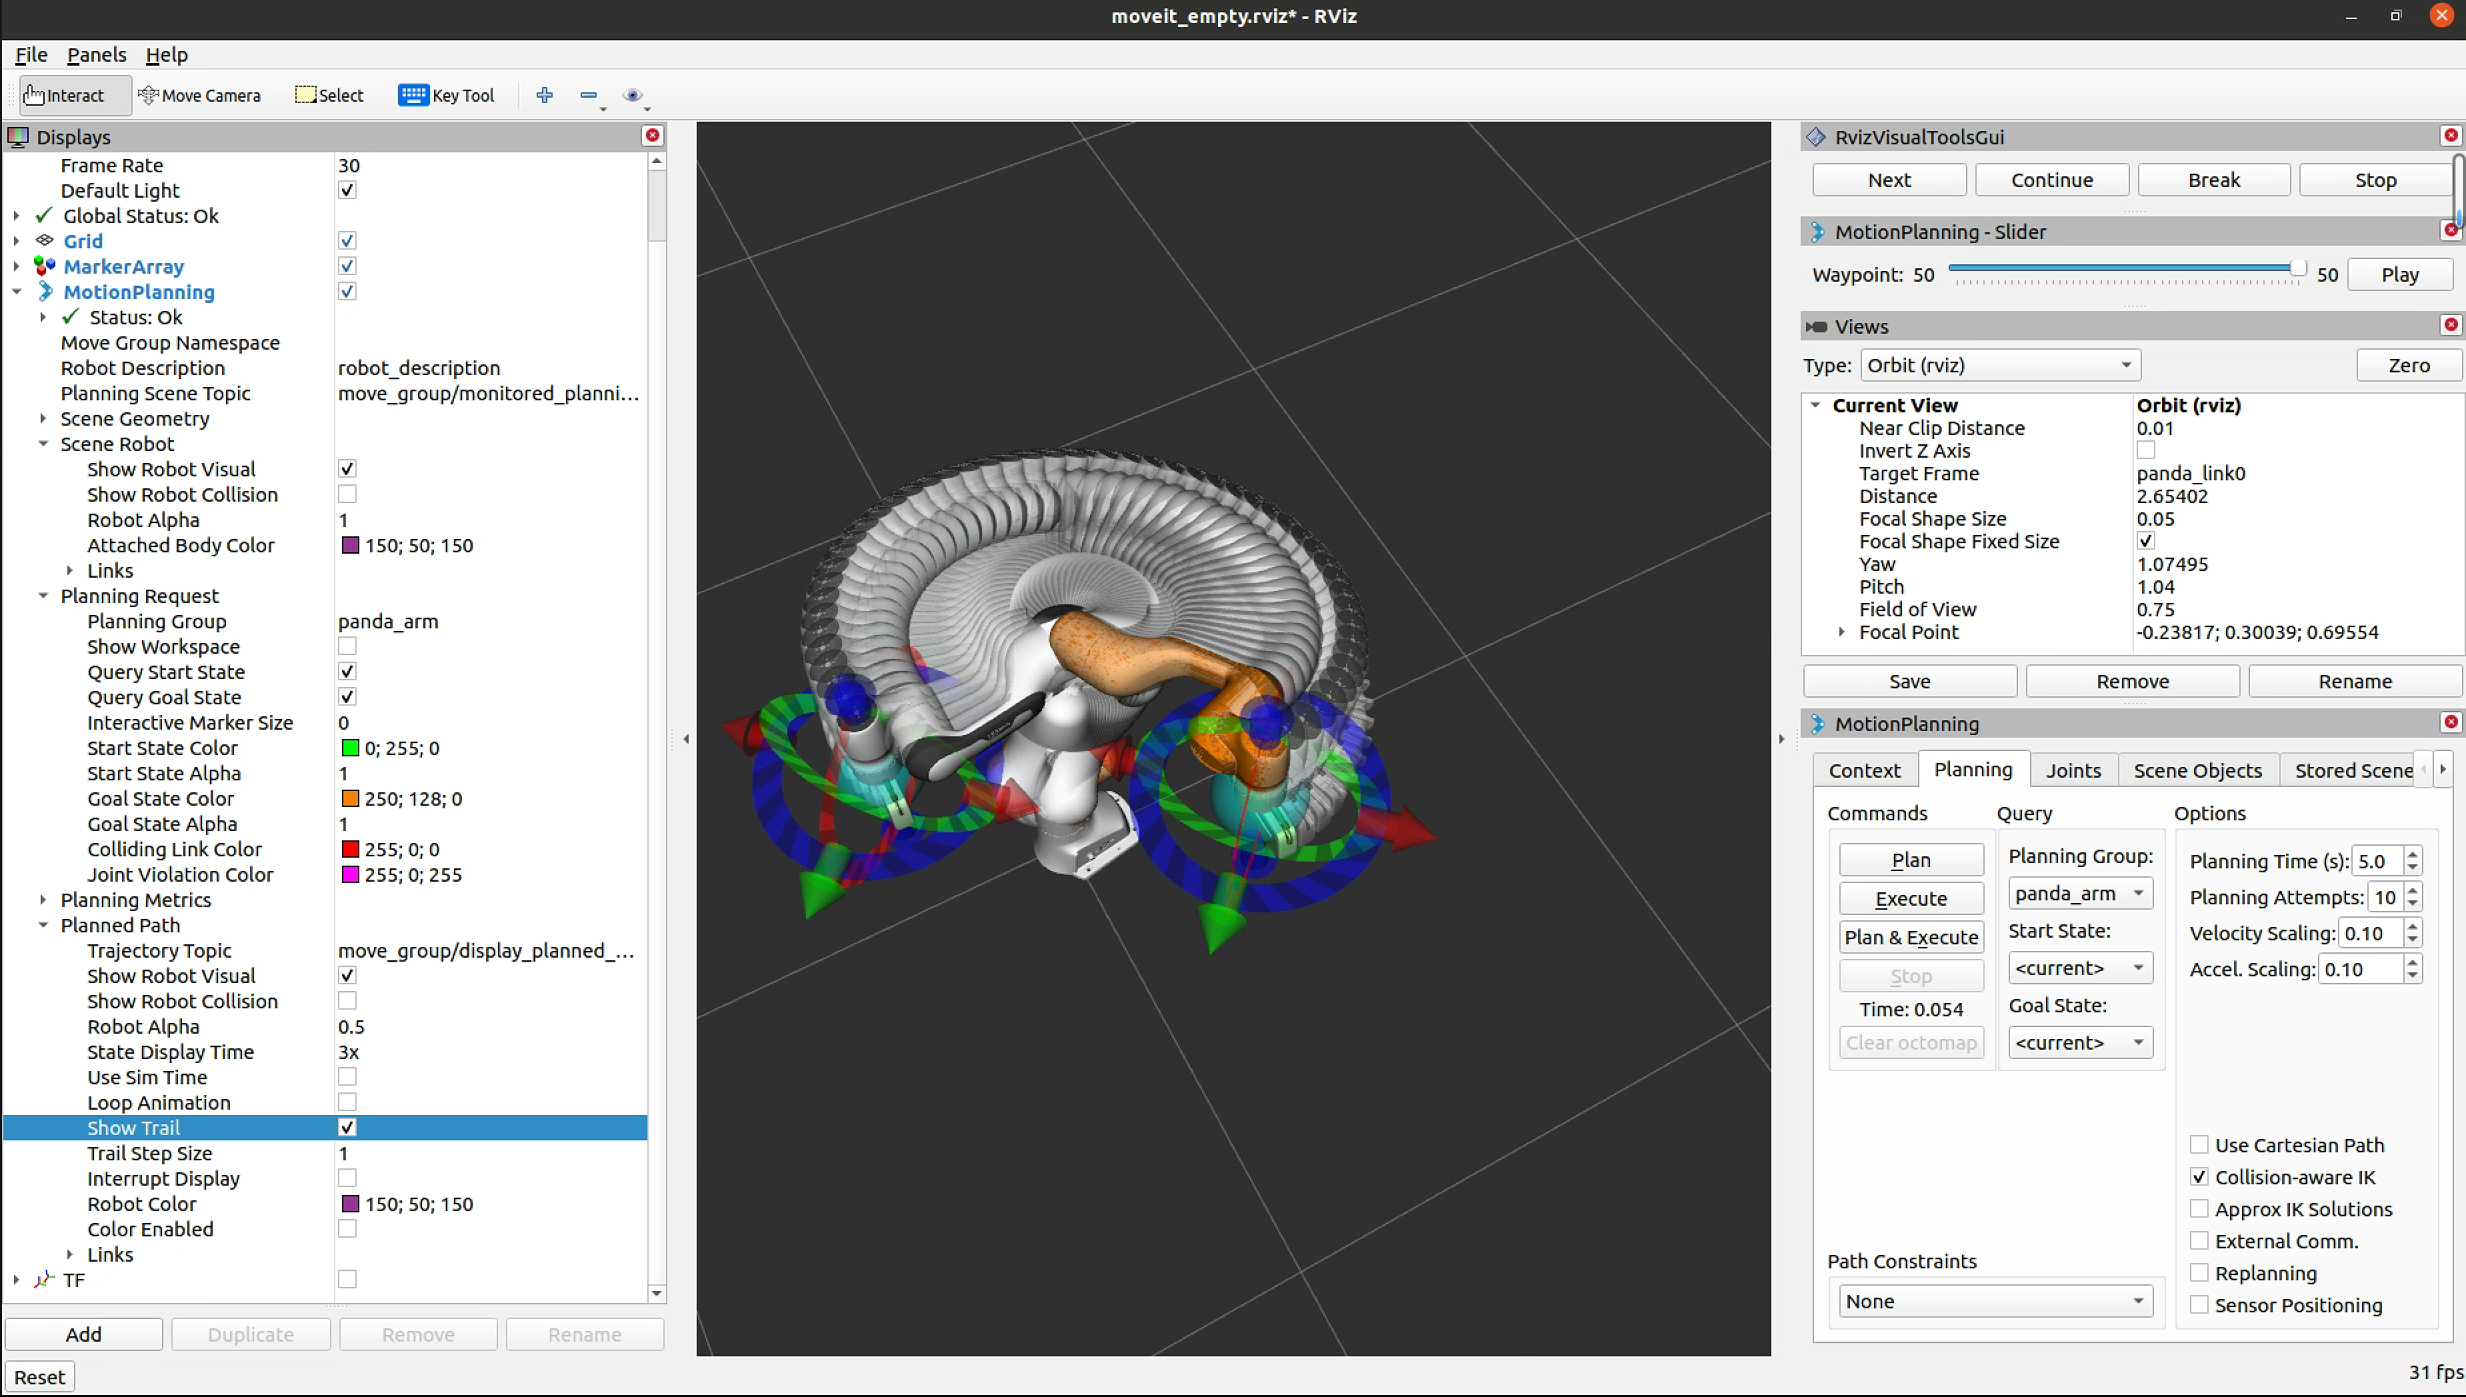
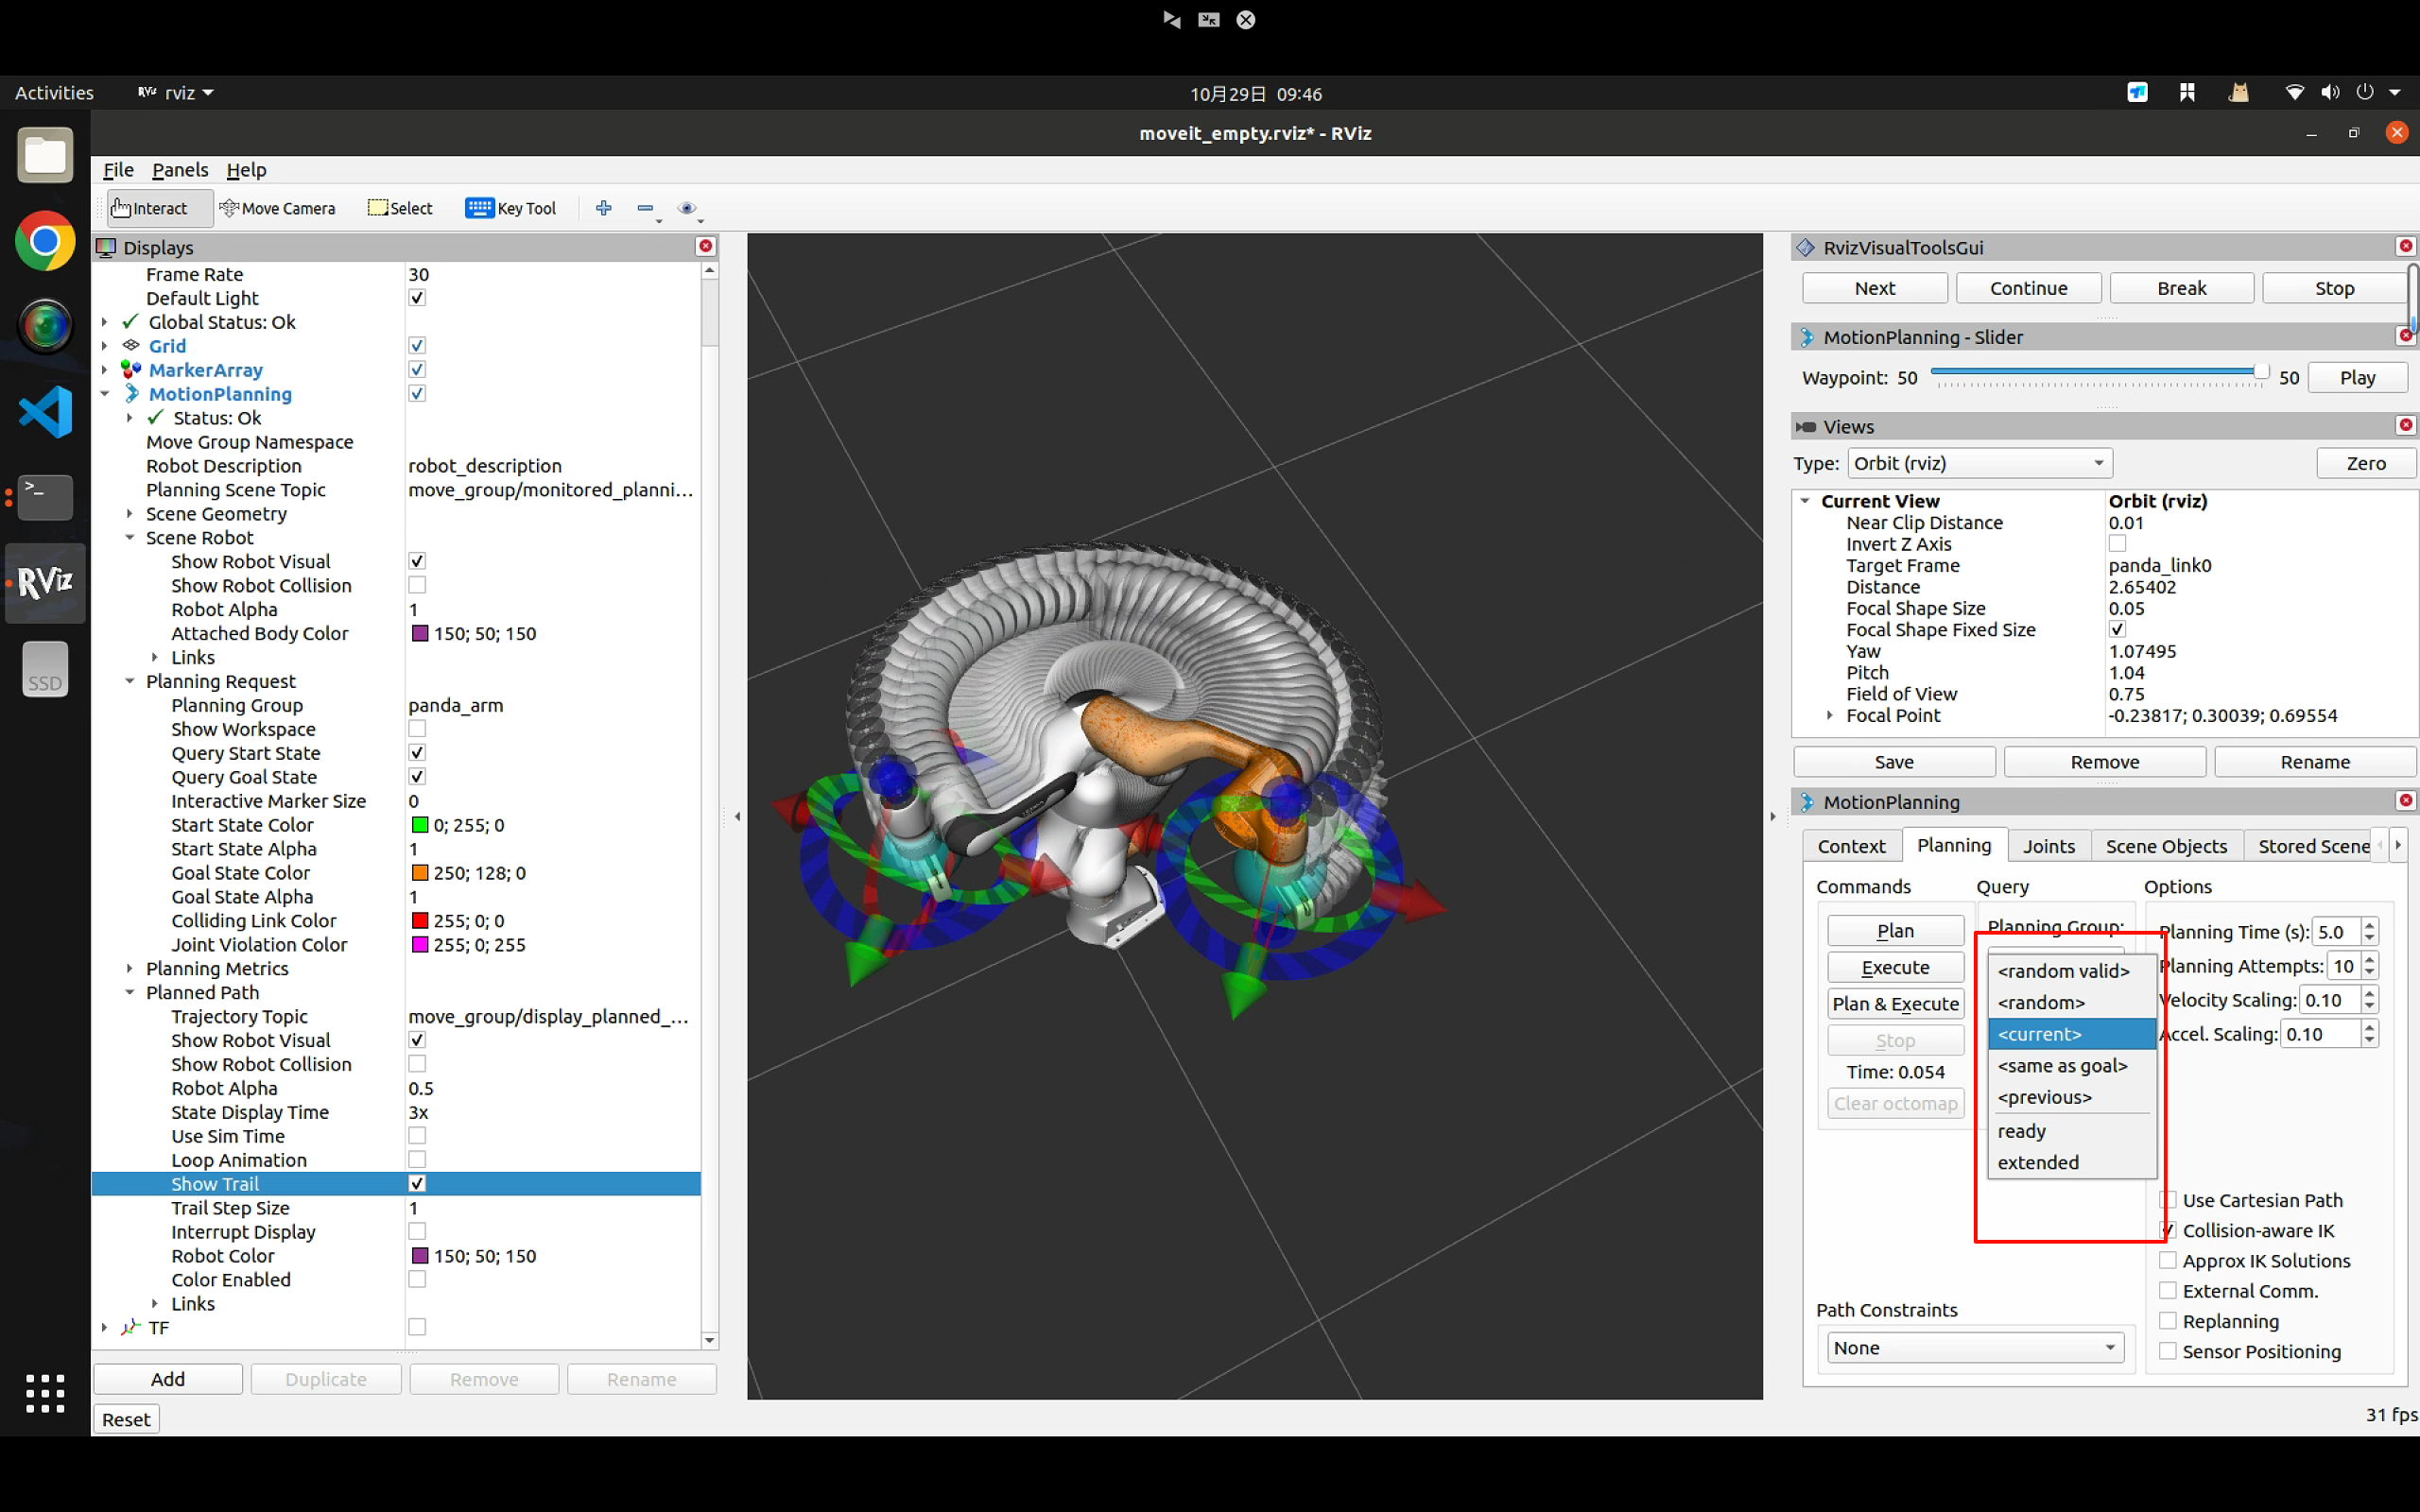
对于起始状态目标状态,是可以选择特定的,现在都是current,也可以是随机的,或者.srdf文件中所定义的内容
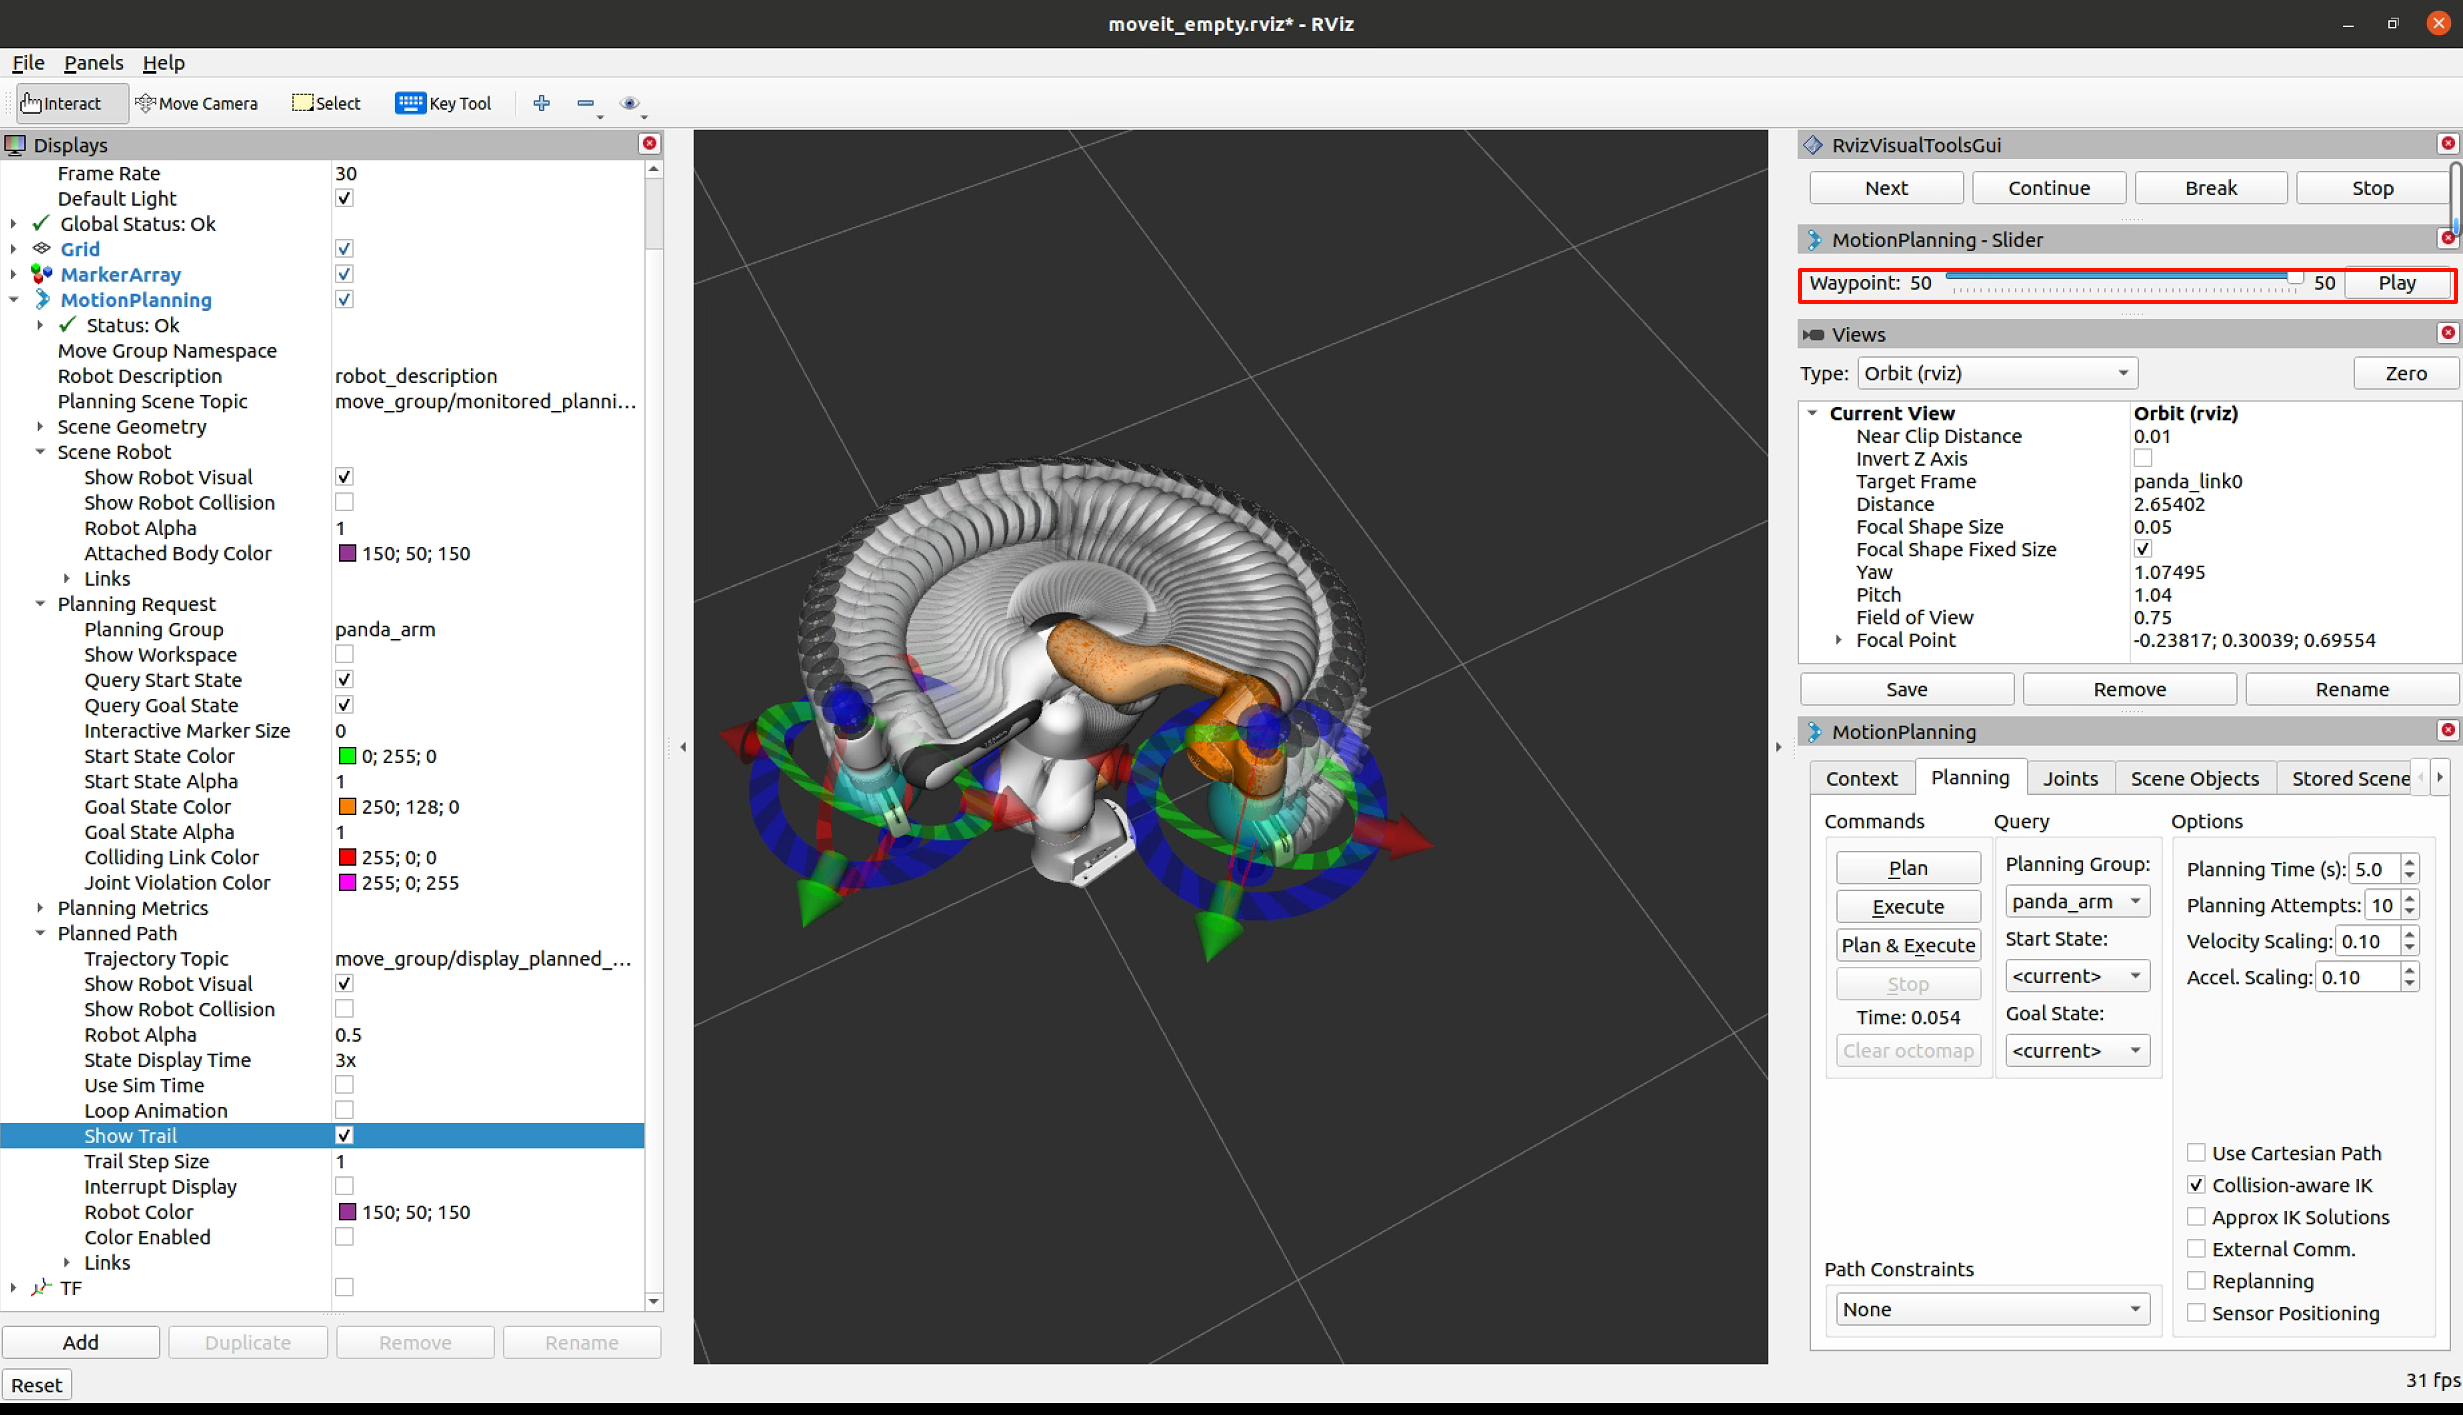
使用MotionPlanning - Slider可以清理的看到有多少waypoint,现在一共是50个。play时是把规划的路径重新播放一次。
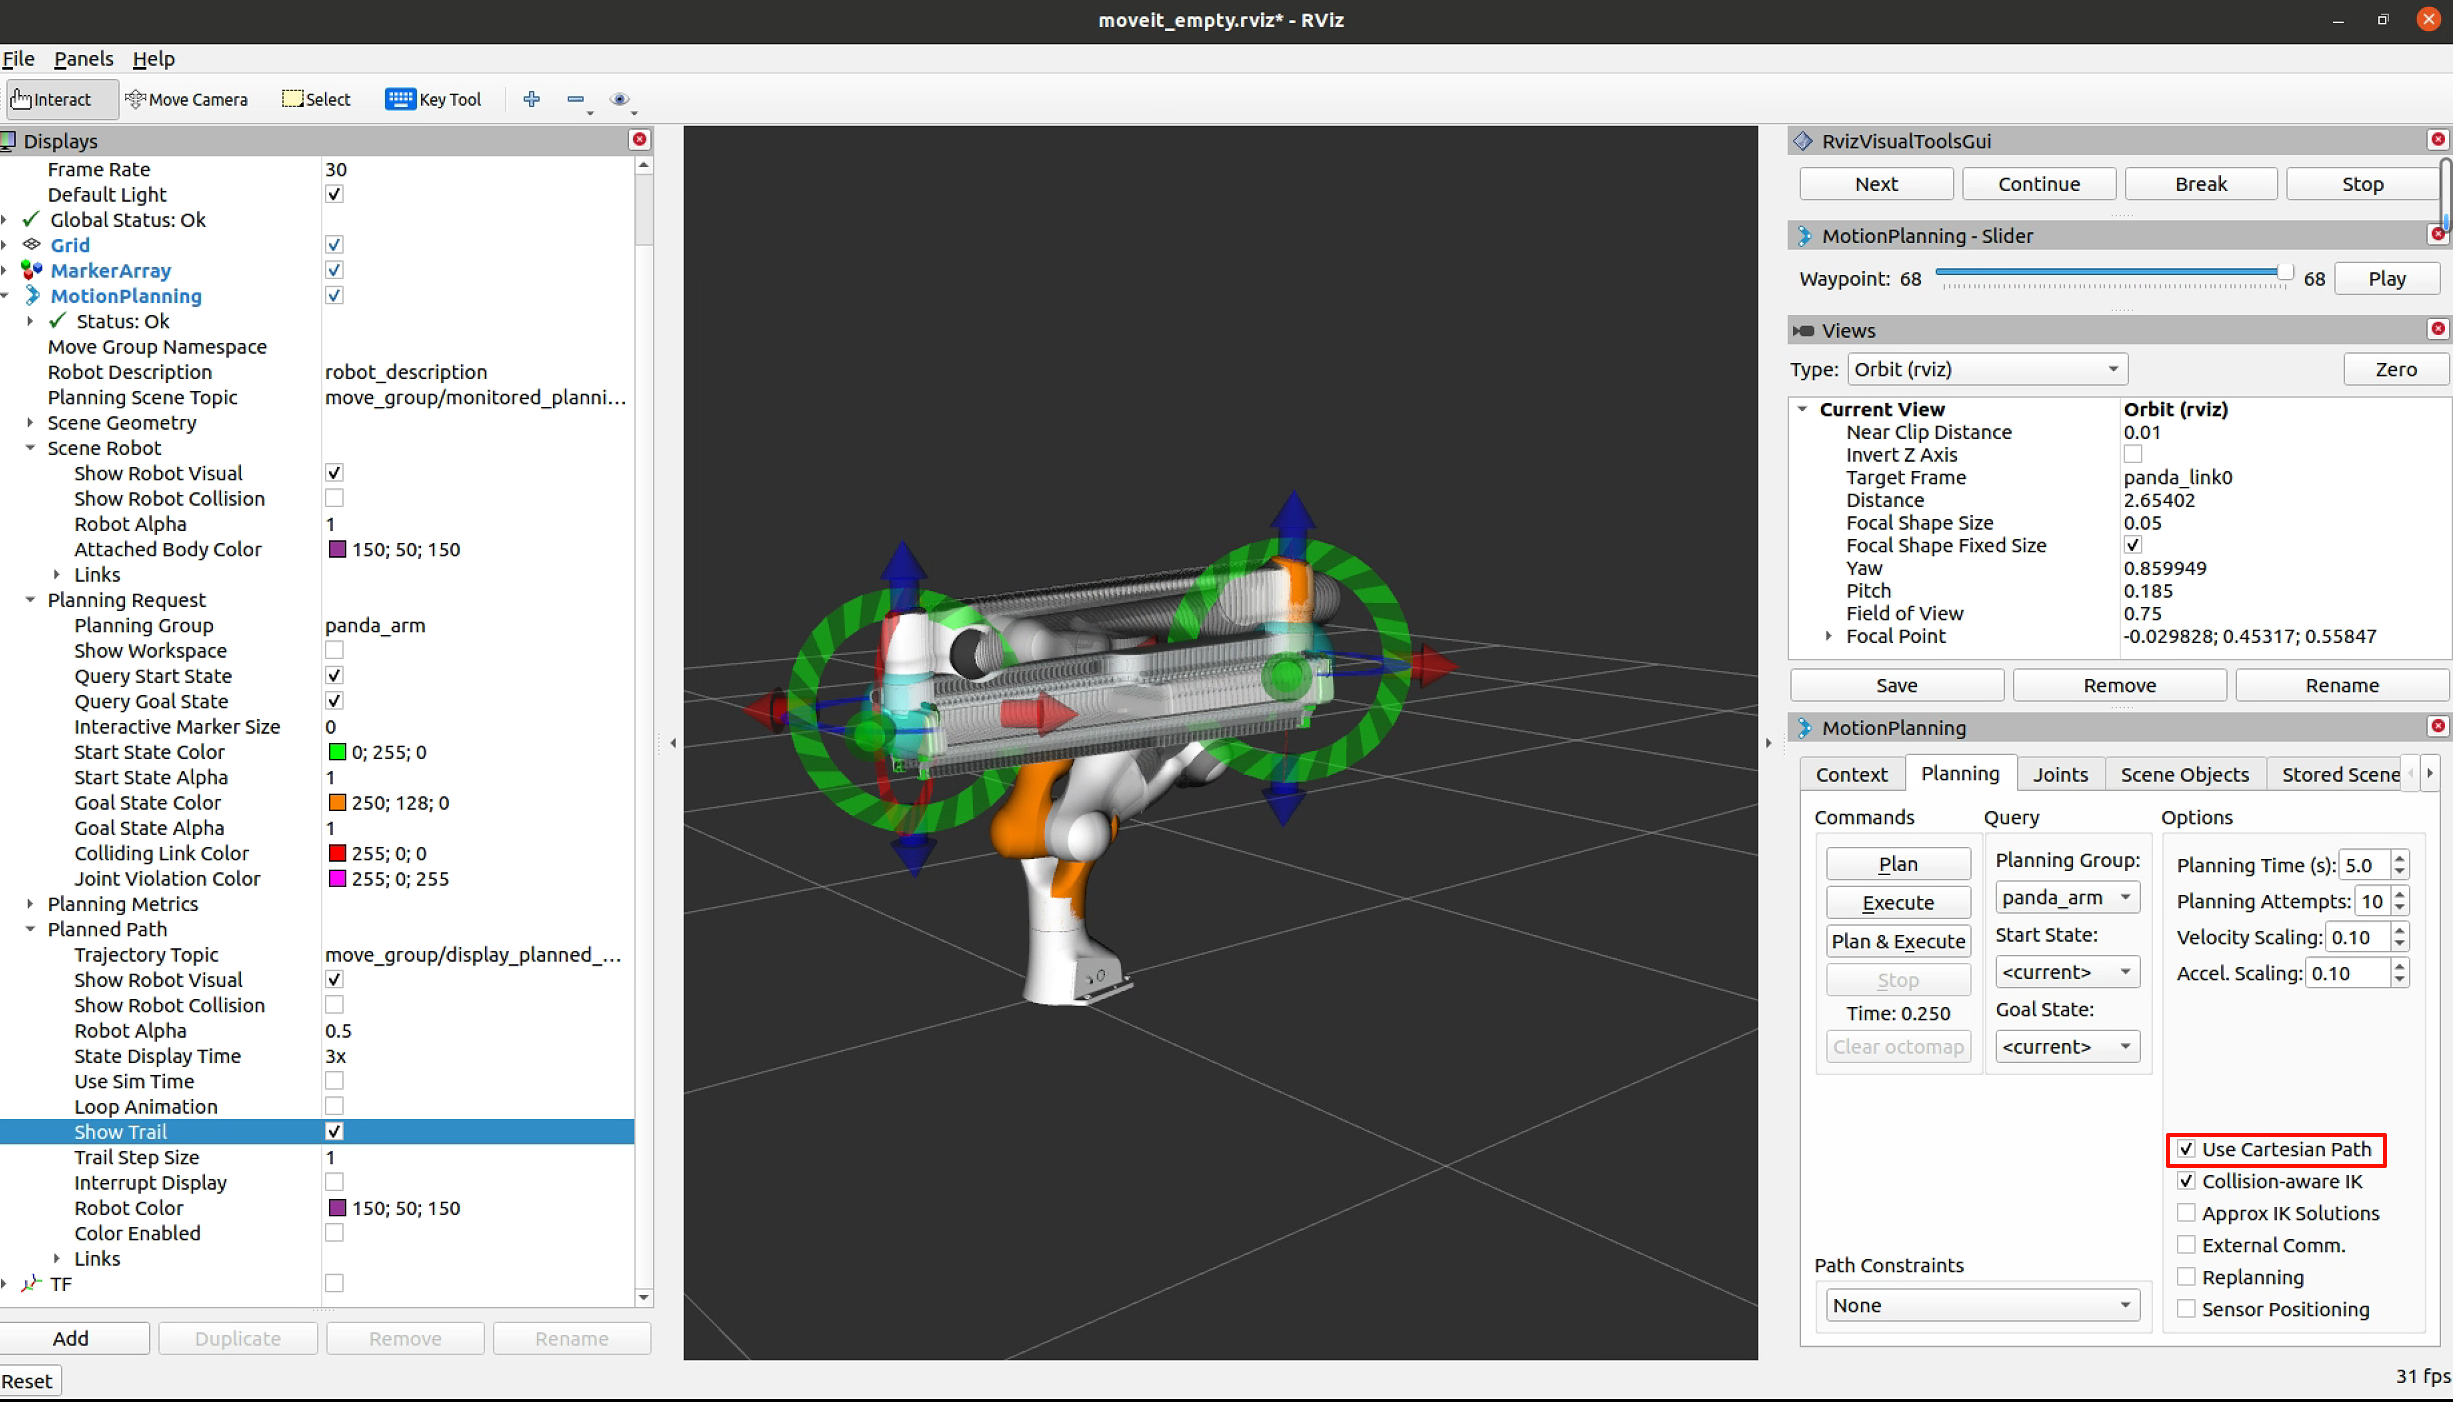
如果勾选了Use Cartesian Path使用直角路径时,它将倾向于在直角空间中线性移动末端执行器
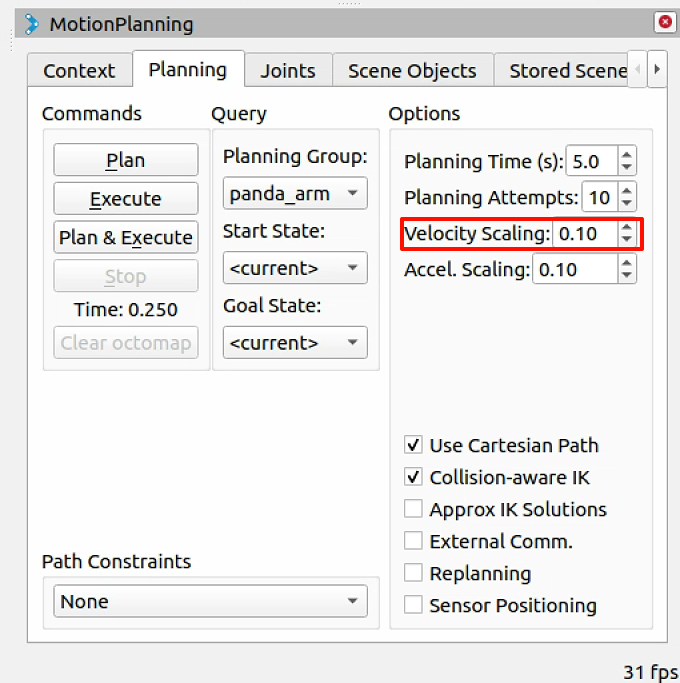
规划并执行Plan & Execute后,会把轨迹发送到robot,最初,默认速度和加速度缩放到机器人最大值的 10% (0.1)。您可以在下面显示的“规划”选项卡中更改这些缩放因子,或在机器人 moveit_config( 在 joint_limits.yaml 中)更改这些默认值。
最后保存一下rviz的配置。
移动接口c++
从这里开始就到了比较关键的地方了,我们需要详细的理解移动的接口,命令接口,以及模型的创建和状态的发布。以及规划场景的问题等等。
首先是c++的控制接口,在 MoveIt 中,最简单的用户界面是通过 MoveGroupInterface 类。它为用户可能想要执行的大多数作提供了易于使用的功能,特别是设置关节或姿势目标、创建运动计划、移动机器人、将对象添加到环境中以及从机器人上连接/分离对象。此接口通过 ROS 主题、服务和作与 MoveGroup 节点进行通信。
首先启动示例
roslaunch panda_moveit_config demo.launch
第二个终端中,启动
roslaunch moveit_tutorials move_group_interface_tutorial.launch
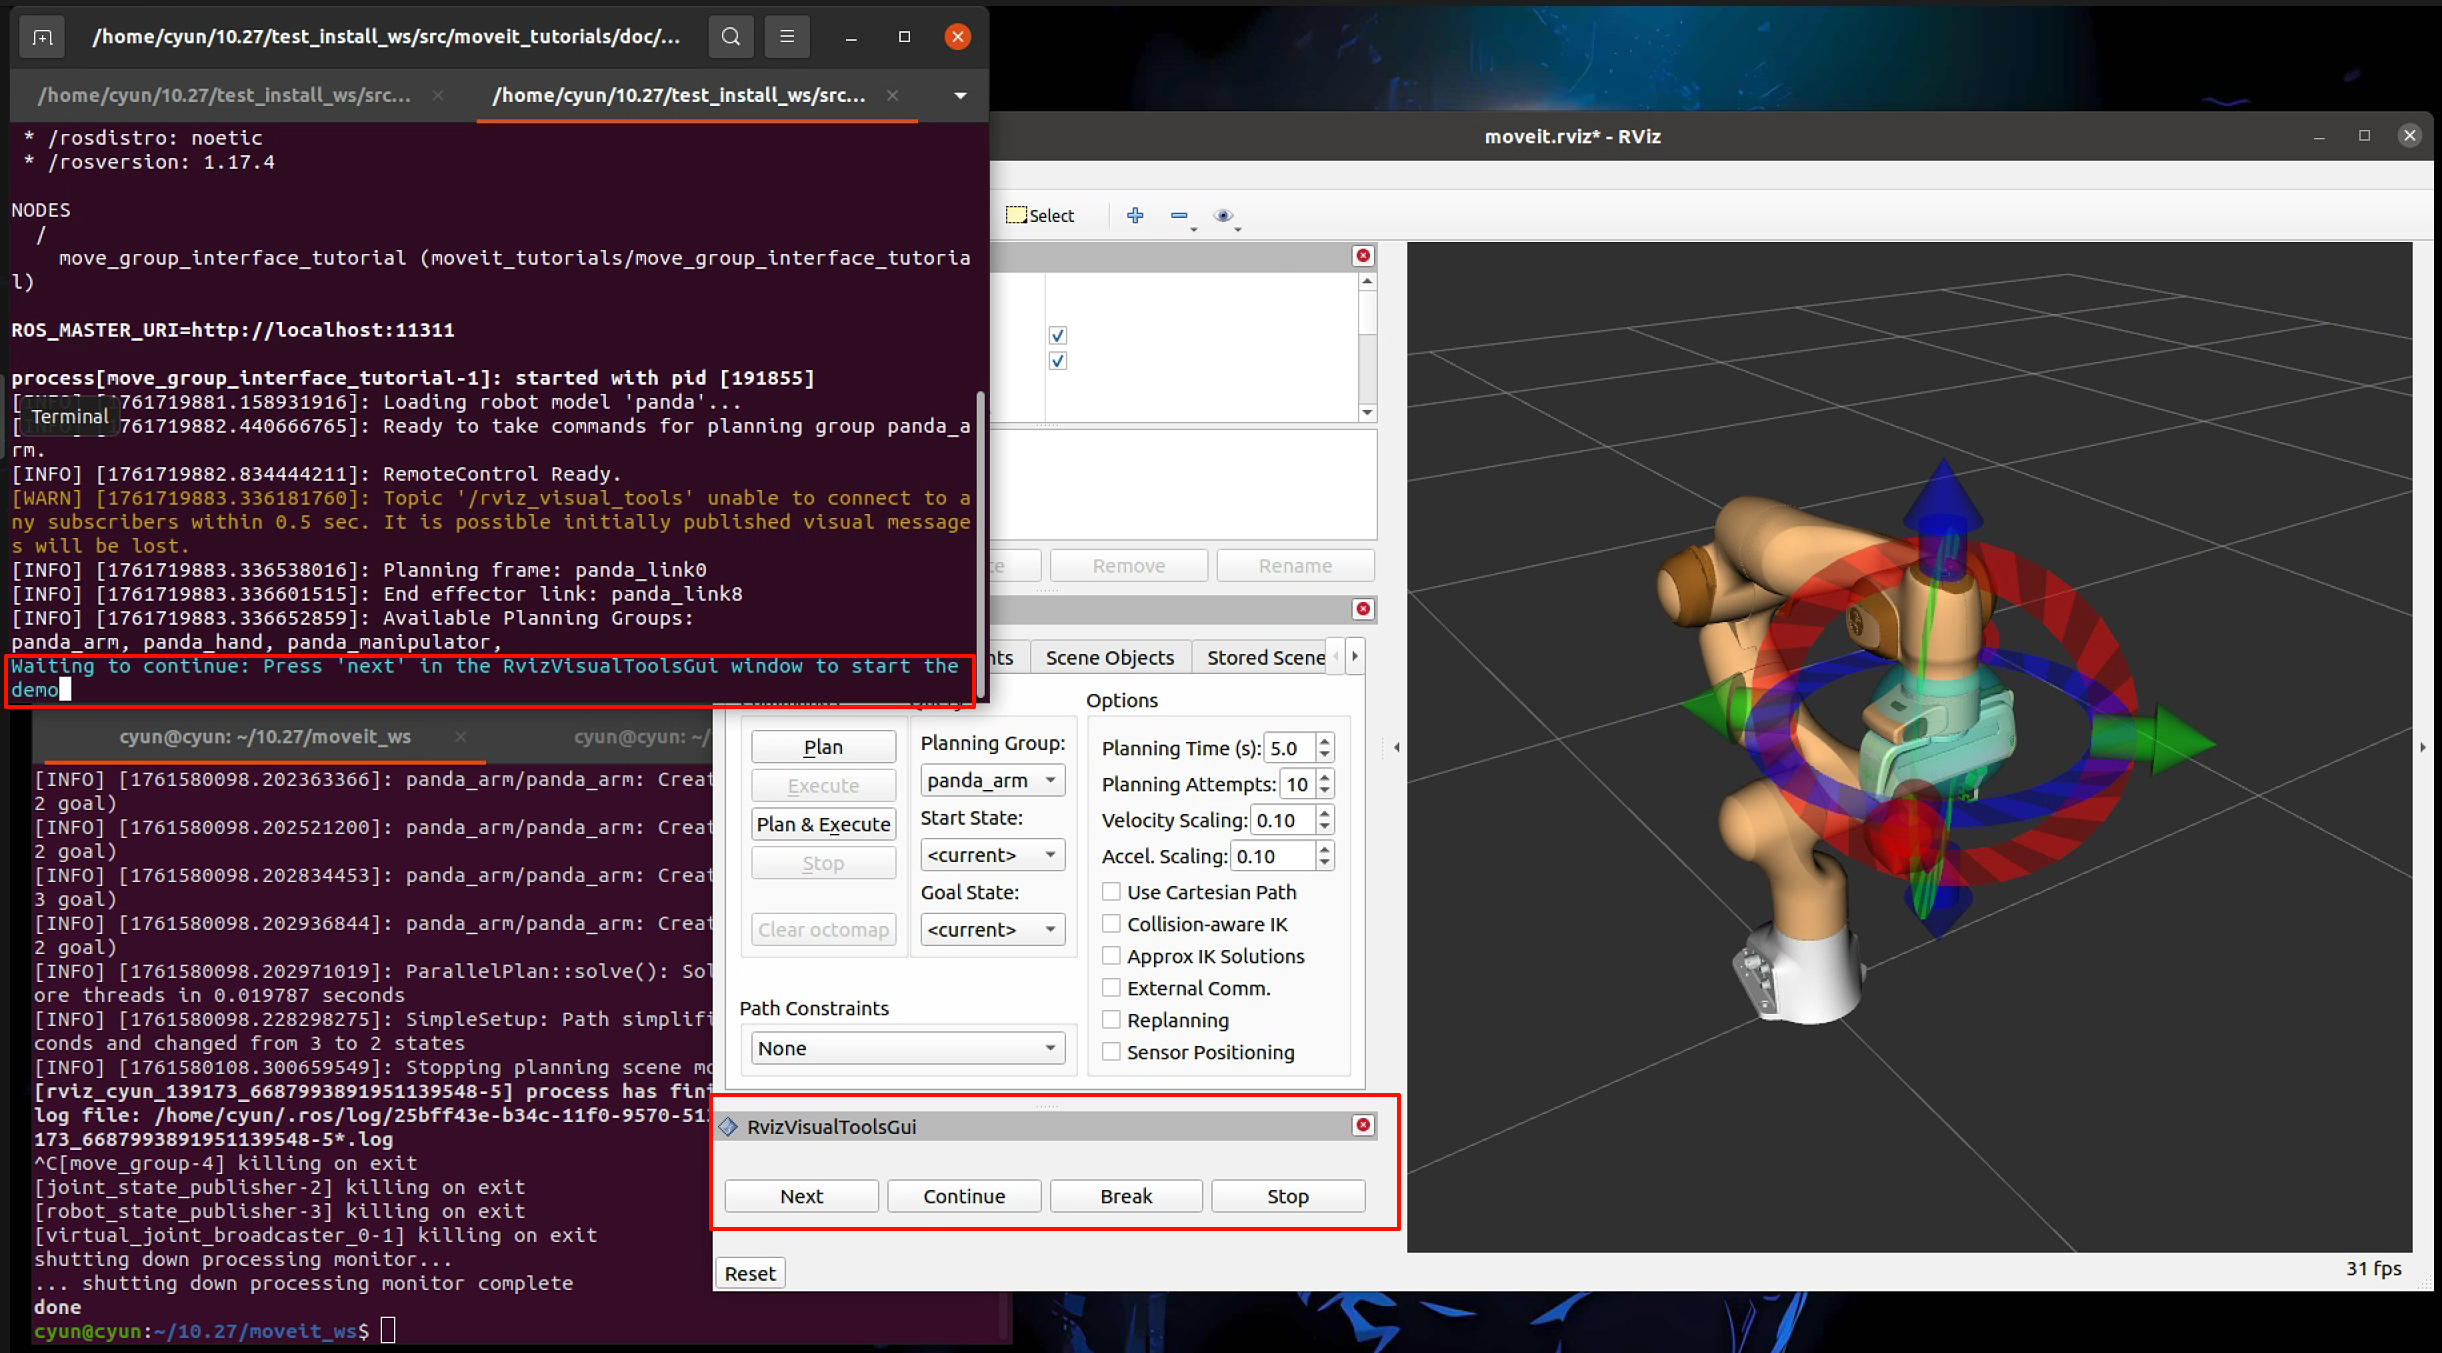
注意: 本教程使用 RvizVisualToolsGui 面板来逐步完成演示。要将此面板添加到 RViz,请按照可视化教程中的说明进行作。
依次点击next,可以看到:
机器人将手臂移动到其前面的姿势目标。
机器人将手臂移动到其侧面的关节目标。
机器人将其手臂移回新的姿势目标,同时保持末端执行器水平。
机器人沿着所需的直角路径(向下、向右、向上+向左的三角形)移动其手臂。
将一个方框对象添加到手臂右侧的环境中。
机器人将手臂移动到姿势目标,避免与盒子发生碰撞。
物体附着在手腕上(其颜色将变为紫色/橙色/绿色)。
对象从手腕上分离(其颜色将变回绿色)。
对象将从环境中移除。
这里面与物体相关的话题放在了scene geometry中,
核心代码放在了https://github.com/moveit/moveit_tutorials/blob/master/doc/move_group_interface/src/move_group_interface_tutorial.cpp中,接下来我们来理解一下这个过程。
MoveIt 对称为“规划组”的关节集进行作,并将它们存储在名为 JointModelGroup 的对象中。在整个 MoveIt 中,术语“规划组”和“联合模型组”可以互换使用。
static const std::string PLANNING_GROUP = "panda_arm";
只需使用要控制和规划的规划组的名称即可轻松设置 MoveGroupInterface 类。
moveit::planning_interface::MoveGroupInterface move_group_interface(PLANNING_GROUP);
我们将使用 PlanningSceneInterface 类,用于在我们的“虚拟世界”场景中添加和删除碰撞对象
moveit::planning_interface::PlanningSceneInterface planning_scene_interface;
原始指针经常用于引用计划组以提高性能。
const moveit::core::JointModelGroup* joint_model_group =
    move_group_interface.getCurrentState()->getJointModelGroup(PLANNING_GROUP);
MoveItVisualTools 包提供了许多功能,用于在 RViz 中可视化对象、机器人和轨迹,以及调试工具,例如脚本的分步自省。
namespace rvt = rviz_visual_tools;
moveit_visual_tools::MoveItVisualTools visual_tools("panda_link0");
visual_tools.deleteAllMarkers();
远程控制是一种自省工具,允许用户通过 RViz 中的按钮和键盘快捷键逐步执行高级脚本
visual_tools.loadRemoteControl();
RViz 提供了多种类型的标记,在此演示中,我们将使用文本、圆柱体和球体
Eigen::Isometry3d text_pose = Eigen::Isometry3d::Identity();
text_pose.translation().z() = 1.0;
visual_tools.publishText(text_pose, "MoveGroupInterface Demo", rvt::WHITE, rvt::XLARGE);
批量发布用于减少发送到 RViz 以进行大型可视化的消息数量
visual_tools.trigger();
我们可以打印该机器人的参考系名称。
ROS_INFO_NAMED("tutorial", "Planning frame: %s", move_group_interface.getPlanningFrame().c_str());
我们还可以打印该组的末端执行器链接的名称。
ROS_INFO_NAMED("tutorial", "End effector link: %s", move_group_interface.getEndEffectorLink().c_str());
我们可以得到机器人中所有组的列表:
ROS_INFO_NAMED("tutorial", "Available Planning Groups:");
std::copy(move_group_interface.getJointModelGroupNames().begin(),
          move_group_interface.getJointModelGroupNames().end(), std::ostream_iterator<std::string>(std::cout, ", "));
Start the demo 开始演示
visual_tools.prompt("Press 'next' in the RvizVisualToolsGui window to start the demo");
规划姿势目标
我们可以为该组计划一个运动,使其达到末端执行器所需的姿势。
geometry_msgs::Pose target_pose1;
target_pose1.orientation.w = 1.0;
target_pose1.position.x = 0.28;
target_pose1.position.y = -0.2;
target_pose1.position.z = 0.5;
move_group_interface.setPoseTarget(target_pose1);
现在,我们调用规划器来计算计划并将其可视化。请注意,我们只是在计划,而不是要求 move_group_interface 实际移动机器人。
moveit::planning_interface::MoveGroupInterface::Plan my_plan;

bool success = (move_group_interface.plan(my_plan) == moveit::core::MoveItErrorCode::SUCCESS);

ROS_INFO_NAMED("tutorial", "Visualizing plan 1 (pose goal) %s", success ? "" : "FAILED");
我们还可以在 RViz 中将平面图可视化为带有标记的线。
ROS_INFO_NAMED("tutorial", "Visualizing plan 1 as trajectory line");
visual_tools.publishAxisLabeled(target_pose1, "pose1");
visual_tools.publishText(text_pose, "Pose Goal", rvt::WHITE, rvt::XLARGE);
visual_tools.publishTrajectoryLine(my_plan.trajectory_, joint_model_group);
visual_tools.trigger();
visual_tools.prompt("Press 'next' in the RvizVisualToolsGui window to continue the demo");
最后,要执行存储在 my_plan 中的轨迹,您可以使用以下方法调用:请注意,如果机器人同时移动,这可能会导致问题。move_group_interface.execute(my_plan);
移动到姿势目标
如果您不想检查计划的轨迹,下面是上面显示的两步计划 + 执行模式的更稳健的组合,应该是首选。请注意,我们之前设置的姿势目标仍然处于活动状态,因此机器人将尝试移动到该目标。
move_group_interface.move();
规划联合空间目标
让我们设定一个共同的太空目标并朝着它前进。这将替换我们上面设置的姿势目标。
首先,我们将创建一个引用当前机器人状态的指针。RobotState 是包含所有当前位置/速度/加速度数据的对象。
moveit::core::RobotStatePtr current_state = move_group_interface.getCurrentState();
接下来,获取组的当前关节值集。
std::vector<double> joint_group_positions;
current_state->copyJointGroupPositions(joint_model_group, joint_group_positions);
现在,让我们修改其中一个关节,规划到新的关节空间目标并可视化该计划。
joint_group_positions[0] = -tau / 6;  // -1/6 turn in radians
move_group_interface.setJointValueTarget(joint_group_positions);
我们将允许的最大速度和加速度降低到最大值的 5%。默认值为 10% (0.1)。在机器人 moveit_config 的 joint_limits.yaml 文件中设置您的首选默认值,或者如果您需要机器人移动得更快,请在代码中设置显式因素。
move_group_interface.setMaxVelocityScalingFactor(0.05);
move_group_interface.setMaxAccelerationScalingFactor(0.05);

success = (move_group_interface.plan(my_plan) == moveit::core::MoveItErrorCode::SUCCESS);
ROS_INFO_NAMED("tutorial", "Visualizing plan 2 (joint space goal) %s", success ? "" : "FAILED");
在 RViz 中可视化计划
visual_tools.deleteAllMarkers();
visual_tools.publishText(text_pose, "Joint Space Goal", rvt::WHITE, rvt::XLARGE);
visual_tools.publishTrajectoryLine(my_plan.trajectory_, joint_model_group);
visual_tools.trigger();
visual_tools.prompt("Press 'next' in the RvizVisualToolsGui window to continue the demo");
可以轻松地为机器人上的链接指定路径约束。让我们为我们的组指定一个路径约束和一个姿势目标。首先定义路径约束。
moveit_msgs::OrientationConstraint ocm;
ocm.link_name = "panda_link7";
ocm.header.frame_id = "panda_link0";
ocm.orientation.w = 1.0;
ocm.absolute_x_axis_tolerance = 0.1;
ocm.absolute_y_axis_tolerance = 0.1;
ocm.absolute_z_axis_tolerance = 0.1;
ocm.weight = 1.0;
现在,将其设置为组的路径约束。
moveit_msgs::Constraints test_constraints;
test_constraints.orientation_constraints.push_back(ocm);
move_group_interface.setPathConstraints(test_constraints);
在联合空间中实施规划
根据规划问题,MoveIt 在 用于问题表示的联合空间和笛卡尔空间 。在 ompl_planning.yaml 文件 enforce_joint_model_state_space:true 中设置 group 参数会强制为所有计划使用联合空间 。
默认情况下,具有方向路径约束的规划请求在笛卡尔空间中进行采样,以便调用 IK 充当生成采样器。
通过强制执行联合空间 ,规划过程将使用拒绝抽样来查找有效请求。请注意,这可能会大大增加规划时间。
我们将重用我们曾经拥有的旧目标并计划它。请注意,仅当当前状态已经满足路径约束时,这才有效。所以我们需要将开始状态设置为一个新的姿势。
moveit::core::RobotState start_state(*move_group_interface.getCurrentState());
geometry_msgs::Pose start_pose2;
start_pose2.orientation.w = 1.0;
start_pose2.position.x = 0.55;
start_pose2.position.y = -0.05;
start_pose2.position.z = 0.8;
start_state.setFromIK(joint_model_group, start_pose2);
move_group_interface.setStartState(start_state);
现在,我们将从刚刚创建的新开始状态规划到较早的姿势目标。
move_group_interface.setPoseTarget(target_pose1);
使用约束进行规划可能会很慢,因为每个样本都必须调用逆运动学求解器。让我们将计划时间从默认的 5 秒增加,以确保计划者有足够的时间取得成功。
move_group_interface.setPlanningTime(10.0);

success = (move_group_interface.plan(my_plan) == moveit::core::MoveItErrorCode::SUCCESS);
ROS_INFO_NAMED("tutorial", "Visualizing plan 3 (constraints) %s", success ? "" : "FAILED");
在 RViz 中可视化计划
visual_tools.deleteAllMarkers();
visual_tools.publishAxisLabeled(start_pose2, "start");
visual_tools.publishAxisLabeled(target_pose1, "goal");
visual_tools.publishText(text_pose, "Constrained Goal", rvt::WHITE, rvt::XLARGE);
visual_tools.publishTrajectoryLine(my_plan.trajectory_, joint_model_group);
visual_tools.trigger();
visual_tools.prompt("next step");
完成路径约束后,请务必清除它。
move_group_interface.clearPathConstraints();
Cartesian Paths 笛卡尔路径
您可以通过指定末端执行器要经过的航点列表来直接规划笛卡尔路径。请注意,我们从上面的新开始状态开始。初始姿势(开始状态)不需要添加到航点列表中,但添加它可以帮助可视化
std::vector<geometry_msgs::Pose> waypoints;
waypoints.push_back(start_pose2);

geometry_msgs::Pose target_pose3 = start_pose2;

target_pose3.position.z -= 0.2;
waypoints.push_back(target_pose3);  // down

target_pose3.position.y -= 0.2;
waypoints.push_back(target_pose3);  // right

target_pose3.position.z += 0.2;
target_pose3.position.y += 0.2;
target_pose3.position.x -= 0.2;
waypoints.push_back(target_pose3);  // up and left
我们希望笛卡尔路径以 1 厘米的分辨率进行插值,这就是为什么我们将指定 0.01 作为笛卡尔平移中的最大步长。我们将跳转阈值指定为 0.0,从而有效地禁用它。警告 - 在作真实硬件时禁用跳跃阈值可能会导致冗余关节发生大的不可预测运动,并且可能是一个安全问题
moveit_msgs::RobotTrajectory trajectory;
const double eef_step = 0.01;
double fraction = move_group_interface.computeCartesianPath(waypoints, eef_step, trajectory);
ROS_INFO_NAMED("tutorial", "Visualizing plan 4 (Cartesian path) (%.2f%% achieved)", fraction * 100.0);
在 RViz 中可视化计划
visual_tools.deleteAllMarkers();
visual_tools.publishText(text_pose, "Cartesian Path", rvt::WHITE, rvt::XLARGE);
visual_tools.publishTrajectoryLine(trajectory, joint_model_group);
visual_tools.publishPath(waypoints, rvt::LIME_GREEN, rvt::SMALL);
for (std::size_t i = 0; i < waypoints.size(); ++i)
  visual_tools.publishAxisLabeled(waypoints[i], "pt" + std::to_string(i), rvt::SMALL);
visual_tools.trigger();
visual_tools.prompt("Press 'next' in the RvizVisualToolsGui window to continue the demo");
直角运动通常应该很慢,例如在接近物体时。笛卡尔计划的速度目前无法通过 maxVelocityScalingFactor 设置,但需要手动计时轨迹, 如此处所述。欢迎拉取请求。
将对象添加到环境中
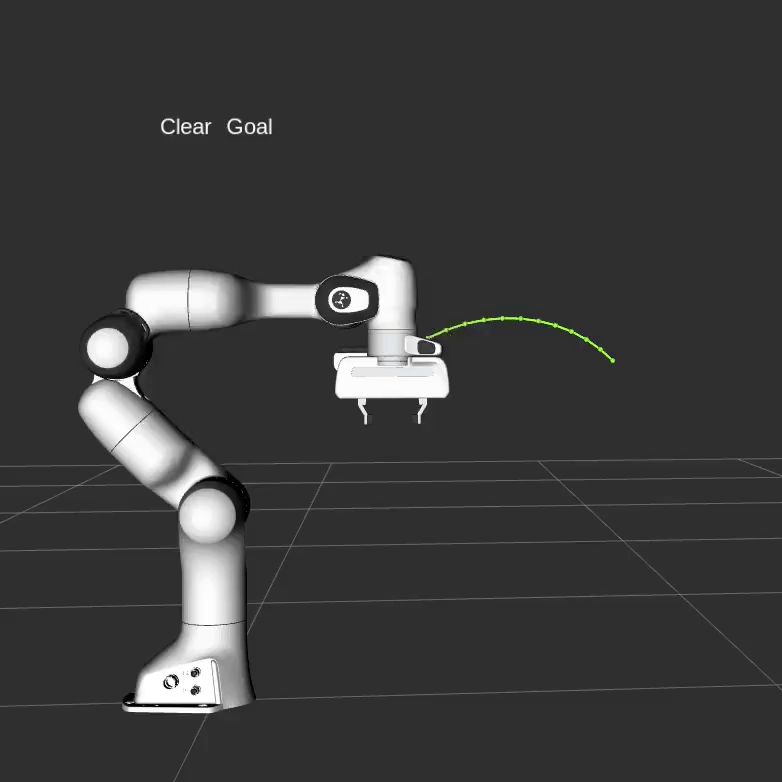
首先,让我们计划另一个没有物体阻碍的简单目标。
move_group_interface.setStartState(*move_group_interface.getCurrentState());
geometry_msgs::Pose another_pose;
another_pose.orientation.x = 1.0;
another_pose.position.x = 0.7;
another_pose.position.y = 0.0;
another_pose.position.z = 0.59;
move_group_interface.setPoseTarget(another_pose);

success = (move_group_interface.plan(my_plan) == moveit::core::MoveItErrorCode::SUCCESS);
ROS_INFO_NAMED("tutorial", "Visualizing plan 5 (with no obstacles) %s", success ? "" : "FAILED");

visual_tools.deleteAllMarkers();
visual_tools.publishText(text_pose, "Clear Goal", rvt::WHITE, rvt::XLARGE);
visual_tools.publishTrajectoryLine(my_plan.trajectory_, joint_model_group);
visual_tools.trigger();
visual_tools.prompt("next step");
结果可能如下所示:
现在让我们定义一个碰撞对象 ROS 消息,让机器人避免。
moveit_msgs::CollisionObject collision_object;
collision_object.header.frame_id = move_group_interface.getPlanningFrame();
对象的 ID 用于标识它。
collision_object.id = "box1";
定义要添加到世界中的框。
shape_msgs::SolidPrimitive primitive;
primitive.type = primitive.BOX;
primitive.dimensions.resize(3);
primitive.dimensions[primitive.BOX_X] = 0.1;
primitive.dimensions[primitive.BOX_Y] = 1.5;
primitive.dimensions[primitive.BOX_Z] = 0.5;
定义盒子的姿势(相对于 frame_id 指定)
geometry_msgs::Pose box_pose;
box_pose.orientation.w = 1.0;
box_pose.position.x = 0.5;
box_pose.position.y = 0.0;
box_pose.position.z = 0.25;

collision_object.primitives.push_back(primitive);
collision_object.primitive_poses.push_back(box_pose);
collision_object.operation = collision_object.ADD;

std::vector<moveit_msgs::CollisionObject> collision_objects;
collision_objects.push_back(collision_object);
现在,让我们将碰撞对象添加到世界中(使用可以包含其他对象的向量)
ROS_INFO_NAMED("tutorial", "Add an object into the world");
planning_scene_interface.addCollisionObjects(collision_objects);
在 RViz 中显示状态的文本,并等待 MoveGroup 接收并处理碰撞对象消息
visual_tools.publishText(text_pose, "Add object", rvt::WHITE, rvt::XLARGE);
visual_tools.trigger();
visual_tools.prompt("Press 'next' in the RvizVisualToolsGui window to once the collision object appears in RViz");
现在,当我们规划轨迹时,它会避开障碍物
success = (move_group_interface.plan(my_plan) == moveit::core::MoveItErrorCode::SUCCESS);
ROS_INFO_NAMED("tutorial", "Visualizing plan 6 (pose goal move around cuboid) %s", success ? "" : "FAILED");
visual_tools.publishText(text_pose, "Obstacle Goal", rvt::WHITE, rvt::XLARGE);
visual_tools.publishTrajectoryLine(my_plan.trajectory_, joint_model_group);
visual_tools.trigger();
visual_tools.prompt("Press 'next' in the RvizVisualToolsGui window once the plan is complete");
结果可能如下所示:
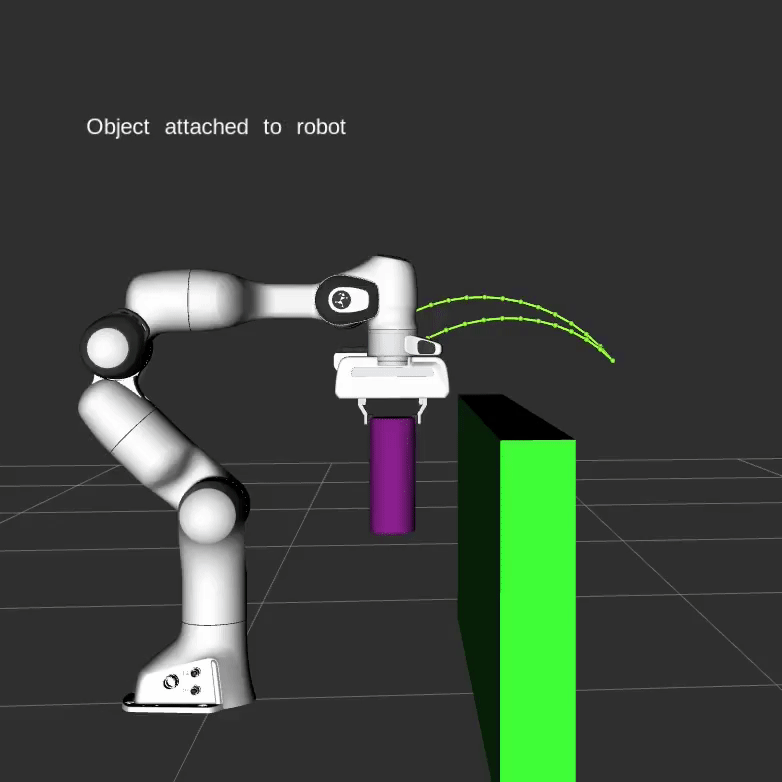
将物体连接到机器人
您可以将对象附加到机器人,以便它随着机器人几何体移动。这模拟拾取对象以进行作。运动规划还应避免两个对象之间的碰撞。
moveit_msgs::CollisionObject object_to_attach;
object_to_attach.id = "cylinder1";

shape_msgs::SolidPrimitive cylinder_primitive;
cylinder_primitive.type = primitive.CYLINDER;
cylinder_primitive.dimensions.resize(2);
cylinder_primitive.dimensions[primitive.CYLINDER_HEIGHT] = 0.20;
cylinder_primitive.dimensions[primitive.CYLINDER_RADIUS] = 0.04;
我们定义该圆柱体的框架/姿势,使其出现在夹持器中
object_to_attach.header.frame_id = move_group_interface.getEndEffectorLink();
geometry_msgs::Pose grab_pose;
grab_pose.orientation.w = 1.0;
grab_pose.position.z = 0.2;
首先,我们将对象添加到世界中(不使用向量)
object_to_attach.primitives.push_back(cylinder_primitive);
object_to_attach.primitive_poses.push_back(grab_pose);
object_to_attach.operation = object_to_attach.ADD;
planning_scene_interface.applyCollisionObject(object_to_attach);
然后,我们将对象“附加”到给定链接处的机器人上,并允许对象与列出的链接之间发生碰撞。您还可以使用 applyAttachedCollisionObject 将对象直接附加到机器人。
ROS_INFO_NAMED("tutorial", "Attach the object to the robot");
move_group_interface.attachObject(object_to_attach.id, "panda_hand", { "panda_leftfinger", "panda_rightfinger" });

visual_tools.publishText(text_pose, "Object attached to robot", rvt::WHITE, rvt::XLARGE);
visual_tools.trigger();

/* Wait for MoveGroup to receive and process the attached collision object message */
visual_tools.prompt("Press 'next' in the RvizVisualToolsGui window once the new object is attached to the robot");
重新计划,但现在手里有对象。
move_group_interface.setStartStateToCurrentState();
success = (move_group_interface.plan(my_plan) == moveit::core::MoveItErrorCode::SUCCESS);
ROS_INFO_NAMED("tutorial", "Visualizing plan 7 (move around cuboid with cylinder) %s", success ? "" : "FAILED");
visual_tools.publishTrajectoryLine(my_plan.trajectory_, joint_model_group);
visual_tools.trigger();
visual_tools.prompt("Press 'next' in the RvizVisualToolsGui window once the plan is complete");
结果可能如下所示:
分离和删除对象
现在,让我们将气缸从机器人的夹持器上拆下。
ROS_INFO_NAMED("tutorial", "Detach the object from the robot");
move_group_interface.detachObject(object_to_attach.id);
在状态的 RViz 中显示文本
visual_tools.deleteAllMarkers();
visual_tools.publishText(text_pose, "Object detached from robot", rvt::WHITE, rvt::XLARGE);
visual_tools.trigger();

/* Wait for MoveGroup to receive and process the attached collision object message */
visual_tools.prompt("Press 'next' in the RvizVisualToolsGui window once the new object is detached from the robot");
现在,让我们从世界中删除对象。
ROS_INFO_NAMED("tutorial", "Remove the objects from the world");
std::vector<std::string> object_ids;
object_ids.push_back(collision_object.id);
object_ids.push_back(object_to_attach.id);
planning_scene_interface.removeCollisionObjects(object_ids);
在状态的 RViz 中显示文本
visual_tools.publishText(text_pose, "Objects removed", rvt::WHITE, rvt::XLARGE);
visual_tools.trigger();

/* Wait for MoveGroup to receive and process the attached collision object message */
visual_tools.prompt("Press 'next' in the RvizVisualToolsGui window to once the collision object disappears");
The Launch File 启动文件
整个启动文件位于 GitHub 上。本教程中的所有代码都可以从作为 MoveIt 设置的一部分的 moveit_tutorials 包运行。
<launch>

  <node name="move_group_interface_tutorial" pkg="moveit_tutorials" type="move_group_interface_tutorial" respawn="false" output="screen">
  </node>

</launch>
cpp的完整节点为
/*********************************************************************
 * Software License Agreement (BSD License)
 *
 *  Copyright (c) 2013, SRI International
 *  All rights reserved.
 *
 *  Redistribution and use in source and binary forms, with or without
 *  modification, are permitted provided that the following conditions
 *  are met:
 *
 *   * Redistributions of source code must retain the above copyright
 *     notice, this list of conditions and the following disclaimer.
 *   * Redistributions in binary form must reproduce the above
 *     copyright notice, this list of conditions and the following
 *     disclaimer in the documentation and/or other materials provided
 *     with the distribution.
 *   * Neither the name of SRI International nor the names of its
 *     contributors may be used to endorse or promote products derived
 *     from this software without specific prior written permission.
 *
 *  THIS SOFTWARE IS PROVIDED BY THE COPYRIGHT HOLDERS AND CONTRIBUTORS
 *  "AS IS" AND ANY EXPRESS OR IMPLIED WARRANTIES, INCLUDING, BUT NOT
 *  LIMITED TO, THE IMPLIED WARRANTIES OF MERCHANTABILITY AND FITNESS
 *  FOR A PARTICULAR PURPOSE ARE DISCLAIMED. IN NO EVENT SHALL THE
 *  COPYRIGHT OWNER OR CONTRIBUTORS BE LIABLE FOR ANY DIRECT, INDIRECT,
 *  INCIDENTAL, SPECIAL, EXEMPLARY, OR CONSEQUENTIAL DAMAGES (INCLUDING,
 *  BUT NOT LIMITED TO, PROCUREMENT OF SUBSTITUTE GOODS OR SERVICES;
 *  LOSS OF USE, DATA, OR PROFITS; OR BUSINESS INTERRUPTION) HOWEVER
 *  CAUSED AND ON ANY THEORY OF LIABILITY, WHETHER IN CONTRACT, STRICT
 *  LIABILITY, OR TORT (INCLUDING NEGLIGENCE OR OTHERWISE) ARISING IN
 *  ANY WAY OUT OF THE USE OF THIS SOFTWARE, EVEN IF ADVISED OF THE
 *  POSSIBILITY OF SUCH DAMAGE.
 *********************************************************************/

/* Author: Sachin Chitta, Dave Coleman, Mike Lautman */

#include <moveit/move_group_interface/move_group_interface.h>
#include <moveit/planning_scene_interface/planning_scene_interface.h>

#include <moveit_msgs/DisplayRobotState.h>
#include <moveit_msgs/DisplayTrajectory.h>

#include <moveit_msgs/AttachedCollisionObject.h>
#include <moveit_msgs/CollisionObject.h>

#include <moveit_visual_tools/moveit_visual_tools.h>

// The circle constant tau = 2*pi. One tau is one rotation in radians.
const double tau = 2 * M_PI;

int main(int argc, char** argv)
{
  ros::init(argc, argv, "move_group_interface_tutorial");
  ros::NodeHandle node_handle;

  // ROS spinning must be running for the MoveGroupInterface to get information
  // about the robot's state. One way to do this is to start an AsyncSpinner
  // beforehand.
  ros::AsyncSpinner spinner(1);
  spinner.start();

  // BEGIN_TUTORIAL
  //
  // Setup
  // ^^^^^
  //
  // MoveIt operates on sets of joints called "planning groups" and stores them in an object called
  // the `JointModelGroup`. Throughout MoveIt the terms "planning group" and "joint model group"
  // are used interchangeably.
  static const std::string PLANNING_GROUP = "panda_arm";

  // The :planning_interface:`MoveGroupInterface` class can be easily
  // setup using just the name of the planning group you would like to control and plan for.
  moveit::planning_interface::MoveGroupInterface move_group_interface(PLANNING_GROUP);

  // We will use the :planning_interface:`PlanningSceneInterface`
  // class to add and remove collision objects in our "virtual world" scene
  moveit::planning_interface::PlanningSceneInterface planning_scene_interface;

  // Raw pointers are frequently used to refer to the planning group for improved performance.
  const moveit::core::JointModelGroup* joint_model_group =
      move_group_interface.getCurrentState()->getJointModelGroup(PLANNING_GROUP);

  // Visualization
  // ^^^^^^^^^^^^^
  //
  // The package MoveItVisualTools provides many capabilities for visualizing objects, robots,
  // and trajectories in RViz as well as debugging tools such as step-by-step introspection of a script.
  namespace rvt = rviz_visual_tools;
  moveit_visual_tools::MoveItVisualTools visual_tools("panda_link0");
  visual_tools.deleteAllMarkers();

  // Remote control is an introspection tool that allows users to step through a high level script
  // via buttons and keyboard shortcuts in RViz
  visual_tools.loadRemoteControl();

  // RViz provides many types of markers, in this demo we will use text, cylinders, and spheres
  Eigen::Isometry3d text_pose = Eigen::Isometry3d::Identity();
  text_pose.translation().z() = 1.0;
  visual_tools.publishText(text_pose, "MoveGroupInterface Demo", rvt::WHITE, rvt::XLARGE);

  // Batch publishing is used to reduce the number of messages being sent to RViz for large visualizations
  visual_tools.trigger();

  // Getting Basic Information
  // ^^^^^^^^^^^^^^^^^^^^^^^^^
  //
  // We can print the name of the reference frame for this robot.
  ROS_INFO_NAMED("tutorial", "Planning frame: %s", move_group_interface.getPlanningFrame().c_str());

  // We can also print the name of the end-effector link for this group.
  ROS_INFO_NAMED("tutorial", "End effector link: %s", move_group_interface.getEndEffectorLink().c_str());

  // We can get a list of all the groups in the robot:
  ROS_INFO_NAMED("tutorial", "Available Planning Groups:");
  std::copy(move_group_interface.getJointModelGroupNames().begin(),
            move_group_interface.getJointModelGroupNames().end(), std::ostream_iterator<std::string>(std::cout, ", "));

  // Start the demo
  // ^^^^^^^^^^^^^^^^^^^^^^^^^
  visual_tools.prompt("Press 'next' in the RvizVisualToolsGui window to start the demo");

  // .. _move_group_interface-planning-to-pose-goal:
  //
  // Planning to a Pose goal
  // ^^^^^^^^^^^^^^^^^^^^^^^
  // We can plan a motion for this group to a desired pose for the
  // end-effector.
  geometry_msgs::Pose target_pose1;
  target_pose1.orientation.w = 1.0;
  target_pose1.position.x = 0.28;
  target_pose1.position.y = -0.2;
  target_pose1.position.z = 0.5;
  move_group_interface.setPoseTarget(target_pose1);

  // Now, we call the planner to compute the plan and visualize it.
  // Note that we are just planning, not asking move_group_interface
  // to actually move the robot.
  moveit::planning_interface::MoveGroupInterface::Plan my_plan;

  bool success = (move_group_interface.plan(my_plan) == moveit::core::MoveItErrorCode::SUCCESS);

  ROS_INFO_NAMED("tutorial", "Visualizing plan 1 (pose goal) %s", success ? "" : "FAILED");

  // Visualizing plans
  // ^^^^^^^^^^^^^^^^^
  // We can also visualize the plan as a line with markers in RViz.
  ROS_INFO_NAMED("tutorial", "Visualizing plan 1 as trajectory line");
  visual_tools.publishAxisLabeled(target_pose1, "pose1");
  visual_tools.publishText(text_pose, "Pose Goal", rvt::WHITE, rvt::XLARGE);
  visual_tools.publishTrajectoryLine(my_plan.trajectory_, joint_model_group);
  visual_tools.trigger();
  visual_tools.prompt("Press 'next' in the RvizVisualToolsGui window to continue the demo");

  // Finally, to execute the trajectory stored in my_plan, you could use the following method call:
  // Note that this can lead to problems if the robot moved in the meanwhile.
  // move_group_interface.execute(my_plan);

  // Moving to a pose goal
  // ^^^^^^^^^^^^^^^^^^^^^
  //
  // If you do not want to inspect the planned trajectory,
  // the following is a more robust combination of the two-step plan+execute pattern shown above
  // and should be preferred. Note that the pose goal we had set earlier is still active,
  // so the robot will try to move to that goal.

  // move_group_interface.move();

  // Planning to a joint-space goal
  // ^^^^^^^^^^^^^^^^^^^^^^^^^^^^^^
  //
  // Let's set a joint space goal and move towards it.  This will replace the
  // pose target we set above.
  //
  // To start, we'll create an pointer that references the current robot's state.
  // RobotState is the object that contains all the current position/velocity/acceleration data.
  moveit::core::RobotStatePtr current_state = move_group_interface.getCurrentState();
  //
  // Next get the current set of joint values for the group.
  std::vector<double> joint_group_positions;
  current_state->copyJointGroupPositions(joint_model_group, joint_group_positions);

  // Now, let's modify one of the joints, plan to the new joint space goal and visualize the plan.
  joint_group_positions[0] = -tau / 6;  // -1/6 turn in radians
  move_group_interface.setJointValueTarget(joint_group_positions);

  // We lower the allowed maximum velocity and acceleration to 5% of their maximum.
  // The default values are 10% (0.1).
  // Set your preferred defaults in the joint_limits.yaml file of your robot's moveit_config
  // or set explicit factors in your code if you need your robot to move faster.
  move_group_interface.setMaxVelocityScalingFactor(0.05);
  move_group_interface.setMaxAccelerationScalingFactor(0.05);

  success = (move_group_interface.plan(my_plan) == moveit::core::MoveItErrorCode::SUCCESS);
  ROS_INFO_NAMED("tutorial", "Visualizing plan 2 (joint space goal) %s", success ? "" : "FAILED");

  // Visualize the plan in RViz
  visual_tools.deleteAllMarkers();
  visual_tools.publishText(text_pose, "Joint Space Goal", rvt::WHITE, rvt::XLARGE);
  visual_tools.publishTrajectoryLine(my_plan.trajectory_, joint_model_group);
  visual_tools.trigger();
  visual_tools.prompt("Press 'next' in the RvizVisualToolsGui window to continue the demo");

  // Planning with Path Constraints
  // ^^^^^^^^^^^^^^^^^^^^^^^^^^^^^^
  //
  // Path constraints can easily be specified for a link on the robot.
  // Let's specify a path constraint and a pose goal for our group.
  // First define the path constraint.
  moveit_msgs::OrientationConstraint ocm;
  ocm.link_name = "panda_link7";
  ocm.header.frame_id = "panda_link0";
  ocm.orientation.w = 1.0;
  ocm.absolute_x_axis_tolerance = 0.1;
  ocm.absolute_y_axis_tolerance = 0.1;
  ocm.absolute_z_axis_tolerance = 0.1;
  ocm.weight = 1.0;

  // Now, set it as the path constraint for the group.
  moveit_msgs::Constraints test_constraints;
  test_constraints.orientation_constraints.push_back(ocm);
  move_group_interface.setPathConstraints(test_constraints);

  // Enforce Planning in Joint Space
  // ^^^^^^^^^^^^^^^^^^^^^^^^^^^^^^^
  //
  // Depending on the planning problem MoveIt chooses between
  // ``joint space`` and ``cartesian space`` for problem representation.
  // Setting the group parameter ``enforce_joint_model_state_space:true`` in
  // the ompl_planning.yaml file enforces the use of ``joint space`` for all plans.
  //
  // By default planning requests with orientation path constraints
  // are sampled in ``cartesian space`` so that invoking IK serves as a
  // generative sampler.
  //
  // By enforcing ``joint space`` the planning process will use rejection
  // sampling to find valid requests. Please note that this might
  // increase planning time considerably.
  //
  // We will reuse the old goal that we had and plan to it.
  // Note that this will only work if the current state already
  // satisfies the path constraints. So we need to set the start
  // state to a new pose.
  moveit::core::RobotState start_state(*move_group_interface.getCurrentState());
  geometry_msgs::Pose start_pose2;
  start_pose2.orientation.w = 1.0;
  start_pose2.position.x = 0.55;
  start_pose2.position.y = -0.05;
  start_pose2.position.z = 0.8;
  start_state.setFromIK(joint_model_group, start_pose2);
  move_group_interface.setStartState(start_state);

  // Now we will plan to the earlier pose target from the new
  // start state that we have just created.
  move_group_interface.setPoseTarget(target_pose1);

  // Planning with constraints can be slow because every sample must call an inverse kinematics solver.
  // Lets increase the planning time from the default 5 seconds to be sure the planner has enough time to succeed.
  move_group_interface.setPlanningTime(10.0);

  success = (move_group_interface.plan(my_plan) == moveit::core::MoveItErrorCode::SUCCESS);
  ROS_INFO_NAMED("tutorial", "Visualizing plan 3 (constraints) %s", success ? "" : "FAILED");

  // Visualize the plan in RViz
  visual_tools.deleteAllMarkers();
  visual_tools.publishAxisLabeled(start_pose2, "start");
  visual_tools.publishAxisLabeled(target_pose1, "goal");
  visual_tools.publishText(text_pose, "Constrained Goal", rvt::WHITE, rvt::XLARGE);
  visual_tools.publishTrajectoryLine(my_plan.trajectory_, joint_model_group);
  visual_tools.trigger();
  visual_tools.prompt("next step");

  // When done with the path constraint be sure to clear it.
  move_group_interface.clearPathConstraints();

  // Cartesian Paths
  // ^^^^^^^^^^^^^^^
  // You can plan a Cartesian path directly by specifying a list of waypoints
  // for the end-effector to go through. Note that we are starting
  // from the new start state above.  The initial pose (start state) does not
  // need to be added to the waypoint list but adding it can help with visualizations
  std::vector<geometry_msgs::Pose> waypoints;
  waypoints.push_back(start_pose2);

  geometry_msgs::Pose target_pose3 = start_pose2;

  target_pose3.position.z -= 0.2;
  waypoints.push_back(target_pose3);  // down

  target_pose3.position.y -= 0.2;
  waypoints.push_back(target_pose3);  // right

  target_pose3.position.z += 0.2;
  target_pose3.position.y += 0.2;
  target_pose3.position.x -= 0.2;
  waypoints.push_back(target_pose3);  // up and left

  // We want the Cartesian path to be interpolated at a resolution of 1 cm
  // which is why we will specify 0.01 as the max step in Cartesian
  // translation.  We will specify the jump threshold as 0.0, effectively disabling it.
  // Warning - disabling the jump threshold while operating real hardware can cause
  // large unpredictable motions of redundant joints and could be a safety issue
  moveit_msgs::RobotTrajectory trajectory;
  const double eef_step = 0.01;
  double fraction = move_group_interface.computeCartesianPath(waypoints, eef_step, trajectory);
  ROS_INFO_NAMED("tutorial", "Visualizing plan 4 (Cartesian path) (%.2f%% achieved)", fraction * 100.0);

  // Visualize the plan in RViz
  visual_tools.deleteAllMarkers();
  visual_tools.publishText(text_pose, "Cartesian Path", rvt::WHITE, rvt::XLARGE);
  visual_tools.publishTrajectoryLine(trajectory, joint_model_group);
  visual_tools.publishPath(waypoints, rvt::LIME_GREEN, rvt::SMALL);
  for (std::size_t i = 0; i < waypoints.size(); ++i)
    visual_tools.publishAxisLabeled(waypoints[i], "pt" + std::to_string(i), rvt::SMALL);
  visual_tools.trigger();
  visual_tools.prompt("Press 'next' in the RvizVisualToolsGui window to continue the demo");

  // Cartesian motions should often be slow, e.g. when approaching objects. The speed of cartesian
  // plans cannot currently be set through the maxVelocityScalingFactor, but requires you to time
  // the trajectory manually, as described `here <https://groups.google.com/forum/#!topic/moveit-users/MOoFxy2exT4>`_.
  // Pull requests are welcome.
  //
  // You can execute a trajectory like this:
  // move_group_interface.execute(trajectory);

  // Adding objects to the environment
  // ^^^^^^^^^^^^^^^^^^^^^^^^^^^^^^^^^
  //
  // First let's plan to another simple goal with no objects in the way.
  move_group_interface.setStartState(*move_group_interface.getCurrentState());
  geometry_msgs::Pose another_pose;
  another_pose.orientation.x = 1.0;
  another_pose.position.x = 0.7;
  another_pose.position.y = 0.0;
  another_pose.position.z = 0.59;
  move_group_interface.setPoseTarget(another_pose);

  success = (move_group_interface.plan(my_plan) == moveit::core::MoveItErrorCode::SUCCESS);
  ROS_INFO_NAMED("tutorial", "Visualizing plan 5 (with no obstacles) %s", success ? "" : "FAILED");

  visual_tools.deleteAllMarkers();
  visual_tools.publishText(text_pose, "Clear Goal", rvt::WHITE, rvt::XLARGE);
  visual_tools.publishTrajectoryLine(my_plan.trajectory_, joint_model_group);
  visual_tools.trigger();
  visual_tools.prompt("next step");

  // The result may look like this:
  //
  // .. image:: ./move_group_interface_tutorial_clear_path.gif
  //    :alt: animation showing the arm moving relatively straight toward the goal
  //
  // Now let's define a collision object ROS message for the robot to avoid.
  moveit_msgs::CollisionObject collision_object;
  collision_object.header.frame_id = move_group_interface.getPlanningFrame();

  // The id of the object is used to identify it.
  collision_object.id = "box1";

  // Define a box to add to the world.
  shape_msgs::SolidPrimitive primitive;
  primitive.type = primitive.BOX;
  primitive.dimensions.resize(3);
  primitive.dimensions[primitive.BOX_X] = 0.1;
  primitive.dimensions[primitive.BOX_Y] = 1.5;
  primitive.dimensions[primitive.BOX_Z] = 0.5;

  // Define a pose for the box (specified relative to frame_id)
  geometry_msgs::Pose box_pose;
  box_pose.orientation.w = 1.0;
  box_pose.position.x = 0.5;
  box_pose.position.y = 0.0;
  box_pose.position.z = 0.25;

  collision_object.primitives.push_back(primitive);
  collision_object.primitive_poses.push_back(box_pose);
  collision_object.operation = collision_object.ADD;

  std::vector<moveit_msgs::CollisionObject> collision_objects;
  collision_objects.push_back(collision_object);

  // Now, let's add the collision object into the world
  // (using a vector that could contain additional objects)
  ROS_INFO_NAMED("tutorial", "Add an object into the world");
  planning_scene_interface.addCollisionObjects(collision_objects);

  // Show text in RViz of status and wait for MoveGroup to receive and process the collision object message
  visual_tools.publishText(text_pose, "Add object", rvt::WHITE, rvt::XLARGE);
  visual_tools.trigger();
  visual_tools.prompt("Press 'next' in the RvizVisualToolsGui window to once the collision object appears in RViz");

  // Now when we plan a trajectory it will avoid the obstacle
  success = (move_group_interface.plan(my_plan) == moveit::core::MoveItErrorCode::SUCCESS);
  ROS_INFO_NAMED("tutorial", "Visualizing plan 6 (pose goal move around cuboid) %s", success ? "" : "FAILED");
  visual_tools.publishText(text_pose, "Obstacle Goal", rvt::WHITE, rvt::XLARGE);
  visual_tools.publishTrajectoryLine(my_plan.trajectory_, joint_model_group);
  visual_tools.trigger();
  visual_tools.prompt("Press 'next' in the RvizVisualToolsGui window once the plan is complete");

  // The result may look like this:
  //
  // .. image:: ./move_group_interface_tutorial_avoid_path.gif
  //    :alt: animation showing the arm moving avoiding the new obstacle
  //
  // Attaching objects to the robot
  // ^^^^^^^^^^^^^^^^^^^^^^^^^^^^^^
  //
  // You can attach objects to the robot, so that it moves with the robot geometry.
  // This simulates picking up the object for the purpose of manipulating it.
  // The motion planning should avoid collisions between the two objects as well.
  moveit_msgs::CollisionObject object_to_attach;
  object_to_attach.id = "cylinder1";

  shape_msgs::SolidPrimitive cylinder_primitive;
  cylinder_primitive.type = primitive.CYLINDER;
  cylinder_primitive.dimensions.resize(2);
  cylinder_primitive.dimensions[primitive.CYLINDER_HEIGHT] = 0.20;
  cylinder_primitive.dimensions[primitive.CYLINDER_RADIUS] = 0.04;

  // We define the frame/pose for this cylinder so that it appears in the gripper
  object_to_attach.header.frame_id = move_group_interface.getEndEffectorLink();
  geometry_msgs::Pose grab_pose;
  grab_pose.orientation.w = 1.0;
  grab_pose.position.z = 0.2;

  // First, we add the object to the world (without using a vector)
  object_to_attach.primitives.push_back(cylinder_primitive);
  object_to_attach.primitive_poses.push_back(grab_pose);
  object_to_attach.operation = object_to_attach.ADD;
  planning_scene_interface.applyCollisionObject(object_to_attach);

  // Then, we "attach" the object to the robot at the given link and allow collisions between the object and the listed
  // links. You could also use applyAttachedCollisionObject to attach an object to the robot directly.
  ROS_INFO_NAMED("tutorial", "Attach the object to the robot");
  move_group_interface.attachObject(object_to_attach.id, "panda_hand", { "panda_leftfinger", "panda_rightfinger" });

  visual_tools.publishText(text_pose, "Object attached to robot", rvt::WHITE, rvt::XLARGE);
  visual_tools.trigger();

  /* Wait for MoveGroup to receive and process the attached collision object message */
  visual_tools.prompt("Press 'next' in the RvizVisualToolsGui window once the new object is attached to the robot");

  // Replan, but now with the object in hand.
  move_group_interface.setStartStateToCurrentState();
  success = (move_group_interface.plan(my_plan) == moveit::core::MoveItErrorCode::SUCCESS);
  ROS_INFO_NAMED("tutorial", "Visualizing plan 7 (move around cuboid with cylinder) %s", success ? "" : "FAILED");
  visual_tools.publishTrajectoryLine(my_plan.trajectory_, joint_model_group);
  visual_tools.trigger();
  visual_tools.prompt("Press 'next' in the RvizVisualToolsGui window once the plan is complete");

  // The result may look something like this:
  //
  // .. image:: ./move_group_interface_tutorial_attached_object.gif
  //    :alt: animation showing the arm moving differently once the object is attached
  //
  // Detaching and Removing Objects
  // ^^^^^^^^^^^^^^^^^^^^^^^^^^^^^^
  //
  // Now, let's detach the cylinder from the robot's gripper.
  ROS_INFO_NAMED("tutorial", "Detach the object from the robot");
  move_group_interface.detachObject(object_to_attach.id);

  // Show text in RViz of status
  visual_tools.deleteAllMarkers();
  visual_tools.publishText(text_pose, "Object detached from robot", rvt::WHITE, rvt::XLARGE);
  visual_tools.trigger();

  /* Wait for MoveGroup to receive and process the attached collision object message */
  visual_tools.prompt("Press 'next' in the RvizVisualToolsGui window once the new object is detached from the robot");

  // Now, let's remove the objects from the world.
  ROS_INFO_NAMED("tutorial", "Remove the objects from the world");
  std::vector<std::string> object_ids;
  object_ids.push_back(collision_object.id);
  object_ids.push_back(object_to_attach.id);
  planning_scene_interface.removeCollisionObjects(object_ids);

  // Show text in RViz of status
  visual_tools.publishText(text_pose, "Objects removed", rvt::WHITE, rvt::XLARGE);
  visual_tools.trigger();

  /* Wait for MoveGroup to receive and process the attached collision object message */
  visual_tools.prompt("Press 'next' in the RvizVisualToolsGui window to once the collision object disappears");

  // END_TUTORIAL

  ros::shutdown();
  return 0;
}
c++的接口只做了解,我们主要是使用python接口
接下来就是对python接口,commander scripts和机器人模型状态,以及规划场景四个部分的解析和使用了.
未来的一些需求
- 更换底盘工作
将现在的叉车底盘换成对应的模块. - 到第六部分的解析
- issacsim仿真之移动机器人强化学习训练
- mujoco仿真训练之移动机器人强化学习训练
(都可以直接使用github仓库)


 1100
1100

 被折叠的 条评论
为什么被折叠?
被折叠的 条评论
为什么被折叠?
 到【灌水乐园】发言


