


接上文,我们要对一下四个方面进行学习.
python接口,commander scripts和机器人模型状态,以及规划场景四个部分的解析和使用了.
目录
python接口实现运动规划
上次我们了解了一下在c++接口中怎么规划机械臂的行为,现在我们通过python接口来试一下。最简单的 MoveIt 用户界面之一是通过基于 Python 的移动组界面。这些包装器为普通用户可能需要的大多数作提供了功能,特别是设置关节或姿势目标、创建运动计划、移动机器人、将对象添加到环境中以及从机器人上连接/分离对象。
同样的,我们打开两个终端,运行以下两个内容:
打开环境
roslaunch panda_moveit_config demo.launch
python实现的movegroup
rosrun moveit_tutorials move_group_python_interface_tutorial.py
输出信息是一个过程,需要和enter键进行交互才知道具体的过程。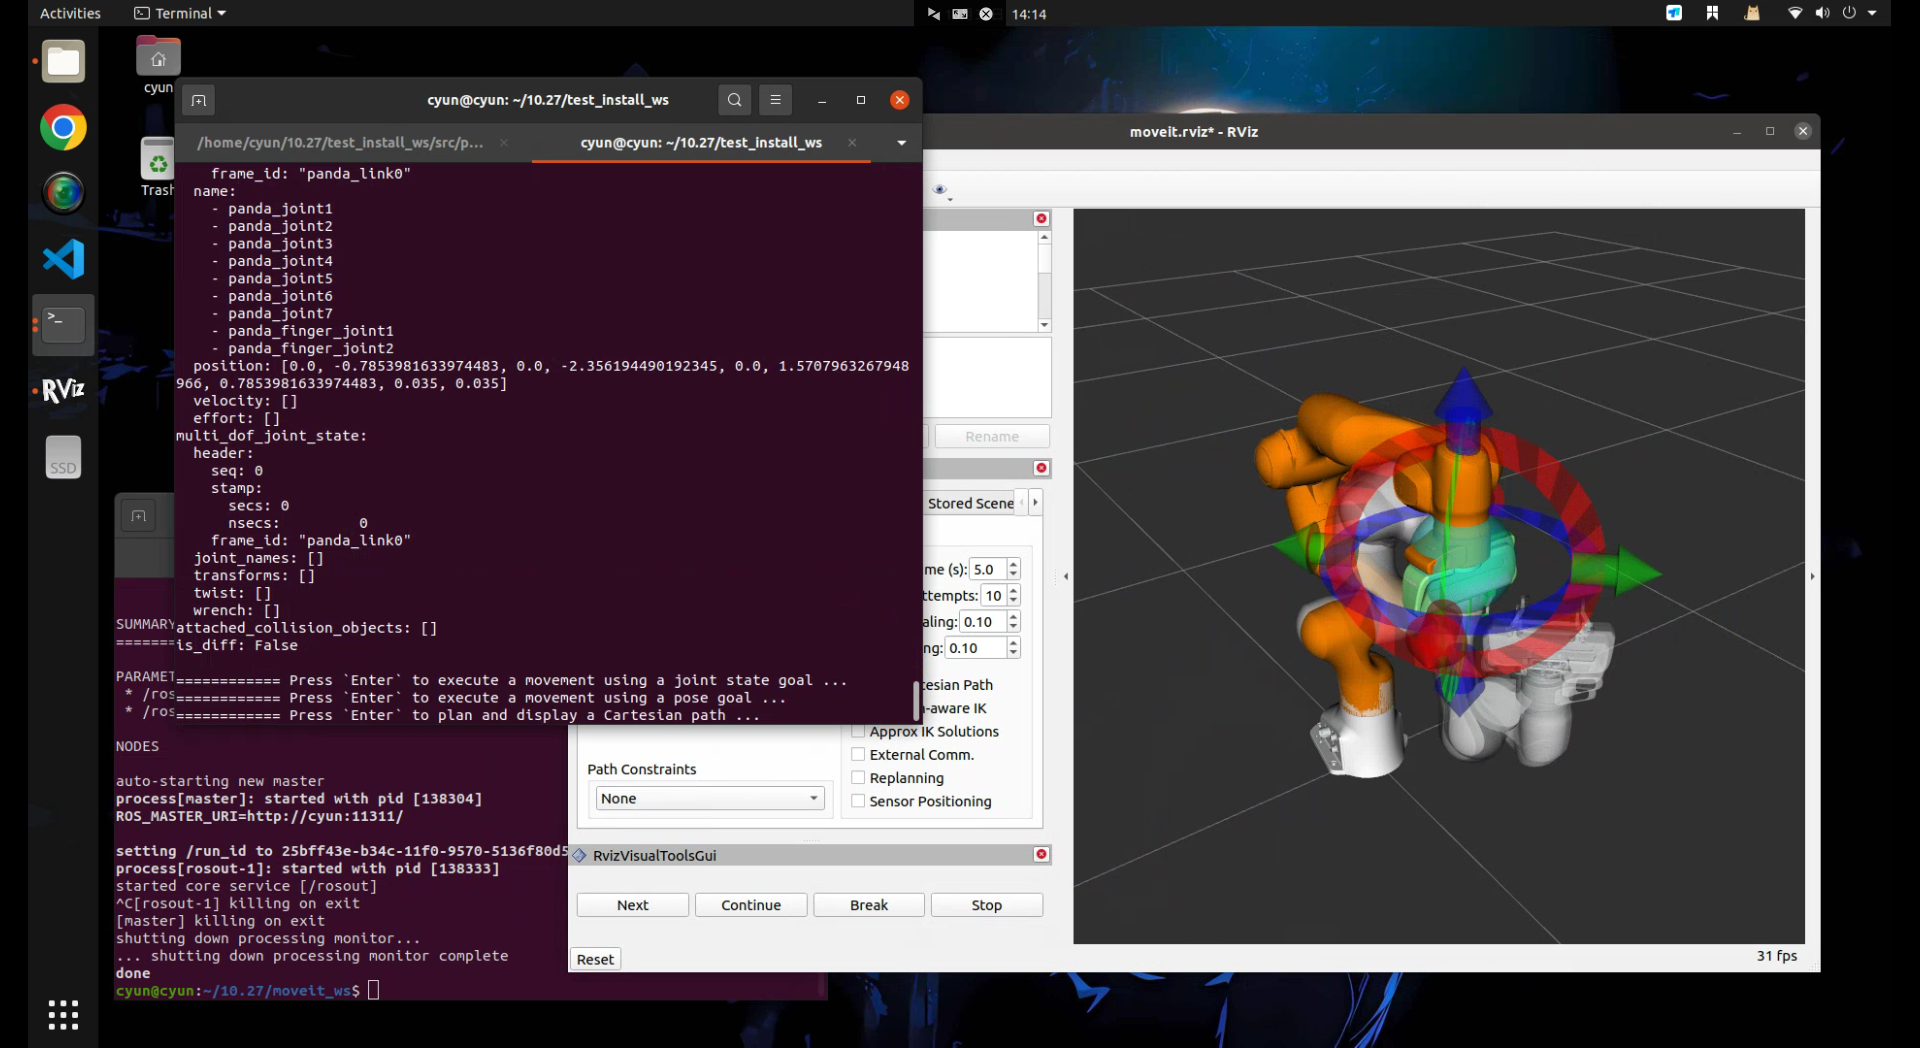
============ Press `Enter` to execute a movement using a joint state goal ...
============ Press `Enter` to execute a movement using a pose goal ...
============ Press `Enter` to plan and display a Cartesian path ...
============ Press `Enter` to display a saved trajectory (this will replay the Cartesian path)  ...
============ Press `Enter` to execute a saved path ...
============ Press `Enter` to add a box to the planning scene ...
============ Press `Enter` to attach a Box to the Panda robot ...
============ Press `Enter` to plan and execute a path with an attached collision object ...
============ Press `Enter` to detach the box from the Panda robot ...
============ Press `Enter` to remove the box from the planning scene ...
============ Python tutorial demo complete!
接下来就让我解读一下这个代码中的内容来分析具体发生了什么。
这里就不给出完整的源码了,只需要知道这个过程是调用一些函数的结果即可。https://github.com/moveit/moveit_tutorials/blob/master/doc/move_group_python_interface/scripts/move_group_python_interface_tutorial.py
#!/usr/bin/env python
from __future__ import print_function
from six.moves import input
import sys
import copy
import rospy
import moveit_commander
import moveit_msgs.msg
import geometry_msgs.msg
try:
from math import pi, tau, dist, fabs, cos
except: # For Python 2 compatibility
from math import pi, fabs, cos, sqrt
tau = 2.0 * pi
def dist(p, q):
return sqrt(sum((p_i - q_i) ** 2.0 for p_i, q_i in zip(p, q)))
from std_msgs.msg import String
from moveit_commander.conversions import pose_to_list
## END_SUB_TUTORIAL
def all_close(goal, actual, tolerance):
if type(goal) is list:
for index in range(len(goal)):
if abs(actual[index] - goal[index]) > tolerance:
return False
elif type(goal) is geometry_msgs.msg.PoseStamped:
return all_close(goal.pose, actual.pose, tolerance)
elif type(goal) is geometry_msgs.msg.Pose:
x0, y0, z0, qx0, qy0, qz0, qw0 = pose_to_list(actual)
x1, y1, z1, qx1, qy1, qz1, qw1 = pose_to_list(goal)
# Euclidean distance
d = dist((x1, y1, z1), (x0, y0, z0))
# phi = angle between orientations
cos_phi_half = fabs(qx0 * qx1 + qy0 * qy1 + qz0 * qz1 + qw0 * qw1)
return d <= tolerance and cos_phi_half >= cos(tolerance / 2.0)
return True
class MoveGroupPythonInterfaceTutorial(object):
"""MoveGroupPythonInterfaceTutorial"""
def __init__(self):
super(MoveGroupPythonInterfaceTutorial, self).__init__()
## BEGIN_SUB_TUTORIAL setup
##
## First initialize `moveit_commander`_ and a `rospy`_ node:
moveit_commander.roscpp_initialize(sys.argv)
rospy.init_node("move_group_python_interface_tutorial", anonymous=True)
## Instantiate a `RobotCommander`_ object. Provides information such as the robot's
## kinematic model and the robot's current joint states
robot = moveit_commander.RobotCommander()
## Instantiate a `PlanningSceneInterface`_ object. This provides a remote interface
## for getting, setting, and updating the robot's internal understanding of the
## surrounding world:
scene = moveit_commander.PlanningSceneInterface()
## Instantiate a `MoveGroupCommander`_ object. This object is an interface
## to a planning group (group of joints). In this tutorial the group is the primary
## arm joints in the Panda robot, so we set the group's name to "panda_arm".
## If you are using a different robot, change this value to the name of your robot
## arm planning group.
## This interface can be used to plan and execute motions:
group_name = "panda_arm"
move_group = moveit_commander.MoveGroupCommander(group_name)
## Create a `DisplayTrajectory`_ ROS publisher which is used to display
## trajectories in Rviz:
display_trajectory_publisher = rospy.Publisher(
"/move_group/display_planned_path",
moveit_msgs.msg.DisplayTrajectory,
queue_size=20,
)
## END_SUB_TUTORIAL
## BEGIN_SUB_TUTORIAL basic_info
##
## Getting Basic Information
## ^^^^^^^^^^^^^^^^^^^^^^^^^
# We can get the name of the reference frame for this robot:
planning_frame = move_group.get_planning_frame()
print("============ Planning frame: %s" % planning_frame)
# We can also print the name of the end-effector link for this group:
eef_link = move_group.get_end_effector_link()
print("============ End effector link: %s" % eef_link)
# We can get a list of all the groups in the robot:
group_names = robot.get_group_names()
print("============ Available Planning Groups:", robot.get_group_names())
# Sometimes for debugging it is useful to print the entire state of the
# robot:
print("============ Printing robot state")
print(robot.get_current_state())
print("")
## END_SUB_TUTORIAL
# Misc variables
self.box_name = ""
self.robot = robot
self.scene = scene
self.move_group = move_group
self.display_trajectory_publisher = display_trajectory_publisher
self.planning_frame = planning_frame
self.eef_link = eef_link
self.group_names = group_names
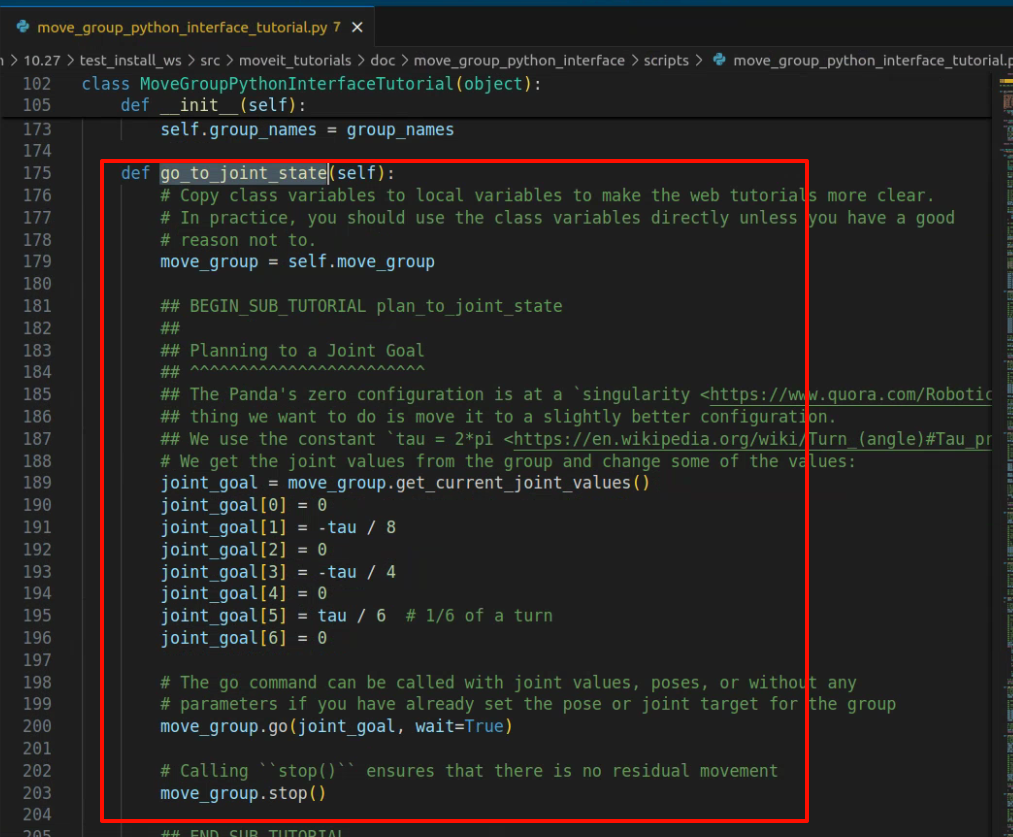
def go_to_joint_state(self):
# Copy class variables to local variables to make the web tutorials more clear.
# In practice, you should use the class variables directly unless you have a good
# reason not to.
move_group = self.move_group
## BEGIN_SUB_TUTORIAL plan_to_joint_state
##
## Planning to a Joint Goal
## ^^^^^^^^^^^^^^^^^^^^^^^^
## The Panda's zero configuration is at a `singularity <https://www.quora.com/Robotics-What-is-meant-by-kinematic-singularity>`_, so the first
## thing we want to do is move it to a slightly better configuration.
## We use the constant `tau = 2*pi <https://en.wikipedia.org/wiki/Turn_(angle)#Tau_proposals>`_ for convenience:
# We get the joint values from the group and change some of the values:
joint_goal = move_group.get_current_joint_values()
joint_goal[0] = 0
joint_goal[1] = -tau / 8
joint_goal[2] = 0
joint_goal[3] = -tau / 4
joint_goal[4] = 0
joint_goal[5] = tau / 6 # 1/6 of a turn
joint_goal[6] = 0
# The go command can be called with joint values, poses, or without any
# parameters if you have already set the pose or joint target for the group
move_group.go(joint_goal, wait=True)
# Calling ``stop()`` ensures that there is no residual movement
move_group.stop()
## END_SUB_TUTORIAL
# For testing:
current_joints = move_group.get_current_joint_values()
return all_close(joint_goal, current_joints, 0.01)
def main():
try:
print("")
print("----------------------------------------------------------")
print("Welcome to the MoveIt MoveGroup Python Interface Tutorial")
print("----------------------------------------------------------")
print("Press Ctrl-D to exit at any time")
print("")
input(
"============ Press `Enter` to begin the tutorial by setting up the moveit_commander ..."
)
tutorial = MoveGroupPythonInterfaceTutorial()
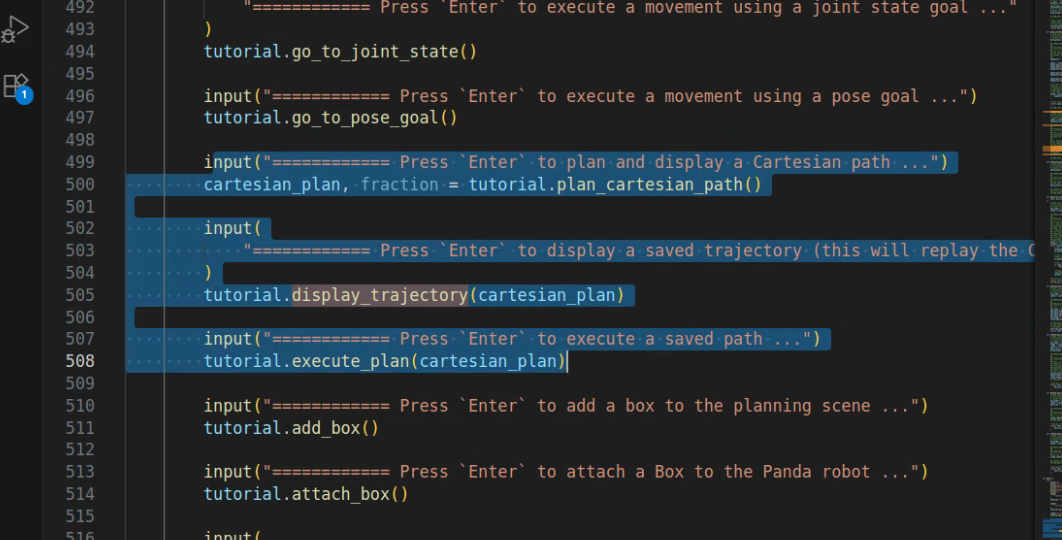
input(
"============ Press `Enter` to execute a movement using a joint state goal ..."
)
tutorial.go_to_joint_state()
input("============ Press `Enter` to execute a movement using a pose goal ...")
tutorial.go_to_pose_goal()
input("============ Press `Enter` to plan and display a Cartesian path ...")
cartesian_plan, fraction = tutorial.plan_cartesian_path()
input(
"============ Press `Enter` to display a saved trajectory (this will replay the Cartesian path) ..."
)
tutorial.display_trajectory(cartesian_plan)
input("============ Press `Enter` to execute a saved path ...")
tutorial.execute_plan(cartesian_plan)
input("============ Press `Enter` to add a box to the planning scene ...")
tutorial.add_box()
input("============ Press `Enter` to attach a Box to the Panda robot ...")
tutorial.attach_box()
input(
"============ Press `Enter` to plan and execute a path with an attached collision object ..."
)
cartesian_plan, fraction = tutorial.plan_cartesian_path(scale=-1)
tutorial.execute_plan(cartesian_plan)
input("============ Press `Enter` to detach the box from the Panda robot ...")
tutorial.detach_box()
input(
"============ Press `Enter` to remove the box from the planning scene ..."
)
tutorial.remove_box()
print("============ Python tutorial demo complete!")
except rospy.ROSInterruptException:
return
except KeyboardInterrupt:
return
if __name__ == "__main__":
main()
初始化信息
手续爱你导入的一些内容,以及初始化节点。
# Python 2/3 compatibility imports
from __future__ import print_function
from six.moves import input

import sys
import copy
import rospy
import moveit_commander
import moveit_msgs.msg
import geometry_msgs.msg

try:
    from math import pi, tau, dist, fabs, cos
except:  # For Python 2 compatibility
    from math import pi, fabs, cos, sqrt

    tau = 2.0 * pi

    def dist(p, q):
        return sqrt(sum((p_i - q_i) ** 2.0 for p_i, q_i in zip(p, q)))


from std_msgs.msg import String
from moveit_commander.conversions import pose_to_list
初始化 moveit_commander 和一个 rospy 节点:
moveit_commander.roscpp_initialize(sys.argv)
rospy.init_node("move_group_python_interface_tutorial", anonymous=True)
实例化规划场景:
scene = moveit_commander.PlanningSceneInterface()
实例化MoveGroupCommander对象,它是规划组的接口,这里主要对panda_arm进行控制
group_name = "panda_arm"
move_group = moveit_commander.MoveGroupCommander(group_name)
创建一个DisplayTrajectory的ROS发布器,用于在rviz中显示轨迹:
display_trajectory_publisher = rospy.Publisher(
    "/move_group/display_planned_path",
    moveit_msgs.msg.DisplayTrajectory,
    queue_size=20,
)
获取基本信息
# We can get the name of the reference frame for this robot:
planning_frame = move_group.get_planning_frame()
print("============ Planning frame: %s" % planning_frame)

# We can also print the name of the end-effector link for this group:
eef_link = move_group.get_end_effector_link()
print("============ End effector link: %s" % eef_link)

# We can get a list of all the groups in the robot:
group_names = robot.get_group_names()
print("============ Available Planning Groups:", robot.get_group_names())

# Sometimes for debugging it is useful to print the entire state of the
# robot:
print("============ Printing robot state")
print(robot.get_current_state())
print("")
在终端中打印出来就是:
============ Planning frame: panda_link0
============ End effector link: panda_link8
============ Available Planning Groups: ['panda_arm', 'panda_hand', 'panda_manipulator']
============ Printing robot state
joint_state:
  header:
    seq: 0
    stamp:
      secs: 0
      nsecs:         0
    frame_id: "panda_link0"
  name:
    - panda_joint1
    - panda_joint2
    - panda_joint3
    - panda_joint4
    - panda_joint5
    - panda_joint6
    - panda_joint7
    - panda_finger_joint1
    - panda_finger_joint2
  position: [0.0, -0.7853981633974483, 0.0, -2.356194490192345, 0.0, 1.5707963267948966, 0.7853981633974483, 0.035, 0.035]
  velocity: []
  effort: []
multi_dof_joint_state:
  header:
    seq: 0
    stamp:
      secs: 0
      nsecs:         0
    frame_id: "panda_link0"
  joint_names: []
  transforms: []
  twist: []
  wrench: []
attached_collision_objects: []
is_diff: False
规划关节目标
Panda 的零配置处于奇点 ,所以我们要做的第一件事就是将其移动到稍微好一点的配置。为了方便起见,我们使用常数 tau = 2*pi:
# We get the joint values from the group and change some of the values:
joint_goal = move_group.get_current_joint_values()
joint_goal[0] = 0
joint_goal[1] = -tau / 8
joint_goal[2] = 0
joint_goal[3] = -tau / 4
joint_goal[4] = 0
joint_goal[5] = tau / 6  # 1/6 of a turn
joint_goal[6] = 0

# The go command can be called with joint values, poses, or without any
# parameters if you have already set the pose or joint target for the group
move_group.go(joint_goal, wait=True)

# Calling ``stop()`` ensures that there is no residual movement
move_group.stop()
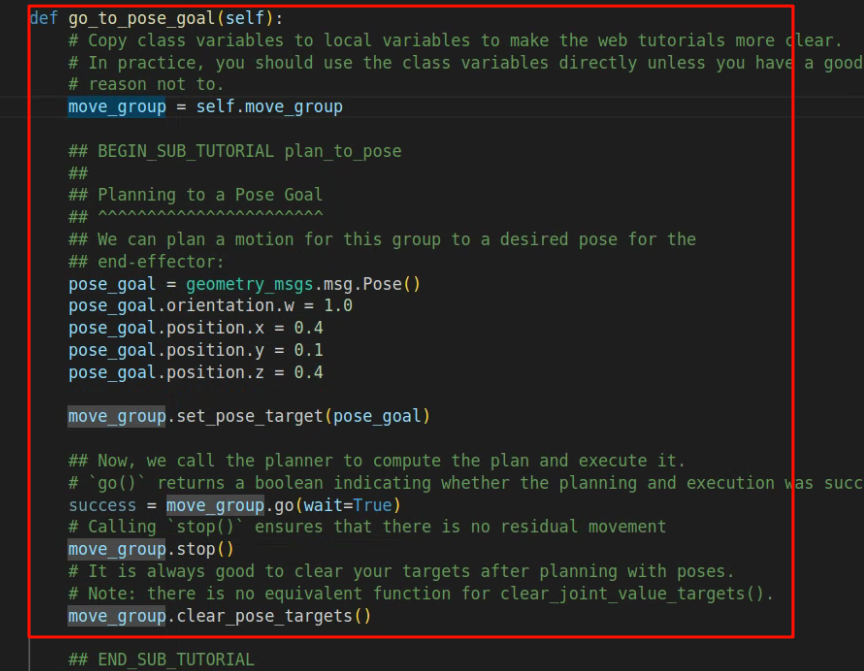
规划Pose目标
这个是末端执行器所需的姿势
pose_goal = geometry_msgs.msg.Pose()
pose_goal.orientation.w = 1.0
pose_goal.position.x = 0.4
pose_goal.position.y = 0.1
pose_goal.position.z = 0.4

move_group.set_pose_target(pose_goal)
然后调用规划期来计算并执行
# `go()` returns a boolean indicating whether the planning and execution was successful.
success = move_group.go(wait=True)
# Calling `stop()` ensures that there is no residual movement
move_group.stop()
# It is always good to clear your targets after planning with poses.
# Note: there is no equivalent function for clear_joint_value_targets().
move_group.clear_pose_targets()
笛卡尔路径
您可以通过指定末端执行器要经过的航点列表来直接规划笛卡尔路径。如果在 Python shell 中以交互方式执行,请设置 scale = 1.0。
waypoints = []

wpose = move_group.get_current_pose().pose
wpose.position.z -= scale * 0.1  # First move up (z)
wpose.position.y += scale * 0.2  # and sideways (y)
waypoints.append(copy.deepcopy(wpose))

wpose.position.x += scale * 0.1  # Second move forward/backwards in (x)
waypoints.append(copy.deepcopy(wpose))

wpose.position.y -= scale * 0.1  # Third move sideways (y)
waypoints.append(copy.deepcopy(wpose))

# We want the Cartesian path to be interpolated at a resolution of 1 cm
# which is why we will specify 0.01 as the eef_step in Cartesian
# translation.  We will disable the jump threshold by setting it to 0.0,
# ignoring the check for infeasible jumps in joint space, which is sufficient
# for this tutorial.
(plan, fraction) = move_group.compute_cartesian_path(
    waypoints, 0.01  # waypoints to follow  # eef_step
)

# Note: We are just planning, not asking move_group to actually move the robot yet:
return plan, fraction
这里只返回了路径和对应的分数
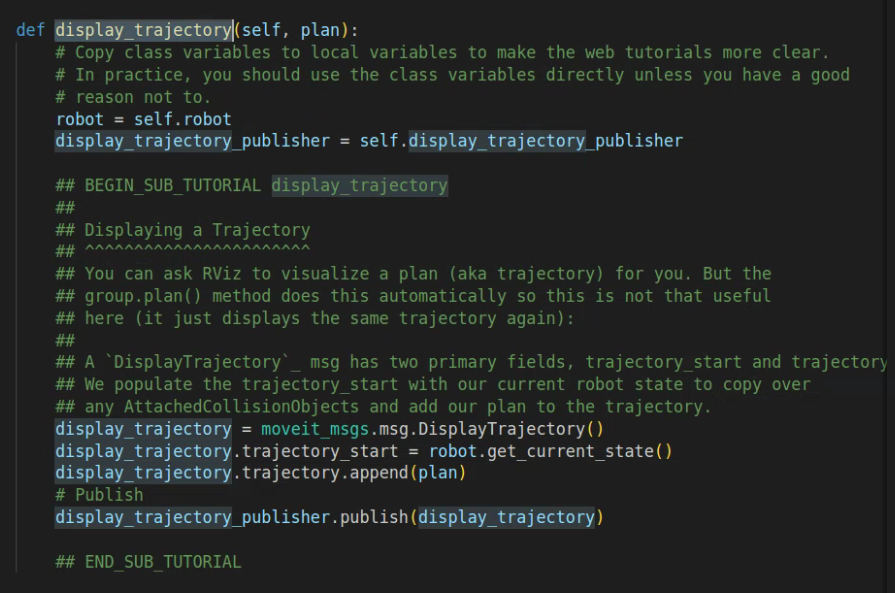
显示轨迹
刚才是规划了一个笛卡尔的轨迹,这里给它可视化出来,您可以要求 RViz 为您可视化计划(又名轨迹)。但是 group.plan() 方法会自动执行此作,因此这在这里没有那么有用(它只是再次显示相同的轨迹)。DisplayTrajectory 消息有两个主要字段,trajectory_start 和 trajectory。我们用当前机器人状态填充 trajectory_start,以复制任何 AttachedCollisionObjects,并将我们的计划添加到轨迹中。
display_trajectory = moveit_msgs.msg.DisplayTrajectory()
display_trajectory.trajectory_start = robot.get_current_state()
display_trajectory.trajectory.append(plan)
# Publish
display_trajectory_publisher.publish(display_trajectory)
执行规划
如果您希望机器人遵循已计算的计划,请使用 execute:
move_group.execute(plan, wait=True)
注意: 机器人的当前关节状态必须在 RobotTrajectory 中第一个航路点的某个容差范围内,否则 execute() 将失败
将对象添加到规划场景
首先,我们将在手指之间在规划场景中创建一个盒子:
box_pose = geometry_msgs.msg.PoseStamped()
box_pose.header.frame_id = "panda_hand"
box_pose.pose.orientation.w = 1.0
box_pose.pose.position.z = 0.11  # above the panda_hand frame
box_name = "box"
scene.add_box(box_name, box_pose, size=(0.075, 0.075, 0.075))
确保收到碰撞更新
如果 Python 节点是刚刚创建的, 或在实际发布场景更新消息之前死亡,消息 可能会丢失,盒子将不会出现。为确保更新 made 时,我们等到 get_attached_objects() 和 get_known_object_names() 列表。出于本教程的目的,我们在添加、删除、附加或分离规划场景中的对象后调用此函数。然后,我们等待更新完成或超时秒数过去。为了避免等待这样的场景更新,请使用 synchronous = True 初始化规划场景接口。
start = rospy.get_time()
seconds = rospy.get_time()
while (seconds - start < timeout) and not rospy.is_shutdown():
    # Test if the box is in attached objects
    attached_objects = scene.get_attached_objects([box_name])
    is_attached = len(attached_objects.keys()) > 0

    # Test if the box is in the scene.
    # Note that attaching the box will remove it from known_objects
    is_known = box_name in scene.get_known_object_names()

    # Test if we are in the expected state
    if (box_is_attached == is_attached) and (box_is_known == is_known):
        return True

    # Sleep so that we give other threads time on the processor
    rospy.sleep(0.1)
    seconds = rospy.get_time()

# If we exited the while loop without returning then we timed out
return False
将物体附加到机器人上
接下来,我们将盒子连接到熊猫手腕上。纵物体需要机器人能够触摸它们,而规划场景不会将接触报告为碰撞。通过向 touch_links 数组添加链接名称,我们告诉规划场景忽略这些链接与盒子之间的冲突。对于 Panda 机器人,我们设置 grasping_group = ‘panda_hand’。如果您使用的是其他机器人,则应将此值更改为末端执行器组名称的名称。
grasping_group = "panda_hand"
touch_links = robot.get_link_names(group=grasping_group)
scene.attach_box(eef_link, box_name, touch_links=touch_links)
从机器人上分离物体
我们还可以从规划场景中分离和删除对象:
scene.remove_attached_object(eef_link, name=box_name)
The Launch File
注意: 必须先分离对象,然后才能将其从世界中删除
launch启动的化,文件为:
<launch>

  <node name="move_group_python_interface_tutorial" pkg="moveit_tutorials" type="move_group_python_interface_tutorial.py" respawn="false" output="screen">
  </node>

</launch>


 470
470

 被折叠的 条评论
为什么被折叠?
被折叠的 条评论
为什么被折叠?
 到【灌水乐园】发言


