


我年轻时很穷,努力了几年,终于不再年轻了
0. 一些概念
-
RTSP是 TCP/IP 协议体系中的一个应用层协议,该协议定义了一对多应用程序如何有效地通过 IP 网络传送多媒体数据。RTSP在体系结构上位于RTP和RTCP之上,它使用TCP或UDP完成数据传输。其中,TCP/UDP是发送视频数据的网络层协议,RTSP/RTP/RTCP是解析视频数据的应用层协议,注意区分!
-
RTSP服务、RTSP推流、RTSP拉流,缺一不可,尤其是RTSP服务。
-
RTSP服务器、RTSP客户端。推流和拉流都是由客户端发起,向服务器发起对应的请求。RTSP推流一般由RTSP相机或app发起,RTSP拉流一般由上位机的app发起。
-
RTSP服务器默认端⼝是554,在客户端SETUP的时候会把⾃身的RTP和RTCP端⼝告知服务器。在RTSP的session建⽴后,会使⽤RTP/RTCP在约定好的端⼝上传输数据。
-
向服务端推流
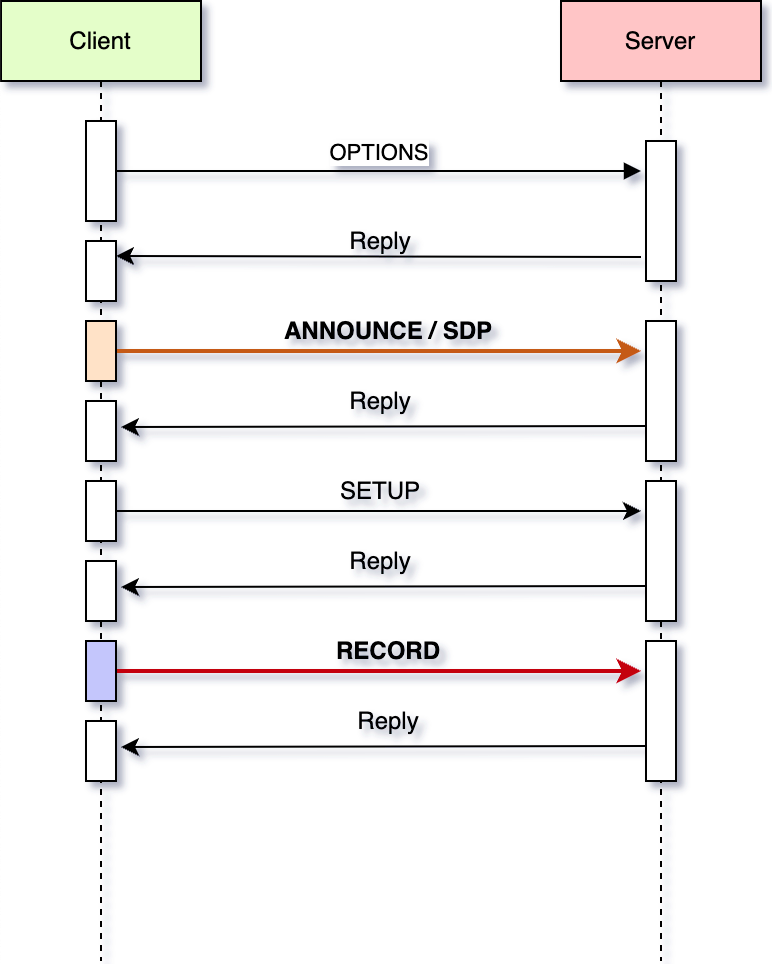
-
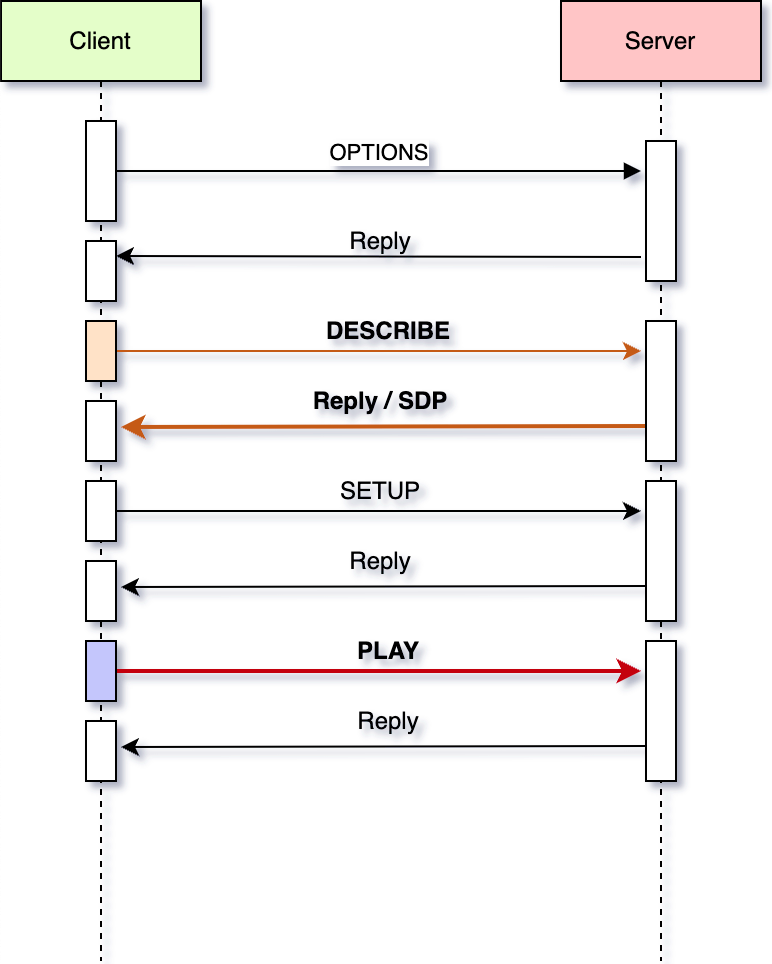
从服务端拉流
1. Ubuntu搭建RTSP服务器的方式
-
live555
live555 Media Server -
gstreamer
gst-rtsp-server包
c++编写
注意:安装gstreamer-1.0时并不会自动安装gst-rtsp-server,gst-rtsp-server需要另行通过make方式安装,如下:git clone -b 1.8 https://github.com/GStreamer/gst-rtsp-server.git //下载源码 cd gst-rtsp-server git submodule update --init --recursive ./autogen.sh sudo make sudo make install -
FFmpeg
搭建不了服务,只能推流、拉流、播放! -
rtsp-simple-server
go语言编写 -
EasyDarwin
easy-darwin -
ZLMediaKit
推荐使用!!
使用文档:https://github.com/ZLMediaKit/ZLMediaKit/wiki/快速开始
2. 在Ubuntu上搭建RTSP服务器
推荐使用ZLMediaKit,以Ubuntu为例:
ZLMediaKit使用文档:https://github.com/ZLMediaKit/ZLMediaKit/wiki/快速开始
- 下载
git clone --depth 1 https://gitee.com/xia-chu/ZLMediaKit cd ZLMediaKit git submodule update --init # 安装依赖,可选。参考文档 - 编译
cd ZLMediaKit mkdir build cd build cmake .. make -j4 - 运行
cd ZLMediaKit/release/linux/Debug
#通过-h可以了解启动参数
./MediaServer -h
# 以守护进程模式启动:主进程关闭自动重启。需要加sudo,因为544端口需要管理员权限!!!!
sudo ./MediaServer -d
# 设置log打印等级:0~4,等级越高越简洁,下图是等级0
sudo ./MediaServer -d -l 0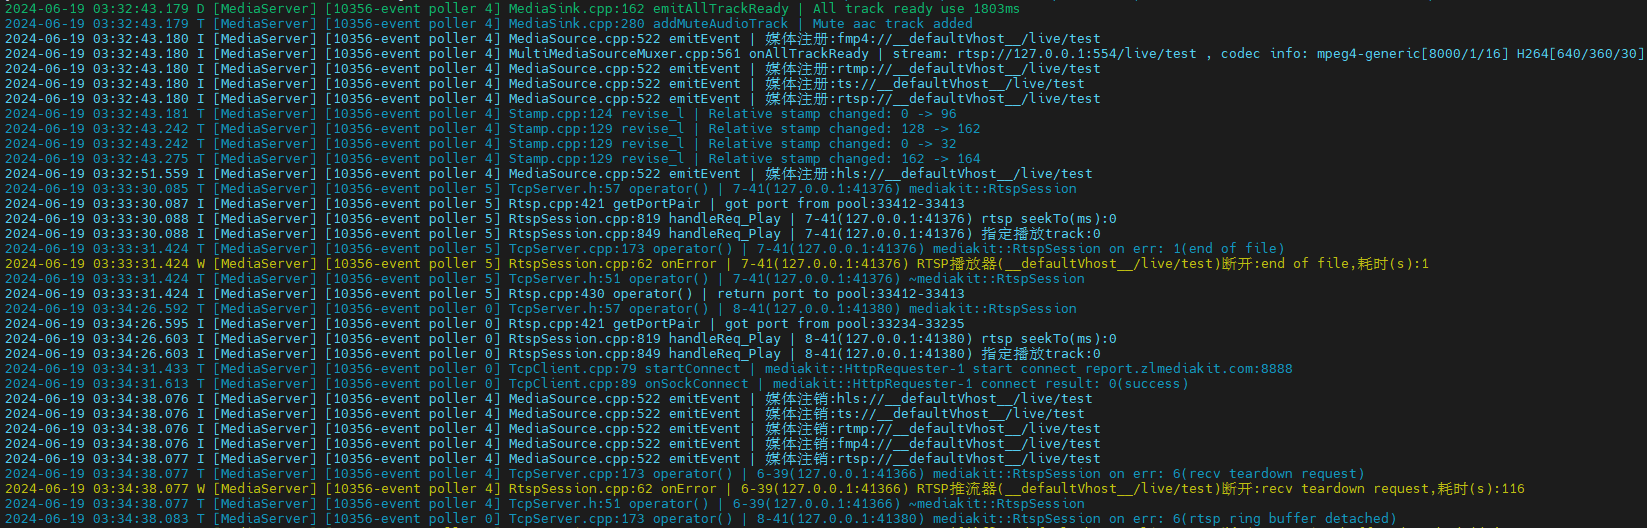
- 关闭服务
sudo killall -2 MediaServer - log
log保存在ZLMediaKit/release/linux/Debug/log中。 - 推流测试
要先开启RTSP服务再推流不然会报类似下面的错误:

用ffmpeg 推:
推流成功后查看ZLMediaKit的log可以得到更多有用的信息:# ZLMediaKit的RTSP服务默认端口是554,可缺省!/live是参数之一,不能少!!! ffmpeg -re -i "/path/to/test.mp4" -vcodec h264 -acodec aac -f rtsp -rtsp_transport tcp rtsp://127.0.0.1/live/test

- 拉流播放测试
注意:rtsp地址要与推流地址保持一致,不然无法拉取和播放!!注意ffplay -rtsp_transport tcp -i rtsp://127.0.0.1:554/live/testlive是参数不能漏!!
3. 推流
要先开启RTSP服务再推流不然会报类似下面的错误:
- ffmpeg
推流成功后查看ZLMediaKit的log可以得到更多有用的信息:# ZLMediaKit的RTSP服务默认端口是554,可缺省!/live是参数之一,不能少!!! ffmpeg -re -i "/path/to/test.mp4" -vcodec h264 -acodec aac -f rtsp -rtsp_transport tcp rtsp://127.0.0.1/live/test
- opencv + ffmpeg
int main(int argc, char **argv)
{

	//rtsp
	std::string rtsp_server_url = "rtsp://127.0.0.1:554/live/0";
	std::stringstream command;
	command << "ffmpeg ";
	// inputfile options
	command << "-y "  // overwrite output files
	<< "-an " // disable audio
	<< "-f rawvideo " // force format to rawvideo
	<< "-vcodec rawvideo "  // force video rawvideo ('copy' to copy stream)
	<< "-pix_fmt bgr24 "  // set pixel format to bgr24
	<< "-s 640x480 "  // set frame size (WxH or abbreviation)
	<< "-r 30 "; // set frame rate (Hz value, fraction or abbreviation)
	command << "-i - ";
	// outputfile options
	command
	<< "-c:v libx264 "  // Hyper fast Audio and Video encoder
	<< "-pix_fmt yuv420p "  // set pixel format to yuv420p
	<< "-tune:v zerolatency "
	<< "-preset ultrafast " // set the libx264 encoding preset to ultrafast
	<< "-f rtsp " // force format to flv for rtmp, rtsp for rtsp
	<< rtsp_server_url;

	FILE *fp = nullptr;
	try {

		cv::Mat frame;
		vpRealSense2 rs2;
		std::string product_line2 = rs2.getProductLine();//获取相机信息
		std::cout << "Product line: " << product_line2 << std::endl;
		rs2::config config2;
		config2.enable_stream(RS2_STREAM_COLOR, 640, 480, RS2_FORMAT_RGBA8, 30);//配置相机
		config2.enable_stream(RS2_STREAM_DEPTH, 640, 480, RS2_FORMAT_Z16, 30);
		config2.enable_stream(RS2_STREAM_INFRARED, 640, 480, RS2_FORMAT_Y8, 30);
		rs2.open(config2);//启动相机
		vpCameraParameters cam2 = rs2.getCameraParameters(RS2_STREAM_COLOR);//获取相机 内参
		vpImage<vpRGBa> I2(rs2.getIntrinsics(RS2_STREAM_COLOR)
 最低0.47元/天 解锁文章


 被折叠的 条评论
为什么被折叠?
被折叠的 条评论
为什么被折叠?
 到【灌水乐园】发言


