 Unity Shader 实现贴图过渡


 本文介绍如何使用Unity Shader实现贴图之间的平滑过渡效果。通过定义MixValue参数,控制两个贴图间的渐变过程,并提供了一个Unity脚本实例,演示如何在运行时动态改变MixValue以达到平滑切换贴图的目的。
今天要实现一个贴图切换过渡的一个效果,Unlit的性能比较好,所以参考了网上一些Texture的shader之后,写了一下。
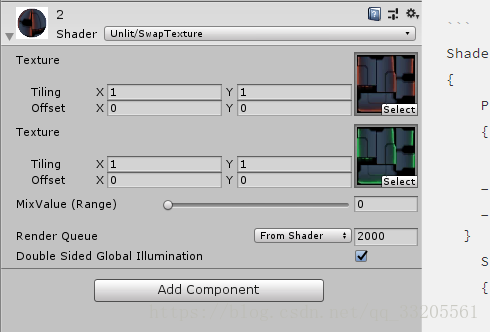
具体内容:MixValue 来完成渐变效果, MixValue = 1时为下面的Texture, MixValue = 0时为上面的Texutrue
下面是shader的代码:主要是frag 部分,通过mixvalue去进行两个贴图的颜色混合
Shader "Unlit/SwapTexture"
{
    Properties
    {
        _MainTex ("Texture", 2D) = "white" {}
    _SubText("Texture", 2D) = "white"{}
    _MixValue("MixValue (Range)",Range(0,1)) = 0.5
  }
    SubShader
    {
        Tags { "RenderType"="Opaque" }
        LOD 100

        Pass
        {
            CGPROGRAM
            #pragma vertex vert
            #pragma fragment frag
            // make fog work
            #pragma multi_compile_fog

            #include "UnityCG.cginc"

            struct appdata
            {
                float4 vertex : POSITION;
                float2 uv : TEXCOORD0;
            };

            struct v2f
            {
                float2 uv : TEXCOORD0;
                UNITY_FOG_COORDS(1)
                float4 vertex : SV_POSITION;
            };

            sampler2D _MainTex;
      sampler2D _SubText;
      float _MixValue;
            float4 _MainTex_ST;

            v2f vert (appdata v)
            {
                v2f o;
                o.vertex = UnityObjectToClipPos(v.vertex);
                o.uv = TRANSFORM_TEX(v.uv, _MainTex);
                UNITY_TRANSFER_FOG(o,o.vertex);
                return o;
            }

            fixed4 frag (v2f i) : SV_Target
            {
                // sample the texture
                fixed4 main = tex2D(_MainTex, i.uv);
        fixed4 sub = tex2D(_SubText, i.uv);
                // apply fog
        main = main * (1 - _MixValue);
        sub = sub * _MixValue;
        fixed4 col = main + sub;
                UNITY_APPLY_FOG(i.fogCoord, col);
                return col;
            }
            ENDCG
        }
    }
}
一个配套使用的脚本:挂在换贴图的物体上
using System.Collections;
using System.Collections.Generic;
using UnityEngine;
using System;
public class TextureSwapComp : MonoBehaviour {
  Renderer target;
  Shader shader;
  bool is_swaping;
  public int texture_index;
  // Use this for initialization
  private void Awake()
  {
    shader = Shader.Find("Unlit/SwapTexture");
    target = this.GetComponent<Renderer>();
    is_swaping = false;
  }

  private void Start()
  {
    ThemeManager.AddTextureSwap(this);
  }

  public void SwapTexture(Texture to, float time, Action action)
  {
    if (is_swaping) StopAllCoroutines();
    StartCoroutine(__Swap(to, time, action));
  }


  IEnumerator __Swap(Texture to, float time, Action action)
  {
    is_swaping = true;
    float timer = 0;
    float mix_value = 0;
    Material swaping_mat =  new Material(shader);
    Material currect_mat = target.material;

    swaping_mat.SetTexture("_MainTex", currect_mat.mainTexture);
    swaping_mat.SetTexture("_SubTex", to);
    swaping_mat.SetFloat("_MixValue", 0);
    target.material = swaping_mat;

    while (time >= timer)
    {
      timer += Time.deltaTime;
      mix_value = Mathf.Lerp(mix_value, 1, timer / time);
      swaping_mat.SetFloat("_MixValue", mix_value);
      yield return null;
    }

    currect_mat.SetTexture("_MainTex", to);
    target.material = currect_mat;

    currect_mat = null;
    swaping_mat = null;
    is_swaping = false;
    if (action != null) action();
  }

  private void OnDestroy()
  {
    StopAllCoroutines();
    ThemeManager.RemoveTextureSwap(this);
  }

  private void OnDisable()
  {
    StopAllCoroutines();
    ThemeManager.RemoveTextureSwap(this);
  }
}


 4630
4630

 被折叠的 条评论
为什么被折叠?
被折叠的 条评论
为什么被折叠?
 到【灌水乐园】发言


