


 本文介绍了如何配置新建工程的工具版本,如JDK、Scala和Sbt,以及SpinalHDL的使用。提供了`build.sbt`和`build.properties`的示例,并展示了在IDEA中更新SpinalVersion和Reloadsbt项目的方法。此外,通过三个逐步进阶的SpinalHDL计数器demo,详细讲解了异步复位功能的实现,包括Verilog代码生成和模拟测试。
文章目录
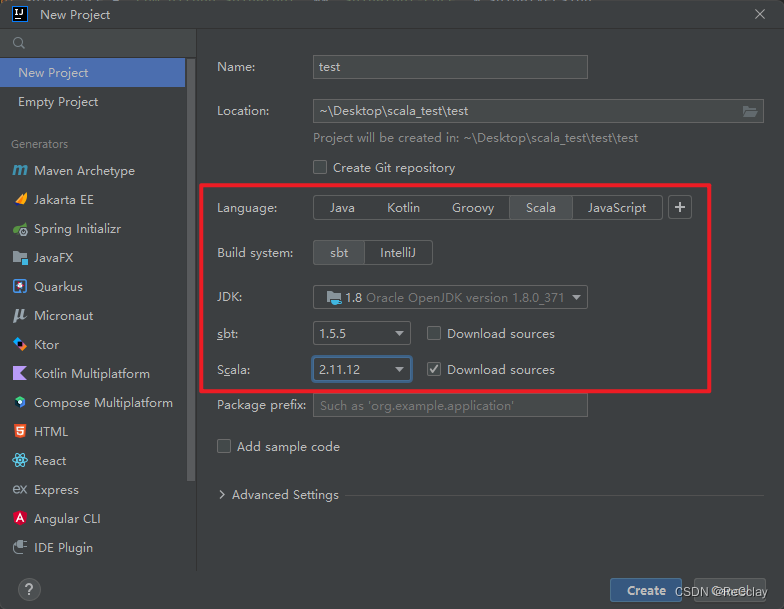
新建工程
各个工具版本
配置文件主要是:
build.sbt和build.properties
- JDK:1.8
- scala:2.11.12
- sbt:1.5.5
- spinal:1.6.0 / 1.6.1(加入Enum)/ 1.8.1
build.sbt 示例
常见写法参考:
ThisBuild / version := "0.1.0-SNAPSHOT"

ThisBuild / scalaVersion := "2.11.12"

val spinalVersion = "1.6.0"
val spinalCore = "com.github.spinalhdl" %% "spinalhdl-core" % spinalVersion
val spinalLib = "com.github.spinalhdl" %% "spinalhdl-lib" % spinalVersion
val spinalIdslPlugin = compilerPlugin("com.github.spinalhdl" %% "spinalhdl-idsl-plugin" % spinalVersion)
lazy val root = (project in file("."))
  .settings(
    name := "scala_test",
    //    Compile / scalaSource := baseDirectory.value / "hw" / "spinal", //scala源文件不是在`src/main/scala`下,可以参考如下写法更改路径
    libraryDependencies ++= Seq(spinalCore, spinalLib, spinalIdslPlugin)
  )

fork := true
build.properties 示例
sbt.version = 1.5.5
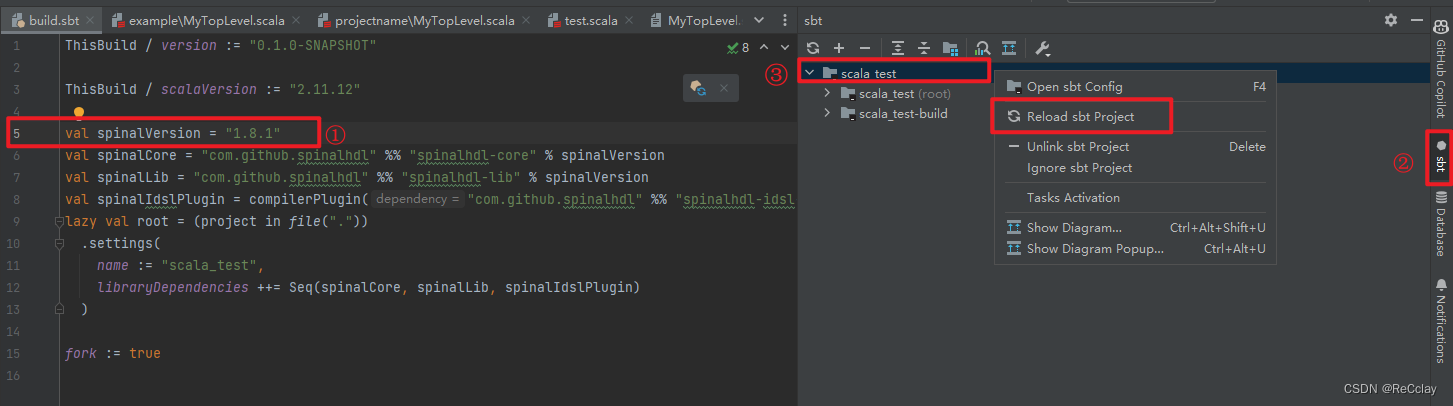
如何在IEDA中更新 SpinalVersion 并 Reload sbt Project
SpinalHDL入门例子:计数器
demo1
最后生成的波形文件是test.vcd,gtkwave可以打开!
MyTopLevel.scala
package mylib

import spinal.core._
import spinal.lib._

import scala.util.Random

//Hardware definition
class MyTopLevel extends Component {
  val io = new Bundle {
    val cond0 = in  Bool()
    val cond1 = in  Bool()
    val flag  = out Bool()
    val state = out UInt(8 bits)
  }
  val counter = Reg(UInt(8 bits)) init(0)

  when(io.cond0){
    counter := counter + 1
  }

  io.state := counter
  io.flag  := (counter === 0) | io.cond1
}

//Generate the MyTopLevel's Verilog
object MyTopLevelVerilog {
  def main(args: Array[String]) {
    SpinalVerilog(new MyTopLevel)
  }
}

//Generate the MyTopLevel's VHDL
//object MyTopLevelVhdl {
//  def main(args: Array[String]) {
//    SpinalVhdl(new MyTopLevel)
//  }
//}


//Define a custom SpinalHDL configuration with synchronous reset instead of the default asynchronous one. This configuration can be resued everywhere
//定义一个自定义的SpinalHDL配置,使用同步复位而不是默认的异步复位。这个配置可以在任何地方重用。
object MySpinalConfig extends SpinalConfig(defaultConfigForClockDomains = ClockDomainConfig(resetKind = SYNC))

//Generate the MyTopLevel's Verilog using the above custom configuration.
//使用上述自定义配置生成MyTopLevel的Verilog。
object MyTopLevelVerilogWithCustomConfig {
  def main(args: Array[String]) {
    MySpinalConfig.generateVerilog(new MyTopLevel)
  }
}
对应生成的Verilog代码
// Generator : SpinalHDL v1.6.0    git head : 73c8d8e2b86b45646e9d0b2e729291f2b65e6be3
// Component : MyTopLevel


module MyTopLevel (
  input               io_cond0,
  input               io_cond1,
  output              io_flag,
  output     [7:0]    io_state,
  input               clk,
  input               reset
);
  reg        [7:0]    counter;

  assign io_state = counter;
  assign io_flag = ((counter == 8'h0) || io_cond1);
  always @(posedge clk or posedge reset) begin
    if(reset) begin
      counter <= 8'h0;
    end else begin
      if(io_cond0) begin
        counter <= (counter + 8'h01);
      end
    end
  end


endmodule
MyTopLevelSim
package mylib

import spinal.core._
import spinal.sim._
import spinal.core.sim._

import scala.util.Random


//MyTopLevel's testbench
object MyTopLevelSim {
  def main(args: Array[String]) {
    SimConfig.withWave.doSim(new MyTopLevel){dut =>
      //Fork a process to generate the reset and the clock on the dut
      dut.clockDomain.forkStimulus(period = 10)

      var modelState = 0
      for(idx <- 0 to 99){
        //Drive the dut inputs with random values
        dut.io.cond0 #= Random.nextBoolean()
        dut.io.cond1 #= Random.nextBoolean()

        //Wait a rising edge on the clock
        dut.clockDomain.waitRisingEdge()

        //Check that the dut values match with the reference model ones
        val modelFlag = modelState == 0 || dut.io.cond1.toBoolean
        assert(dut.io.state.toInt == modelState)
        assert(dut.io.flag.toBoolean == modelFlag)

        //Update the reference model value
        if(dut.io.cond0.toBoolean) {
          modelState = (modelState + 1) & 0xFF
        }
      }
    }
  }
}
demo2(支持reset信号异步复位,低电平有效)
最后生成的波形文件是test.fst,gtkwave也是也可以打开的!
Config.scala
package projectname

import spinal.core._
import spinal.core.sim._

object Config {
  def spinal = SpinalConfig(
//    targetDirectory = "hw/gen",
    defaultConfigForClockDomains = ClockDomainConfig(
//      resetActiveLevel = HIGH
      //异步复位
      clockEdge = RISING,
      resetKind = ASYNC,
      resetActiveLevel = LOW
    ),
    onlyStdLogicVectorAtTopLevelIo = true
  )

  def sim = SimConfig.withConfig(spinal).withFstWave
}
MyTopLevel.scala
package projectname

import spinal.core._

// Hardware definition
case class MyTopLevel() extends Component {
  val io = new Bundle {
    val cond0 = in  Bool()
    val cond1 = in  Bool()
    val flag  = out Bool()
    val state = out UInt(8 bits)
  }

  val counter = Reg(UInt(8 bits)) init 0

  when(io.cond0) {
    counter := counter + 1
  }

  io.state := counter
  io.flag := (counter === 0) | io.cond1
}

//main函数就在App这个类中!
object MyTopLevelVerilog extends App {
  Config.spinal.generateVerilog(MyTopLevel())
}

//object MyTopLevelVhdl extends App {
//  Config.spinal.generateVhdl(MyTopLevel())
//}
生成的Verilog代码如下:
// Generator : SpinalHDL v1.6.0    git head : 73c8d8e2b86b45646e9d0b2e729291f2b65e6be3
// Component : MyTopLevel


module MyTopLevel (
  input               io_cond0,
  input               io_cond1,
  output              io_flag,
  output     [7:0]    io_state,
  input               clk,
  input               resetn
);
  reg        [7:0]    counter;

  assign io_state = counter;
  assign io_flag = ((counter == 8'h0) || io_cond1);
  always @(posedge clk or negedge resetn) begin
    if(!resetn) begin
      counter <= 8'h0;
    end else begin
      if(io_cond0) begin
        counter <= (counter + 8'h01);
      end
    end
  end


endmodule
MyTopLevelSim.scala
package projectname

import spinal.core._
import spinal.core.sim._

object MyTopLevelSim extends App {
  Config.sim.compile(MyTopLevel()).doSim { dut =>
    // Fork a process to generate the reset and the clock on the dut
    dut.clockDomain.forkStimulus(period = 10)

    var modelState = 0
    for (idx <- 0 to 99) {
      // Drive the dut inputs with random values
      dut.io.cond0.randomize()
      dut.io.cond1.randomize()

      // Wait a rising edge on the clock
      dut.clockDomain.waitRisingEdge()

      // Check that the dut values match with the reference model ones
      val modelFlag = modelState == 0 || dut.io.cond1.toBoolean
      assert(dut.io.state.toInt == modelState)
      assert(dut.io.flag.toBoolean == modelFlag)

      // Update the reference model value
      if (dut.io.cond0.toBoolean) {
        modelState = (modelState + 1) & 0xff
      }
    }
  }
}
demo3(一个文件,支持异步复位)【个人常用这个】
package test

import spinal.core._
import spinal.lib._


case class MyTopLevel() extends Component {
  val io = new Bundle {
    val cond0 = in  Bool()
    val cond1 = in  Bool()
    val flag  = out Bool()
    val state = out UInt(8 bits)
  }
  val counter = Reg(UInt(8 bits)) init(0)

  when(io.cond0){
    counter := counter + 1
  }

  io.state := counter
  io.flag  := (counter === 0) | io.cond1
}


object MyTopLevelApp extends App{
  SpinalConfig(
  	//异步复位
    defaultConfigForClockDomains = ClockDomainConfig(
      clockEdge = RISING,
      resetKind = ASYNC,
      resetActiveLevel = LOW
    ),
    //defaultClockDomainFrequency = FixedFrequency(100 MHz),
    targetDirectory = "rtl" //生成的Verilog放到rtl目录下
  ).generateVerilog(MyTopLevel()).printPruned() //generateSystemVerilog也是可以的
}
Scala 基础
饱和运算
- 关于饱和运算详细介绍参考:https://zh.wikipedia.org/wiki/%E9%A5%B1%E5%92%8C%E8%BF%90%E7%AE%97
- 一句话解释就是:即当运算结果大于某上限或小于某下限时,其运算结果为该上限或下限的一种运算方式。比方说,当运算范围为 [0,255] 时:100+200的结果为255,而非300。
《SpinalHDL_docs》P53
x +| y 饱和加法运算 T(max(w(x), w(y)) bits)
x -| y 饱和减法运算 T(max(w(x), w(y)) bits)
val e = a +| U"8’x20"
assert(e === U"8’xff") //结果是最大值255.


 569
569

 被折叠的 条评论
为什么被折叠?
被折叠的 条评论
为什么被折叠?
 到【灌水乐园】发言


