


 本文介绍了如何通过board.h文件启用和配置微控制器的外设,如UART和I2C。首先,根据串口号定义相应宏如BSP_USING_UART1,然后指定串口的TX和RX引脚,如PA9和PA10。若需使用UART DMA,还需在RT-Thread设置中开启。对于I2C,需打开I2C驱动支持,并定义I2C总线及引脚信息。
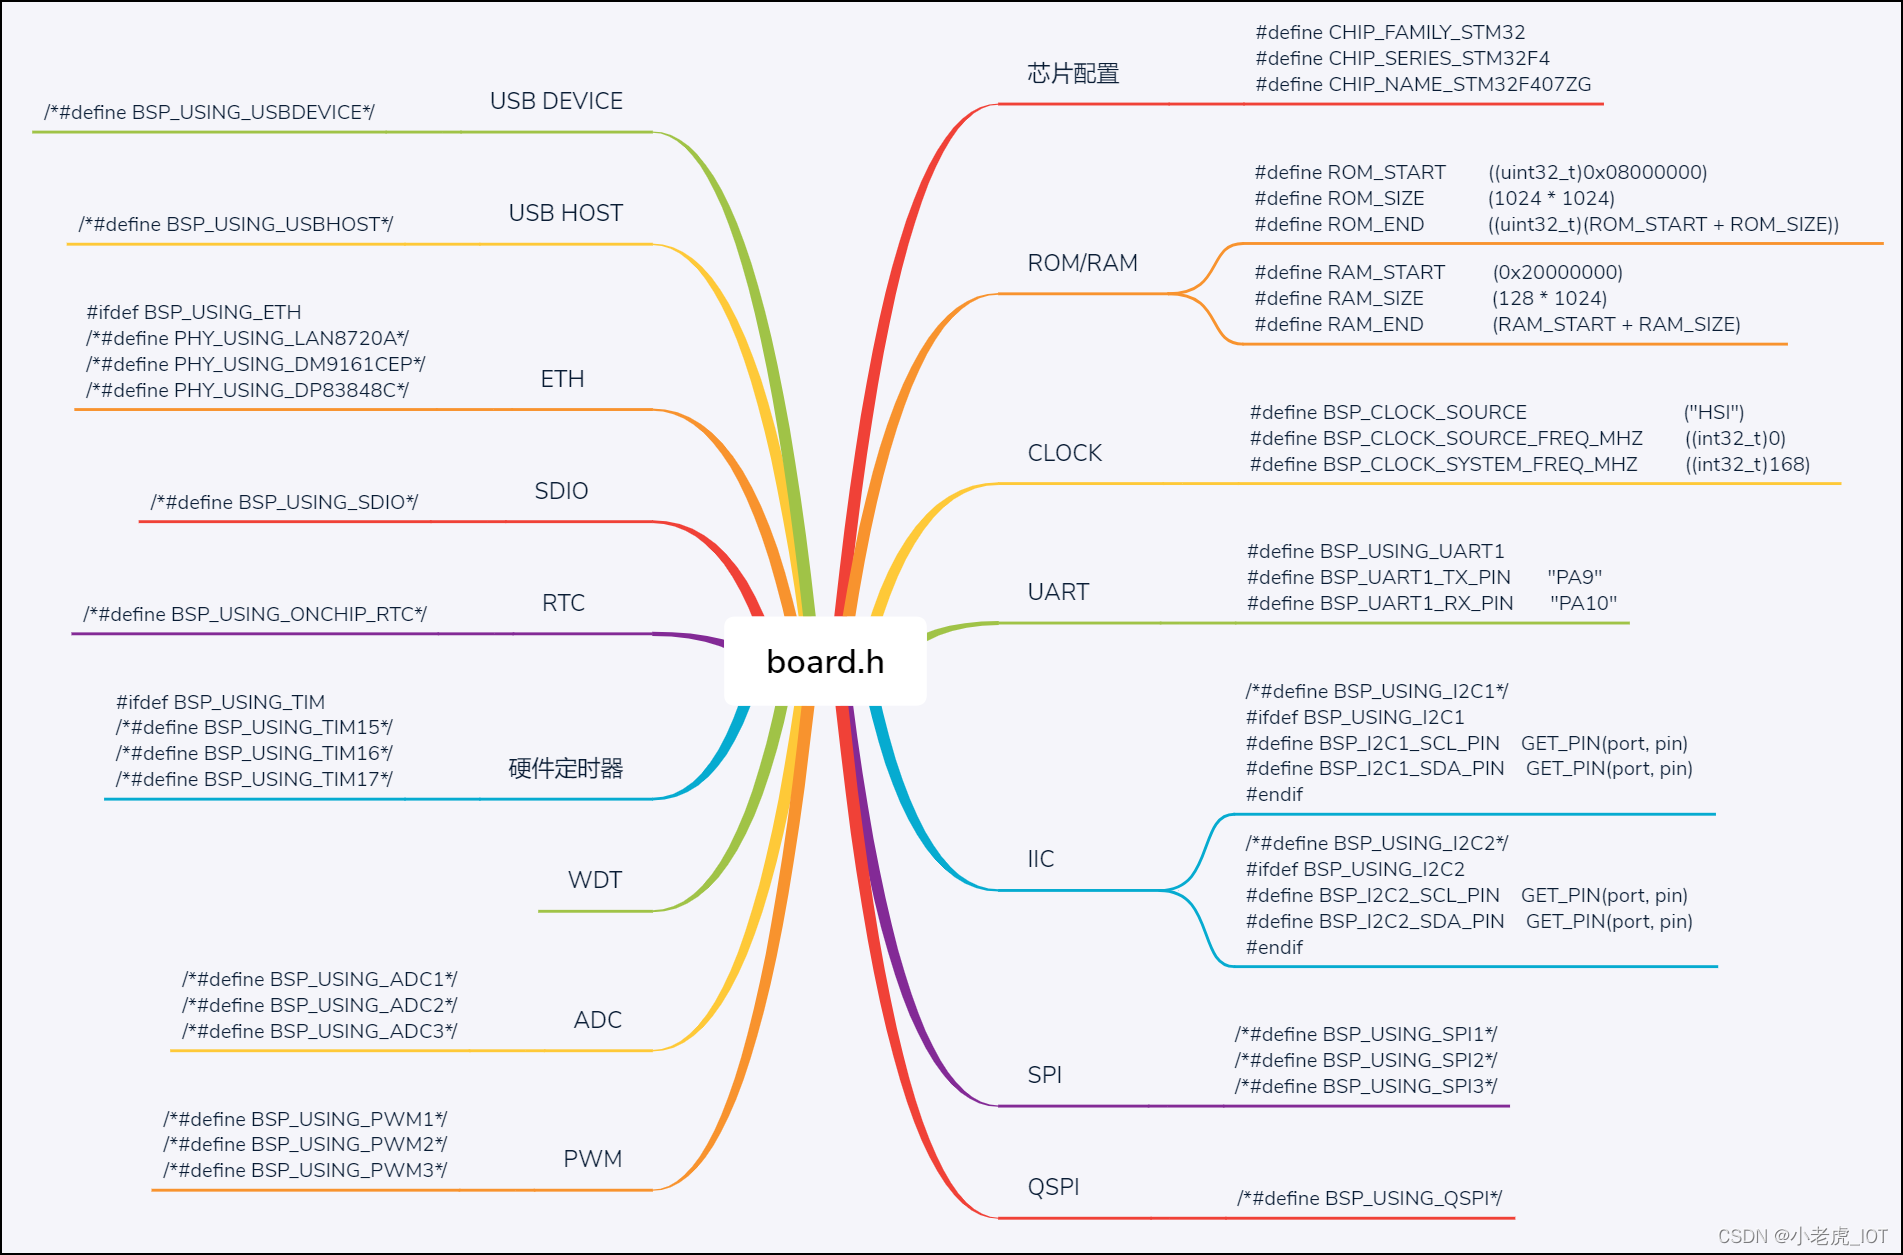
1、board.h的宏
想要使用某个外设,就可以去board.h里开启对应的宏。
下面是board.h里涵盖的宏的思维导图,一目了然。
2、配置
开启宏并不是唯一的步骤,在注释里还有详细的操作步骤说明,这里截取两个。
/*-------------------------- UART CONFIG BEGIN --------------------------*/

/** After configuring corresponding UART or UART DMA, you can use it.
 *
 * STEP 1, define macro define related to the serial port opening based on the serial port number
 *                 such as     #define BSP_USING_UART1
 *
 * STEP 2, according to the corresponding pin of serial port, define the related serial port information macro
 *                 such as     #define BSP_UART1_TX_PIN       "PA9"
 *                             #define BSP_UART1_RX_PIN       "PA10"
 *
 * STEP 3, if you want using SERIAL DMA, you must open it in the RT-Thread Settings.
 *                 RT-Thread Setting -> Components -> Device Drivers -> Serial Device Drivers -> Enable Serial DMA Mode
 *
 * STEP 4, according to serial port number to define serial port tx/rx DMA function in the board.h file
 *                 such as     #define BSP_UART1_RX_USING_DMA
 *
 */

#define BSP_USING_UART1
#define BSP_UART1_TX_PIN       "PA9"
#define BSP_UART1_RX_PIN       "PA10"

/*-------------------------- UART CONFIG END --------------------------*/
/*-------------------------- I2C CONFIG BEGIN --------------------------*/

/** if you want to use i2c bus(soft simulate) you can use the following instructions.
 *
 * STEP 1, open i2c driver framework(soft simulate) support in the RT-Thread Settings file
 *
 * STEP 2, define macro related to the i2c bus
 *                 such as     #define BSP_USING_I2C1
 *
 * STEP 3, according to the corresponding pin of i2c port, modify the related i2c port and pin information
 *                 such as     #define BSP_I2C1_SCL_PIN    GET_PIN(port, pin)   ->   GET_PIN(C, 11)
 *                             #define BSP_I2C1_SDA_PIN    GET_PIN(port, pin)   ->   GET_PIN(C, 12)
 */

/*#define BSP_USING_I2C1*/
#ifdef BSP_USING_I2C1
#define BSP_I2C1_SCL_PIN    GET_PIN(port, pin)
#define BSP_I2C1_SDA_PIN    GET_PIN(port, pin)
#endif

/*#define BSP_USING_I2C2*/
#ifdef BSP_USING_I2C2
#define BSP_I2C2_SCL_PIN    GET_PIN(port, pin)
#define BSP_I2C2_SDA_PIN    GET_PIN(port, pin)
#endif

/*-------------------------- I2C CONFIG END --------------------------*/


 2823
2823

 被折叠的 条评论
为什么被折叠?
被折叠的 条评论
为什么被折叠?
 到【灌水乐园】发言


