


 本文介绍如何使用OpenCV实现图像的仿射变换和旋转,包括如何获取仿射变换矩阵和旋转矩阵,并通过示例代码展示了具体的操作过程。
Goal
在本教程中,您将学习如何:
使用 OpenCV 函数 cv::warpAffine 来实现简单的重新映射例程。
使用OpenCV函数cv::getRotationMatrix2D得到一个2×3的旋转矩阵
Theory
什么是仿射变换?
1. 可以用矩阵乘法(线性变换)后跟向量加法(平移)的形式表示的变换。
2. 综上所述,我们可以使用仿射变换来表达:
旋转(线性变换)
平移(向量加法)
缩放操作(线性变换)
- Rotations (linear transformation)
- Translations (vector addition)
- Scale operations (linear transformation)
您可以看到,本质上,仿射变换表示两个图像之间的关系。
3. 表示仿射变换的常用方法是使用 2×3 矩阵。


考虑到我们想通过使用 A 和 B 来转换 2D 向量 X=[x;y],我们可以这样做:


How do we get an Affine Transformation?
1. 我们提到仿射变换基本上是两个图像之间的关系。 关于这种关系的信息大致可以通过两种方式获得:
a. 我们知道 X 和 T,我们也知道它们是相关的。 那么我们的任务就是找到M
b.我们知道 M 和 X。要获得 T,我们只需要应用 T=M⋅X。 我们对 M 的信息可能是明确的(即具有 2×3 矩阵),也可能是点之间的几何关系。
- We know both X and T and we also know that they are related. Then our task is to find M
- We know M and X. To obtain T we only need to apply T=M⋅X. Our information for M may be explicit (i.e. have the 2-by-3 matrix) or it can come as a geometric relation between points.
2. 让我们以更好的方式解释这一点 (b)。 由于 M 涉及 2 个图像,我们可以分析最简单的情况,即它涉及两个图像中的三个点。 看下图:
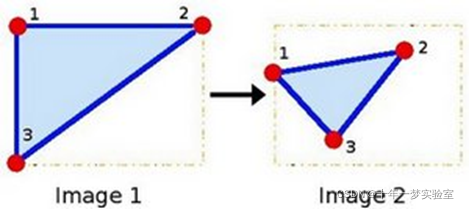
点 1、2 和 3(在图像 1 中形成三角形)被映射到图像 2 中,仍然形成三角形,但现在它们发生了众所周知的变化。 如果我们找到具有这 3 个点的仿射变换(您可以随意选择它们),那么我们可以将这个找到的关系应用于图像中的所有像素。
Code
这个程序有什么作用?
加载图像
对图像应用仿射变换。 该变换是从三点之间的关系中获得的。 为此,我们使用函数 cv::warpAffine。
变换后对图像应用旋转。 这种旋转是相对于图像中心的
等到用户退出程序
本教程的代码如下所示。 你也可以在这里raw.githubusercontent.com 下载
#include "opencv2/imgcodecs.hpp"
#include "opencv2/highgui.hpp"
#include "opencv2/imgproc.hpp"
#include <iostream>
using namespace cv;
using namespace std;
int main( int argc, char** argv )
{
    CommandLineParser parser( argc, argv, "{@input | lena.jpg | input image}" );
    Mat src = imread( samples::findFile( parser.get<String>( "@input" ) ) );
    if( src.empty() )
    {
        cout << "Could not open or find the image!\n" << endl;
        cout << "Usage: " << argv[0] << " <Input image>" << endl;
        return -1;
    }
    Point2f srcTri[3];
    srcTri[0] = Point2f( 0.f, 0.f );
    srcTri[1] = Point2f( src.cols - 1.f, 0.f );
    srcTri[2] = Point2f( 0.f, src.rows - 1.f );
    Point2f dstTri[3];
    dstTri[0] = Point2f( 0.f, src.rows*0.33f );
    dstTri[1] = Point2f( src.cols*0.85f, src.rows*0.25f );
    dstTri[2] = Point2f( src.cols*0.15f, src.rows*0.7f );
    Mat warp_mat = getAffineTransform( srcTri, dstTri );
    Mat warp_dst = Mat::zeros( src.rows, src.cols, src.type() );
    warpAffine( src, warp_dst, warp_mat, warp_dst.size() );
    Point center = Point( warp_dst.cols/2, warp_dst.rows/2 );
    double angle = -50.0;
    double scale = 0.6;
    Mat rot_mat = getRotationMatrix2D( center, angle, scale );
    Mat warp_rotate_dst;
    warpAffine( warp_dst, warp_rotate_dst, rot_mat, warp_dst.size() );
    imshow( "Source image", src );
    imshow( "Warp", warp_dst );
    imshow( "Warp + Rotate", warp_rotate_dst );
    waitKey();
    return 0;
}
Explanation
- 加载图片
CommandLineParser parser( argc, argv, "{@input | lena.jpg | input image}" );
Mat src = imread( samples::findFile( parser.get<String>( "@input" ) ) );
if( src.empty() )
{
cout << "Could not open or find the image!\n" << endl;
cout << "Usage: " << argv[0] << " <Input image>" << endl;
return -1;
}
- Affine Transform: As we explained in lines above, we need two sets of 3 points to derive the affine transform relation. Have a look:
仿射变换:正如我们在上面几行中所解释的,我们需要两组 3 个点来导出仿射变换关系。 看一看:
Point2f srcTri[3];
srcTri[0] = Point2f( 0.f, 0.f );
srcTri[1] = Point2f( src.cols - 1.f, 0.f );
srcTri[2] = Point2f( 0.f, src.rows - 1.f );
Point2f dstTri[3];
dstTri[0] = Point2f( 0.f, src.rows*0.33f );
dstTri[1] = Point2f( src.cols*0.85f, src.rows*0.25f );
dstTri[2] = Point2f( src.cols*0.15f, src.rows*0.7f );
你可能想画出这些点来更好地了解它们是如何变化的。 它们的位置与示例图中(在理论部分)中描述的位置大致相同。 您可能会注意到由 3 个点定义的三角形的大小和方向发生了变化。
- Armed with both sets of points, we calculate the Affine Transform by using OpenCV function cv::getAffineTransform :
有了这两组点,我们使用 OpenCV 函数 cv::getAffineTransform 计算仿射变换:
Mat warp_mat = getAffineTransform( srcTri, dstTri );
我们得到一个 2×3 矩阵作为输出(在本例中为 warp_mat)
- We then apply the Affine Transform just found to the src image
然后我们将刚刚找到的仿射变换应用于 src 图像
Mat warp_dst = Mat::zeros( src.rows, src.cols, src.type() );
warpAffine( src, warp_dst, warp_mat, warp_dst.size() );
具有以下参数:
src:输入图像
warp_dst:输出图像
warp_mat:仿射变换
warp_dst.size():输出图像的所需大小
我们刚刚得到了第一个转换后的图像! 我们将一点一点地显示它。 在此之前,我们还想旋转它...
- Rotate 旋转:要旋转图像,我们需要知道两件事
图像将旋转的中心
要旋转的角度。 在 OpenCV 中,正角是counter-clockwise逆时针的
可选:比例因子
我们使用以下代码段定义这些参数:
Point center = Point( warp_dst.cols/2, warp_dst.rows/2 );
double angle = -50.0;
double scale = 0.6;
我们使用 OpenCV 函数 cv::getRotationMatrix2D 生成旋转矩阵,它返回一个 2×3 矩阵(在本例中为 rot_mat)
Mat rot_mat = getRotationMatrix2D( center, angle, scale );
- 我们现在将找到的旋转应用于我们之前的变换的输出:
Mat warp_rotate_dst;
warpAffine( warp_dst, warp_rotate_dst, rot_mat, warp_dst.size() );
- 最后,我们在两个窗口中显示我们的结果加上原始图像以进行良好的测量:
imshow( "Source image", src );
imshow( "Warp", warp_dst );
imshow( "Warp + Rotate", warp_rotate_dst );
- 我们只需要等到用户退出程序
waitKey();
Result
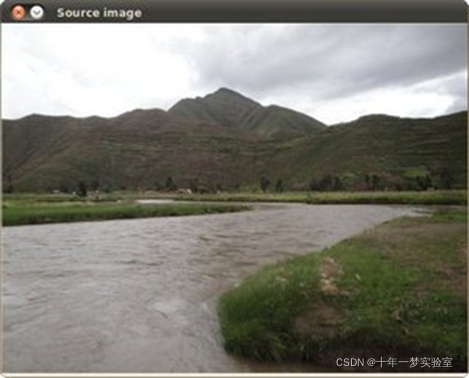
编译上面的代码后,我们可以给它一个图像的路径作为参数。 例如,对于像这样的图片:
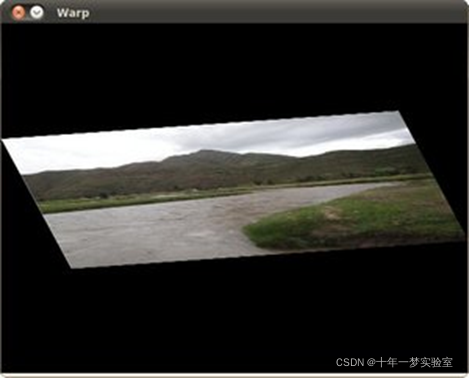
在应用第一个仿射变换后,我们得到:
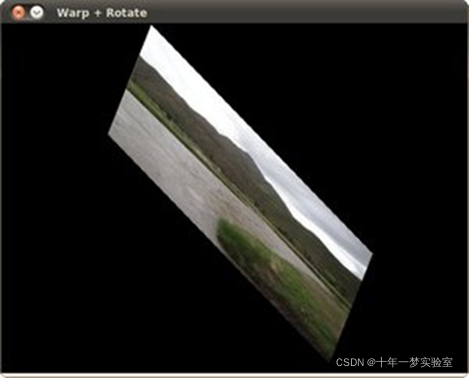
最后,在应用负旋转(记住负表示顺时针)和比例因子后,我们得到:


 628
628

 被折叠的 条评论
为什么被折叠?
被折叠的 条评论
为什么被折叠?
 到【灌水乐园】发言


