配置BGP的基本功能示例

学习精彩网络技术老师:华为HCIA和HCIP数通eNSP实战视频课、华三、锐捷、WLAN、IPv6等全套视频课程

配置BGP的基本功能后可以组建BGP网络。

组网需求

某个地区拥有多个AS,AS之间有相互访问的需求,因此需要AS之间相互交换本AS内部的路由。由于AS内NE数量众多,导致路由数量较大,路由变化频繁,如何高效率的在AS之间传递大量路由,并且不占用大量带宽成为一个难题。为解决上述问题,可以使用BGP协议。

图1所示,DeviceA处于AS65008,DeviceB、DeviceC和DeviceD处于AS65009,并且这几个NE的路由数量都比较大,路由表变化频繁。在这几个NE上部署BGP协议之后,NE之间可以相互传递路由,并且当任何一个NE有路由更新时,只需发送路由更新信息给邻居NE,而无须发送整个路由表,大大节约了网络带宽。
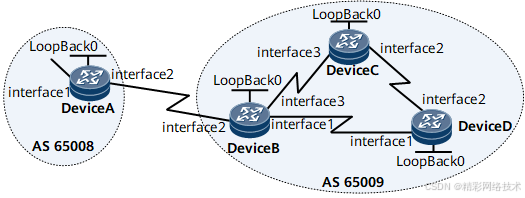
图1 配置BGP基本组网图

本例中interface1,interface2,interface3分别代表GE0/1/0,GE0/2/0,GE0/3/0。

设备名称

接口

IP地址

DeviceA

Loopback 0

1.1.1.1/32

GE 0/1/0

172.16.0.1/16

GE 0/2/0

192.168.0.1/24

DeviceB

Loopback 0

2.2.2.2/32

GE 0/1/0

10.1.1.1/24

GE 0/2/0

192.168.0.2/24

GE 0/3/0

10.1.3.1/24

DeviceC

Loopback 0

3.3.3.3/32

GE 0/2/0

10.1.2.1/24

GE 0/3/0

10.1.3.2/24

DeviceD

Loopback 0

4.4.4.4/32

GE 0/1/0

10.1.1.2/24

GE 0/2/0

10.1.2.2/24

配置注意事项

在配置过程中,需注意以下事项:

建立对等体时,当所指定的对等体的IP地址为Loopback接口地址或子接口的IP地址时,需要在对等体两端同时配置命令peer connect-interface,以保证两端连接的正确性。

EBGP对等体之间不是直连的物理链路时,则必须使用peer ebgp-max-hop命令允许它们之间经过多跳建立TCP连接。

配置思路

采用如下的思路配置BGP的基本功能:

在DeviceB、DeviceC、DeviceD之间配置IBGP连接。

在DeviceA和DeviceB之间配置EBGP连接。

在DeviceA上通过network命令发布路由,查看DeviceA、DeviceB、DeviceC的路由表信息。

在DeviceB上配置BGP引入直连路由,查看DeviceA、DeviceC的路由表信息。

数据准备

为完成此配置例,需准备如下的数据:

DeviceA的Router ID以及所在的AS号。

DeviceB、DeviceC、DeviceD的Router ID以及所在的AS号。

操作步骤
  1. 配置各接口的IP地址,请参见配置文件
  2. 配置OSPF

# 配置DeviceB。

[~DeviceB] ospf 1

[*DeviceB-ospf-1] area 0

[*DeviceB-ospf-1-area-0.0.0.0] network 10.1.1.0 0.0.0.255

[*DeviceB-ospf-1-area-0.0.0.0] network 10.1.3.0 0.0.0.255

[*DeviceB-ospf-1-area-0.0.0.0] network 2.2.2.2 0.0.0.0

[*DeviceB-ospf-1-area-0.0.0.0] commit

[~DeviceB-ospf-1-area-0.0.0.0] quit

[~DeviceB-ospf-1] quit

# 配置DeviceC。

[~DeviceC] ospf 1

[*DeviceC-ospf-1] area 0

[*DeviceC-ospf-1-area-0.0.0.0] network 10.1.2.0 0.0.0.255

[*DeviceC-ospf-1-area-0.0.0.0] network 10.1.3.0 0.0.0.255

[*DeviceC-ospf-1-area-0.0.0.0] network 3.3.3.3 0.0.0.0

[*DeviceC-ospf-1-area-0.0.0.0] commit

[~DeviceC-ospf-1-area-0.0.0.0] quit

[~DeviceC-ospf-1] quit

# 配置DeviceD。

[~DeviceD] ospf 1

[*DeviceD-ospf-1] area 0

[*DeviceD-ospf-1-area-0.0.0.0] network 10.1.1.0 0.0.0.255

[*DeviceD-ospf-1-area-0.0.0.0] network 10.1.2.0 0.0.0.255

[*DeviceD-ospf-1-area-0.0.0.0] network 4.4.4.4 0.0.0.0

[*DeviceD-ospf-1-area-0.0.0.0] commit

[~DeviceD-ospf-1-area-0.0.0.0] quit

[~DeviceD-ospf-1] quit

  1. 配置IBGP连接

# 配置DeviceB。

[~DeviceB] bgp 65009

[*DeviceB-bgp] router-id 2.2.2.2

[*DeviceB-bgp] peer 3.3.3.3 as-number 65009

[*DeviceB-bgp] peer 4.4.4.4 as-number 65009

[*DeviceB-bgp] peer 3.3.3.3 connect-interface LoopBack0

[*DeviceB-bgp] peer 4.4.4.4 connect-interface LoopBack0

[*DeviceB-bgp] commit

[~DeviceB-bgp] quit

# 配置DeviceC。

[~DeviceC] bgp 65009

[*DeviceC-bgp] router-id 3.3.3.3

[*DeviceC-bgp] peer 2.2.2.2 as-number 65009

[*DeviceC-bgp] peer 4.4.4.4 as-number 65009

[*DeviceC-bgp] peer 2.2.2.2 connect-interface LoopBack0

[*DeviceC-bgp] peer 4.4.4.4 connect-interface LoopBack0

[*DeviceC-bgp] commit

[~DeviceC-bgp] quit

# 配置DeviceD。

[~DeviceD] bgp 65009

[*DeviceD-bgp] router-id 4.4.4.4

[*DeviceD-bgp] peer 2.2.2.2 as-number 65009

[*DeviceD-bgp] peer 3.3.3.3 as-number 65009

[*DeviceD-bgp] peer 2.2.2.2 connect-interface LoopBack0

[*DeviceD-bgp] peer 3.3.3.3 connect-interface LoopBack0

[*DeviceD-bgp] commit

[~DeviceD-bgp] quit

  1. 配置EBGP

# 配置DeviceA。

[~DeviceA] bgp 65008

[*DeviceA-bgp] router-id 1.1.1.1

[*DeviceA-bgp] peer 192.168.0.2 as-number 65009

[*DeviceA-bgp] commit

[~DeviceA-bgp] quit

# 配置DeviceB。

[~DeviceB] bgp 65009

[*DeviceB-bgp] peer 192.168.0.1 as-number 65008

[*DeviceB-bgp] commit

[~DeviceB-bgp] quit

# 查看BGP对等体的连接状态。

[~DeviceB] display bgp peer

 BGP local router ID : 2.2.2.2

 Local AS number : 65009

 Total number of peers : 3                 Peers in established state : 3

  Peer            V    AS  MsgRcvd  MsgSent  OutQ  Up/Down       State PrefRcv

  3.3.3.3         4 65009        5        5     0 00:44:58 Established       0

  4.4.4.4         4 65009        4        4     0 00:40:54 Established       0

  192.168.0.1     4 65008        3        3     0 00:44:03 Established       0

可以看出,DeviceB到其他NE的BGP连接均已建立(连接状态为“Established”)。

  1. 配置DeviceA发布路由172.16.0.0/16

# 配置DeviceA发布路由。

[~DeviceA] bgp 65008

[*DeviceA-bgp] ipv4-family unicast

[*DeviceA-bgp-af-ipv4] network 172.16.0.0 255.255.0.0

[*DeviceA-bgp-af-ipv4] commit

[~DeviceA-bgp-af-ipv4] quit

[~DeviceA-bgp] quit

# 查看DeviceA路由表信息。

[~DeviceA] display bgp routing-table

 BGP Local router ID is 1.1.1.1

 Status codes: * - valid, > - best, d - damped, x - best external, a - add path,

               h - history,  i - internal, s - suppressed, S - Stale

               Origin : i - IGP, e - EGP, ? - incomplete

 RPKI validation codes: V - valid, I - invalid, N - not-found

 Total Number of Routes: 1

      Network            NextHop        MED        LocPrf    PrefVal Path/Ogn

 *>   172.16.0.0          0.0.0.0         0                     0      i

# 显示DeviceB的路由表。

[~DeviceB] display bgp routing-table

 BGP Local router ID is 2.2.2.2

 Status codes: * - valid, > - best, d - damped, x - best external, a - add path,

               h - history,  i - internal, s - suppressed, S - Stale

               Origin : i - IGP, e - EGP, ? - incomplete

 RPKI validation codes: V - valid, I - invalid, N - not-found

 Total Number of Routes: 1

      Network            NextHop        MED        LocPrf    PrefVal Path/Ogn

 *>   172.16.0.0          192.168.0.1    0                     0      65008i

# 显示DeviceC的路由表。

[~DeviceC] display bgp routing-table

 BGP Local router ID is 3.3.3.3

 Status codes: * - valid, > - best, d - damped, x - best external, a - add path,

               h - history,  i - internal, s - suppressed, S - Stale

               Origin : i - IGP, e - EGP, ? - incomplete

 RPKI validation codes: V - valid, I - invalid, N - not-found

 Total Number of Routes: 1

      Network            NextHop        MED        LocPrf    PrefVal Path/Ogn

   i  172.16.0.0          192.168.0.1    0          100        0      65008i

从路由表可以看出,DeviceC虽然学到了AS65008中的172.16.0.0的路由,但因为下一跳192.168.0.1不可达,所以也不是有效路由。

  1. 配置BGP引入直连路由

# 配置DeviceB。

[~DeviceB] bgp 65009

[*DeviceB-bgp] ipv4-family unicast

[*DeviceB-bgp-af-ipv4] import-route direct

[*DeviceB-bgp-af-ipv4] commit

[~DeviceB-bgp-af-ipv4] quit

[~DeviceB-bgp] quit

# 显示DeviceA的BGP路由表。

[~DeviceA] display bgp routing-table

 BGP Local router ID is 1.1.1.1

 Status codes: * - valid, > - best, d - damped, x - best external, a - add path,

               h - history,  i - internal, s - suppressed, S - Stale

               Origin : i - IGP, e - EGP, ? - incomplete RPKI validation codes: V - valid, I - invalid, N - not-found

 Total Number of Routes: 8

      Network            NextHop        MED        LocPrf    PrefVal Path/Ogn

 *>   2.2.2.2/32         192.168.0.2     0                     0      65009?

 *>   172.16.0.0          0.0.0.0         0                     0      i

 *>   10.1.1.0/24        192.168.0.2     0                     0      65009?

 *>   10.1.1.2/32        192.168.0.2     0                     0      65009?

 *>   10.1.3.0/24        192.168.0.2     0                     0      65009?

 *>   10.1.3.2/32        192.168.0.2     0                     0      65009?

 *    192.168.0.0        192.168.0.2     0                     0      65009?

 *    192.168.0.1/32     192.168.0.2     0                     0      65009?

# 显示DeviceC的路由表。

[~DeviceC] display bgp routing-table

 BGP Local router ID is 3.3.3.3

 Status codes: * - valid, > - best, d - damped, x - best external, a - add path,

               h - history,  i - internal, s - suppressed, S - Stale

               Origin : i - IGP, e - EGP, ? - incomplete RPKI validation codes: V - valid, I - invalid, N - not-found

 Total Number of Routes: 8

      Network            NextHop        MED        LocPrf    PrefVal Path/Ogn

   i  2.2.2.2/32         2.2.2.2         0          100        0      ?

 *>i  172.16.0.0          192.168.0.1     0          100        0      65008i

 *>i  10.1.1.0/24        2.2.2.2         0          100        0      ?

 *>i  10.1.1.2/32        2.2.2.2         0          100        0      ?

 * i  10.1.3.0/24        2.2.2.2         0          100        0      ?

 * i  10.1.3.2/32        2.2.2.2         0          100        0      ?

 *>i  192.168.0.0        2.2.2.2         0          100        0      ?

 *>i  192.168.0.1/32     2.2.2.2         0          100        0      ?

可以看出,到172.16.0.0的路由变为有效路由,下一跳为DeviceA的地址。

# 使用Ping进行验证。

[~DeviceC] ping 172.16.0.1

  PING 172.16.0.1: 56  data bytes, press CTRL_C to break

    Reply from 172.16.0.1: bytes=56 Sequence=1 ttl=254 time=31 ms

    Reply from 172.16.0.1: bytes=56 Sequence=2 ttl=254 time=47 ms

    Reply from 172.16.0.1: bytes=56 Sequence=3 ttl=254 time=31 ms

    Reply from 172.16.0.1: bytes=56 Sequence=4 ttl=254 time=16 ms

    Reply from 172.16.0.1: bytes=56 Sequence=5 ttl=254 time=31 ms

  --- 172.16.0.1 ping statistics ---

    5 packet(s) transmitted

    5 packet(s) received

    0.00% packet loss

    round-trip min/avg/max = 16/31/47 ms

配置文件

DeviceA的配置文件

#

sysname DeviceA

#

interface GigabitEthernet0/1/0

 undo shutdown

 ip address 172.16.0.1 255.255.0.0

#

interface GigabitEthernet0/2/0

 undo shutdown

 ip address 192.168.0.1 255.255.255.0

#

interface LoopBack0

 ip address 1.1.1.1 255.255.255.255

#

bgp 65008

 router-id 1.1.1.1

 peer 192.168.0.2 as-number 65009

 #

 ipv4-family unicast

  undo synchronization

  network 172.16.0.0 255.255.0.0

  peer 192.168.0.2 enable

#

return

DeviceB的配置文件

sysname DeviceB

#

interface GigabitEthernet0/1/0

 undo shutdown

 ip address 10.1.1.1 255.255.255.0

#

interface GigabitEthernet0/2/0

 undo shutdown

 ip address 192.168.0.2 255.255.255.0

#

interface GigabitEthernet0/3/0

 undo shutdown

 ip address 10.1.3.1 255.255.255.0

#

interface LoopBack0

 ip address 2.2.2.2 255.255.255.255

#

bgp 65009

 router-id 2.2.2.2

 peer 3.3.3.3 as-number 65009

 peer 3.3.3.3 connect-interface LoopBack0

 peer 4.4.4.4 as-number 65009

 peer 4.4.4.4 connect-interface LoopBack0

 peer 192.168.0.1 as-number 65008

#

 ipv4-family unicast

  undo synchronization

  import-route direct

  peer 3.3.3.3 enable

  peer 4.4.4.4 enable

  peer 192.168.0.1 enable

#

ospf 1

 area 0.0.0.0

  network 2.2.2.2 0.0.0.0

  network 10.1.1.0 0.0.0.255

  network 10.1.3.0 0.0.0.255

#

return

DeviceC的配置文件

#

sysname DeviceC

#

interface GigabitEthernet0/2/0

 undo shutdown

 ip address 10.1.2.1 255.255.255.0

#

interface GigabitEthernet0/3/0

 undo shutdown

 ip address 10.1.3.2 255.255.255.0

#

interface LoopBack0

 ip address 3.3.3.3 255.255.255.255

#

bgp 65009

 router-id 3.3.3.3

 peer 2.2.2.2. as-number 65009

 peer 2.2.2.2 connect-interface LoopBack0

 peer 4.4.4.4 as-number 65009

 peer 4.4.4.4 connect-interface LoopBack0

 #

 ipv4-family unicast

  undo synchronization

  peer 2.2.2.2 enable

  peer 4.4.4.4 enable

#

ospf 1

 area 0.0.0.0

  network 3.3.3.3 0.0.0.0

  network 10.1.2.0 0.0.0.255

  network 10.1.3.0 0.0.0.255

#

return

DeviceD的配置文件

#

sysname DeviceD

#

interface GigabitEthernet0/1/0

 undo shutdown

 ip address 10.1.1.2 255.255.255.0

#

interface GigabitEthernet0/2/0

 undo shutdown

 ip address 10.1.2.2 255.255.255.0

#

interface LoopBack0

 ip address 4.4.4.4 255.255.255.255

#

bgp 65009

 router-id 4.4.4.4

 peer 2.2.2.2 as-number 65009

 peer 2.2.2.2 connect-interface LoopBack0

 peer 3.3.3.3 as-number 65009

 peer 3.3.3.3 connect-interface LoopBack0

 #

 ipv4-family unicast

  undo synchronization

  peer 2.2.2.2 enable

  peer 3.3.3.3 enable

#

ospf 1

 area 0.0.0.0

  network 4.4.4.4 0.0.0.0

  network 10.1.1.0 0.0.0.255

  network 10.1.2.0 0.0.0.255

#

return

评论
添加红包

请填写红包祝福语或标题

红包个数最小为10个

红包金额最低5元

当前余额3.43前往充值 >
需支付:10.00
成就一亿技术人!
领取后你会自动成为博主和红包主的粉丝 规则
hope_wisdom
发出的红包

打赏作者

精彩网络技术

你的鼓励将是我创作的最大动力

¥1 ¥2 ¥4 ¥6 ¥10 ¥20
扫码支付:¥1
获取中
扫码支付

您的余额不足,请更换扫码支付或充值

打赏作者

实付
使用余额支付
点击重新获取
扫码支付
钱包余额 0

抵扣说明:

1.余额是钱包充值的虚拟货币,按照1:1的比例进行支付金额的抵扣。
2.余额无法直接购买下载,可以购买VIP、付费专栏及课程。

余额充值