


Configuration with Intel Realsense D555 Camera
Hardware Requirements
- Robot Arm: UFACTORY 850, xArm 5/6/7 Series
- Gripper: UFACTORY xArm Gripper G1/G2
- Camera: Intel RealSense D555
- PoE Injector: Tenda POE30G-AT, 1000M, 30W (Other brands will also work)
- Camera Mount: Provided by UFACTORY (3D printing or CNC with 3D file)
- 3D File Download: D555_Camera_Stand.STEP
850 User Ethernet Port
The standard 850 robotic arm is internally equipped with a 100M Ethernet cable compliant with standard CAT5, connecting from the base to the end of the arm. This Ethernet port can be used if internal wiring is required.
For D555 camera testing, it is recommended to use a customized version of the 850, which features an internal 1000M Ethernet cable to ensure stable camera data transmission.
If you require the customized version of the 850 or an M8 aviation connector-to-Ethernet port adapter cable, please contact technical support at support@ufactory.cc.
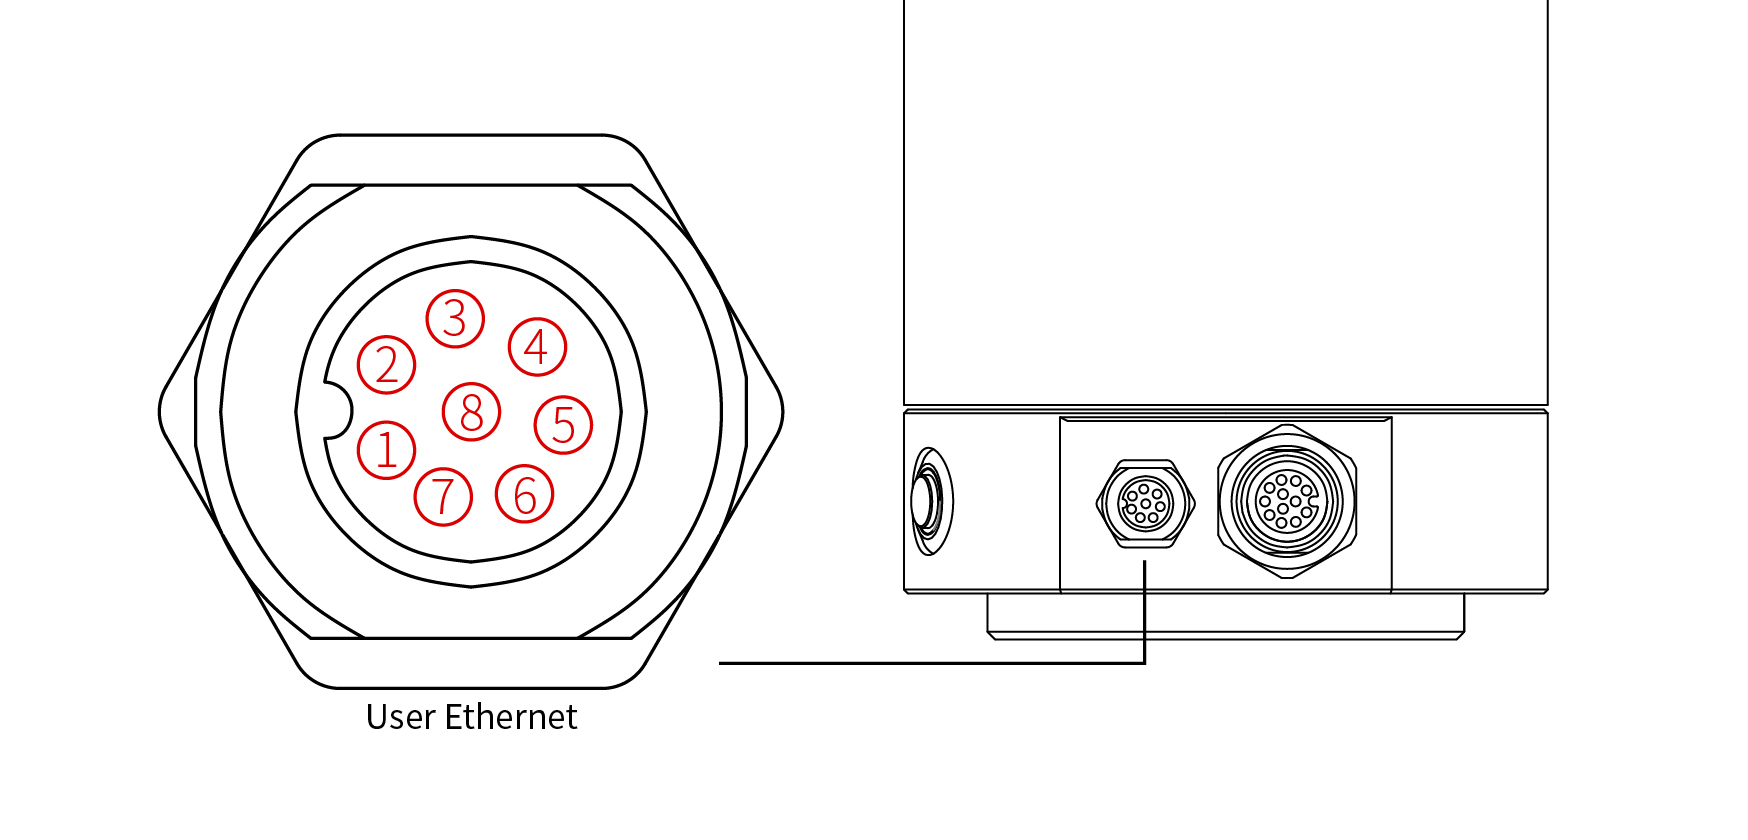
Customized 850 (1000Mbps) User Ethernet Port Definition:
| PIN | Signal |
|---|---|
| 1 | MX2-/DC- |
| 2 | MX3+/DD+ |
| 3 | MX3-/DD- |
| 4 | MX0-/DA- |
| 5 | MX1+/DB+ |
| 6 | MX0+/DA+ |
| 7 | MX0+/DC+ |
| 8 | MX1-/DB- |
Software
Supported Python Versions
Supported Python versions: 3.8-3.11 (Recommended: 3.11).
Installation
1. Clone the Repository
git clone https://github.com/xArm-Developer/ufactory_vision.git
cd ufactory_vision
2. Create a Python Virtual Environment
It is recommended to use a virtual environment for running this project.
Windows (Using Anaconda)
conda create --name ufactory_vision python=3.11
conda activate ufactory_vision
Linux (Using venv)
python3.11 -m venv ufactory_vision
source ufactory_vision/bin/activate
3. Install Dependencies and Run Examples
Please follow the corresponding installation and execution steps based on the camera model you are using.
First, ensure you are in the realsense_d555 directory:
cd ggcnn_grasping_demo/example/realsense_d555
3.1 Install Dependencies
pip install -r requirements_rs.txt
3.2 Run Example
Replace 192.168.1.xxx with the actual IP address of your robot arm controller.
- UFACTORY 850 or xArm 5/6/7 Series Robot Arm
python run_rs_d555_grasp.py 192.168.1.xxx
Note: Although the D555 is technically compatible with the Lite6, its weight(D555+vacuum gripper Lite) exceeds the Lite6’s payload capacity and therefore is not recommended for use.
Important Notes
- TCP/Coordinate Offset: Do not set TCP offset or coordinate offset, otherwise you may need to fine-tune the code.
- TCP Payload: Set TCP payload to avoid false collision detection.
- Collision Detection: Before running the example, ensure that collision detection is enabled. It is recommended to set the collision sensitivity to 3 or higher.


 1055
1055

 被折叠的 条评论
为什么被折叠?
被折叠的 条评论
为什么被折叠?
 到【灌水乐园】发言


