我想在UR5e上面复现github上的这个代码,但我不知道怎么开始。包括配置中控之类的,请你把我当成一个小白来详细教我。# Diffusion Policy
[[Project page]](https://diffusion-policy.cs.columbia.edu/)
[[Paper]](https://diffusion-policy.cs.columbia.edu/#paper)
[[Data]](https://diffusion-policy.cs.columbia.edu/data/)
[[Colab (state)]](https://colab.research.google.com/drive/1gxdkgRVfM55zihY9TFLja97cSVZOZq2B?usp=sharing)
[[Colab (vision)]](https://colab.research.google.com/drive/18GIHeOQ5DyjMN8iIRZL2EKZ0745NLIpg?usp=sharing)
[Cheng Chi](http://cheng-chi.github.io/)<sup>1</sup>,
[Siyuan Feng](https://www.cs.cmu.edu/~sfeng/)<sup>2</sup>,
[Yilun Du](https://yilundu.github.io/)<sup>3</sup>,
[Zhenjia Xu](https://www.zhenjiaxu.com/)<sup>1</sup>,
[Eric Cousineau](https://www.eacousineau.com/)<sup>2</sup>,
[Benjamin Burchfiel](http://www.benburchfiel.com/)<sup>2</sup>,
[Shuran Song](https://www.cs.columbia.edu/~shurans/)<sup>1</sup>
<sup>1</sup>Columbia University,
<sup>2</sup>Toyota Research Institute,
<sup>3</sup>MIT
<img src="media/teaser.png" alt="drawing" width="100%"/>
<img src="media/multimodal_sim.png" alt="drawing" width="100%"/>
## 🛝 Try it out!
Our self-contained Google Colab notebooks is the easiest way to play with Diffusion Policy. We provide separate notebooks for [state-based environment](https://colab.research.google.com/drive/1gxdkgRVfM55zihY9TFLja97cSVZOZq2B?usp=sharing) and [vision-based environment](https://colab.research.google.com/drive/18GIHeOQ5DyjMN8iIRZL2EKZ0745NLIpg?usp=sharing).
## 🧾 Checkout our experiment logs!
For each experiment used to generate Table I,II and IV in the [paper](https://diffusion-policy.cs.columbia.edu/#paper), we provide:
1. A `config.yaml` that contains all parameters needed to reproduce the experiment.
2. Detailed training/eval `logs.json.txt` for every training step.
3. Checkpoints for the best `epoch=*-test_mean_score=*.ckpt` and last `latest.ckpt` epoch of each run.
Experiment logs are hosted on our website as nested directories in format:
`https://diffusion-policy.cs.columbia.edu/data/experiments/<image|low_dim>/<task>/<method>/`
Within each experiment directory you may find:
```
.
├── config.yaml
├── metrics
│ └── logs.json.txt
├── train_0
│ ├── checkpoints
│ │ ├── epoch=0300-test_mean_score=1.000.ckpt
│ │ └── latest.ckpt
│ └── logs.json.txt
├── train_1
│ ├── checkpoints
│ │ ├── epoch=0250-test_mean_score=1.000.ckpt
│ │ └── latest.ckpt
│ └── logs.json.txt
└── train_2
├── checkpoints
│ ├── epoch=0250-test_mean_score=1.000.ckpt
│ └── latest.ckpt
└── logs.json.txt
```
The `metrics/logs.json.txt` file aggregates evaluation metrics from all 3 training runs every 50 epochs using `multirun_metrics.py`. The numbers reported in the paper correspond to `max` and `k_min_train_loss` aggregation keys.
To download all files in a subdirectory, use:
```console
$ wget --recursive --no-parent --no-host-directories --relative --reject="index.html*" https://diffusion-policy.cs.columbia.edu/data/experiments/low_dim/square_ph/diffusion_policy_cnn/
```
## 🛠️ Installation
### 🖥️ Simulation
To reproduce our simulation benchmark results, install our conda environment on a Linux machine with Nvidia GPU. On Ubuntu 20.04 you need to install the following apt packages for mujoco:
```console
$ sudo apt install -y libosmesa6-dev libgl1-mesa-glx libglfw3 patchelf
```
We recommend [Mambaforge](https://github.com/conda-forge/miniforge#mambaforge) instead of the standard anaconda distribution for faster installation:
```console
$ mamba env create -f conda_environment.yaml
```
but you can use conda as well:
```console
$ conda env create -f conda_environment.yaml
```
The `conda_environment_macos.yaml` file is only for development on MacOS and does not have full support for benchmarks.
### 🦾 Real Robot
Hardware (for Push-T):
* 1x [UR5-CB3](https://www.universal-robots.com/cb3) or [UR5e](https://www.universal-robots.com/products/ur5-robot/) ([RTDE Interface](https://www.universal-robots.com/articles/ur/interface-communication/real-time-data-exchange-rtde-guide/) is required)
* 2x [RealSense D415](https://www.intelrealsense.com/depth-camera-d415/)
* 1x [3Dconnexion SpaceMouse](https://3dconnexion.com/us/product/spacemouse-wireless/) (for teleop)
* 1x [Millibar Robotics Manual Tool Changer](https://www.millibar.com/manual-tool-changer/) (only need robot side)
* 1x 3D printed [End effector](https://cad.onshape.com/documents/a818888644a15afa6cc68ee5/w/2885b48b018cda84f425beca/e/3e8771c2124cee024edd2fed?renderMode=0&uiState=63ffcba6631ca919895e64e5)
* 1x 3D printed [T-block](https://cad.onshape.com/documents/f1140134e38f6ed6902648d5/w/a78cf81827600e4ff4058d03/e/f35f57fb7589f72e05c76caf?renderMode=0&uiState=63ffcbc9af4a881b344898ee)
* USB-C cables and screws for RealSense
Software:
* Ubuntu 20.04.3 (tested)
* Mujoco dependencies:
`sudo apt install libosmesa6-dev libgl1-mesa-glx libglfw3 patchelf`
* [RealSense SDK](https://github.com/IntelRealSense/librealsense/blob/master/doc/distribution_linux.md)
* Spacemouse dependencies:
`sudo apt install libspnav-dev spacenavd; sudo systemctl start spacenavd`
* Conda environment `mamba env create -f conda_environment_real.yaml`
## 🖥️ Reproducing Simulation Benchmark Results
### Download Training Data
Under the repo root, create data subdirectory:
```console
[diffusion_policy]$ mkdir data && cd data
```
Download the corresponding zip file from [https://diffusion-policy.cs.columbia.edu/data/training/](https://diffusion-policy.cs.columbia.edu/data/training/)
```console
[data]$ wget https://diffusion-policy.cs.columbia.edu/data/training/pusht.zip
```
Extract training data:
```console
[data]$ unzip pusht.zip && rm -f pusht.zip && cd ..
```
Grab config file for the corresponding experiment:
```console
[diffusion_policy]$ wget -O image_pusht_diffusion_policy_cnn.yaml https://diffusion-policy.cs.columbia.edu/data/experiments/image/pusht/diffusion_policy_cnn/config.yaml
```
### Running for a single seed
Activate conda environment and login to [wandb](https://wandb.ai) (if you haven't already).
```console
[diffusion_policy]$ conda activate robodiff
(robodiff)[diffusion_policy]$ wandb login
```
Launch training with seed 42 on GPU 0.
```console
(robodiff)[diffusion_policy]$ python train.py --config-dir=. --config-name=image_pusht_diffusion_policy_cnn.yaml training.seed=42 training.device=cuda:0 hydra.run.dir='data/outputs/${now:%Y.%m.%d}/${now:%H.%M.%S}_${name}_${task_name}'
```
This will create a directory in format `data/outputs/yyyy.mm.dd/hh.mm.ss_<method_name>_<task_name>` where configs, logs and checkpoints are written to. The policy will be evaluated every 50 epochs with the success rate logged as `test/mean_score` on wandb, as well as videos for some rollouts.
```console
(robodiff)[diffusion_policy]$ tree data/outputs/2023.03.01/20.02.03_train_diffusion_unet_hybrid_pusht_image -I wandb
data/outputs/2023.03.01/20.02.03_train_diffusion_unet_hybrid_pusht_image
├── checkpoints
│ ├── epoch=0000-test_mean_score=0.134.ckpt
│ └── latest.ckpt
├── .hydra
│ ├── config.yaml
│ ├── hydra.yaml
│ └── overrides.yaml
├── logs.json.txt
├── media
│ ├── 2k5u6wli.mp4
│ ├── 2kvovxms.mp4
│ ├── 2pxd9f6b.mp4
│ ├── 2q5gjt5f.mp4
│ ├── 2sawbf6m.mp4
│ └── 538ubl79.mp4
└── train.log
3 directories, 13 files
```
### Running for multiple seeds
Launch local ray cluster. For large scale experiments, you might want to setup an [AWS cluster with autoscaling](https://docs.ray.io/en/master/cluster/vms/user-guides/launching-clusters/aws.html). All other commands remain the same.
```console
(robodiff)[diffusion_policy]$ export CUDA_VISIBLE_DEVICES=0,1,2 # select GPUs to be managed by the ray cluster
(robodiff)[diffusion_policy]$ ray start --head --num-gpus=3
```
Launch a ray client which will start 3 training workers (3 seeds) and 1 metrics monitor worker.
```console
(robodiff)[diffusion_policy]$ python ray_train_multirun.py --config-dir=. --config-name=image_pusht_diffusion_policy_cnn.yaml --seeds=42,43,44 --monitor_key=test/mean_score -- multi_run.run_dir='data/outputs/${now:%Y.%m.%d}/${now:%H.%M.%S}_${name}_${task_name}' multi_run.wandb_name_base='${now:%Y.%m.%d-%H.%M.%S}_${name}_${task_name}'
```
In addition to the wandb log written by each training worker individually, the metrics monitor worker will log to wandb project `diffusion_policy_metrics` for the metrics aggregated from all 3 training runs. Local config, logs and checkpoints will be written to `data/outputs/yyyy.mm.dd/hh.mm.ss_<method_name>_<task_name>` in a directory structure identical to our [training logs](https://diffusion-policy.cs.columbia.edu/data/experiments/):
```console
(robodiff)[diffusion_policy]$ tree data/outputs/2023.03.01/22.13.58_train_diffusion_unet_hybrid_pusht_image -I 'wandb|media'
data/outputs/2023.03.01/22.13.58_train_diffusion_unet_hybrid_pusht_image
├── config.yaml
├── metrics
│ ├── logs.json.txt
│ ├── metrics.json
│ └── metrics.log
├── train_0
│ ├── checkpoints
│ │ ├── epoch=0000-test_mean_score=0.174.ckpt
│ │ └── latest.ckpt
│ ├── logs.json.txt
│ └── train.log
├── train_1
│ ├── checkpoints
│ │ ├── epoch=0000-test_mean_score=0.131.ckpt
│ │ └── latest.ckpt
│ ├── logs.json.txt
│ └── train.log
└── train_2
├── checkpoints
│ ├── epoch=0000-test_mean_score=0.105.ckpt
│ └── latest.ckpt
├── logs.json.txt
└── train.log
7 directories, 16 files
```
### 🆕 Evaluate Pre-trained Checkpoints
Download a checkpoint from the published training log folders, such as [https://diffusion-policy.cs.columbia.edu/data/experiments/low_dim/pusht/diffusion_policy_cnn/train_0/checkpoints/epoch=0550-test_mean_score=0.969.ckpt](https://diffusion-policy.cs.columbia.edu/data/experiments/low_dim/pusht/diffusion_policy_cnn/train_0/checkpoints/epoch=0550-test_mean_score=0.969.ckpt).
Run the evaluation script:
```console
(robodiff)[diffusion_policy]$ python eval.py --checkpoint data/0550-test_mean_score=0.969.ckpt --output_dir data/pusht_eval_output --device cuda:0
```
This will generate the following directory structure:
```console
(robodiff)[diffusion_policy]$ tree data/pusht_eval_output
data/pusht_eval_output
├── eval_log.json
└── media
├── 1fxtno84.mp4
├── 224l7jqd.mp4
├── 2fo4btlf.mp4
├── 2in4cn7a.mp4
├── 34b3o2qq.mp4
└── 3p7jqn32.mp4
1 directory, 7 files
```
`eval_log.json` contains metrics that is logged to wandb during training:
```console
(robodiff)[diffusion_policy]$ cat data/pusht_eval_output/eval_log.json
{
"test/mean_score": 0.9150393806777066,
"test/sim_max_reward_4300000": 1.0,
"test/sim_max_reward_4300001": 0.9872969750774386,
...
"train/sim_video_1": "data/pusht_eval_output//media/2fo4btlf.mp4"
}
```
## 🦾 Demo, Training and Eval on a Real Robot
Make sure your UR5 robot is running and accepting command from its network interface (emergency stop button within reach at all time), your RealSense cameras plugged in to your workstation (tested with `realsense-viewer`) and your SpaceMouse connected with the `spacenavd` daemon running (verify with `systemctl status spacenavd`).
Start the demonstration collection script. Press "C" to start recording. Use SpaceMouse to move the robot. Press "S" to stop recording.
```console
(robodiff)[diffusion_policy]$ python demo_real_robot.py -o data/demo_pusht_real --robot_ip 192.168.0.204
```
This should result in a demonstration dataset in `data/demo_pusht_real` with in the same structure as our example [real Push-T training dataset](https://diffusion-policy.cs.columbia.edu/data/training/pusht_real.zip).
To train a Diffusion Policy, launch training with config:
```console
(robodiff)[diffusion_policy]$ python train.py --config-name=train_diffusion_unet_real_image_workspace task.dataset_path=data/demo_pusht_real
```
Edit [`diffusion_policy/config/task/real_pusht_image.yaml`](./diffusion_policy/config/task/real_pusht_image.yaml) if your camera setup is different.
Assuming the training has finished and you have a checkpoint at `data/outputs/blah/checkpoints/latest.ckpt`, launch the evaluation script with:
```console
python eval_real_robot.py -i data/outputs/blah/checkpoints/latest.ckpt -o data/eval_pusht_real --robot_ip 192.168.0.204
```
Press "C" to start evaluation (handing control over to the policy). Press "S" to stop the current episode.
## 🗺️ Codebase Tutorial
This codebase is structured under the requirement that:
1. implementing `N` tasks and `M` methods will only require `O(N+M)` amount of code instead of `O(N*M)`
2. while retaining maximum flexibility.
To achieve this requirement, we
1. maintained a simple unified interface between tasks and methods and
2. made the implementation of the tasks and the methods independent of each other.
These design decisions come at the cost of code repetition between the tasks and the methods. However, we believe that the benefit of being able to add/modify task/methods without affecting the remainder and being able understand a task/method by reading the code linearly outweighs the cost of copying and pasting 😊.
### The Split
On the task side, we have:
* `Dataset`: adapts a (third-party) dataset to the interface.
* `EnvRunner`: executes a `Policy` that accepts the interface and produce logs and metrics.
* `config/task/<task_name>.yaml`: contains all information needed to construct `Dataset` and `EnvRunner`.
* (optional) `Env`: an `gym==0.21.0` compatible class that encapsulates the task environment.
On the policy side, we have:
* `Policy`: implements inference according to the interface and part of the training process.
* `Workspace`: manages the life-cycle of training and evaluation (interleaved) of a method.
* `config/<workspace_name>.yaml`: contains all information needed to construct `Policy` and `Workspace`.
### The Interface
#### Low Dim
A [`LowdimPolicy`](./diffusion_policy/policy/base_lowdim_policy.py) takes observation dictionary:
- `"obs":` Tensor of shape `(B,To,Do)`
and predicts action dictionary:
- `"action": ` Tensor of shape `(B,Ta,Da)`
A [`LowdimDataset`](./diffusion_policy/dataset/base_dataset.py) returns a sample of dictionary:
- `"obs":` Tensor of shape `(To, Do)`
- `"action":` Tensor of shape `(Ta, Da)`
Its `get_normalizer` method returns a [`LinearNormalizer`](./diffusion_policy/model/common/normalizer.py) with keys `"obs","action"`.
The `Policy` handles normalization on GPU with its copy of the `LinearNormalizer`. The parameters of the `LinearNormalizer` is saved as part of the `Policy`'s weights checkpoint.
#### Image
A [`ImagePolicy`](./diffusion_policy/policy/base_image_policy.py) takes observation dictionary:
- `"key0":` Tensor of shape `(B,To,*)`
- `"key1":` Tensor of shape e.g. `(B,To,H,W,3)` ([0,1] float32)
and predicts action dictionary:
- `"action": ` Tensor of shape `(B,Ta,Da)`
A [`ImageDataset`](./diffusion_policy/dataset/base_dataset.py) returns a sample of dictionary:
- `"obs":` Dict of
- `"key0":` Tensor of shape `(To, *)`
- `"key1":` Tensor fo shape `(To,H,W,3)`
- `"action":` Tensor of shape `(Ta, Da)`
Its `get_normalizer` method returns a [`LinearNormalizer`](./diffusion_policy/model/common/normalizer.py) with keys `"key0","key1","action"`.
#### Example
```
To = 3
Ta = 4
T = 6
|o|o|o|
| | |a|a|a|a|
|o|o|
| |a|a|a|a|a|
| | | | |a|a|
```
Terminology in the paper: `varname` in the codebase
- Observation Horizon: `To|n_obs_steps`
- Action Horizon: `Ta|n_action_steps`
- Prediction Horizon: `T|horizon`
The classical (e.g. MDP) single step observation/action formulation is included as a special case where `To=1` and `Ta=1`.
## 🔩 Key Components
### `Workspace`
A `Workspace` object encapsulates all states and code needed to run an experiment.
* Inherits from [`BaseWorkspace`](./diffusion_policy/workspace/base_workspace.py).
* A single `OmegaConf` config object generated by `hydra` should contain all information needed to construct the Workspace object and running experiments. This config correspond to `config/<workspace_name>.yaml` + hydra overrides.
* The `run` method contains the entire pipeline for the experiment.
* Checkpoints happen at the `Workspace` level. All training states implemented as object attributes are automatically saved by the `save_checkpoint` method.
* All other states for the experiment should be implemented as local variables in the `run` method.
The entrypoint for training is `train.py` which uses `@hydra.main` decorator. Read [hydra](https://hydra.cc/)'s official documentation for command line arguments and config overrides. For example, the argument `task=<task_name>` will replace the `task` subtree of the config with the content of `config/task/<task_name>.yaml`, thereby selecting the task to run for this experiment.
### `Dataset`
A `Dataset` object:
* Inherits from `torch.utils.data.Dataset`.
* Returns a sample conforming to [the interface](#the-interface) depending on whether the task has Low Dim or Image observations.
* Has a method `get_normalizer` that returns a `LinearNormalizer` conforming to [the interface](#the-interface).
Normalization is a very common source of bugs during project development. It is sometimes helpful to print out the specific `scale` and `bias` vectors used for each key in the `LinearNormalizer`.
Most of our implementations of `Dataset` uses a combination of [`ReplayBuffer`](#replaybuffer) and [`SequenceSampler`](./diffusion_policy/common/sampler.py) to generate samples. Correctly handling padding at the beginning and the end of each demonstration episode according to `To` and `Ta` is important for good performance. Please read our [`SequenceSampler`](./diffusion_policy/common/sampler.py) before implementing your own sampling method.
### `Policy`
A `Policy` object:
* Inherits from `BaseLowdimPolicy` or `BaseImagePolicy`.
* Has a method `predict_action` that given observation dict, predicts actions conforming to [the interface](#the-interface).
* Has a method `set_normalizer` that takes in a `LinearNormalizer` and handles observation/action normalization internally in the policy.
* (optional) Might has a method `compute_loss` that takes in a batch and returns the loss to be optimized.
* (optional) Usually each `Policy` class correspond to a `Workspace` class due to the differences of training and evaluation process between methods.
### `EnvRunner`
A `EnvRunner` object abstracts away the subtle differences between different task environments.
* Has a method `run` that takes a `Policy` object for evaluation, and returns a dict of logs and metrics. Each value should be compatible with `wandb.log`.
To maximize evaluation speed, we usually vectorize environments using our modification of [`gym.vector.AsyncVectorEnv`](./diffusion_policy/gym_util/async_vector_env.py) which runs each individual environment in a separate process (workaround python GIL).
⚠️ Since subprocesses are launched using `fork` on linux, you need to be specially careful for environments that creates its OpenGL context during initialization (e.g. robosuite) which, once inherited by the child process memory space, often causes obscure bugs like segmentation fault. As a workaround, you can provide a `dummy_env_fn` that constructs an environment without initializing OpenGL.
### `ReplayBuffer`
The [`ReplayBuffer`](./diffusion_policy/common/replay_buffer.py) is a key data structure for storing a demonstration dataset both in-memory and on-disk with chunking and compression. It makes heavy use of the [`zarr`](https://zarr.readthedocs.io/en/stable/index.html) format but also has a `numpy` backend for lower access overhead.
On disk, it can be stored as a nested directory (e.g. `data/pusht_cchi_v7_replay.zarr`) or a zip file (e.g. `data/robomimic/datasets/square/mh/image_abs.hdf5.zarr.zip`).
Due to the relative small size of our datasets, it's often possible to store the entire image-based dataset in RAM with [`Jpeg2000` compression](./diffusion_policy/codecs/imagecodecs_numcodecs.py) which eliminates disk IO during training at the expense increasing of CPU workload.
Example:
```
data/pusht_cchi_v7_replay.zarr
├── data
│ ├── action (25650, 2) float32
│ ├── img (25650, 96, 96, 3) float32
│ ├── keypoint (25650, 9, 2) float32
│ ├── n_contacts (25650, 1) float32
│ └── state (25650, 5) float32
└── meta
└── episode_ends (206,) int64
```
Each array in `data` stores one data field from all episodes concatenated along the first dimension (time). The `meta/episode_ends` array stores the end index for each episode along the fist dimension.
### `SharedMemoryRingBuffer`
The [`SharedMemoryRingBuffer`](./diffusion_policy/shared_memory/shared_memory_ring_buffer.py) is a lock-free FILO data structure used extensively in our [real robot implementation](./diffusion_policy/real_world) to utilize multiple CPU cores while avoiding pickle serialization and locking overhead for `multiprocessing.Queue`.
As an example, we would like to get the most recent `To` frames from 5 RealSense cameras. We launch 1 realsense SDK/pipeline per process using [`SingleRealsense`](./diffusion_policy/real_world/single_realsense.py), each continuously writes the captured images into a `SharedMemoryRingBuffer` shared with the main process. We can very quickly get the last `To` frames in the main process due to the FILO nature of `SharedMemoryRingBuffer`.
We also implemented [`SharedMemoryQueue`](./diffusion_policy/shared_memory/shared_memory_queue.py) for FIFO, which is used in [`RTDEInterpolationController`](./diffusion_policy/real_world/rtde_interpolation_controller.py).
### `RealEnv`
In contrast to [OpenAI Gym](https://gymnasium.farama.org/), our polices interact with the environment asynchronously. In [`RealEnv`](./diffusion_policy/real_world/real_env.py), the `step` method in `gym` is split into two methods: `get_obs` and `exec_actions`.
The `get_obs` method returns the latest observation from `SharedMemoryRingBuffer` as well as their corresponding timestamps. This method can be call at any time during an evaluation episode.
The `exec_actions` method accepts a sequence of actions and timestamps for the expected time of execution for each step. Once called, the actions are simply enqueued to the `RTDEInterpolationController`, and the method returns without blocking for execution.
## 🩹 Adding a Task
Read and imitate:
* `diffusion_policy/dataset/pusht_image_dataset.py`
* `diffusion_policy/env_runner/pusht_image_runner.py`
* `diffusion_policy/config/task/pusht_image.yaml`
Make sure that `shape_meta` correspond to input and output shapes for your task. Make sure `env_runner._target_` and `dataset._target_` point to the new classes you have added. When training, add `task=<your_task_name>` to `train.py`'s arguments.
## 🩹 Adding a Method
Read and imitate:
* `diffusion_policy/workspace/train_diffusion_unet_image_workspace.py`
* `diffusion_policy/policy/diffusion_unet_image_policy.py`
* `diffusion_policy/config/train_diffusion_unet_image_workspace.yaml`
Make sure your workspace yaml's `_target_` points to the new workspace class you created.
## 🏷️ License
This repository is released under the MIT license. See [LICENSE](LICENSE) for additional details.
## 🙏 Acknowledgement
* Our [`ConditionalUnet1D`](./diffusion_policy/model/diffusion/conditional_unet1d.py) implementation is adapted from [Planning with Diffusion](https://github.com/jannerm/diffuser).
* Our [`TransformerForDiffusion`](./diffusion_policy/model/diffusion/transformer_for_diffusion.py) implementation is adapted from [MinGPT](https://github.com/karpathy/minGPT).
* The [BET](./diffusion_policy/model/bet) baseline is adapted from [its original repo](https://github.com/notmahi/bet).
* The [IBC](./diffusion_policy/policy/ibc_dfo_lowdim_policy.py) baseline is adapted from [Kevin Zakka's reimplementation](https://github.com/kevinzakka/ibc).
* The [Robomimic](https://github.com/ARISE-Initiative/robomimic) tasks and [`ObservationEncoder`](https://github.com/ARISE-Initiative/robomimic/blob/master/robomimic/models/obs_nets.py) are used extensively in this project.
* The [Push-T](./diffusion_policy/env/pusht) task is adapted from [IBC](https://github.com/google-research/ibc).
* The [Block Pushing](./diffusion_policy/env/block_pushing) task is adapted from [BET](https://github.com/notmahi/bet) and [IBC](https://github.com/google-research/ibc).
* The [Kitchen](./diffusion_policy/env/kitchen) task is adapted from [BET](https://github.com/notmahi/bet) and [Relay Policy Learning](https://github.com/google-research/relay-policy-learning).
* Our [shared_memory](./diffusion_policy/shared_memory) data structures are heavily inspired by [shared-ndarray2](https://gitlab.com/osu-nrsg/shared-ndarray2).


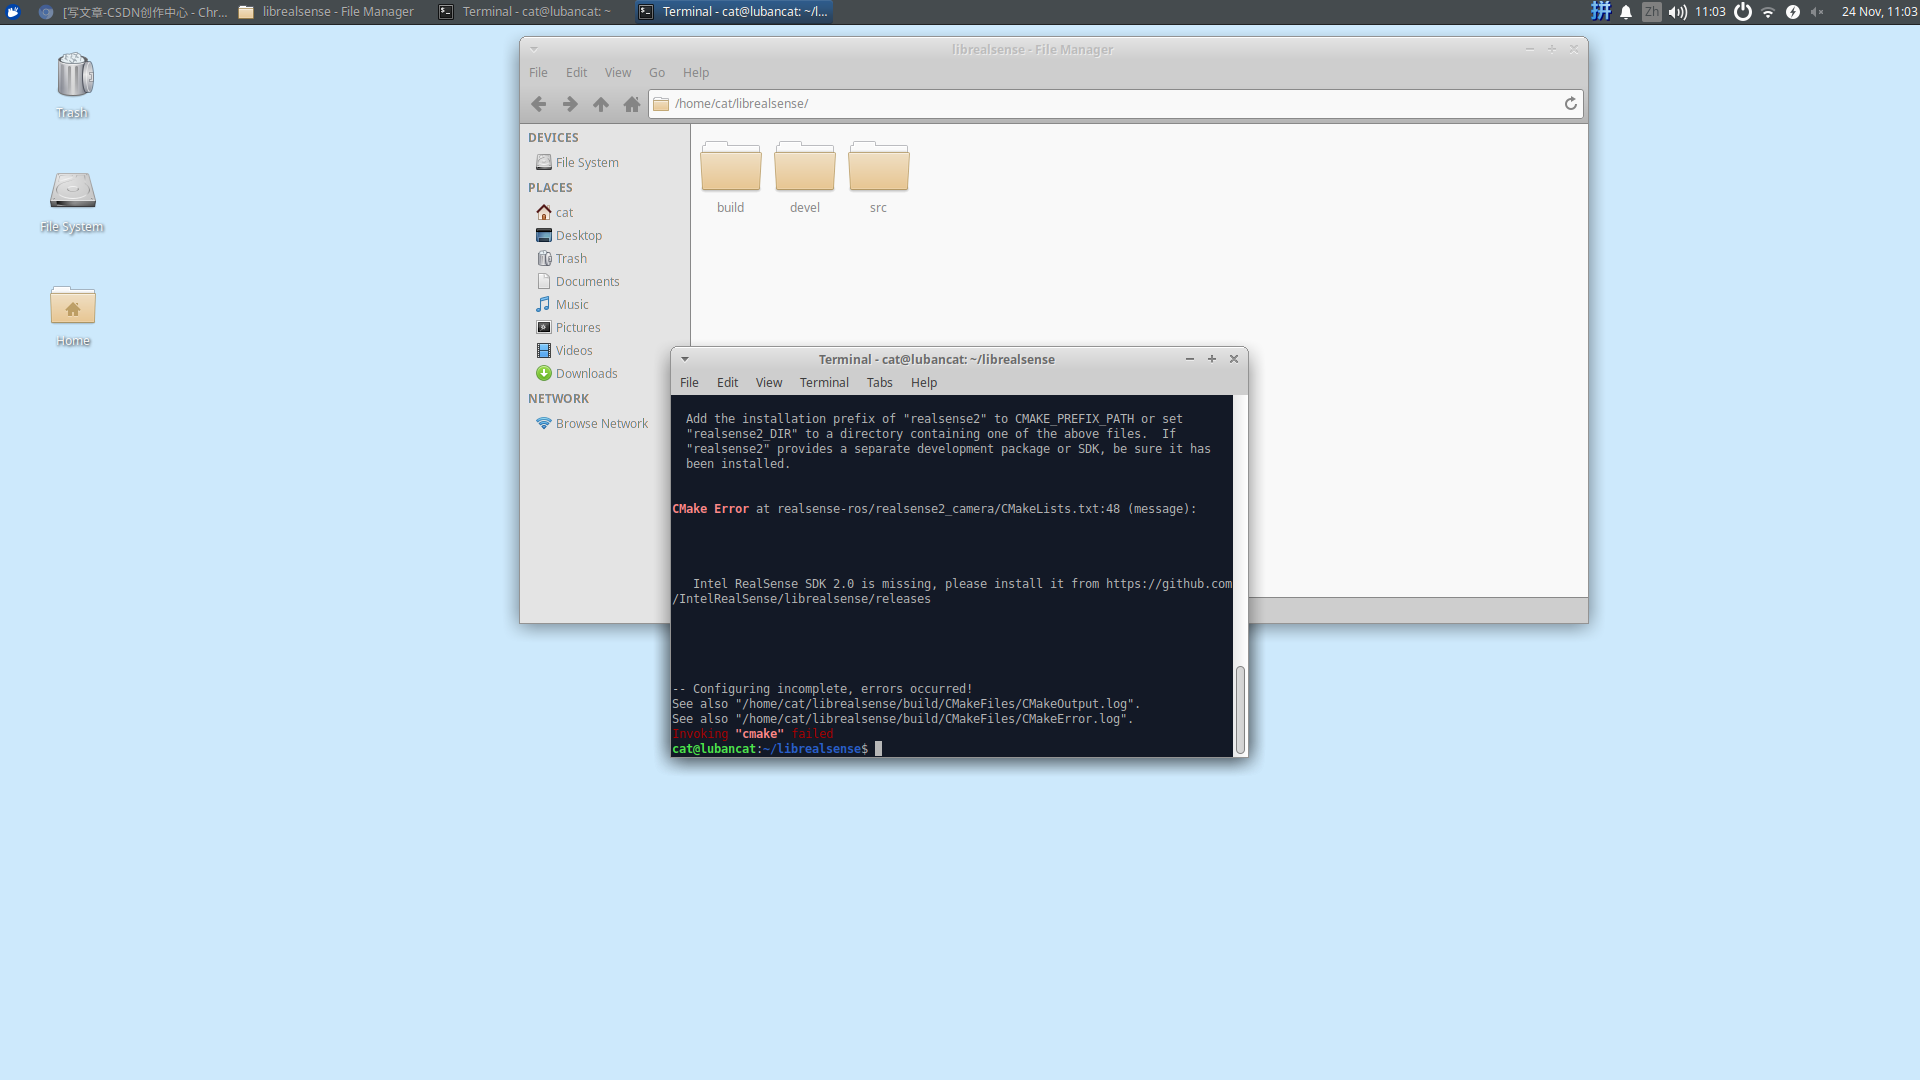
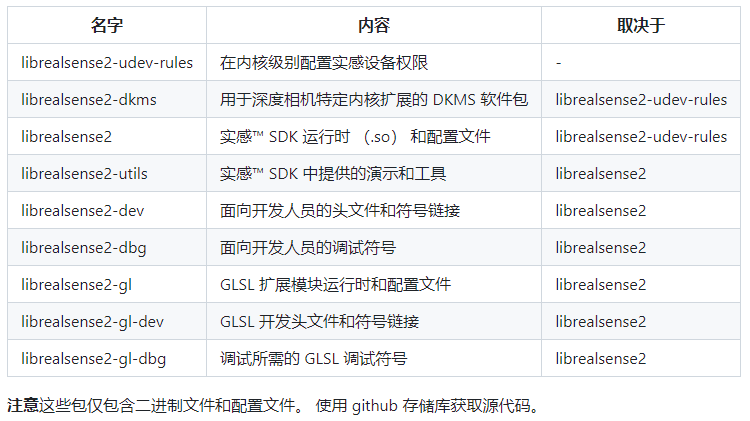
 https://github.com/IntelRealSense/realsense-ros/tree/ros1-legacy


 1377
1377

 被折叠的 条评论
为什么被折叠?
被折叠的 条评论
为什么被折叠?
 到【灌水乐园】发言


