


import numpy as np
import torch
import matplotlib.pyplot as plt
# 设置中文显示
plt.rcParams['font.sans-serif'] = ['SimHei']
plt.rcParams['axes.unicode_minus'] = False
# 创建卷积核
w1 = np.array([1, -1], dtype='float32').reshape([1, 1, 1, 2])
w2 = np.array([1, -1], dtype='float32').T.reshape([1, 1, 2, 1])
w3 = np.array([[1, -1], [-1, 1]], dtype='float32').reshape([1, 1, 2, 2])
w1 = torch.Tensor(w1)
w2 = torch.Tensor(w2)
w3 = torch.Tensor(w3)
conv1 = torch.nn.Conv2d(1, 1, [1, 2])
conv1.weight = torch.nn.Parameter(w1)
conv2 = torch.nn.Conv2d(1, 1, [2, 1])
conv2.weight = torch.nn.Parameter(w2)
conv3 = torch.nn.Conv2d(1, 1, [2, 2])
conv3.weight = torch.nn.Parameter(w3)
# 创建图像1
img1 = np.ones([7, 6], dtype='float32')
img1[:, 3:] = 0.
img1[:, :3] = 255.
x1 = img1.reshape([1, 1, 7, 6])
x1 = torch.Tensor(x1)
# 进行卷积
y1_1 = conv1(x1).detach().numpy()
y1_2 = conv2(x1).detach().numpy()
# 创建图像2
img2 = np.ones([8, 8], dtype='float32')
img2[:4, :4] = 0.
img2[:4, 4:] = 255.
img2[4:, :4] = 255.
img2[4:, 4:] = 0.
x2 = img2.reshape([1, 1, 8, 8])
x2 = torch.Tensor(x2)
y2_1 = conv1(x2).detach().numpy()
y2_2 = conv2(x2).detach().numpy()
# 创建图像3
img3 = np.ones([9, 9], dtype='float32')
for i in range(7):
img3[i + 1, i + 1] = 255.
img3[i + 1, 7 - i] = 255.
x3 = img3.reshape([1, 1, 9, 9])
x3 = torch.Tensor(x3)
y3_1 = conv1(x3).detach().numpy()
y3_2 = conv2(x3).detach().numpy()
y3_3 = conv3(x3).detach().numpy()
# 绘制图像
plt.figure(figsize=(15, 10))
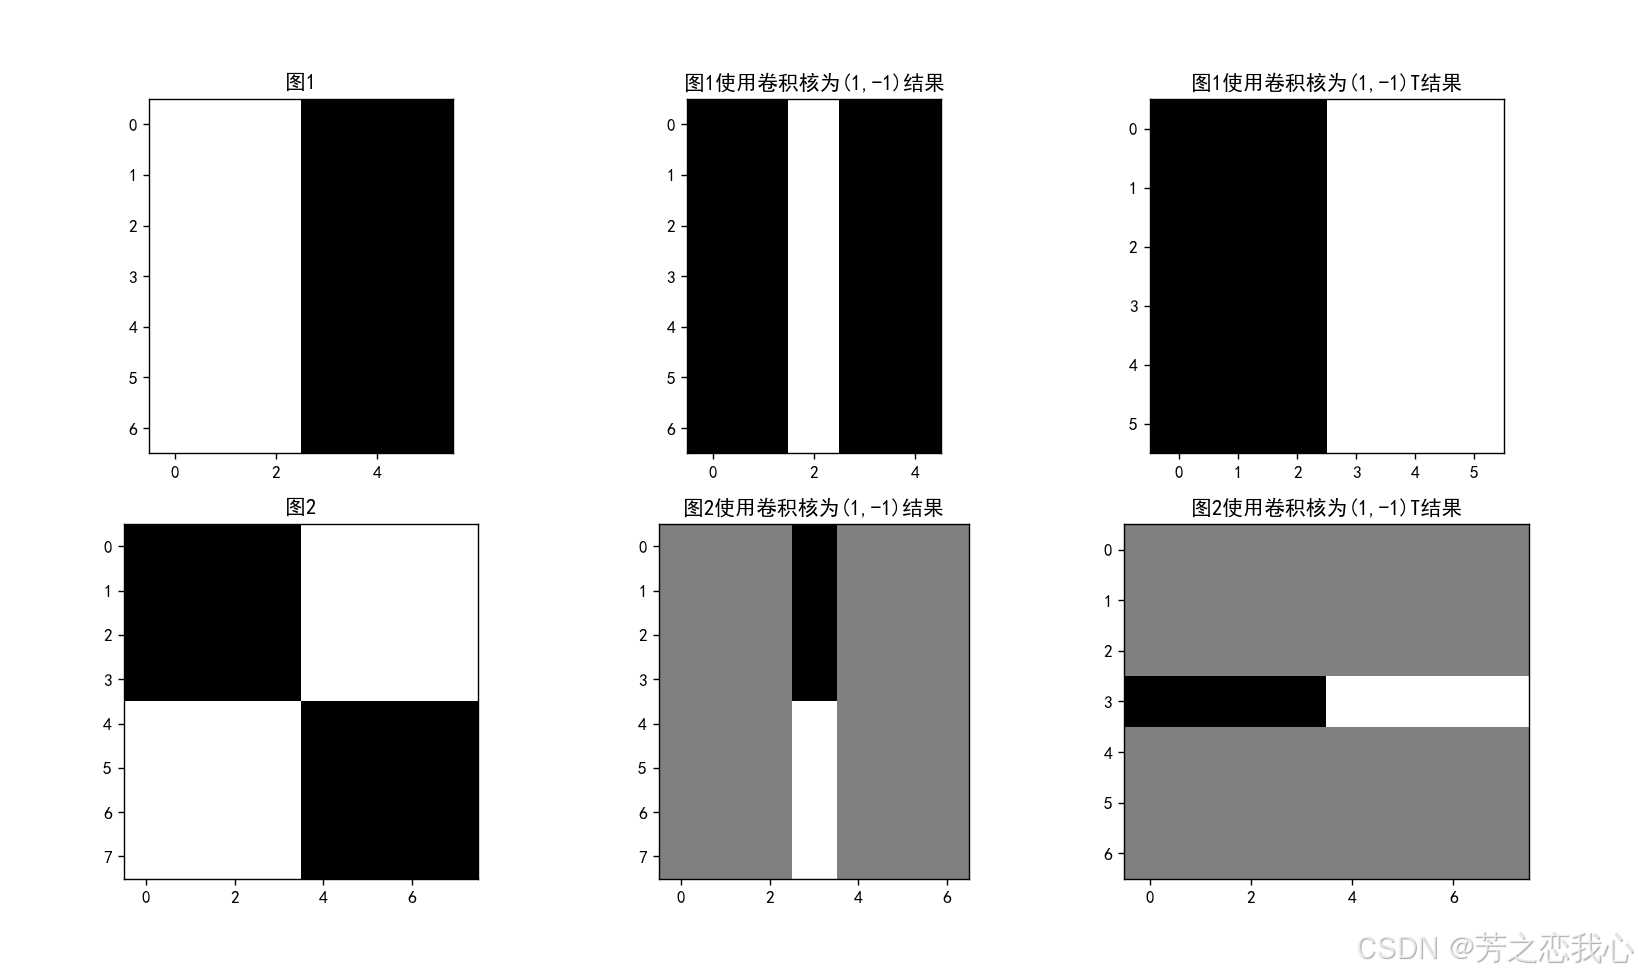
# 图像1
plt.subplot(231).set_title('图1')
plt.imshow(img1, cmap='gray')
plt.subplot(232).set_title('图1使用卷积核为(1,-1)结果')
plt.imshow(y1_1.squeeze(), cmap='gray')
plt.subplot(233).set_title('图1使用卷积核为(1,-1)T结果')
plt.imshow(y1_2.squeeze(), cmap='gray')
# 图像2
plt.subplot(234).set_title('图2')
plt.imshow(img2, cmap='gray')
plt.subplot(235).set_title('图2使用卷积核为(1,-1)结果')
plt.imshow(y2_1.squeeze(), cmap='gray')
plt.subplot(236).set_title('图2使用卷积核为(1,-1)T结果')
plt.imshow(y2_2.squeeze(), cmap='gray')
plt.show()
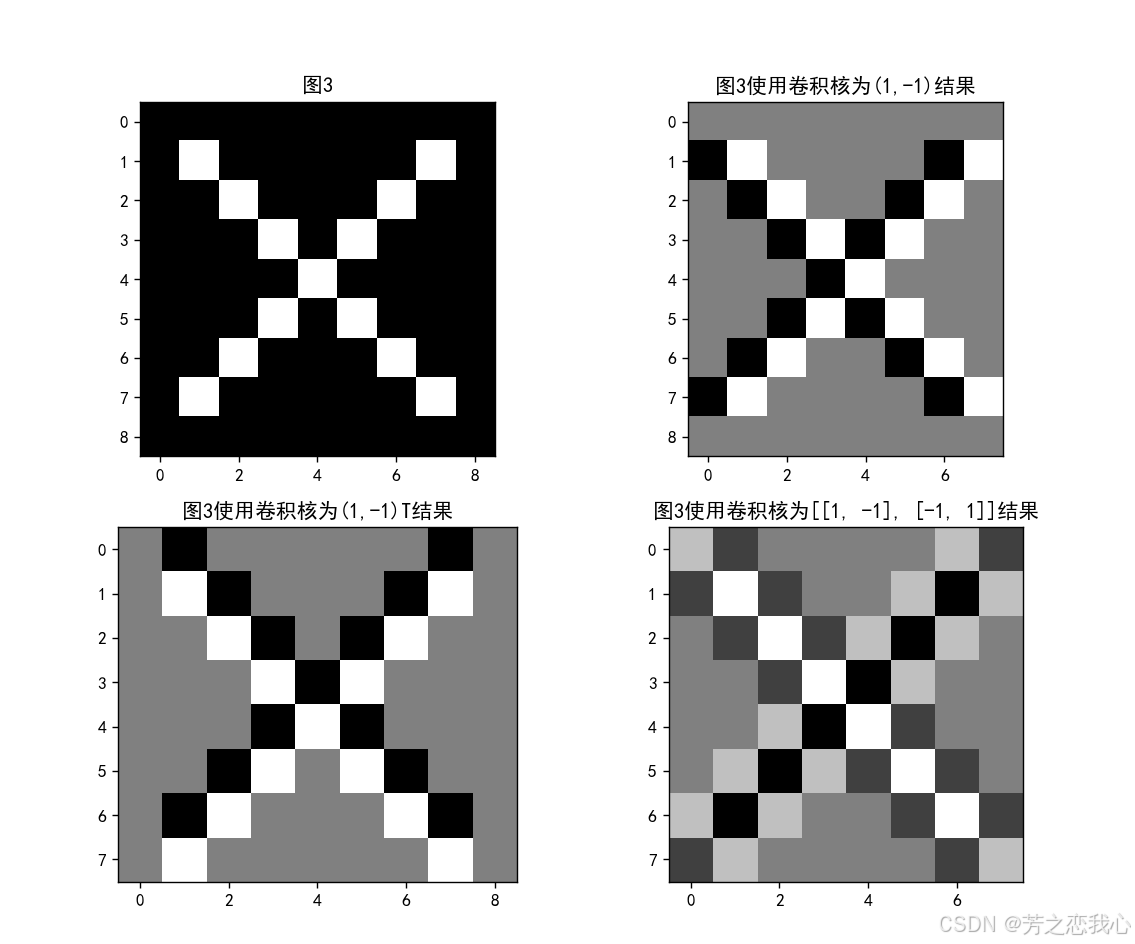
# 图像3
plt.figure(figsize=(10, 10))
plt.subplot(221).set_title('图3')
plt.imshow(img3, cmap='gray')
plt.subplot(222).set_title('图3使用卷积核为(1,-1)结果')
plt.imshow(y3_1.squeeze(), cmap='gray')
plt.subplot(223).set_title('图3使用卷积核为(1,-1)T结果')
plt.imshow(y3_2.squeeze(), cmap='gray')
plt.subplot(224).set_title('图3使用卷积核为[[1, -1], [-1, 1]]结果')
plt.imshow(y3_3.squeeze(), cmap='gray')
plt.show()
运行结果
import numpy as np
import cv2
import matplotlib.pyplot as plt
plt.rcParams['font.sans-serif'] = ['SimHei']
# 读取图像并转换为灰度图
image_path = 'img.png' # 请将路径替换为实际图像路径
image = cv2.imread(image_path, cv2.IMREAD_GRAYSCALE)
# 定义卷积核
edge_detection_kernel = np.array([[-1, -1, -1],
[-1, 8, -1],
[-1, -1, -1]])
sharpen_kernel = np.array([[ 0, -1, 0],
[-1, 5, -1],
[ 0, -1, 0]])
blur_kernel = np.array([[1, 1, 1],
[1, 1, 1],
[1, 1, 1]]) / 9.0
# 定义卷积操作函数
def apply_filter(image, kernel):
return cv2.filter2D(image, -1, kernel)
# 应用不同的滤波器
edge_detected = apply_filter(image, edge_detection_kernel)
sharpened = apply_filter(image, sharpen_kernel)
blurred = apply_filter(image, blur_kernel)
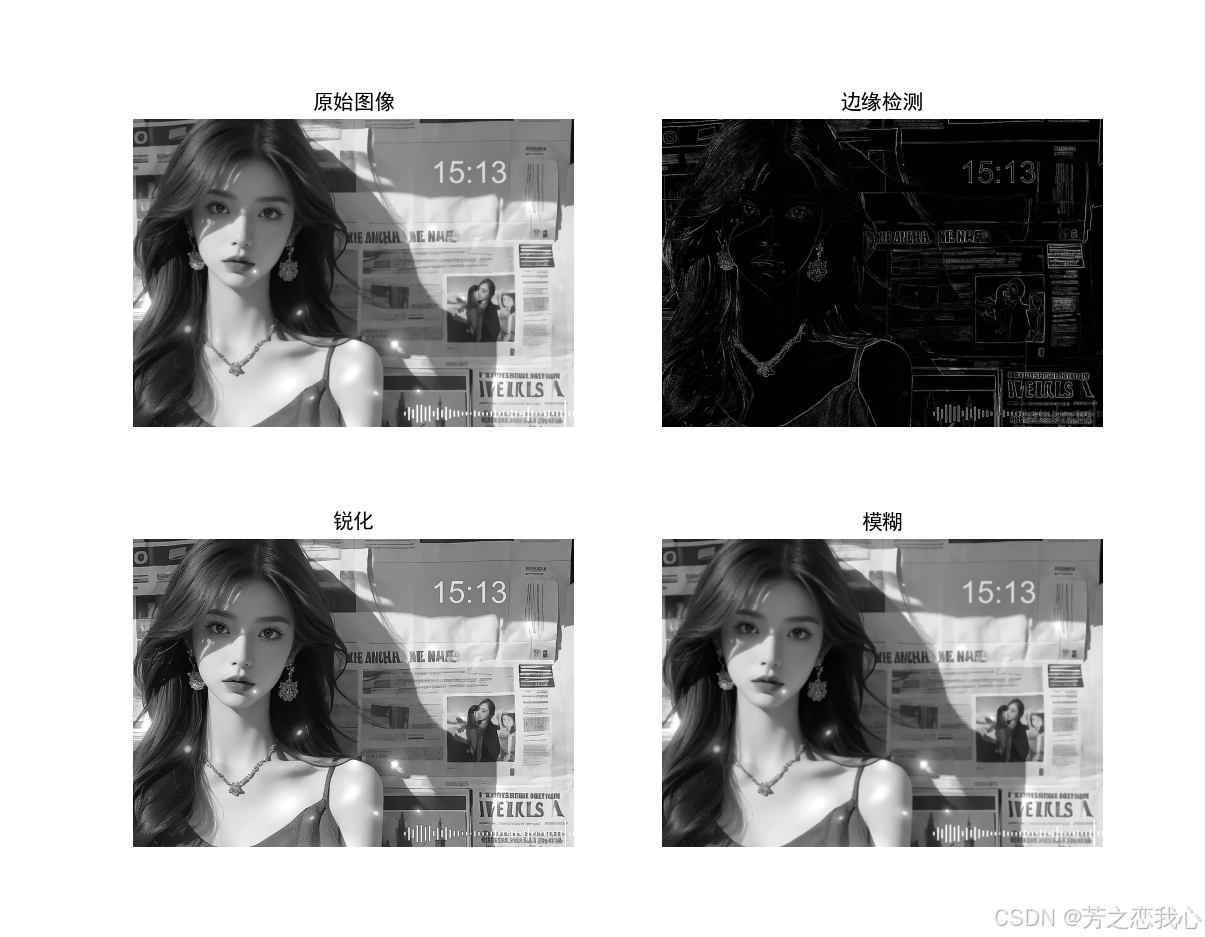
# 可视化结果
plt.figure(figsize=(10, 8))
plt.subplot(2, 2, 1)
plt.imshow(image, cmap='gray')
plt.title('原始图像')
plt.axis('off')
plt.subplot(2, 2, 2)
plt.imshow(edge_detected, cmap='gray')
plt.title('边缘检测')
plt.axis('off')
plt.subplot(2, 2, 3)
plt.imshow(sharpened, cmap='gray')
plt.title('锐化')
plt.axis('off')
plt.subplot(2, 2, 4)
plt.imshow(blurred, cmap='gray')
plt.title('模糊')
plt.axis('off')
plt.show()
运行结果
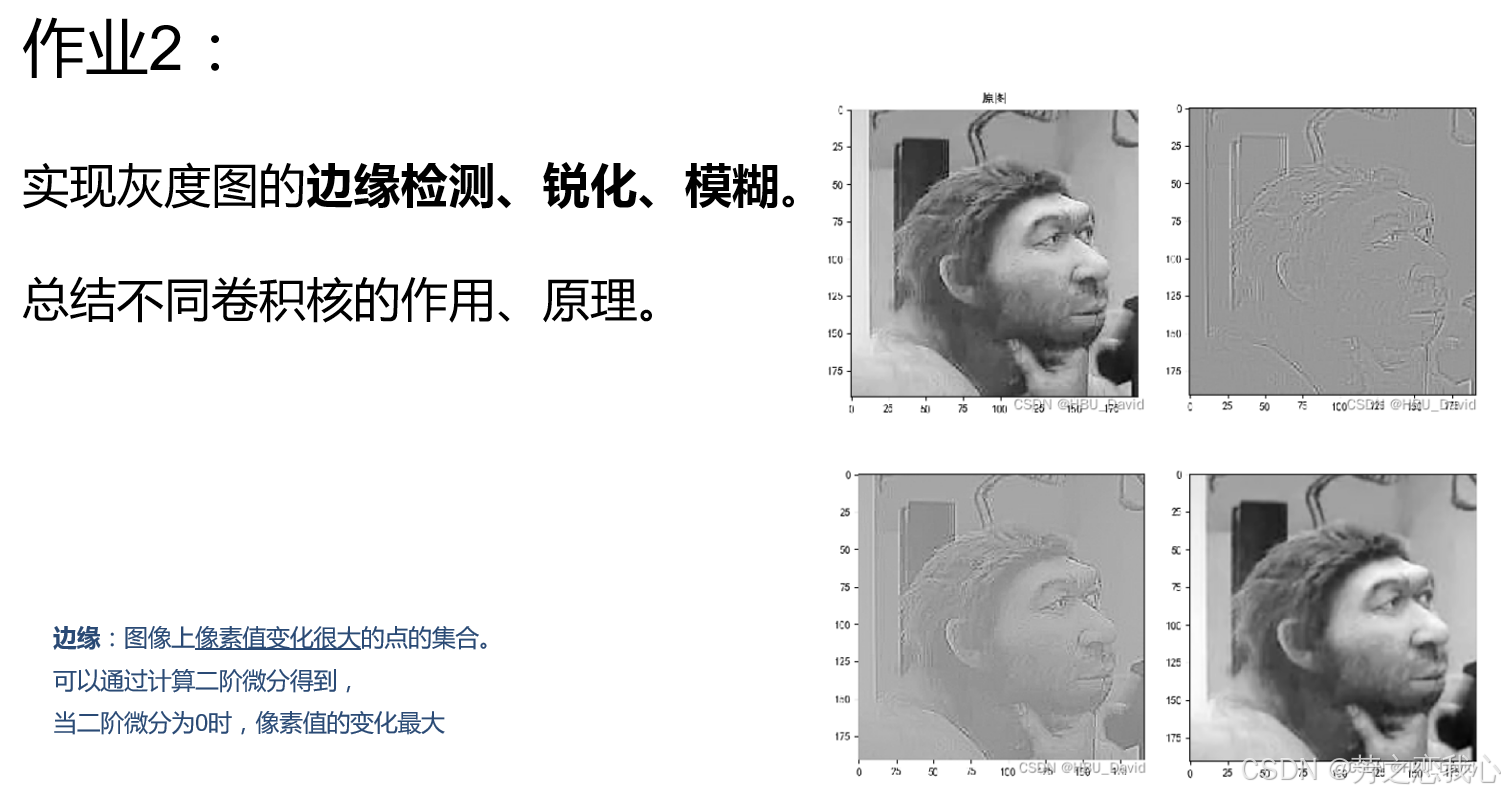
卷积能够提取特征的原理:
局部感受野:卷积操作通过滑动窗口(滤波器)对输入图像进行处理,每次只关注图像的一小部分。这种局部特征的提取使得卷积能够有效捕捉局部结构,如边缘、纹理等。
权重共享:卷积核在整个输入图像上重复使用相同的权重,减少了模型的参数数量,还使得卷积网络对平移不变性(即物体位置变化时特征仍能被识别)具有更强的能力。
多层次特征提取:通过堆叠多个卷积层,网络能够逐步提取更高层次的特征。低层次的卷积层可能学习边缘和角点等简单特征,而高层次的卷积层则能够组合这些简单特征,形成更复杂的模式。
非线性激活:卷积操作后通常会应用非线性激活函数(如ReLU),这使得网络能够学习更复杂的特征关系,而不仅仅是线性组合。
下采样和特征图:通过池化操作对卷积输出进行下采样,进一步减少特征图的维度,同时保留重要的信息。


 1万+
1万+

 被折叠的 条评论
为什么被折叠?
被折叠的 条评论
为什么被折叠?
 到【灌水乐园】发言


