


文章目录
配置过程中踩了很多坑,github上有ur10+rg2的资源,但是我需要配置ur10e,并且这个是很久之前的。现在网络上的许多教程资源包已经更新不再试用,现根据最新的官方ur和onrobot rg2/rg6进行配置,之后会上传到github中,后续会配置realsense d415相机,该系列会持续更新
环境
ROS Noetic
Ubuntu 20.04
UR10e
Onrobot RG2 Gripper
配置过程
1.创建工作空间
这里我创建一个新的工作空间ur_ws,此外我还有一个工作空间catkin_ws,这样的意义是为了确保catkin_ws中的各种资源包是正确的,如果你修改ur_ws中的文档无法复原或者不小心删除,直接copycatkin_ws中的对应的文件过来就ok
mkdir -p ~/ur_ws/src
2.下载 ur和 onrobot rg的包
cd ~/ur_ws/
git clone https://github.com/UniversalRobots/Universal_Robots_ROS_Driver.git src/Universal_Robots_ROS_Driver
git clone https://github.com/ros-industrial/universal_robot.git src/universal_robot
git clone https://github.com/ros-industrial/ur_msgs.git src/ur_msgs
git clone https://github.com/ros-industrial/robotiq.git(这个二爪三爪模型中没有rg2 但是有ft sensor)
git clone https://github.com/Osaka-University-Harada-Laboratory/onrobot
e系列一定要下载这个ur,网上人多人使用这个包fmauch_ur,但是只有ur机型不够全
3.编译工作环境
在 ROS 中,每次你修改或添加新的包时,通常需要重新编译工作空间
sudo apt update -qq
rosdep update
rosdep install --from-paths src --ignore-src -y
catkin_make
source devel/setup.bash
每次打开新的终端时,你需要设置环境变量以确保 ROS 能够找到你的工作空间:
source ~/ur_ws/devel/setup.bash
可以将这个命令添加到你的 .bashrc 文件中,以便每次打开终端时自动设置环境变量:
echo "source ~/ur_ws/devel/setup.bash" >> ~/.bashrc source ~/.bashrc
只对单独一个包进行编译 catkin_make --only-pkg-with-deps <package_name>
4. 添加RG2夹爪
首先必须要先熟悉各个文件的路径和结构
rg2夹爪的相关文件在/home/oliver/ur_ws/src/onrobot/onrobot_rg_description/urdf下,
包含关系如下:
ur10e的相关文件在/home/oliver/ur_ws/src/universal_robot/ur_description/urdf/inc和/home/oliver/ur_ws/src/universal_robot/ur_description/urdf文件夹下
包含关系如下:
4.1 ur10e_rg2_d415.xacro文件
在/home/oliver/ur_ws/src/universal_robot/ur_description/urdf/目录下,复制ur10e.xacro文件,重命名为ur10e_rg2_d415.xacro
原内容如下:
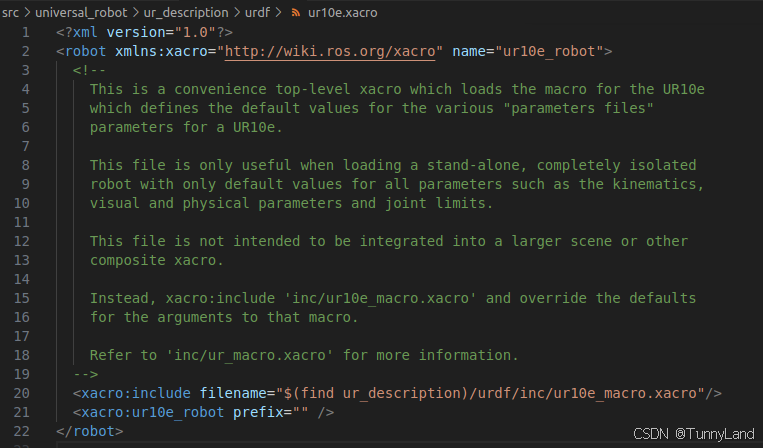
我们需要在这个文件中加载ur10e本体,rg2夹爪,以及后续需要的相机等
这里加载ur10e本体还有另一种写法,如下:
<xacro:include filename="$(find ur_description)/urdf/ur10e.xacro"/>
这么写就不需要<xacro:ur10e_robot prefix=""/>这个宏定义了,不然会报base_link不唯一。
4.1.1 添加RG2夹爪:
写法一:
  <!-- Gripper RG2 -->
  <xacro:include filename="$(find onrobot_rg_description)/urdf/onrobot_rg2_model_macro.xacro"/>
  <xacro:onrobot_rg2 prefix=""/>
这里为什么添加的文件是onrobot_rg2_model_macro.xacro而不是onrobot_rg2_model.xacro?
因为onrobot_rg2_model.xacro中有onrobot_rg2的定义,在ur10e_rg2_d415.xacro文件下,我们重复定义了onrobot_rg2,<xacro:onrobot_rg2 prefix=""/>,所以这里有两种方法,但是你要保证,只定义过一次<xacro:onrobot_rg2 prefix=""/>,不然就会出现[ERROR] [1732687149.221659184]: link ‘onrobot_rg2_base_link’ is not unique.的错误。
onrobot_rg2_model.xacro文件内容:
除了上面的写法,还有下面的写法二:
只在onrobot_rg2_model.xacro中定义一次onrobot_rg2_model
  <!-- Gripper RG2 -->
 <xacro:include filename="$(find onrobot_rg_description)/urdf/onrobot_rg2_model.xacro"/>
4.1.2 连接RG2和ur10e
4.1.2.1 RG2-link
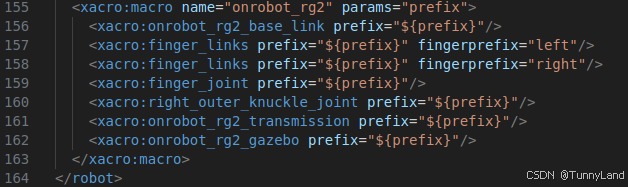
在onrobot_rg2_model_macro.xacro文件下,可以看到暴露在最外面的是onrobot_rg2_base_link, 还可以看到他是_inner_knuckle_joint,right_outer_knuckle_joint,finger_joint的parent link,一定要确保他不作为任何joint的child link
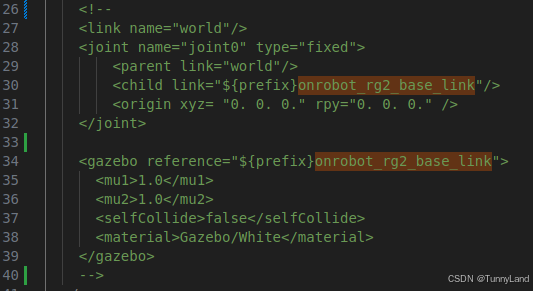
但是在onrobot_rg2.xacro文件中,我们可以找到
    <link name="world"/>
    <joint name="joint0" type="fixed">
        <parent link="world"/>
        <child link="${prefix}onrobot_rg2_base_link"/>
        <origin xyz= "0. 0. 0." rpy="0. 0. 0." />
    </joint>
这里直接把部分注释掉,让onrobot_rg2_base_link作为rg2暴露在外面的link,其实我把下面的也一起注释了,不影响
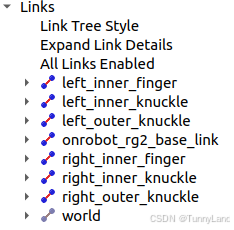
其实这里改完之后你不确定或者本来不太清楚哪个连杆是什么可以roslaunch 对应的launch文件看一下,这里就可以roslaunch 看一下
cd ~/ur_ws
roslaunch ~/ur_ws/src/universal_robot/ur_description/launch/view_ur10e_rg2.launch
4.1.2.2 ur10e-link
可以查看ur_macro.xacro文件中各个link的关系,在最后可以看到暴露在最外面,不作为任何link的parent link的是tool0.
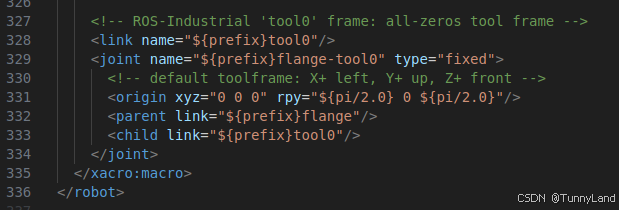
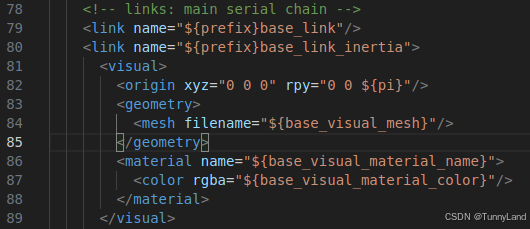
最基础的link是base_link
4.1.2.3 连接rg2-ur10e
  <!-- Attach the RG2 gripper to the UR10e tool0 link -->
  <joint name="rg2_joint" type="fixed">
    <parent link="tool0"/>
    <child link = "onrobot_rg2_base_link"/>
		<origin xyz="0 0 0" rpy="0 0 0"/>
  </joint>
如果你还想要一个world的话,可以再新定义一个link,命名为world,作为ur10e的parent link,不过这个不加也是ok的
  <!-- UR10e -->
  <link name = "world"/>
  <joint name="world_joint" type="fixed">
    <parent link="world"/>
    <child link = "base_link" />
    <origin xyz="0.0 0.0 0.0" rpy="0.0 0.0 0.0" />
  </joint>
所以完整的ur10e_rg2_d415.xacro文件如下:
<?xml version="1.0"?>
  <robot xmlns:xacro="http://wiki.ros.org/xacro" name="ur10e_rg2_d415">

  <!-- ur10e -->
  <xacro:include filename="$(find ur_description)/urdf/inc/ur10e_macro.xacro"/>
  <!--<xacro:include filename="$(find ur_description)/urdf/ur10e.xacro"/>-->
  <xacro:ur10e_robot prefix=""/>

  <!-- Gripper RG2 -->
  <xacro:include filename="$(find onrobot_rg_description)/urdf/onrobot_rg2_model_macro.xacro"/>
  <xacro:onrobot_rg2 prefix=""/>

  <!-- UR10e -->
  <!--
  <link name = "world"/>
  <joint name="world_joint" type="fixed">
    <parent link="world"/>
    <child link = "base_link" />
    <origin xyz="0.0 0.0 0.0" rpy="0.0 0.0 0.0" />
  </joint>
  -->

  <!-- Attach the RG2 gripper to the UR10e tool0 link -->

  <joint name="rg2_joint" type="fixed">
    <parent link="tool0"/>
    <child link = "onrobot_rg2_base_link"/>
		<origin xyz="0 0 0" rpy="0 0 0"/>
  </joint>
</robot>
4.2 launch文件
launch文件需要改动的一共有三个,view_ur10e_rg2.launch,load_ur10e_rg2.launch , load_ur_rg2.launch三个文件,分别由view_ur10e.launch,load_ur10e.launch , load_ur.launch三个文件copy并修改而来
均在/home/oliver/ur_ws/src/universal_robot/ur_description/launch路径下
我们需要roslaunch带有view字样的launch文件,才能在rviz中看到相关模型,原本的文件加载路径是这样的:
所以我们一步步来改
4.2.1 view_ur10e_rg2.launch
第二行由load_ur10e.launch改为view_ur10e_rg2.launch
<?xml version="1.0"?>
<launch>
  <include file="$(find ur_description)/launch/load_ur10e_rg2.launch"/>

  <node name="joint_state_publisher_gui" pkg="joint_state_publisher_gui" type="joint_state_publisher_gui" />
  <node name="robot_state_publisher" pkg="robot_state_publisher" type="robot_state_publisher" />
  <node name="rviz" pkg="rviz" type="rviz" args="-d $(find ur_description)/cfg/view_robot.rviz" required="true" />
</launch>
4.2.2 load_ur10e_rg2.launch
倒数第二行load_ur.launch改为load_ur_rg2.launch
<?xml version="1.0"?>
<launch>
  <!--ur10e parameters files -->
  <arg name="joint_limit_params" default="$(find ur_description)/config/ur10e/joint_limits.yaml"/>
  <arg name="kinematics_params" default="$(find ur_description)/config/ur10e/default_kinematics.yaml"/>
  <arg name="physical_params" default="$(find ur_description)/config/ur10e/physical_parameters.yaml"/>
  <arg name="visual_params" default="$(find ur_description)/config/ur10e/visual_parameters.yaml"/>
  <!--common parameters -->
  <arg name="transmission_hw_interface" default="hardware_interface/PositionJointInterface" />
  <arg name="safety_limits" default="false" doc="If True, enable the safety limits controller"/>
  <arg name="safety_pos_margin" default="0.15" doc="The lower/upper limits in the safety controller" />
  <arg name="safety_k_position" default="20" doc="Used to set k position in the safety controller" />


  <arg name="robot_model" value="ur10e" />
  <!--param name="robot_description" command="$(find xacro)/xacro -inorder '$(find ur_description)/urdf/ur10e_rg2_d415.xacro'" />
  -->
  <!-- use common launch file and pass all arguments to it -->
  <include file="$(find ur_description)/launch/load_ur_rg2.launch" pass_all_args="true"/>

</launch>
4.2.3 load_ur_rg2.launch
<param name="robot_description" command="$(find xacro)/xacro '$(find ur_description)/urdf/ur10e.xacro'改为<param name="robot_description" command="$(find xacro)/xacro '$(find ur_description)/urdf/ur10e_rg2_d415.xacro'
<?xml version="1.0"?>
<launch>
  <!--ur parameters files -->
  <arg name="joint_limit_params" doc="YAML file containing the joint limit values"/>
  <arg name="kinematics_params" doc="YAML file containing the robot's kinematic parameters. These will be different for each robot as they contain the robot's calibration."/>
  <arg name="physical_params" doc="YAML file containing the phycical parameters of the robots"/>
  <arg name="visual_params" doc="YAML file containing the visual model of the robots"/>
  <!--common parameters  -->
  <arg name="transmission_hw_interface" default="hardware_interface/PositionJointInterface" />
  <arg name="safety_limits" default="false" doc="If True, enable the safety limits controller"/>
  <arg name="safety_pos_margin" default="0.15" doc="The lower/upper limits in the safety controller" />
  <arg name="safety_k_position" default="20" doc="Used to set k position in the safety controller" />

  <arg name="robot_model" />

  <!-- Load the top-level (ie: stand-alone and complete) xacro for the UR
       variant defined by the set of yaml parameter files (so to load a UR5
       onto the ROS parameter server, provide paths to the .yaml files which
       contain the limits, kinematics, physical and visual parameters which
       together describe a UR5 robot.

       NOTE: users will typically want to use use one of the other .launch files
       in this directory (ie: 'load_urXXX.launch'), as those already contain
       appropriate default values for the required arguments for the various
       supported robots.

       NOTE2: if you have a custom robot configuration, or your robot is
       integrated into a work cell, do NOT change this file or add all of the
       work cell objects to the ur.xacro file. Create a new top-level xacro and
       include the ur_macro.xacro file into it. Then write a new .launch file
       to load it onto the parameter server.
  -->
  <param name="robot_description" command="$(find xacro)/xacro '$(find ur_description)/urdf/ur10e_rg2_d415.xacro'
    robot_model:=$(arg robot_model)
    joint_limit_params:=$(arg joint_limit_params)
    kinematics_params:=$(arg kinematics_params)
    physical_params:=$(arg physical_params)
    visual_params:=$(arg visual_params)
    transmission_hw_interface:=$(arg transmission_hw_interface)
    safety_limits:=$(arg safety_limits)
    safety_pos_margin:=$(arg safety_pos_margin)
    safety_k_position:=$(arg safety_k_position)"
    />
</launch>
这样所有的文件我们就改完了
可以运行以下代码 生成urdf文件并检查是否正确
rosrun xacro xacro ~/ur_ws/src/universal_robot/ur_description/urdf/ur10e_rg2_d415.xacro > ~/ur_ws/ur10e_rg2.urdf
check_urdf ~/ur_ws/ur10e_rg2.urdf
如果正确,可以看到如下生成:(这是添加world作为最基础的link生成的)
robot name is: ur10e_rg2_d415
---------- Successfully Parsed XML ---------------
root Link: world has 1 child(ren)
    child(1):  base_link
        child(1):  base
        child(2):  base_link_inertia
            child(1):  shoulder_link
                child(1):  upper_arm_link
                    child(1):  forearm_link
                        child(1):  wrist_1_link
                            child(1):  wrist_2_link
                                child(1):  wrist_3_link
                                    child(1):  flange
                                        child(1):  tool0
                                            child(1):  onrobot_rg2_base_link
                                                child(1):  left_outer_knuckle
                                                    child(1):  left_inner_finger
                                                child(2):  left_inner_knuckle
                                                child(3):  right_inner_knuckle
                                                child(4):  right_outer_knuckle
                                                    child(1):  right_inner_finge
5. 运行roslaunch
最后我们运行roslaunch试一下
roslaunch ~/ur_ws/src/universal_robot/ur_description/launch/view_ur10e_rg2.launch
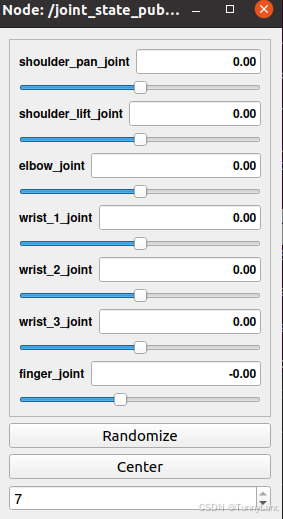

可以正常运行,完结撒花!


 779
779

 被折叠的 条评论
为什么被折叠?
被折叠的 条评论
为什么被折叠?
 到【灌水乐园】发言


