


 本文详细介绍了Unity中相机的工作原理,包括视图平截头体的理解、Dolly Zoom视觉效果的实现,以及如何通过相机射线进行交互。通过调整相机的视场角、裁剪平面以及使用Raycasting技术,可以创造出各种增强游戏体验的视觉效果。
Camera Tricks 相机技巧
本文档主要是对Unity官方手册的个人理解与总结(其实以翻译记录为主:>)
仅作为个人学习使用,不得作为商业用途,欢迎转载,并请注明出处。
文章中涉及到的操作都是基于Unity2018.2版本
参考链接:https://docs.unity3d.com/Manual/CameraTricks.html
It is useful to understand how the camera works when designing certain visual effects or interactions with objects in the scene. This section explains the nature of the camera’s view and how it can be used to enhance gameplay.
在设计特定的视觉效果或与场景中的对象交互时,理解相机如何工作是很有用的。本节将解释相机视图的性质以及如何使用它来增强游戏玩法。
Understanding the View Frustum 理解视图平截头体
The word frustum refers to a solid shape that looks like a pyramid with the top cut off parallel to the base. This is the shape of the region that can be seen and rendered by a perspective camera. The following thought experiment should help to explain why this is the case.
frustum这个词指的是一个看起来像金字塔的立体形状,顶面与底面平行。通过一个透视相机可以看到渲染的区域形状。下面的思考实验应该有助于解释为什么会这样。
Imagine holding a straight rod (a broom handle or a pencil, for example) end-on to a camera and then taking a picture. If the rod were held in the centre of the picture, perpendicular to the camera lens, then only its end would be visible as a circle on the picture; all other parts of it would be obscured. If you moved it upward, the lower side would start to become visible but you could hide it again by angling the rod upward. If you continued moving the rod up and angling it further upward, the circular end would eventually reach the top edge of the picture. At this point, any object above the line traced by the rod in world space would not be visible on the picture.
想象一下,把一根笔直的杆子(比如扫帚柄或铅笔)一端放到相机镜头前,然后拍照。如果杆子在照片的中心,垂直于相机镜头,那么只有它的末端才能在照片上看到一个圆;它的其他部分将被掩盖。如果你向上移动它,下面的部分就会开始变得可见,但是你可以通过向上倾斜杆来隐藏它。如果你继续向上移动棒,并使它进一步向上倾斜,圆的结束将最终达到图片的顶部边缘。基于这一点上,任何物体在世界空间的杆子跟踪线以上将在图片上不可见。

The rod could just as easily be moved and rotated left, right, or down or any combination of horizontal and vertical. The angle of the “hidden” rod simply depends on its distance from the centre of the screen in both axes.
杆可以很容易地移动和左,右,或向下旋转或任何水平和垂直的组合。“隐藏”杆的角度取决于它与屏幕中心在坐标系下的距离。
The meaning of this thought experiment is that any point in a camera’s image actually corresponds to a line in world space and only a single point along that line is visible in the image. Everything behind that position on the line is obscured.
这个思考实验的意义在于,相机图像中的任何一点实际上都对应于世界空间中的一条直线,而这条直线上只有一个点在图像中可见。线上那个位置后面的一切都被覆盖了。
The outer edges of the image are defined by the diverging lines that correspond to the corners of the image. If those lines were traced backwards towards the camera, they would all eventually converge at a single point. In Unity, this point is located exactly at the camera’s transform position and is known as the centre of perspective. The angle subtended by the lines converging from the top and bottom centres of the screen at the centre of perspective is called the field of view (often abbreviated to FOV).
图像的外边缘由图像的每个角相对应的发射线定义。如果这些线被回溯到相机上,它们最终都会聚在一个点上。在Unity中,落点恰好位于相机变换的位置,被称为透视中心。由从屏幕顶部和底部的边中心汇聚到透视中心的线构成的夹角称为视场角(通常缩写为FOV)。
As stated above, anything that falls outside the diverging lines at the edges of the image will not be visible to the camera, but there are also two other restrictions on what it will render. The near and far clipping planes are parallel to the camera’s XY plane and each set at a certain distance along its centre line. Anything closer to the camera than the near clipping plane and anything farther away than the far clipping plane will not be rendered.
如上所述,任何落在图像边缘发射线之外的东西都不会被摄像机看到,但是对于它呈现的内容还有另外两个限制。近、远裁剪平面平行于相机的XY平面,每一个裁剪平面沿其中心线设置一定的距离。任何比近裁切面更靠近和远裁切面更远离的物体都不会被渲染。

The diverging corner lines of the image along with the two clipping planes define a truncated pyramid - the view frustum.
图像的发散角线和两个裁剪平面定义了一个截断的金字塔——视锥体(平截头体)。
The Size of the Frustum at a Given Distance from the Camera 与摄像机一定距离上的截锥体大小
A cross-section of the view frustum at a certain distance from the camera defines a rectangle in world space that frames the visible area. It is sometimes useful to calculate the size of this rectangle at a given distance, or find the distance where the rectangle is a given size. For example, if a moving camera needs to keep an object (such as the player) completely in shot at all times then it must not get so close that part of that object is cut off.
距摄像机一定距离的视锥体横截面定义了在世界空间的一个可视区域的矩形框。有时计算给定距离下这个矩形的大小是很有用的,或者求出给定矩形大小计算相机距离。例如,如果一个移动的相机需要始终保持一个对象(如玩家)在镜头中,那么它就不能靠得太近以至于该对象的一部分被切掉。
The height of the frustum at a given distance (both in world units) can be obtained with the following formula:
截锥体在给定距离下的高度值(两种单位均为世界单位)可由下式求得:
var frustumHeight = 2.0f * distance * Mathf.Tan(camera.fieldOfView * 0.5f * Mathf.Deg2Rad);
and the process can be reversed to calculate the distance required to give a specified frustum height:
该过程可以反向计算出给定截锥体高度相机所需的距离:
var distance = frustumHeight * 0.5f / Mathf.Tan(camera.fieldOfView * 0.5f * Mathf.Deg2Rad);
It is also possible to calculate the FOV angle when the height and distance are known:
当已知高度和距离时,也可以计算FOV角:
var camera.fieldOfView = 2.0f * Mathf.Atan(frustumHeight * 0.5f / distance) * Mathf.Rad2Deg;
Each of these calculations involves the height of the frustum but this can be obtained from the width (and vice versa) very easily:
这些计算都涉及到截锥体的高度,但这可以从宽度(反之亦然)非常容易地得到:
var frustumWidth = frustumHeight * camera.aspect;
var frustumHeight = frustumWidth / camera.aspect;
Dolly Zoom (AKA the “Trombone” Effect) Dolly Zoom(又名“Trombone”效果)
Dolly Zoom is the well-known visual effect where the camera simultaneously moves towards a target object and zooms out from it. The result is that the object appears roughly the same size but all the other objects in the scene change perspective. Done subtly, dolly zoom has the effect of highlighting the target object, since it is the only thing in the scene that isn’t shifting position in the image. Alternatively, the zoom can be deliberately performed quickly to create the impression of disorientation.
Dolly Zoom是一种著名的视觉效果,摄像机向目标物体移动,同时变焦。结果是,该对象的大小大致相同,但场景中所有其他对象在透视图都改变了。巧妙地完成,dolly zoom有突出目标对象的效果,因为它是唯一在图像上场景所有对象中没有移动位置的。或者,可以故意快速执行变焦,以造成迷失方向的印象。
An object that just fits within the frustum vertically will occupy the whole height of the view as seen on the screen. This is true whatever the object’s distance from the camera and whatever the field of view. For example, you can move the camera closer to the object but then widen the field of view so that the object still just fits inside the frustum’s height. That particular object will appear the same size onscreen but everything else will change size as the distance and FOV change. This is the essence of the dolly zoom effect.
一个对象正好放置满在截锥体垂直方向上将占据屏幕上所看到的视图的整个高度。不管物体到摄像机的距离是多少,不管视野是多少,这都是正确的。例如,您可以将相机移动到离目标更近的地方,然后加宽视野,以便该对象仍然适合于截锥体的高度。那个特定的物体会在屏幕上显示相同的大小,但是其他的东西会随着距离和FOV的变化而改变大小。这是Dolly Zoom效果的本质。
Creating the effect in code is a matter of saving the height of the frustum at the object’s position at the start of the zoom. Then, as the camera moves, its new distance is found and the FOV adjusted to keep it the same height at the object’s position. This can be accomplished with the following code:
在代码中创建效果需要保存变焦开始时对象所在位置的截头高度。然后,随着相机的移动,找到新的距离,并调整FOV,使其在物体的位置保持相同的高度。这可以通过以下代码实现:
using UnityEngine;
using System.Collections;

public class DollyZoom : MonoBehaviour
{
    public Transform target;
    public Camera camera;

    private float initHeightAtDist;
    private bool dzEnabled;

    // Calculate the frustum height at a given distance from the camera.
    float FrustumHeightAtDistance(float distance)
    {
        return 2.0f * distance * Mathf.Tan(camera.fieldOfView * 0.5f * Mathf.Deg2Rad);
    }

    // Calculate the FOV needed to get a given frustum height at a given distance.
    float FOVForHeightAndDistance(float height, float distance)
    {
        return 2.0f * Mathf.Atan(height * 0.5f / distance) * Mathf.Rad2Deg;
    }

    // Start the dolly zoom effect.
    void StartDZ()
    {
        transform.LookAt(target);
        var distance = Vector3.Distance(transform.position, target.position);
        initHeightAtDist = FrustumHeightAtDistance(distance);
        dzEnabled = true;
    }

    // Turn dolly zoom off.
    void StopDZ()
    {
        dzEnabled = false;
    }

    void Start()
    {
        StartDZ();
    }

    void Update()
    {
        if (dzEnabled)
        {
            // Measure the new distance and readjust the FOV accordingly.
            var currDistance = Vector3.Distance(transform.position, target.position);
            camera.fieldOfView = FOVForHeightAndDistance(initHeightAtDist, currDistance);
        }

        // Simple control to allow the camera to be moved in and out using the up/down arrows.
        transform.Translate(Input.GetAxis("Vertical") * Vector3.forward * Time.deltaTime * 50f);
    }
}
Rays from the Camera 相机射线
In the section Understanding the View Frustum, it was explained that any point in the camera’s view corresponds to a line in world space. It is sometimes useful to have a mathematical representation of that line and Unity can provide this in the form of a Ray object. The Ray always corresponds to a point in the view, so the Camera class provides the ScreenPointToRay and ViewportPointToRay functions. The difference between the two is that ScreenPointToRay expects the point to be provided as a pixel coordinate, while ViewportPointToRay takes normalized coordinates in the range 0…1 (where 0 represents the bottom or left and 1 represents the top or right of the view). Each of these functions returns a Ray which consists of a point of origin and a vector which shows the direction of the line from that origin. The Ray originates from the near clipping plane rather than the Camera’s transform.position point.
在理解视锥体部分,解释了相机视图中的任何一点都对应于世界空间中的一条线。有时用数学表示这条线是有用的,Unity 可以用Ray 对象的形式表示。Ray 总是与视图中的一个点相对应,所以Camera类提供了ScreenPointToRay和ViewportPointToRay函数。两者之间的区别是ScreenPointToRay希望以像素坐标的形式提供该点,而ViewportPointToRay接受范围为0-1的归一化坐标(0表示底部或左侧,1表示视图的顶部或右侧)。每个函数都返回一条射线,射线由一个原点和一个向量组成,向量表示从该点出发的直线的方向。射线来自近裁切平面,而不是相机的transform.position点。
Raycasting 光线投射
The most common use of a Ray from the camera is to perform a raycast out into the scene. A raycast sends an imaginary “laser beam” along the ray from its origin until it hits a collider in the scene. Information is then returned about the object and the point that was hit in a RaycastHit object. This is a very useful way to locate an object based on its onscreen image. For example, the object at the mouse position can be determined with the following code:
来自相机的光线最常用的用法是将光线投射到场景中。raycast从射线的原点沿着射线发射一束假想的“激光束”,直到它击中场景中的碰撞体。然后返回关于对象和在RaycastHit对象中命中的点的信息。这是一种非常有用的基于屏幕上图像定位对象的方法。例如,可以通过以下代码确定鼠标位置的对象:
using UnityEngine;
using System.Collections;

public class ExampleScript : MonoBehaviour {
    public Camera camera;

    void Start(){
        RaycastHit hit;
        Ray ray = camera.ScreenPointToRay(Input.mousePosition);

        if (Physics.Raycast(ray, out hit)) {
            Transform objectHit = hit.transform;

            // Do something with the object that was hit by the raycast.
        }
    }
}
Moving the Camera Along a Ray 沿着光线移动相机
It is sometimes useful to get a ray corresponding to a screen position and then move the camera along that ray. For example, you may want to allow the user to select an object with the mouse and then zoom in on it while keeping it “pinned” to the same screen position under the mouse (this might be useful when the camera is looking at a tactical map, for example). The code to do this is fairly straightforward:
有时获得与屏幕位置相对应的光线,然后将摄像机沿该光线移动是很有用的。例如,您可能希望允许用户使用鼠标选择一个对象,然后将其放大,同时将其“固定”在鼠标下相同的屏幕位置(例如,当摄像机查看战术地图时,这可能非常有用)。这样做的代码相当简单:
using UnityEngine;
using System.Collections;

public class ExampleScript : MonoBehaviour {
    public bool zooming;
    public float zoomSpeed;
    public Camera camera;

    void Update() {
        if (zooming) {
            Ray ray = camera.ScreenPointToRay(Input.mousePosition);
            float zoomDistance = zoomSpeed * Input.GetAxis("Vertical") * Time.deltaTime;
            camera.transform.Translate(ray.direction * zoomDistance, Space.World);
        }
    }
}
Using an Oblique Frustum 斜截头体
By default, the view frustum is arranged symmetrically around the camera’s center line, but it doesn’t necessarily need to be. You can make the frustum “oblique”, which means that one side is at a smaller angle to the centre line than the opposite side. This makes the perspective on one side of the image seem more condensed, giving the impression that the viewer is very close to the object visible at that edge. An example of how this can be used is a car racing game; if the frustum is flattened at its bottom edge, it appears to the viewer that they are closer to the road, accentuating the feeling of speed.
默认情况下,视锥体围绕相机的中心线对称布置,但这不是必须的。视锥体可以被制成"斜"的,即有一边的相对于中心线的角度比对面的要小。这使得图像一侧的角度看起来更简明,给人的印象是观察者非常接近对象的可见边缘。赛车游戏的例子是使用了这种方法,视锥体在赛车地步平展,使得观察者看起来更接近路面,突出了速度感。
Although the Camera component does not have functions specifically for setting the obliqueness of the frustum, you can do it by either enabling the camera’s Physical Camera properties and applying a Lens Shift, or by adding a script to alter the camera’s projection matrix.
尽管相机组件没有专门用于设置截锥体倾斜度的函数,但是您可以通过启用相机的物理相机属性并应用镜头平移法,或者通过添加脚本来更改相机的投影矩阵来实现。
Setting Frustum Obliqueness with a Lens Shift 使用镜头平移法设置截锥体倾斜度
Enable a camera’s Physical Camera properties to expose the Lens Shift options. You can use these to offset the camera’s focal center along the X and Y axes in a way that minimizes distortion of the rendered image.
启用相机的物理相机属性来显示镜头平移选项。您可以使用这些来偏移相机的焦点沿X轴和Y轴的方式,以最小化失真的渲染图像。
Shifting the lens reduces the frustum angle on the side opposite the direction of the shift. For example, as you shift the lens up, the angle between the bottom of the frustum and the camera’s center line gets smaller.
移动镜头会减少与移动方向相反的一侧的截锥体角度。例如,当你向上移动镜头时,截锥体底部与相机中心线之间的角度会变小。
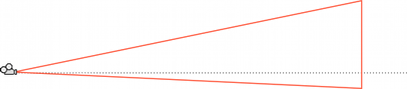
Normally a camera’s frustum is symmetrical (left), meaning the angles on either side of the center line are equal. Shifting the lens (right) makes the frustum oblique, meaning the angle is smaller on one side than on the other.
通常相机的截锥体是对称的(左),这意味着中心线两侧的角度是相等的。移动镜头(右)使截锥体倾斜,这意味着一边的角度小于另一边。
For further information about the Physical Camera options, see documentation on Physical Cameras.
For further information about setting individual Physical Camera properties, see the Camera Component reference.
Setting Frustum Obliqueness Using a Script 使用脚本设置截锥体倾斜度
The following script example shows how to quickly achieve an oblique frustum by altering the camera’s projection matrix. Note that you can only see the effect of the script while the game is running Play mode.
下面的脚本示例展示了如何通过更改摄像机的投影矩阵来快速实现斜截头。注意,您只能在游戏运行Play模式时看到脚本的效果。
using UnityEngine;
using System.Collections;

public class ExampleScript : MonoBehaviour {
    void SetObliqueness(float horizObl, float vertObl) {
        Matrix4x4 mat  = Camera.main.projectionMatrix;
        mat[0, 2] = horizObl;
        mat[1, 2] = vertObl;
        Camera.main.projectionMatrix = mat;
    }
}
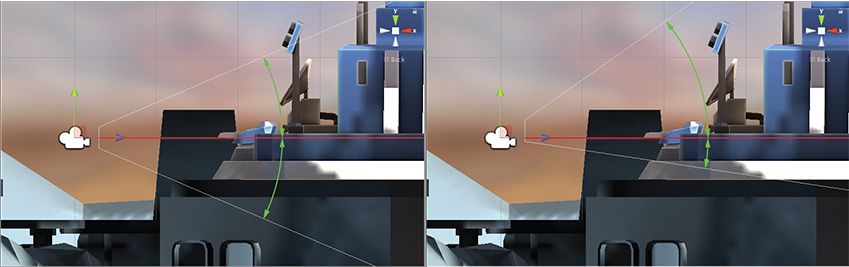
Mercifully, it is not necessary to understand how the projection matrix works to make use of this. The horizObl and vertObl values set the amount of horizontal and vertical obliqueness, respectively. A value of zero indicates no obliqueness. A positive value shifts the frustum rightwards or upwards, thereby flattening the left or bottom side. A negative value shifts leftwards or downwards and consequently flattens the right or top side of the frustum. The effect can be seen directly if this script is added to a camera and the game is switched to the scene view while the game runs; the wireframe depiction of the camera’s frustum will change as you vary the values of horizObl and vertObl in the inspector. A value of 1 or –1 in either variable indicates that one side of the frustum is completely flat against the centreline. It is possible although seldom necessary to use values outside this range.
幸运的是,使用投影矩阵并没有必要理解其是如何工作的。水平倾斜度和垂直倾斜度值分别设置水平倾斜度和垂直倾斜度。值为0表示没有倾斜度。一个正值使截头向右或向上移动,从而使左侧或底部变平。负值向左或向下移动,从而使截头的右侧或顶部变平。如果将该脚本添加到摄像机中,游戏在运行时切换到场景视图,则可以直接看到效果;当您在检查器中改变horizObl 和vertObl的值时,相机截头的线框描述将会改变。在任何一个变量中,值为1或-1表示截头的一侧相对于中心线是完全平坦的。虽然很少需要使用超出此范围的值,但这是可行的。
Creating an Impression of Large or Small Size 给人留下大小不一的印象
From the graphical point of view, the units of distance in Unity are arbitrary and don’t correspond to real world measurements. Although this gives flexibility and convenience for design, it is not always easy to convey the intended size of the object. For example, a toy car looks different to a full size car even though it may be an accurate scale model of the real thing.
从图形的角度来看,Unity距离的单位是任意的,不符合真实世界的测量。虽然已为设计提供了灵活性和方便性,但要转换物体的预期大小会比较麻烦。例如,一个玩具汽车看起来不同于一个全尺寸的汽车,即使它可能是真实尺寸比例下的精确模型。
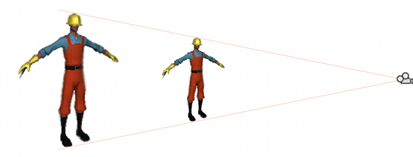
A major element in the impression of an object’s size is the way the perspective changes over the object’s length. For example, if a toy car is viewed from behind then the front of the car will only be a short distance farther away than the back. Since the distance is small, perspective will have relatively little effect and so the front will appear little different in size to the back. With a full size car, however, the front will be several metres farther away from the camera than the back and the effect of perspective will be much more noticeable.
在对对象大小的印象中,一个主要元素是透视图对对象长度变化的方式。例如,如果从后面看一辆玩具车,那么前面的车只会比后面的车远一小段距离。由于距离较小,透视影响相对较小,所以前面的尺寸与后面的尺寸相差不大。然而,如果是一辆全尺寸的汽车,它的前部会比后部离相机更远几米,透视效果也会明显得多。
For an object to appear small, the lines of perspective should diverge only very slightly over its depth. You can achieve this by using a narrower field of view than the default 60 degrees and moving the camera farther away to compensate for the increased onscreen size. Conversely, if you want to make an object look big, use a wide FOV and move the camera in close. When these perspective alterations are used with other obvious techniques (like looking down at a “small” object from higher-than-normal vantage point) the result can be quite convincing.
如果一个物体看起来很小,透视线应该稍微偏离深度,并略微高一点。你可以通过使用比默认的60度更窄的视野来实现这一点,并将相机移动到更远的地方来补偿屏幕尺寸的增加。相反,如果你想让一个物体看起来很大,使用一个宽的FOV,并把相机靠近。当这些视角变化与其他明显的技术一起使用时(比如从高于正常的有利位置向下看一个“小”物体),结果可能相当令人信服。


 728
728

 被折叠的 条评论
为什么被折叠?
被折叠的 条评论
为什么被折叠?
 到【灌水乐园】发言


