 UVM基础类、机制及UVM树详解


 本文围绕UVM展开,介绍了验证环境基本组件及UVM层次结构中的基类,如uvm_void、uvm_root等。阐述了UVM utility与field macros的使用,field_automation机制简化操作。还讲解了UVM对象的print、copy等方法,对比了uvm_object与uvm_component,最后介绍了UVM树的构成与访问方法。
目录
Base Classes
验证环境的基本组件是component(driver、sequencer、monitor等)和以及它们之间用来通信的transaction(类对象包含数据).从UVM的层次结构,我们可以看到UVM中的大多数基类以及从这些基类继承而来的子类.看下图:
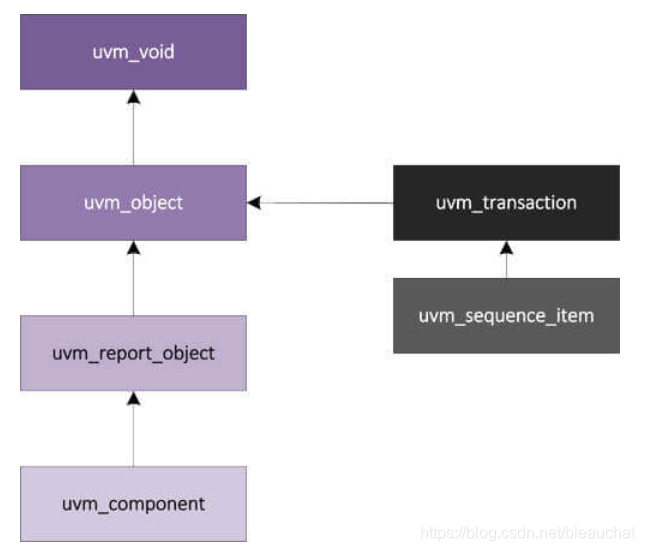
uvm_void
所有UVM类的父类;
uvm_root
当UVM仿真进行时自动创建的一个顶层component,用户可以通过uvm_top来获得 ,uvm_top是uvm_root的一个对象.对于uvm_top:
(1)对于任何component,使用宏在工厂中注册时,如果它的父类被设为null(表示没有),则该component就uvm_top的子类(uvm_top是树根);
class my_component extends uvm_component;
  `uvm_component_utils (my_component)

  function new (string name = "my_component", uvm_component parent);
    super.new (name, parent);
  endfunction
endclass

class my_env extends uvm_env;
  ...
  my_component m_comp0 = new ("m_comp0", null);   // uvm_top是m_comp0的父类
  ...
endclass(2)uvm_top管理所有component的phase;
(3)可以基于component的层次名来搜索component,如:find ("uvm_top.*.usb_drv0");
(4)用uvm_top来配置全局的详细报告,例如:uvm_top.set_report_verbosity_level_hier (UVM_FULL)将为所有component设置详细的报告;
(5)UVM的报告机制可以拓展到component之外,如module中;
值得注意的是,uvm_top会在 end_of_elaboration phase中检查错误,如果发现错误就会发出UVM_FATAL并终止仿真.
uvm_object
uvm_object作为所有类的父类,作用是提供一系列的基本方法,如:copy、print、compare等,子类可以通过继承来实现这些方法.
uvm_report_object
提供了一个指向UVM报告机制的接口,所有由component发布的信息、错误以及提示都通过该接口进行传递.
uvm_component
所有验证环境的组件都继承于uvm_component,它包括以下的interface:
Hierarchy : 定义用于搜索和遍历组件层次结构的方法,例如:env0.pci0.master1.drv
Phasing : 定义一个所有component都遵照的phasing system,例如:build, connect, run等.
Reporting:定义到ReportHandler的接口,所有消息、警告和错误都通过这个接口处理.
Recording:定义将component生成/消费的transaction记录到transaction database的方法.
Factory : 定义一个到uvm_factory的接口 (基于已有的实例创建新的对象).
注意,如果UVM seeding使能的话,uvm_component将自动seed,但是其他对象必须通过uvm_object::reseed来手动seed.
uvm_transaction
包含一个定时和记录的接口,简单的transaction继承于uvm_transaction,sequence-enable的transaction必须继承于uvm_sequence_item.
UVM utility & field macros
UVM使用"factory(工厂)"的概念,所有的对象都在这个工厂中注册,所以工厂可以返回我们所需要的对象.每个对象在工厂中的注册是通过utility macros来完成的,注意宏语句后面都不需要加";"
UVM也提供了一些自动机制对对象进行print、copy、compare等,这些机制是通过field macros来定义的.
Utility Macros
utility macros用来在工厂中注册object或component,它只能在来自uvm_objects的自定义类中使用.
(1)Object Utility
所有来自uvm_object或者uvm_transaction的类的注册都必须使用`uvm_object_utils 宏,并且要在类的构造方法中将类名作为参数进行传递.看下例:
class ABC extends uvm_object;

  // 在factory中注册该自定义类
  `uvm_object_utils(ABC)

  function new(string name = "ABC");
    super.new(name);
  endfunction
endclass注意,常数类使用"`uvm_object_param_utils()" 来注册!
下面总结派生自uvm_object的类中常用的宏:
`uvm_object_utils(类名) //用于将派生自uvm_object的类在工厂中注册
`uvm_object_param_utils(类名) //用于将派生自uvm_object的带参数的类在工厂中注册

`uvm_object_utils_begin(类名) //用于实现变量的在例如print()等方法中的自动操作,在begin...end中包括了方法中要操作的变量
    `uvm_field_int(m_addr, UVM_DEFAULT)
    `uvm_field_int(m_data, UVM_DEFAULT)
`uvm_object_utils_end

`uvm_object_param_utils_begin//与上面类似,只不过这个宏在参数化的类中使用
(2)Component Utility
所有派生自uvm_component的类的注册都必须使用`uvm_component_utils 宏,并且要在类的构造方法中将类名和一个指向父类的句柄作为参数进行传递,这用来构成UVM树.看下例:
class DEF extends uvm_component;

  // 来源于uvm_component的类在factory注册
  `uvm_component_utils(DEF)

  function new(string name = "DEF", uvm_component parent=null);
    super.new(name, parent);
  endfunction
endclass
下面总结派生自uvm_component的类中常用的宏:
`uvm_component_utils(组件名) //用于将派生自uvm_component的组件在工厂中注册
`uvm_component_param_utils(组件名) //用于将派生自uvm_component的参数化的组件在工厂中注册

`uvm_component_utils_begin(组件名) //用于实现组件中某些变量在例如print()方法中的自动操作
    `uvm_field_int(m_addr, UVM_DEFAULT)
    `uvm_field_int(m_data, UVM_DEFAULT)
`uvm_component_end

`uvm_component_param_utils_begin
(3)Macro Expansion: Behind the Scenes 扩展宏
可以在定义宏时用begin和end进行宏扩展,在扩展宏里面可以执行其他宏,格式如下:
`uvm_object_utils_begin(TYPE)
    `uvm_field_*(FIELD,FLAG)
`uvm_object_utils_end
(4)Creation of class object 创建类的对象
对于所有用UVM宏在工厂中注册的类 ,都采用"类名::type_id::create(对象名)"的形式进行对象创建.
class ABC extends uvm_object;
  `uvm_object_utils(ABC)

  function new(string name = "ABC");
    super.new(name);
  endfunction
endclass

class base_test extends uvm_test;
  `uvm_component_utils(base_test)

  function new(string name = "base_test", uvm_component parent=null);
    super.new(name, parent);
  endfunction

  virtual function void build_phase(uvm_phase phase);

    // An object of class "ABC" is instantiated in UVM by calling
    // its "create()" function which has been defined using a macro
    // as shown above
    ABC abc = ABC::type_id::create("abc_inst");//创建对象,组件还需要加父结点
  endfunction
endclass
field_automation 机制
为什么要使用 field_automation 机制
对于这样的一个 transaction,我们经常会用到许多常用的操作,如把所有的字段(成员变量)打印一下, 这个就需要自己写 print 函数:
function void print();
$display(“dmac=%0h”, dmac);
$display(“smac=%0h”, smac);
$display(“eth_type=%0h”, eth_type);
for(int i = 0; I < pload.size; i++) begin
$display(“pload[%0d]=%0h”, i, pload[i]);
end
$display(“crc=%0h”, crc);
endfunction
可以看出,这样写起来将会是相当费时间的。而且对于这些常用的操作,如果transaction 的定义换一下,那么这些所有的函数或任务就都需要重新写,这种代价是相当大的。仔细思考一下,这些事情的通性就是简单,重复,琐碎。那么有没有方
法简化一下呢?答案是有的,这就是 field_automation 机制;
field_automation 机制的使用
使用 field macros用在utility mcros中,用来将变量(field)在工厂中注册,以指定参与到类的方法的执行的变量,这叫做field_automation,也就是将这些field像类一样在factory中注册;这些方法如print、copy、compare等就可以直接使用这些在factory中注册过的field.看下面例子:
class ABC extends uvm_object;
  rand bit [15:0]   m_addr;
  rand bit [15:0]   m_data;

  `uvm_object_utils_begin(ABC)
    `uvm_field_int(m_addr, UVM_DEFAULT)
    `uvm_field_int(m_data, UVM_DEFAULT)
  `uvm_object_utils_end

  function new(string name = "ABC");
    super.new(name);
  endfunction
endclass`uvm_field_int(arg,flag)中的int表示该宏使用的数据类型,如果是字符串,则应该定义为`uvm_field_string;括号中表示宏的参数arg和flag(至少两个参数),其他类型的宏可以查看UVM参考手册.
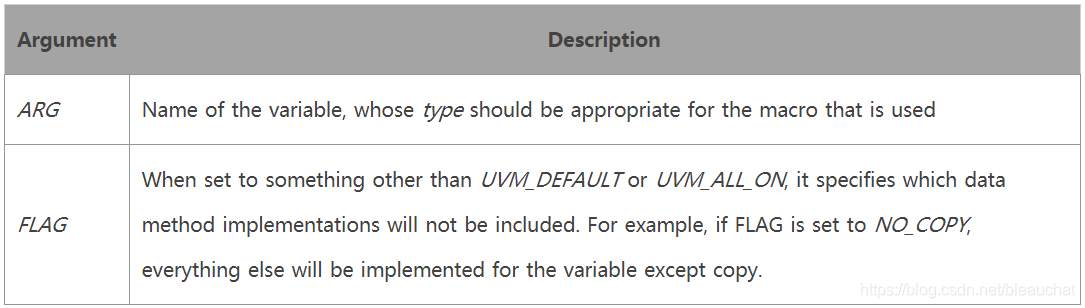
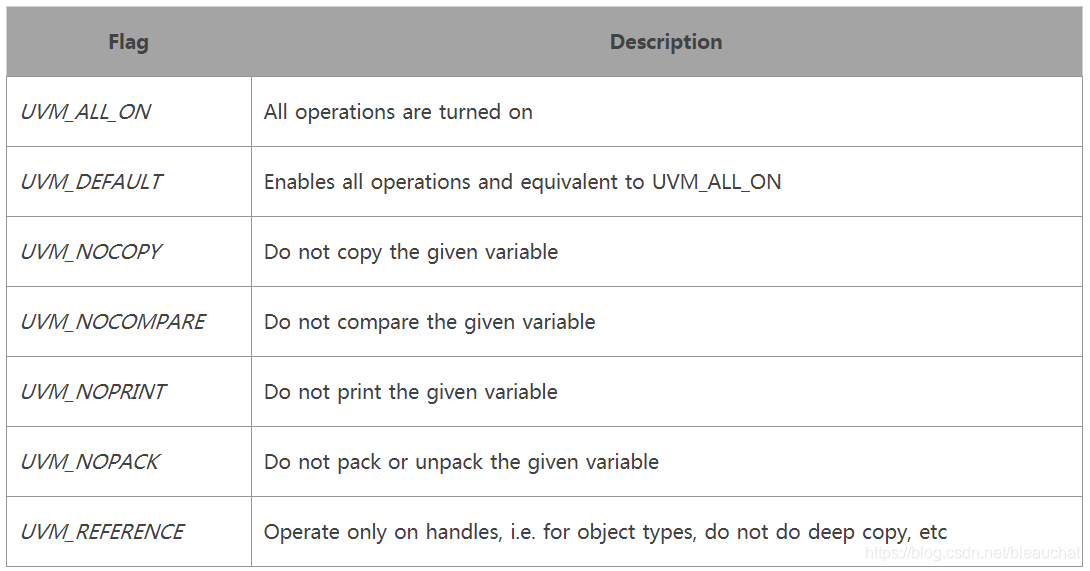
arg为变量名,flag为操作模式,可以取以下的值:
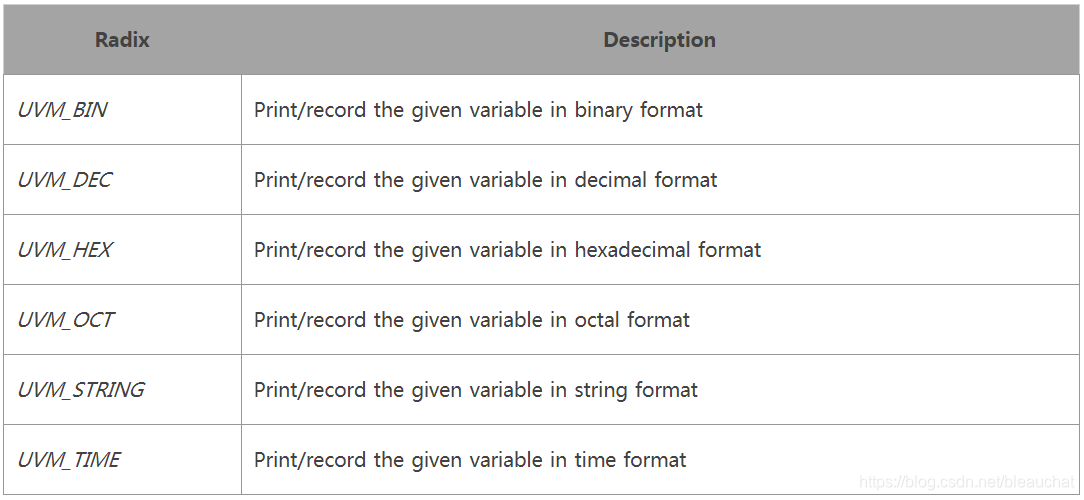
除此之外,field macros也提供了一些控制变量进制的参数,默认情况下为16进制,如下所示:
UVM Object Print
uvm_object是所有子类和组件(component)的父类,对于它的子类上面介绍了在factory中注册的格式,因此子类可以继承父类中的所有方法.通过使用utility macros在工厂中注册子类的目的是为了让子类更加方便的使用父类中的方法,可以在utility macros中添加field macros对子类的属性进行限定,然后再调用父类的方法.看下面例子:
(1)print()
typedef enum {FALSE, TRUE} e_bool;
class Object extends uvm_object;

  rand e_bool         m_bool;
  rand bit[3:0]       m_mode;
  rand byte           m_data[4];
  rand shortint       m_queue[$];
  string              m_name;

  constraint c_queue { m_queue.size() == 3; }

  function new(string name = "Object");
    super.new(name);
    m_name = name;
  endfunction

  // Each variable has to be registered with a macro corresponding to its data
  // type. For example, "int" types use `uvm_field int, "enum" types use
  // `uvm_field_enum, and "string" use `uvm_field_string
  `uvm_object_utils_begin(Object)//定义通用宏
    `uvm_field_enum(e_bool, m_bool,  UVM_DEFAULT)//这个宏的参数有3个,因为e_bool是自定义类型,而它又是属于枚举类型,所以要在参数列表特别指明
    `uvm_field_int (m_mode,          UVM_DEFAULT)//定义field 宏
    `uvm_field_sarray_int(m_data,    UVM_DEFAULT)//最后一个参数一般为UVM_DEFAULT
    `uvm_field_queue_int(m_queue,    UVM_DEFAULT)
    `uvm_field_string(m_name,        UVM_DEFAULT)
  `uvm_object_utils_end
endclass
为了测试上面的代码,我们通过一个类来实例化上面的类,并将调用print()方法打印:
module seq_item_tb;

  //instance
  Object obj;

  initial begin
    //create method
    obj = Object::type_id::create("obj"); //创建对象

    //randomizing the seq_item
    obj.randomize();//随机化

    //printing the seq_item
    obj.print();//调用print
  end
endmodule
结果:
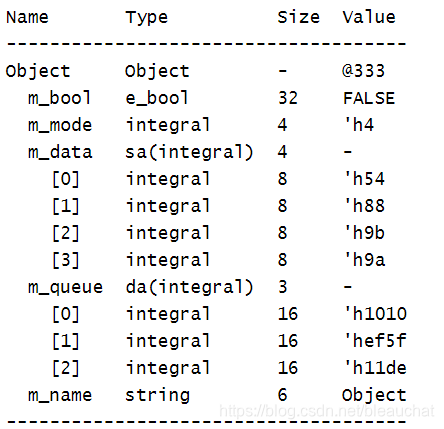
可以看出print()方法是以表格的形式打印的,表格中指明了变量名、变量类型、位宽、变量值;其中第一个打印的是对象本身.
(2)do_print()
上面的成员变量宏定义在通用宏当中,导致通用宏的代码异常复杂,且这样定义的成员变量宏不一定全部都是方法所需要的,这个时候就需要用到do_print()方法,该方法是用户自定义的回调函数(callback function),即在执行print()方法时自动调用。看下面例子:
typedef enum {FALSE, TRUE} e_bool;
class Object extends uvm_object;
rand e_bool m_bool;
rand bit[3:0] m_mode;
rand byte m_data[4];
rand shortint m_queue[$];//定义队列
string m_name;
constraint c_queue { m_queue.size() == 3; }
function new(string name = "Object");
super.new(name);
m_name = name;
endfunction
// 使用do_print(),所以不需要在通用宏中定义成员变量宏
`uvm_object_utils(Object)
// This function simply uses the printer functions to print variables based on their
// data types. For example, "int" variables are printed using function "print_field_int"
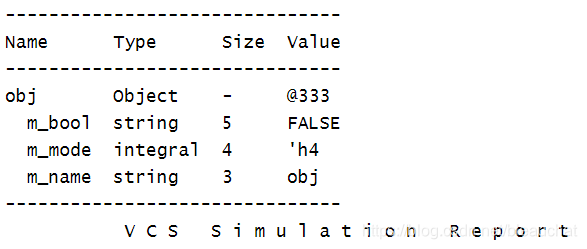
virtual function void do_print(uvm_printer printer);
super.do_print(printer);//执行父类的do_print
printer.print_string("m_bool", m_bool.name());
printer.print_field_int("m_mode", m_mode, $bits(m_mode), UVM_HEX);
printer.print_string("m_name", m_name);
endfunction
endclass
module seq_item_tb;
//instance
Object obj;
initial begin
//create method
obj = Object::type_id::create("obj"); //创建对象
//randomizing the seq_item
obj.randomize();//随机化
//printing the seq_item
obj.print();//调用print
end
endmodule结果:
UVM Object Copy/Clone
(1)copy()
class mem_seq_item extends uvm_sequence_item;
  //Control Information
  rand bit [3:0] addr;
  rand bit       wr_en;
  rand bit       rd_en;

  //Payload Information
  rand bit [7:0] wdata;

  //Analysis Information
       bit [7:0] rdata;

  //Utility and Field macros,
  `uvm_object_utils_begin(mem_seq_item)
    `uvm_field_int(addr,UVM_ALL_ON)
    `uvm_field_int(wr_en,UVM_ALL_ON)
    `uvm_field_int(rd_en,UVM_ALL_ON)
    `uvm_field_int(wdata,UVM_ALL_ON)
  `uvm_object_utils_end

  //Constructor
  function new(string name = "mem_seq_item");
    super.new(name);
  endfunction

  //constaint, to generate any one among write and read
  constraint wr_rd_c { wr_en != rd_en; };

endclass


//-------------------------------------------------------------------------
//Simple TestBench to access sequence item
//-------------------------------------------------------------------------
module seq_item_tb;

  //instance
  mem_seq_item seq_item_0;
  mem_seq_item seq_item_1;

  initial begin
    //create method
    seq_item_0 = mem_seq_item::type_id::create("seq_item_0");
    seq_item_1 = mem_seq_item::type_id::create("seq_item_1");

    seq_item_0.randomize(); //随机化第一个对象
    seq_item_0.print();     //printing the seq_item_0

    //copy method
    seq_item_1.copy(seq_item_0); //调用copy()复制seq_item_0,并把它赋给seq_item_1
    seq_item_1.print();          //printing the seq_item_1

  end
endmodule
结果:
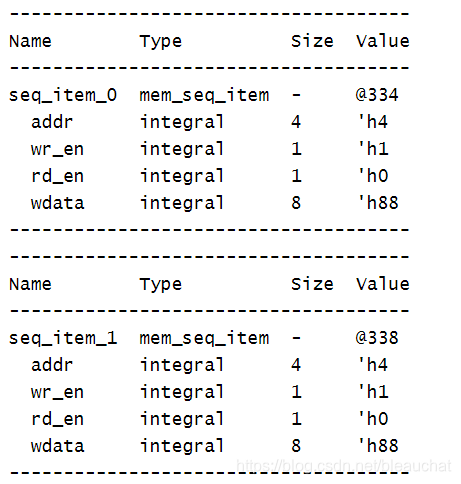
可以看到实现了field maros的变量的复制,且复制后两个对象的句柄不是同一个!这说明复制的是对象的成员,也就是深层复制.
(2)clone()
clone()方法创建并返回一个该对象的复制,也就是说clone = create() + copy().
class mem_seq_item extends uvm_sequence_item;
  //data and control fields
  rand bit [3:0] addr;
  rand bit       wr_en;
  rand bit       rd_en;
  rand bit [7:0] wdata;
       bit [7:0] rdata;

  //Utility and Field macros,
  `uvm_object_utils_begin(mem_seq_item)
    `uvm_field_int(addr,UVM_ALL_ON)
    `uvm_field_int(wr_en,UVM_ALL_ON)
    `uvm_field_int(rd_en,UVM_ALL_ON)
    `uvm_field_int(wdata,UVM_ALL_ON)
  `uvm_object_utils_end

  //Constructor
  function new(string name = "mem_seq_item");
    super.new(name);
  endfunction

  //constaint, to generate any one among write and read
  constraint wr_rd_c { wr_en != rd_en; };

endclass

//-------------------------------------------------------------------------
//Simple TestBench to access sequence item
//-------------------------------------------------------------------------
module seq_item_tb;

  //instance
  mem_seq_item seq_item_0;
  mem_seq_item seq_item_1;

  initial begin
    //create method
    seq_item_0 = mem_seq_item::type_id::create("seq_item_0");

    seq_item_0.randomize(); //randomizing the seq_item
    seq_item_0.print();     //printing the seq_item_0

    //clone method
    $cast(seq_item_1,seq_item_0.clone()); // 将clone()方法执行后的结果转换赋给seq_item_1
//这与上面copy()的最大不同在于不需要再创建一个seq_item_1对象,只需要创建一个句柄

    //changing the seq_item_1 values will not reflect on seq_item_0 values.
    seq_item_1.addr  = 8;
    seq_item_1.wdata = 'h56;//改变seq_item_1的成员
    `uvm_info("","Printing seq_item_0", UVM_LOW)
    seq_item_0.print();          //printing the seq_item_0
    `uvm_info("","Printing seq_item_1", UVM_LOW)
    seq_item_1.print();          //printing the seq_item_1

    //Note:: name of seq_item_1 will be printed as seq_item_0, because there is no option to pass argument to create method while calling the clone method.
  end
endmodule
结果:
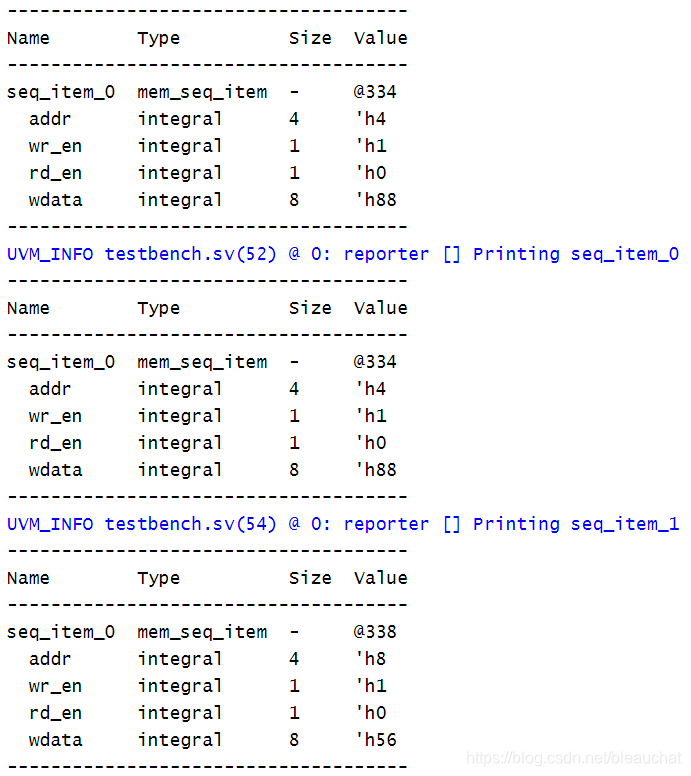
可以看出,使用clone()方法后,两个对象不是同一个地址,所以两者的成员互不影响.
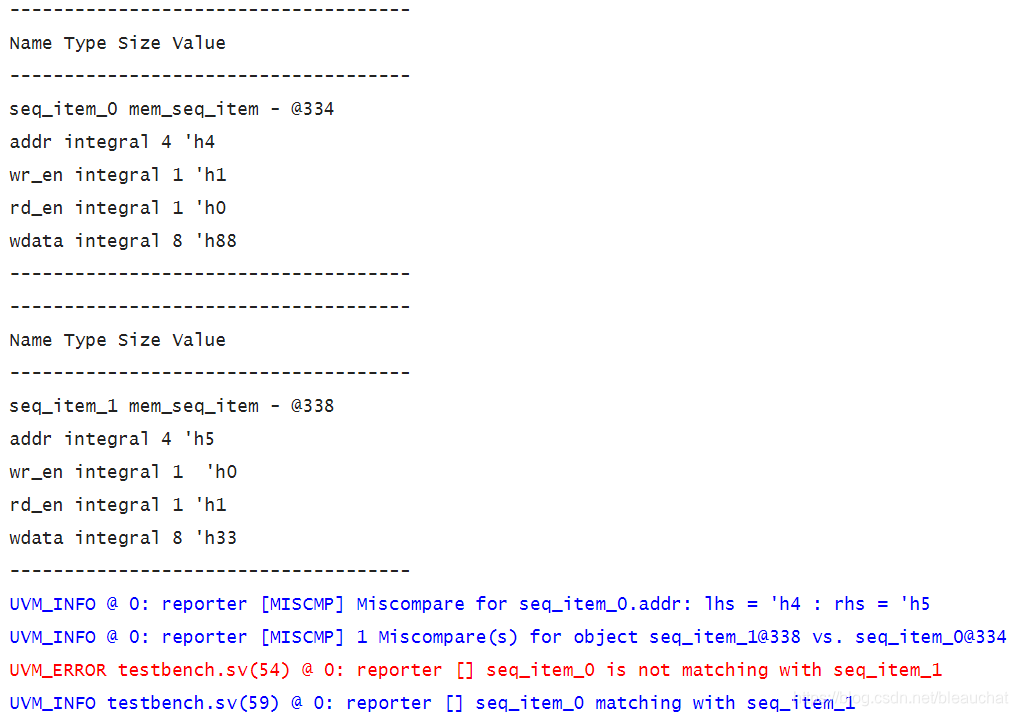
UVM Object compare
comapare()方法深度比较两个对象的成员,如果匹配则返回1,如果不匹配则返回0;
class mem_seq_item extends uvm_sequence_item;
  //data and control fields
  rand bit [3:0] addr;
  rand bit       wr_en;
  rand bit       rd_en;
  rand bit [7:0] wdata;
       bit [7:0] rdata;

  //Utility and Field macros,
  `uvm_object_utils_begin(mem_seq_item)
    `uvm_field_int(addr,UVM_ALL_ON)
    `uvm_field_int(wr_en,UVM_ALL_ON)
    `uvm_field_int(rd_en,UVM_ALL_ON)
    `uvm_field_int(wdata,UVM_ALL_ON)
  `uvm_object_utils_end

  //Constructor
  function new(string name = "mem_seq_item");
    super.new(name);
  endfunction

  //constaint, to generate any one among write and read
  constraint wr_rd_c { wr_en != rd_en; };

endclass

//-------------------------------------------------------------------------
//Simple TestBench to access sequence item
//-------------------------------------------------------------------------
module seq_item_tb;

  //instance
  mem_seq_item seq_item_0;
  mem_seq_item seq_item_1;

  initial begin
    //create method
    seq_item_0 = mem_seq_item::type_id::create("seq_item_0");
    seq_item_1 = mem_seq_item::type_id::create("seq_item_1");//创建两个对象

    //---------------Mismatch Case------------------------------
    seq_item_0.randomize(); //randomizing the seq_item_0
    seq_item_1.randomize(); //randomizing the seq_item_1 随机化

    seq_item_0.print();     //printing the seq_item_0
    seq_item_1.print();     //printing the seq_item_1 打印

    //compare method
    if(seq_item_0.compare(seq_item_1))//比较seq_item_0和seq_item_1
      `uvm_info("","seq_item_0 matching with seq_item_1", UVM_LOW)
    else
      `uvm_error("","seq_item_0 is not matching with seq_item_1")

    //---------------Matching Case------------------------------
    seq_item_1.copy(seq_item_0); //将seq_item_0复制给seq_item_1
    //compare method
    if(seq_item_0.compare(seq_item_1))//比较seq_item_0和seq_item_1
      `uvm_info("","seq_item_0 matching with seq_item_1", UVM_LOW)
    else
      `uvm_error("","seq_item_0 is not matching with seq_item_1")

  end
endmodule
结果:
UVM Object Pack/Unpack
pack()方法将field macros定义的成员变量打包为bit数组的形式,也可以用其他方法打包成byte或int数组;
而unpack()方法将一个bit数组解压为原始成员变量的格式,也可以用其他方法解压其他格式的数组.
这两个方法对于连续通信的接口如SPI、I2C或者RS-232很有用.
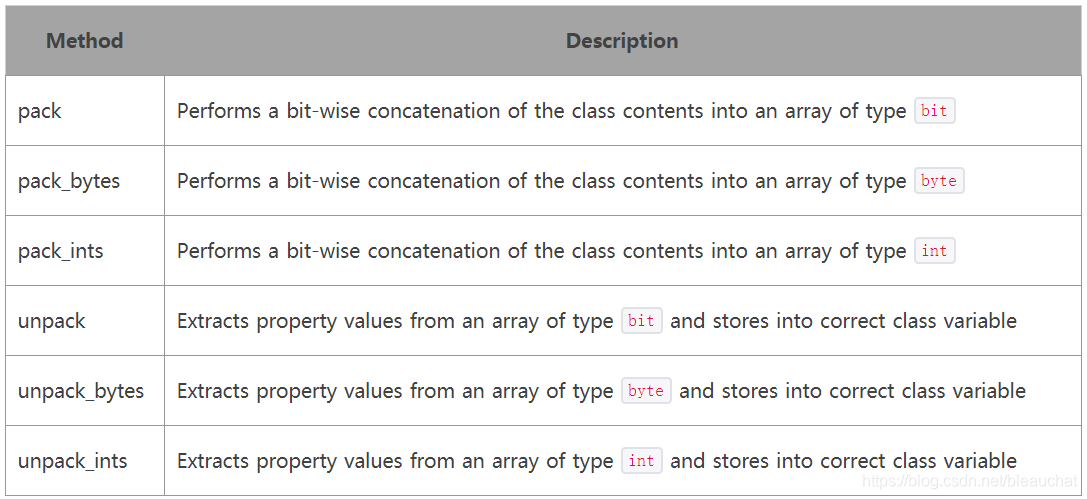
(1)pack
class mem_seq_item extends uvm_sequence_item;
  //data and control fields
  rand bit [3:0] addr;
  rand bit       wr_en;
  rand bit       rd_en;
  rand bit [7:0] wdata;
       bit [7:0] rdata;

  //Utility and Field macros,
  `uvm_object_utils_begin(mem_seq_item)
    `uvm_field_int(addr,UVM_ALL_ON)
    `uvm_field_int(wr_en,UVM_ALL_ON)
    `uvm_field_int(rd_en,UVM_ALL_ON)
    `uvm_field_int(wdata,UVM_ALL_ON)
  `uvm_object_utils_end

  //Constructor
  function new(string name = "mem_seq_item");
    super.new(name);
  endfunction

  //constaint, to generate any one among write and read
  constraint wr_rd_c { wr_en != rd_en; };

endclass

//-------------------------------------------------------------------------
//Simple TestBench to access sequence item
//-------------------------------------------------------------------------
module seq_item_tb;

  //instance
  mem_seq_item seq_item_0;
  mem_seq_item seq_item_1;
  bit bit_packed_data[];

  initial begin
    //create method
    seq_item_0 = mem_seq_item::type_id::create("seq_item_0");
    seq_item_1 = mem_seq_item::type_id::create("seq_item_1");

    //---------------------- PACK  ------------------------------
    seq_item_0.randomize(); //randomizing the seq_item_0
    seq_item_0.print();     //printing the seq_item_0

    seq_item_0.pack(bit_packed_data);    //使用pack将seq_item_0中定义的成员变量宏打包成bit数组,并且赋给bit_packed_data
    foreach(bit_packed_data[i])
      `uvm_info("PACK",$sformatf("bit_packed_data[%0d] = %b",i,bit_packed_data[i]), UVM_LOW)

    //---------------------- UNPACK ------------------------------
    `uvm_info("UNPACK","Before UnPack", UVM_LOW)
    seq_item_1.print();     //printing the seq_item_1
    seq_item_1.unpack(bit_packed_data);     //使用unpack将bit_packed_data数组解压为原始数据,并将它赋给seq_item_1
    `uvm_info("UNPACK","After UnPack", UVM_LOW)
    seq_item_1.print();     //printing the seq_item_1

  end
endmodule
结果:
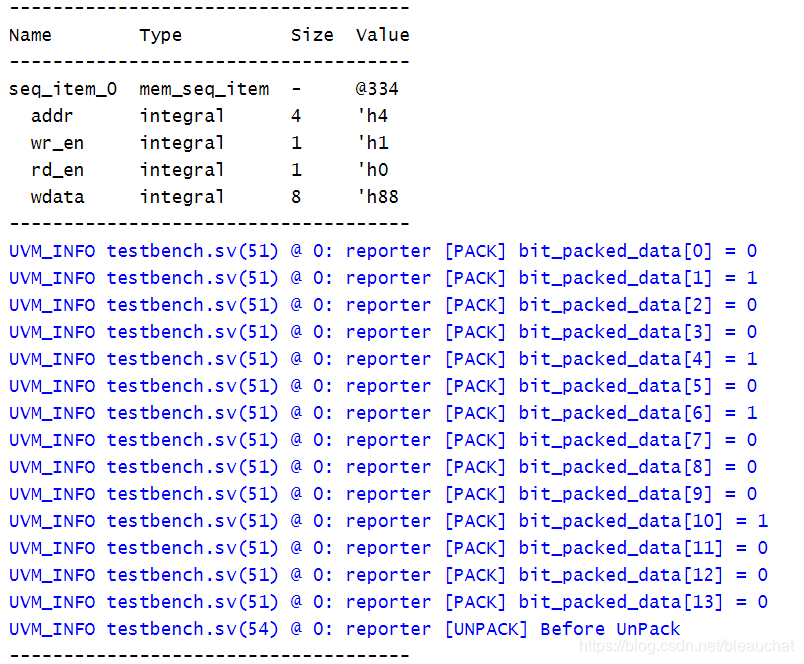
seq_item_0的成员变量宏为'h4、'h1、'h0、'h88,解压后正好对应于数组长度为14的bit数组.
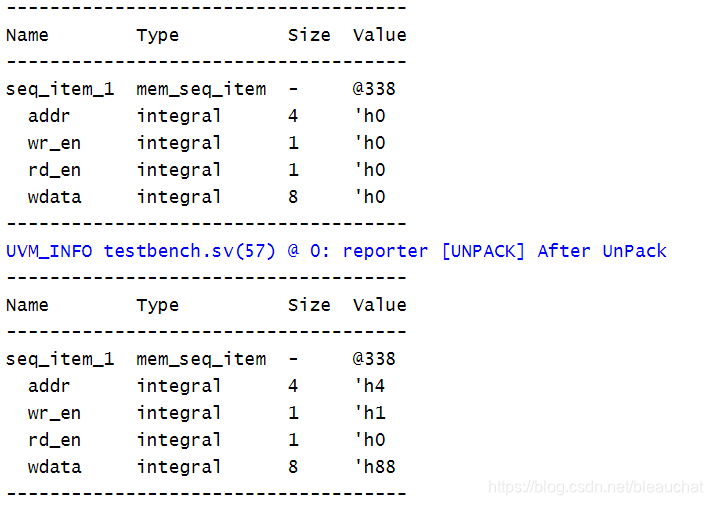
seq_item_1的初值为默认值,将解压后的结果赋给seq_item_1,seq_item_1的成员变量值与seq_item_0的成员变量相等.
(2)pack_bytes
打包成字节数组.
class mem_seq_item extends uvm_sequence_item;
  //data and control fields
  rand bit [3:0] addr;
  rand bit       wr_en;
  rand bit       rd_en;
  rand bit [7:0] wdata;
       bit [7:0] rdata;

  //Utility and Field macros,
  `uvm_object_utils_begin(mem_seq_item)
    `uvm_field_int(addr,UVM_ALL_ON)
    `uvm_field_int(wr_en,UVM_ALL_ON)
    `uvm_field_int(rd_en,UVM_ALL_ON)
    `uvm_field_int(wdata,UVM_ALL_ON)
  `uvm_object_utils_end

  //Constructor
  function new(string name = "mem_seq_item");
    super.new(name);
  endfunction

  //constaint, to generate any one among write and read
  constraint wr_rd_c { wr_en != rd_en; };

endclass

//-------------------------------------------------------------------------
//Simple TestBench to access sequence item
//-------------------------------------------------------------------------
module seq_item_tb;

  //instance
  mem_seq_item seq_item_0;
  mem_seq_item seq_item_1;
  byte unsigned byte_packed_data[];

  initial begin
    //create method
    seq_item_0 = mem_seq_item::type_id::create("seq_item_0");
    seq_item_1 = mem_seq_item::type_id::create("seq_item_1");

    //---------------------- PACK  ------------------------------
    seq_item_0.randomize(); //randomizing the seq_item_0
    seq_item_0.print();     //printing the seq_item_0

    seq_item_0.pack_bytes(byte_packed_data);    //打包成字节

    foreach(byte_packed_data[i])
      `uvm_info("PACK",$sformatf("byte_packed_data[%0d] = %b",i,byte_packed_data[i]), UVM_LOW)

    //---------------------- UNPACK ------------------------------
    `uvm_info("UNPACK","Before UnPack", UVM_LOW)
    seq_item_1.print();     //printing the seq_item_1

    seq_item_1.unpack_bytes(byte_packed_data);     //解压

    `uvm_info("UNPACK","After UnPack", UVM_LOW)
    seq_item_1.print();     //printing the seq_item_1

  end
endmodule
结果:
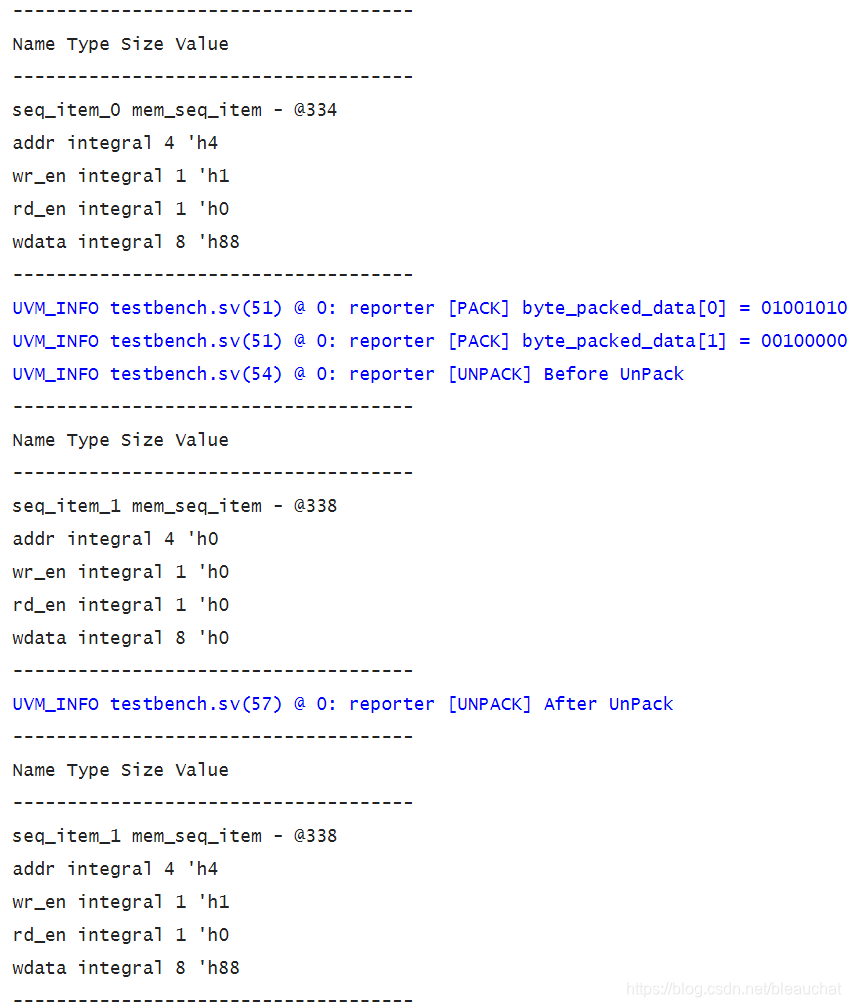
由于成员变量宏总共只有14位,凑不够两个字节,所以在第二个字节末尾自动补零.
(3)pack_ints
打包成32位整型数组.
class mem_seq_item extends uvm_sequence_item;
  //data and control fields
  rand bit [3:0] addr;
  rand bit       wr_en;
  rand bit       rd_en;
  rand bit [7:0] wdata;
       bit [7:0] rdata;

  //Utility and Field macros,
  `uvm_object_utils_begin(mem_seq_item)
    `uvm_field_int(addr,UVM_ALL_ON)
    `uvm_field_int(wr_en,UVM_ALL_ON)
    `uvm_field_int(rd_en,UVM_ALL_ON)
    `uvm_field_int(wdata,UVM_ALL_ON)
  `uvm_object_utils_end

  //Constructor
  function new(string name = "mem_seq_item");
    super.new(name);
  endfunction

  //constaint, to generate any one among write and read
  constraint wr_rd_c { wr_en != rd_en; };

endclass

//-------------------------------------------------------------------------
//Simple TestBench to access sequence item
//-------------------------------------------------------------------------
module seq_item_tb;

  //instance
  mem_seq_item seq_item_0;
  mem_seq_item seq_item_1;
  int unsigned int_packed_data[];

  initial begin
    //create method
    seq_item_0 = mem_seq_item::type_id::create("seq_item_0");
    seq_item_1 = mem_seq_item::type_id::create("seq_item_1");

    //---------------------- PACK  ------------------------------
    seq_item_0.randomize(); //randomizing the seq_item_0
    seq_item_0.print();     //printing the seq_item_0

    seq_item_0.pack_ints(int_packed_data);    //打包

    foreach(int_packed_data[i])
      `uvm_info("PACK",$sformatf("int_packed_data[%0d] = %b",i,int_packed_data[i]), UVM_LOW)

    //---------------------- UNPACK ------------------------------
    `uvm_info("UNPACK","Before UnPack", UVM_LOW)
    seq_item_1.print();     //printing the seq_item_1

    seq_item_1.unpack_ints(int_packed_data);     //解压

    `uvm_info("UNPACK","After UnPack", UVM_LOW)
    seq_item_1.print();     //printing the seq_item_1

  end
endmodule
结果:
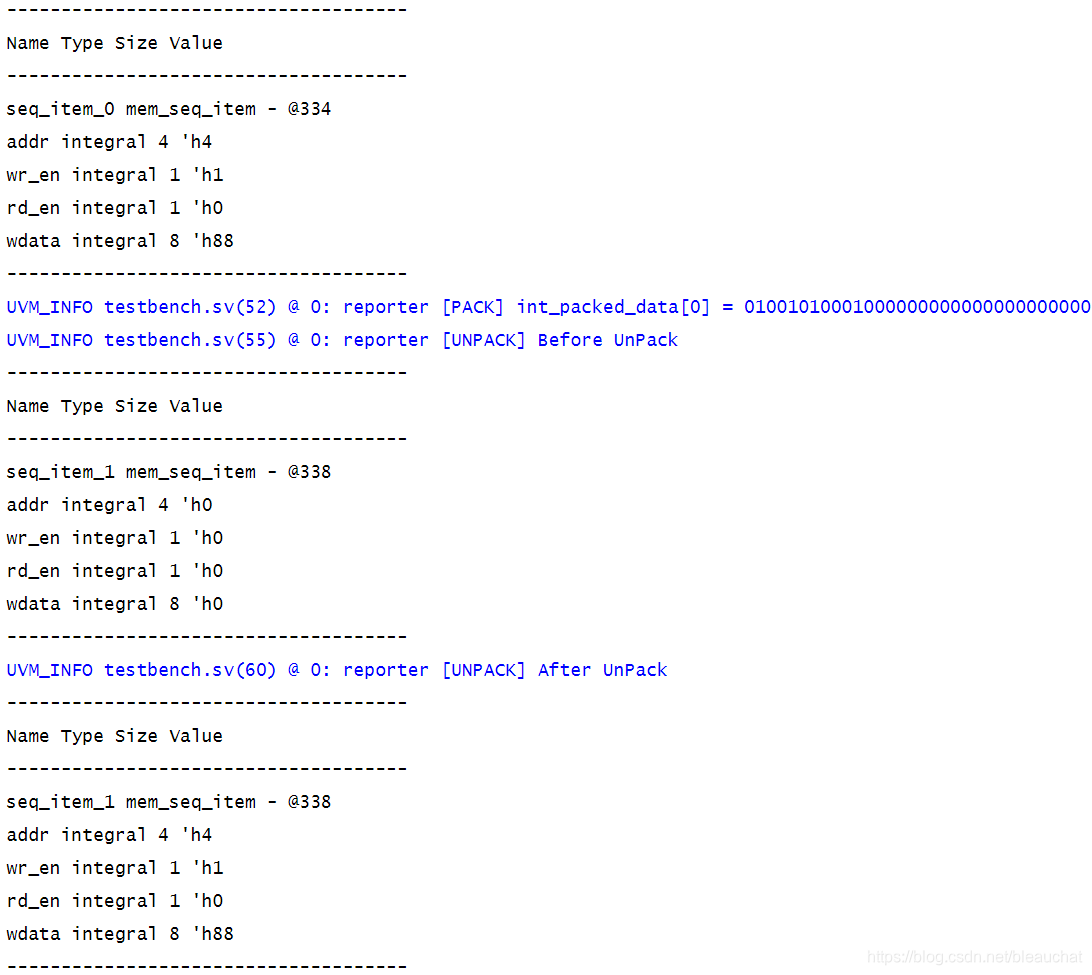
由于成员变量宏总共为14位凑不够一个32位变量,所以在后面自动补零.
uvm_object与uvm_component的比较
虽然uvm_component派生自uvm_object,理论上前者应该具备后者所有的特征性质,但是由于component是作为UVM树的结点而存在的 ,这就使得它失去一些uvm_object的性质;如上面的clone()方法,它用于将uvm_object分配一块内存,并将实例对象复制到这一块新的内存中,但是component无法使用clone()方法,因为一旦使用后,新类的parent参数无法指定!
但是由于clone=new+copy,在使用copy()方法之前,对象已经创建并且实例化,所以component可以使用copy方法!
另外,对于同一父结点下的不同component,在创建对象时不能使用同一个实例名,否则会报错!
UVM树
作为一个验证平台,他必须能够掌控下面的所有组件,在UVM中是通过UVM树来实现的.UVM 是采用树形的组织结构来管理验证平台的各个部分。 driver, monitor, agent, reference model(派生自uvm_component), scoreboard, env 等都是树的一个结点;
在前面派生自uvm_component的组件的定义中, 其构造方法包括两个参数,第一个是组件名,第二个是组件的parent,如下:
function new(string name, uvm_component parent);
  super.new(name,parent);
  ...........
endfunction这个parent参数的含义就是该组件的父结点,也就是说这个组件在UVM树中挂载在这个父结点下.
通常组件B在另一个组件A中实例化时,parent一般设定为"this",这表明A是B的父结点,实例化不管是使用new还是creat,都需要声明以上的两个参数.看下例:
class B extends uvm_component;
...
endclass

class C extends uvm_component;
...
endclass

class A extends uvm_component;
 .....
 B b;
 C c;
 virtual function void build_phase(uvm_phase phase);
     b=new("b",this);
     c = C::type_id::create ("c", this);
 endfunction
endclass上面的例子将组件B和C挂载在父结点A下,构造方法的参数this表示当前实例化所在的类,也就是A.
UVM通过上面的这样层层挂载从而构成了UVM树,那么UVM树的树根在哪呢?UVM中真正的树根是uvm_top,完整的UVM树如下:
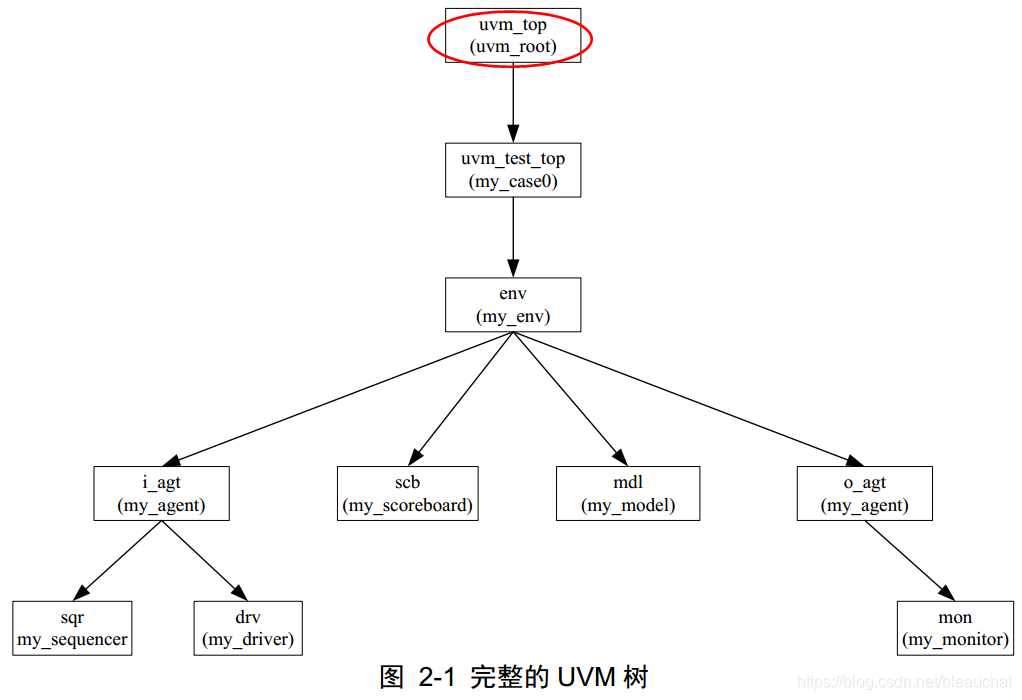
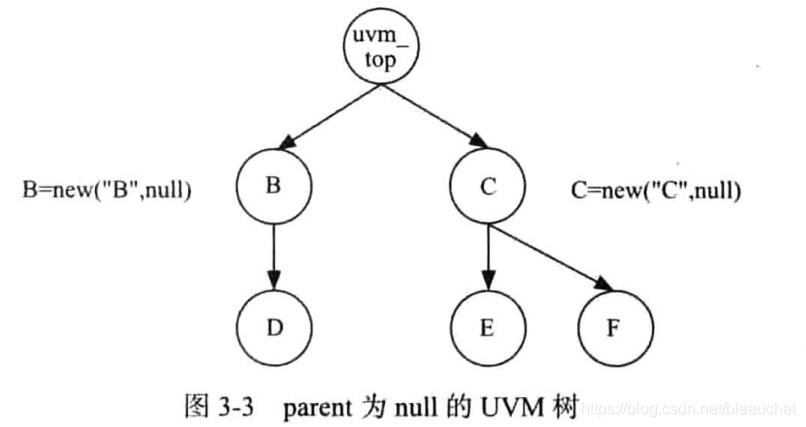
uvm_top是一个全局变量,它是uvm_root的实例,其父结点(parent)是null,表示没有;如果某个组件在实例化时,将其构造方法的第二个参数设置为null,这表示这个组件是uvm_top的子结点,在UVM树中的位置如下所示:
可见,由于uvm_root的存在,保证了UVM树中只存在一棵树,所有的结点都是uvm_top的子结点! uvm_root 派生自
uvm_component,所以 uvm_top 本质上是一个 uvm_component,它是树的根!
有的时候需要得到uvm_top,由于它是全局变量,可以直接使用,也可以通过下面的语句获取其句柄:
uvm_root top;//定义句柄
top=uvm_root::get();此外,开启UVM仿真的run_test()方法也是由uvm_root提供的!!
UVM提供了一系列访问层次结构的方法,如下:
(1)get_parent
virtual function uvm_component get_parent ();//获取当前实例的parentvirtual function string get_full_name ();//获取当前实例的完整层次路径(3)get_child
function uvm_component get_child (
   	string 	name
);
与get_parent不同的是,get_child(name)需要加上一个参数name,表示此child在实例的名字;这是因为一个组件的parent只能有一个,而child可能有好多个
function int get_first_child (
   	ref 	string 	name
);function int get_next_child (
ref string name
);上面三者可以结合使用,如下例:
string name;//作为参数进行传递
uvm_component child;
if (comp.get_first_child(name))
  do begin
    child = comp.get_child(name);
    child.print();
end while (comp.get_next_child(name));(6)get_children
function void get_children(
ref uvm_component children[$]
);//获取当前component的所有child
如下例:
uvm_component array[$];//将队列作为参数
my_comp.get_children(array);
foreach(array[i])
do_something(array[i]);(7)get_num_child
function int get_num_children ();//获取当前component的child数目(8)get_name
virtual function string get_name ();//获取当前对象的名字


 1384
1384

 被折叠的 条评论
为什么被折叠?
被折叠的 条评论
为什么被折叠?
 到【灌水乐园】发言


