


记录编译与修改龙蜥Anolis OS内核的过程(二)理解rpmbuild准备源码的逻辑
想要精准并合理的修改,前提是理解rpmbuild中的%prep流程!
rpm -ivh kernel-5.10.134-18.an8.src.rpm
rpmbuild -bp -v rpmbuild/SPECS/kernel.spec
可以执行%prep的详细过程,逐步分析一下:
第一步:调用%setup解压源代码
%setup -q -n %{name}-%{kernelversion}-%{pkg_release} -c
mv linux-%{kernelversion}-%{pkg_release} linux-%{KVERREL}

cd linux-%{KVERREL}
在RPM包构建过程中,%setup宏是在spec文件中用于解压源代码并准备构建环境的一个重要指令。它位于spec文件的prep段落(即%prep部分)中,主要用于自动处理源代码压缩包的解压和目录切换工作。
具体来说,%setup宏执行以下几个关键任务:
- 解压源代码:它会解压你在spec文件
Source0段落中指定的源代码压缩包。在kernel.spec文件中,定义了很多SourceXX文件,但是%setup仅处理Source0定义的linux-5.10.134-18.an8.tar.xz。而其它SourceXX定义的文件,则需要在%prep中自己编写脚本进行处理!
Source0: linux-%{kernelversion}-%{pkg_release}.tar.xz

Source16: mod-extra.list
Source17: mod-blacklist.sh

Source90: filter-x86_64.sh
Source93: filter-aarch64.sh
Source96: filter-sw_64-6b.sh
Source97: filter-sw_64-8a.sh
Source99: filter-modules.sh

Source20: kernel-%{version}-aarch64.config
Source21: kernel-%{version}-aarch64-debug.config
Source39: kernel-%{version}-x86_64.config
Source40: kernel-%{version}-x86_64-debug.config
Source3000: kernel-%{version}-sw_64-6b.config
Source3001: kernel-%{version}-sw_64-6b-debug.config
Source3002: kernel-%{version}-sw_64-8a.config
Source3003: kernel-%{version}-sw_64-8a-debug.config
Source43: generate_bls_conf.sh
Source44: mod-internal.list
Source45: kernel-5.10.134-loongarch64.config
Source46: kernel-5.10.134-loongarch64-debug.config
- 进入解压后的目录:默认情况下,它会将当前工作目录切换到解压后的源代码根目录。这对于后续的编译步骤非常有用,因为大多数软件项目的构建命令都需要在源代码的根目录下执行。
- 支持补丁应用:通过使用
-q参数可以安静模式运行,而使用-a <n>或-b <n>参数可以在解压后自动应用第n个补丁(其中<n>是补丁的序号,按照它们在spec文件中的顺序)。在本文中的kernel.spec没有使用此功能。
来看一下实际执行过程的输出:
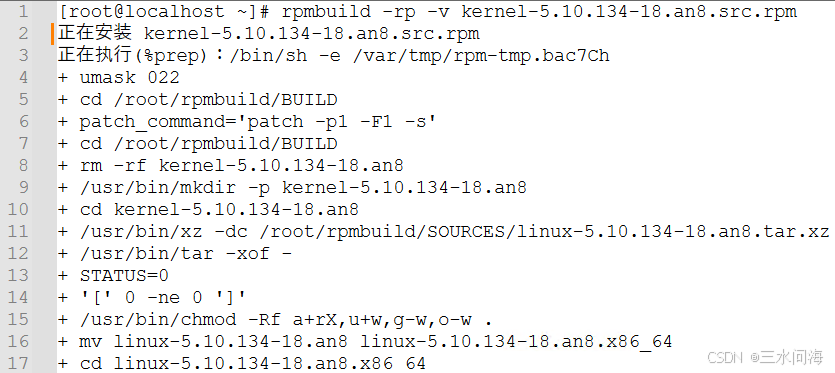
+ cd /root/rpmbuild/BUILD
+ rm -rf kernel-5.10.134-18.an8
+ /usr/bin/mkdir -p kernel-5.10.134-18.an8
+ cd kernel-5.10.134-18.an8
+ /usr/bin/xz -dc /root/rpmbuild/SOURCES/linux-5.10.134-18.an8.tar.xz
+ /usr/bin/tar -xof -
+ mv linux-5.10.134-18.an8 linux-5.10.134-18.an8.x86_64
+ cd linux-5.10.134-18.an8.x86_64
- 切换当前工作目录到
/root/rpmbuild/BUILD,这是存放解压后源码的地方。 - 强制删除可能存在的旧版本目录
kernel-5.10.134-18.an8,以避免冲突或残留文件问题。 - 创建新的目标目录
/root/rpmbuild/BUILD/kernel-5.10.134-18.an8,如果目录已存在则不会报错。 - 切换到新建的目标目录
/root/rpmbuild/BUILD/kernel-5.10.134-18.an8,准备在此目录下解压源码。 - 使用
xz工具解压缩位于/root/rpmbuild/SOURCES/目录下的.tar.xz格式的源码包。 - 将通过
xz解压出来的数据传递给tar命令,将源码提取到当前目录。 - 重命名解压后的目录,从
linux-5.10.134-18.an8改为linux-5.10.134-18.an8.x86_64. - 最后,切换到重命名后的目录
/root/rpmbuild/BUILD/kernel-5.10.134-18.an8/linux-5.10.134-18.an8.x86_64/,准备进一步的操作或应用补丁等。
第二步,配置文件
- 准备configs目录
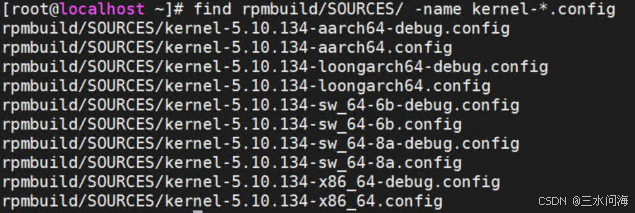
实验验证:直接解压SOURCES/linux-5.10.134-18.an8.tar.xz,发现其实没有configs目录。
rm -rf configs
mkdir configs
- 拷贝所有配置文件
# Drop some necessary files from the source dir into the buildroot
cp $RPM_SOURCE_DIR/kernel-%{version}-*.config .
其中$RPM_SOURCE_DIR目录即rpmbuild/SOURCES目录,确实存在如下配置文件。
来看一下实际执行过程的输出:

把匹配的配置文件,都拷贝到.即当前目录/root/rpmbuild/BUILD/kernel-5.10.134-18.an8/linux-5.10.134-18.an8.x86_64/中。
- 删除多余的配置文件。
# Remove configs not for the buildarch
for cfg in kernel-%{version}-*.config; do
  if [ `echo %{all_arch_configs} | grep -c $cfg` -eq 0 ]; then
    rm -f $cfg
  fi
done
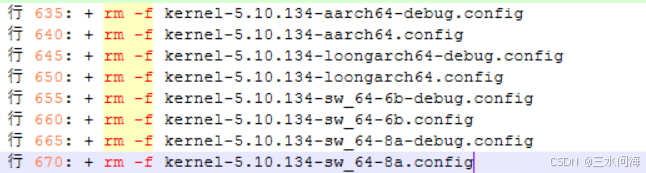
当前是x86_64架构,上述脚本执行的结果,是将其它架构的配置文件都删除掉!最终只留下了:kernel-5.10.134-x86_64.config和kernel-5.10.134-x86_64-debug.config
- 生成最终的配置文件
# now run oldconfig over all the config files
for i in *.config
do
  mv $i .config
  Arch=`sed -n 3p .config | cut -d' ' -f2 | cut -d'/' -f2`
  make ARCH=$Arch listnewconfig | grep -E '^CONFIG_' >.newoptions || true
  if [ -s .newoptions ]; then
    cat .newoptions
    #exit 1
  fi
  rm -f .newoptions
  make ARCH=$Arch olddefconfig
  echo "# $Arch" > configs/$i
  cat .config >> configs/$i
done
# end of kernel config
以kernel-5.10.134-x86_64.config为例,具体的执行过程:
mv kernel-5.10.134-x86_64.config .config
make ARCH=x86 listnewconfig
make ARCH=x86 olddefconfig
cat .config >> configs/kernel-5.10.134-x86_64.config
(1)kernel-5.10.134-x86_64.config变成.config文件
(2)make ARCH=x86 listnewconfig 扫描当前的 .config 文件,并识别出任何未被显式设置(既不是 y 也不是 n,也不是具体的数值)的配置选项。不过,即使发现了,也因为注释掉了#exit 1,不会停下来。不过可以根据输出,自行判断。
(3)make ARCH=x86 olddefconfg 在现有的.config的基础上,帮助你快速地为新的内核版本配置选项,同时保留你之前对于老版本内核所做的自定义设置。
(4)把当前.config内容写入configs/kernel-5.10.134-x86_64.config
最终,在configs目录,生成了最终的kernel-5.10.134-x86_64.config和kernel-5.10.134-x86_64-debug.config文件。
第三步,调用patch命令来打patch
本文中的kernel.spec并没有定义任何的Patch。这是一个简单的例子,以后修改内核,可以使用此方法。
- 定义patch,一般放在kernel.spec靠前的位置
# 定义补丁列表
Patch0:         fix-bug1.patch
Patch1:         update-docs.patch
- 打patch,可以在%prep中增加如下命令:
# 应用补丁
%patch0 -p1  # 应用第一个补丁
%patch1 -p1  # 应用第二个补丁
思考
- 如何修改内核配置文件?
- 方法一:直接修改rpmbuild/SOURCES目录下的配置文件?
- 方法二:把修改放到自定义的patch文件中,在%prep过程中增加补丁?
- 如果修改内核源码?
- 方法一:在执行完%prep直接修改内核源码?
- 方法二:把修改放到自定义的patch文件中,在%prep过程中增加补丁?


 886
886

 被折叠的 条评论
为什么被折叠?
被折叠的 条评论
为什么被折叠?
 到【灌水乐园】发言


