


点击查看系列文章 =》 Interrupt Pipeline系列文章大纲-优快云博客
原创不易,需要大家多多鼓励!您的关注、点赞、收藏就是我的创作动力!
5.3.4 Xenomai3: hello world如何变成Xenomai实时进程
先回顾一下上一章提出的问题:
“hello”进程已经是一个Xenomai进程了,而不是普通的Linux进程。这是怎么做到的呢?
怎么多出了一个线程号785的"cobalt_printf"线程呢?
首先来梳理一下,在Linux Shell下启动一个普通的应用程序,整体流程是什么样的:
(1)Fork 函数:Shell 使用 fork() 函数,调用sys_fork系统调用来创建一个新的子进程。此时,子进程是父进程(通常是 Shell)的一个副本,包括内存空间、文件描述符等。
(2)Exec 系列函数:在子进程中,Shell 调用 execve() 或其他 exec 系列函数之一来加载并执行指定的 ELF 文件。这一步会替换当前进程的用户空间镜像为新程序的镜像。
(3)_start 入口点
控制权传递给程序的入口点 _start。这是由编译器提供的启动代码的一部分,负责设置初始的栈帧和其他必要的环境变量,并准备参数来调用 _libc_start_main。
(4)__libc_start_main/__libc_csu_init
__libc_start_main 是 glibc 内部函数,负责进一步初始化运行时环境,包括调用__libc_csu_init初始化全局构造函数和静态构造函数,即执行所有带有__attribute__((constructor))属性的函数以及C++中的静态对象构造函数。
__libc_start_main最终调用 main()。
(5)main() 函数执行
控制权交给用户定义的 main() 函数,在这个例子中,它调用了 puts 来打印 "Hello, World!\n",然后返回 0 表示成功退出。
Xenomai3主要在上述的第(4)步,做了神奇操作!引用官方的Application setup :: Xenomai 3的一张图,增加一些自己的理解(蓝色背景),如下图。
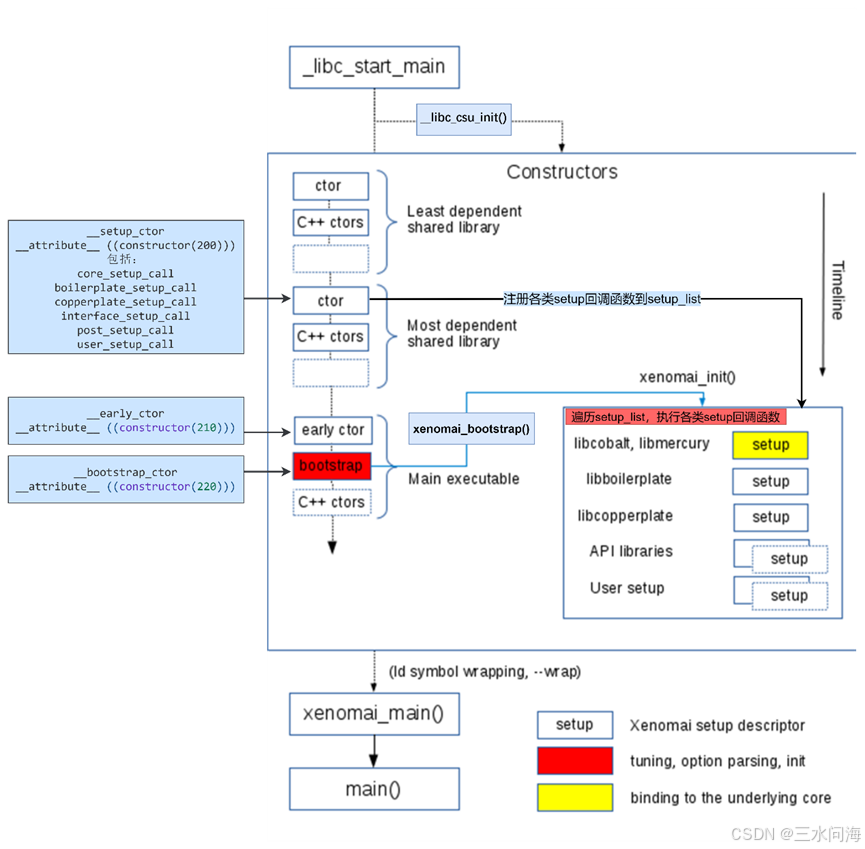
第一部分:__libc_start_main/__libc_csu_init
__libc_start_main调用__libc_csu_init执行所有带有__attribute__((constructor))属性的函数。Xenomai3 利用GCC的 __attribute__((constructor)) 特性来定义了3种优先级的构造函数。凡是有这3个宏作为前缀的函数,总是会在__libc_csu_init中被执行。

(1)__setup_ctor
基于__setup_ctor,进一步封装了宏定义__setup_call。__setup_call总是调用__register_setup_call向一个setup_list链表注册struct setup_descriptor结构体。
xenomai-v3.2.1/include/boilerplate/setup.h:
#define __setup_ctor        __attribute__ ((constructor(200)))

#define __setup_call(__name, __id)          \
static __setup_ctor void __declare_ ## __name(void) \
{                           \
    __register_setup_call(&(__name), __id);     \
}

#define core_setup_call(__name)     __setup_call(__name, 0)
#define boilerplate_setup_call(__name)  __setup_call(__name, 1)
#define copperplate_setup_call(__name)  __setup_call(__name, 2)
#define interface_setup_call(__name)    __setup_call(__name, 3)
#define post_setup_call(__name)     __setup_call(__name, 4)
#define user_setup_call(__name)     __setup_call(__name, 5)
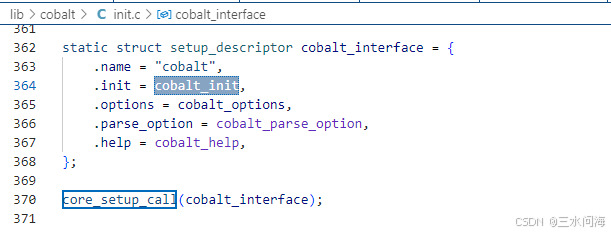
其中,最关键就是core_setup_call,它仅在lib/cobalt/init.c中使用了一次,注册struct setup_descriptor cobalt_interface到setup_list链表,且优先级为0,代表最高!
(2)__early_ctor
xenomai-v3.2.1/include/boilerplate/setup.h:
#define __early_ctor        __attribute__ ((constructor(210)))
(3)__bootstrap_ctor
xenomai-v3.2.1/include/boilerplate/setup.h:
#define __bootstrap_ctor __attribute__ ((constructor(220)))
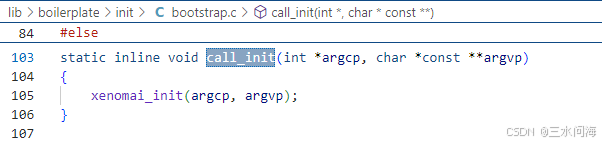
xenomai-v3.2.1/lib/boilerplate/init/bootstrap.c
__bootstrap_ctor static void xenomai_bootstrap(void)
只有一个函数xenomai_bootstrap有__bootstrap_ctor前缀!原图中红色底框的“bootstrap”其实最终就是调用xenomai_bootstrap。
xenomai_bootstrap读取 /proc/self/cmdline 文件,解析命令行参数,并将这些参数传递给初始化函数 call_init(直接调用xenomai_init),处理xenomai特有的参数,将剩余的应用程序自身的参数保存到early_argc/early_argv中。
当使用xeno-config --posix --ldflags获取链接参数时,是默认打开Automatic bootstrap的,即链接bootstrap.o。可以使用xeno-config --posix --ldflags --no-auto-init来放弃Automatic bootstrap,但是必须手动调用xenomai_init()。一般来说还是老老实实的Automatic bootstrap吧。
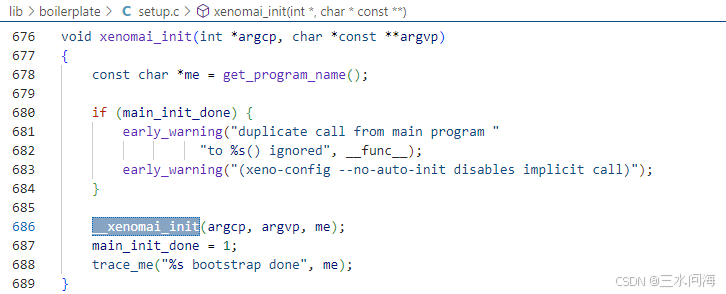
xenomai_init在Xenomai3的源码中有两处定义,注意此时一定是定义在lib/boilerplate/setup.c中的xenomai_init。它做main_init_done的检查,确保不会重复初始化。如果没有初始化,则调用__xenomai_init继续。
__xenomai_init函数比较长,其中参数处理部分就先忽略了,来直接看对setup_list的遍历。找到一个已经注册的struct setup_descriptor,则调用setup->init函数。

在所有已经注册的,关注struct setup_descriptor cobalt_interface,它的init函数是cobalt_init,对应于官方流程图里面的黄色框内的setup.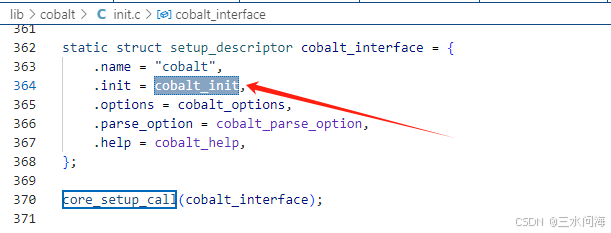
cobalt_init
    ->cobalt_init_1()
    ->cobalt_init_2()
	    ->low_init() // 调用sc_coablt_bind系统调用创建cobalt_process
        ->cobalt_print_init() //创建Linux普通线程cobalt_printf
        -> __RT(pthread_setschedparam(ptid, policy, &parm))
	        ->pthread_setschedparam_ex
pthread_setschedparam_ex的核心部分如下图,主要包括两个Xenomai系统调用!
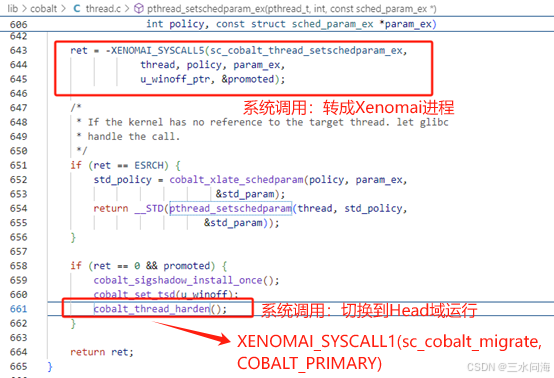
系统调用sc_cobalt_thread_setschedparam_ex在Xenomai内核中的实现如下。
1)创建struct cobalt_thread,插入struct cobalt_process中thread_list链表!
2)将struct cobalt_thread变成Linux struct task_struct的影子
从这里可以看出,Linux的进程用struct task_struct表示,同时struct task_struct也是调度的实体。而Xenomai对应创建了struct cobalt_process,再额外创建了struct cobalt_thread,并且struct cobalt_thread才是运行和调度的实体。
COBALT_SYSCALL(thread_setschedparam_ex, conforming,
           (unsigned long pth,
        int policy,
        const struct sched_param_ex __user *u_param,
        __u32 __user *u_winoff,
        int __user *u_promoted))
-> cobalt_thread_setschedparam_ex
-> thread_lookup_or_shadow
-> cobalt_thread_shadow
-> pthread_create //创建struct cobalt_thread,插入struct cobalt_process中thread_list链表!
-> cobalt_map_user //将struct cobalt_thread变成Linux struct task_struct的影子
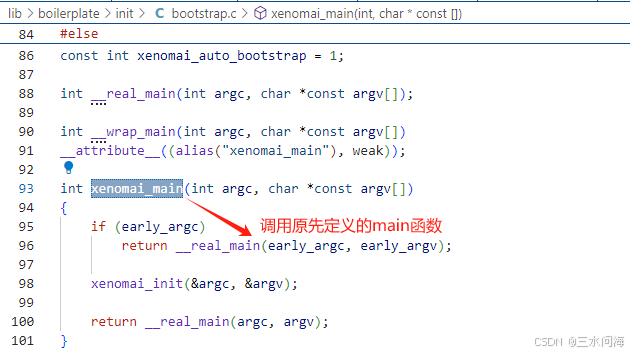
第二部分,__libc_start_main/Xenomai_main
__libc_start_main先调用Xenomai_main,再转到原先的main函数,秘密就在于链接阶段的参数!
-Wl,--wrap=main
-Wl,--dynamic-list=/root/ipipe-arm64/xenomai_install/usr/xenomai/lib/dynlist.ld
-Wl,--wrap=main : 将对 main 函数的所有引用重定向到名为 __wrap_main 的函数,并将 main 函数本身重命名或重新定义为 __real_main。__wrap_main函数就定义在bootstrap.o中,它的别名是xenomai_main!
-Wl,--dynamic-list:通过将main添加到 --dynamic-list 中,确保了即使使用了 -Wl,--wrap=main 选项来包装 main 函数,原始的 main 函数仍然可以被正确地识别和调用。
至此,已经完全回答了本文开头提出的问题!
Xenomai3 利用GCC的 __attribute__((constructor)) 特性来定义了3种优先级的构造函数,按优先级执行,完成了Xenomai相关服务的初始化,把Linux进程转换程序Xenomai进程。
Xenomai3利用GCC的--wrap特性,完成了从xenomai_main到__real_main的切换!
点击查看系列文章 =》 Interrupt Pipeline系列文章大纲-优快云博客
原创不易,需要大家多多鼓励!您的关注、点赞、收藏就是我的创作动力!


 2104
2104

 被折叠的 条评论
为什么被折叠?
被折叠的 条评论
为什么被折叠?
 到【灌水乐园】发言


