


 本文详细介绍在Ubuntu系统中配置深度学习环境的过程,包括安装Anaconda、TensorFlow 2.0和PyTorch等关键步骤,并提供了手动安装指导。同时,通过示例代码对比了PyTorch与不同版本TensorFlow的使用差异。
在安装好ubuntu系统后,我们将开启深度学习的进程,首先是配置python语言、多种深度学习框架、以及各种安装包的环境。
本文将介绍如下内容:
- linux系统中安装anaconda
- linux系统中安装tensorflow2.0
- linux系统中安装pytorch
- 简单对比pytorch、tensorflow1.0、tensorflow2.0
本文章安装依赖于anaconda(因为非常简单),如果想自己安装应用,可以参考这边文章:ubuntu16.04下安装CUDA,cuDNN及tensorflow-gpu版本过程
一,linux系统中安装anaconda
1,在网站中下载anaconda
https://mirrors.tuna.tsinghua.edu.cn/anaconda/archive/Anaconda3-5.2.0-Linux-x86_64.sh
2,安装anaconda
bash Anaconda3-5.2.0-Linux-x86_64.sh
3,更新conda下载源
在终端中输入以下:
conda config --add channels https://mirrors.tuna.tsinghua.edu.cn/anaconda/pkgs/free/
conda config --add channels https://mirrors.tuna.tsinghua.edu.cn/anaconda/pkgs/main/
conda config --set show_channel_urls yes
4,anaconda 常用命令
conda --version           # 获取conda版本号
conda info --envs         # 获取当前所有虚拟环境
source activate 【your_env_name】# 进入某个环境
source deactivate         # 退出当前环境
conda create --name 【new_env_name 】--clone 【old_env_name】 # 复制某个环境
conda remove --name 【your_env_name 】--all  # 删除某个环境
conda list # 查看当前环境中有哪些安装包
二,linux系统安装tensorflow2.0
1,安装nvidia显卡驱动
在开始安装tensorflow2.0之前,我们先确定linux系统是否已经安装好了nvidia显卡驱动。
这里我将不在赘述,详细操作的推荐网址如下:ubuntu16.04系统run方式安装nvidia显卡驱动
如何查看显卡驱动具体信息,可以参考笔者另一篇文章:Linux-ubuntu系统查看显卡型号、显卡信息详解、显卡天梯图
2,安装tensorflow2.0
1)使用anaconda安装tensorflow2.0
使用conda创建python虚拟环境(这里推荐使用–clone方式,推荐使用spyder4.1.2)
conda create --name 【new_env_name 】
安装tensorflow2.0命令如下(此命令将会自动安装CUDA,cuDNN包):
conda install tensorflow-gpu==2.2.0
2)手动下载tensorflow2.0安装包直接安装
很多时候使用anaconda安装tensorflow2.0因为文件很大,会发生下载中断的情况,此时推荐手动下载安装的方式。
在ubuntu终端输入如下命令,查看所需的cuda和cudnn的版本信息
conda install tensorflow-gpu==2.1.0
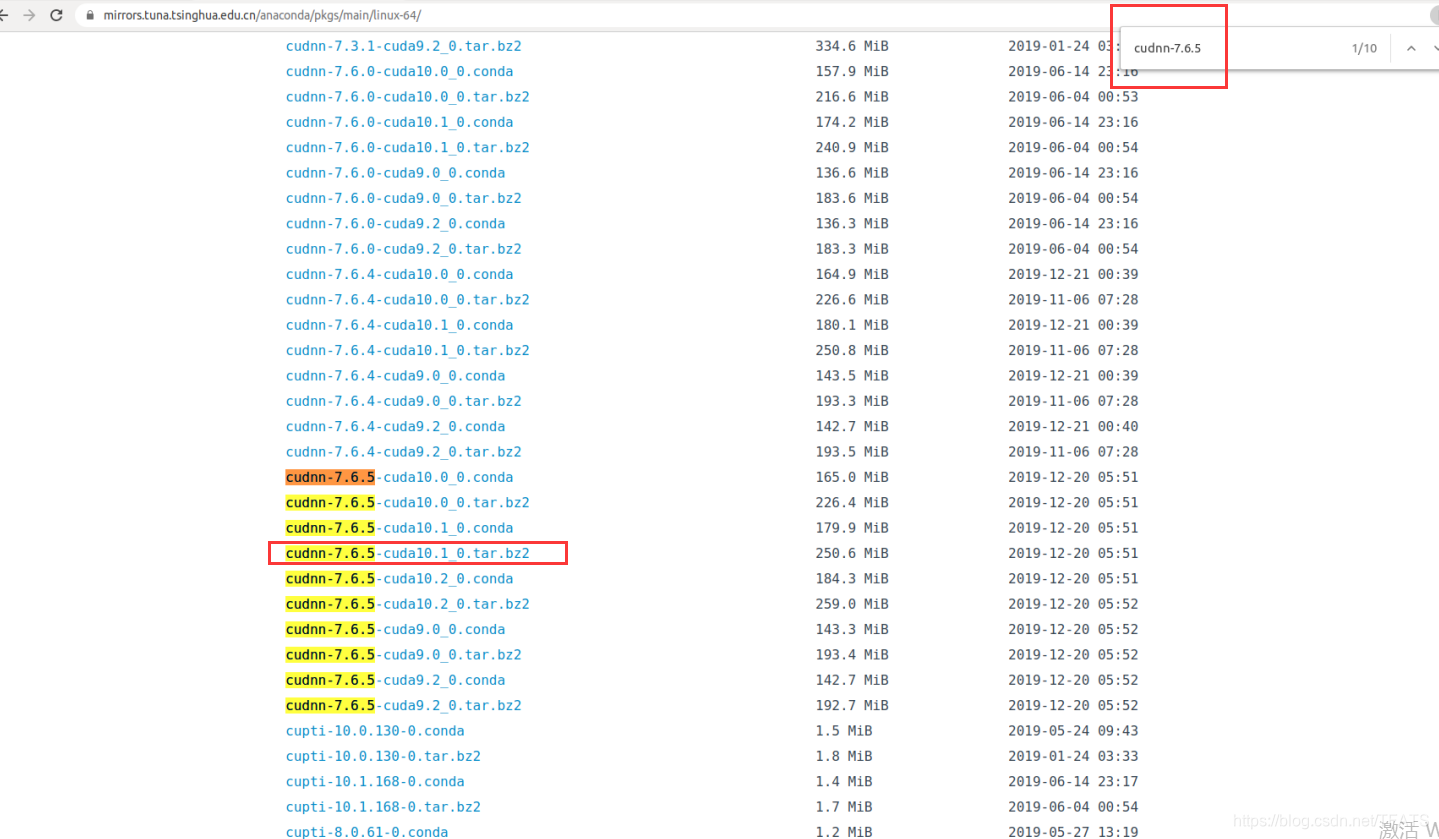
cuda和cudnn所需的版本信息和下载地址如下:
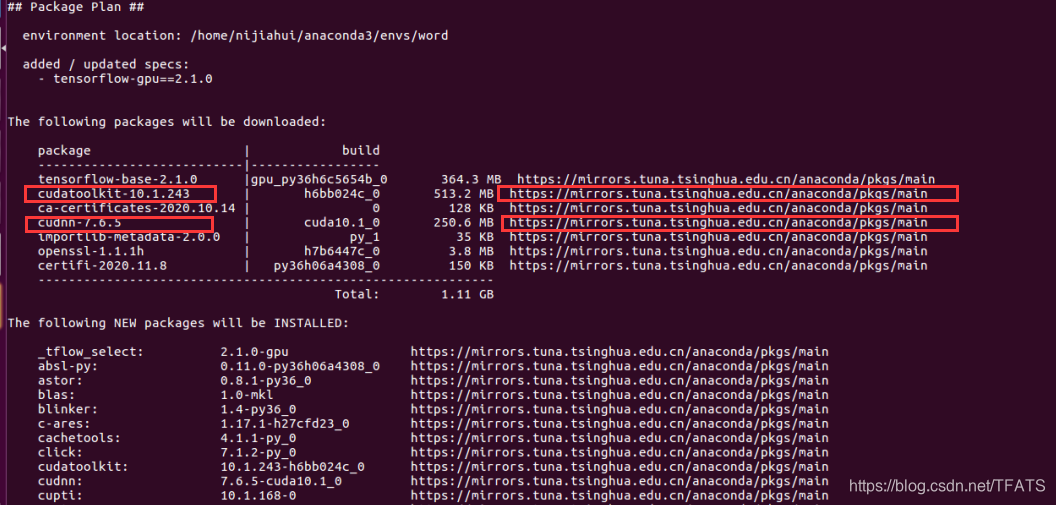
进入cuda和cudnn对应的两个链接,根据package名称搜索并下载
使用conda install 命令直接安装cuda和cudnn
conda install --offline cudnn-7.6.5-cuda10.1_0.tar.bz2
conda install --offline cudatoolkit-10.1.243-h6bb024c_0.tar.bz2
使用豆瓣源下载tensorflow
经过多次验证,此方法速度快、成功率高、且有效。
pip install tensorflow-gpu==2.1.0 -i https://pypi.doubanio.com/simple
使用如下方法验证安装的tensorflow是否是gpu版本
在终端中输入python3进入python命令界面,输入如下命令,若返回结果为True则为gpu版本,反之则不是。
import tensorflow as tf
tf.test.is_gpu_available()
具体过程如下:

在安装后,开启spyder编辑器时可能会出现如下报错信息,可点击如下链接解决
报错信息如下:
TypeError: handle_get_file_code() got an unexpected keyword argument ‘save_all‘
解决链接如下:
https://blog.youkuaiyun.com/TFATS/article/details/110424064
三,linux系统中安装pytorch
1,pytorch官网命令直接安装
进入pytorch官网,下载如下图:

由于有时自动下载速度过慢,可以使用下面方式进行下载安装
2,在官网使用下载后安装
亦或者可以直接进入该下载网址自行下载https://download.pytorch.org/whl/torch_stable.html。
根据在官网中,选择好的torch、python、torchvision、cuda版本号后生成的下载命令,找到这两个下载文件并下载。
如下图:

下载文件名称带参数解释如下:

3,安装pytorch
下载后的两个下载文件如下:

pip install torch-1.6.0+cu101-cp36-cp36m-linux_x86_64.whl
pip install torchvision-0.7.0+cu101-cp36-cp36m-linux_x86_64.whl
四,简单对比pytorch、tensorflow1.0、tensorflow2.0
1,tensorflow1.0
# 1 + 1/2 + 1/2^2 + 1/2^3 + ... + 1/2^50

import tensorflow as tf
print(tf.__version__)

x = tf.Variable(0.)
y = tf.Variable(1.)

print(x)
print(y)

# x = x + y
add_op = x.assign(x + y)
# y = y / 2
div_op = y.assign(y / 2)

with tf.Session() as sess:
    sess.run(tf.global_variables_initializer())
    for iteration in range(50):
        sess.run(add_op)
        sess.run(div_op)
    print(x.eval())   # sess.eval(x)

# -----output-------
1.15.0
<tf.Variable 'Variable_12:0' shape=() dtype=float32_ref>
<tf.Variable 'Variable_13:0' shape=() dtype=float32_ref>
2.0
2,pytorch
import torch
assert torch.cuda.is_available()

print(torch.__version__)

x = torch.Tensor([0.])
y = torch.Tensor([1.])

for iteration in range(50):
    x = x + y
    y = y / 2

print(x)

# -----output--------
1.6.0+cu101
tensor([2.])
3,tensorflow2.0
import tensorflow as tf
# tf.enable_eager_execution()     # tensorflow在1.6版本后添加了此启用动态图机制功能;2.0版本移除了该方法。
tf.compat.v1.enable_eager_execution()	# tensorflow在2.0版本后默认自动开启动态图机制功能;手动开启方法如上。

print(tf.__version__)

x = tf.constant(0.)
y = tf.constant(1.)

for iteration in range(50):
    x = x + y
    y = y / 2

print(x.numpy())

# ------output-------
2.2.0
2.0


 5083
5083

 被折叠的 条评论
为什么被折叠?
被折叠的 条评论
为什么被折叠?
 到【灌水乐园】发言


