


本篇教程基于ShiMetaPi研发的FPGA+ARM开发板——GM-3568JHF展开

1. WIFI模块概述
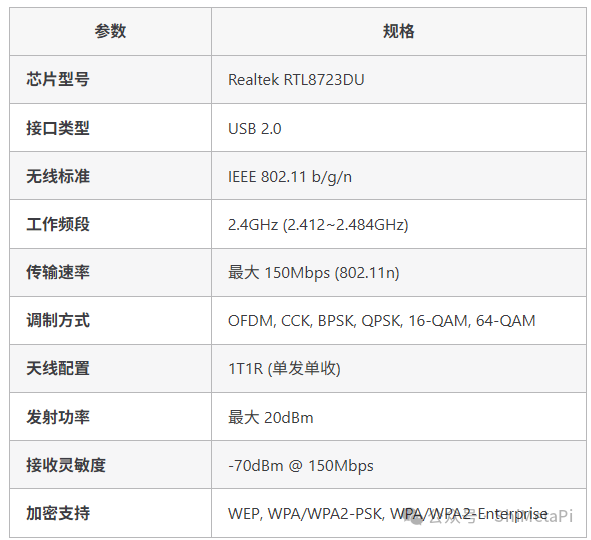
GM-3568JHF开发板集成了RTL8723DU无线网络模块,提供了完整的IEEE 802.11 b/g/n无线网络连接功能。该模块通过USB接口与主控芯片连接,支持2.4GHz频段的无线通信,为开发板提供了灵活的无线网络接入能力。
1.1 RTL8723DU模块技术规格
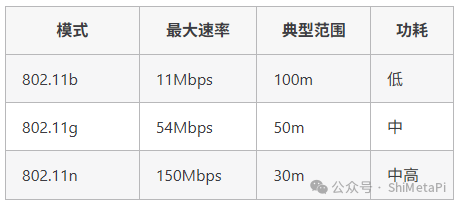
1.2 性能指标
2. WIFI连接配置
开发板使用RTL8723DU模块,系统已默认适配好WIFI驱动和相关软件组件。
2.1 连接WIFI
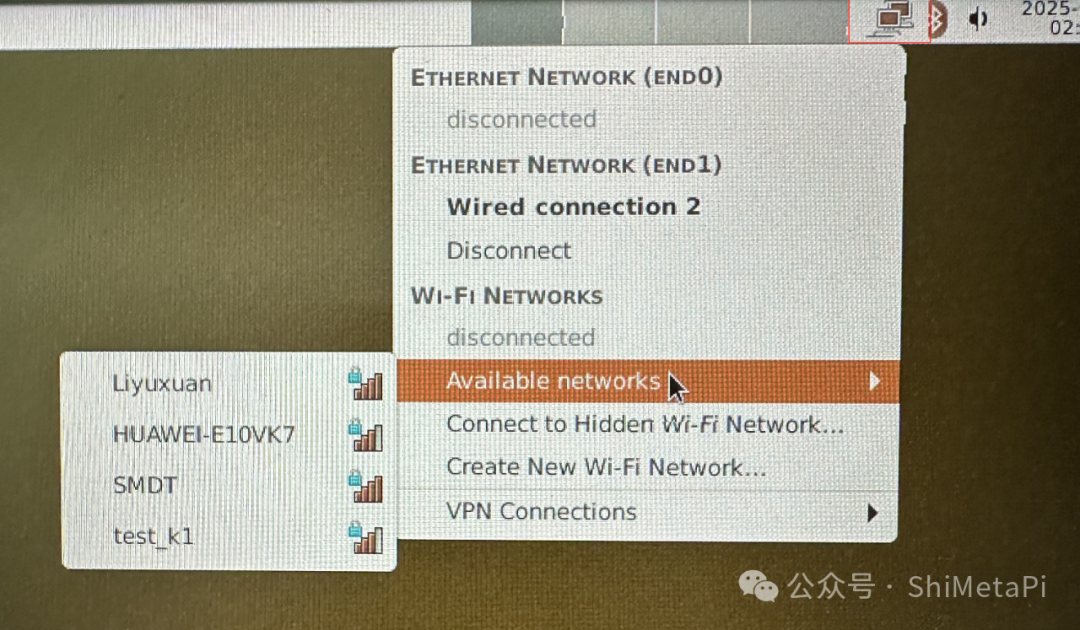
如图所示,找到系统右上角点击网络图标连接WIFI
使用ifconfig命令查看ip地址等信息
root@linaro-alip:/# ifconfig
···
wlx78228877b4a5: flags=4163<UP,BROADCAST,RUNNING,MULTICAST>  mtu 1500
        inet 192.168.137.149  netmask 255.255.255.0  broadcast 192.168.137.255
        inet6 fe80::d175:3cd1:73ca:ecc8  prefixlen 64  scopeid 0x20<link>
        ether 78:22:88:77:b4:a5  txqueuelen 1000  (Ethernet)
        RX packets 69  bytes 954099 (931.7 KiB)
        RX errors 0  dropped 143  overruns 0  frame 0
        TX packets 72  bytes 116372 (113.6 KiB)
        TX errors 0  dropped 23 overruns 0  carrier 0  collisions 0
2.2 连通性测试
执行如下命令查看获取的IP地址,并通过ping命令测试开发板与PC机通信是否正常。192.168.49.85为PC实际的IP地址,请确保开发板与PC机在同一局域网内。
root@linaro-alip:/# ping 192.168.49.85 -I wlx78228877b4a5 -c 8
ping 192.168.49.85 -I wlx78228877b4a5 -c 8
PING 192.168.49.85 (192.168.49.85) from 192.168.137.149 wlx78228877b4a5: 56(84) bytes of data.
64 bytes from 192.168.49.85: icmp_seq=1 ttl=127 time=5.14 ms
64 bytes from 192.168.49.85: icmp_seq=2 ttl=127 time=3.66 ms
64 bytes from 192.168.49.85: icmp_seq=3 ttl=127 time=2.83 ms
64 bytes from 192.168.49.85: icmp_seq=4 ttl=127 time=2.81 ms
64 bytes from 192.168.49.85: icmp_seq=5 ttl=127 time=9.44 ms
64 bytes from 192.168.49.85: icmp_seq=6 ttl=127 time=2.77 ms
64 bytes from 192.168.49.85: icmp_seq=7 ttl=127 time=3.46 ms
64 bytes from 192.168.49.85: icmp_seq=8 ttl=127 time=3.09 ms

--- 192.168.49.85 ping statistics ---
8 packets transmitted, 8 received, 0% packet loss, time 7011ms
rtt min/avg/max/mdev = 2.771/4.150/9.442/2.128 ms
2.3 TCP带宽测试
如下使用iperf3工具测试开发板与PC机的网络通信带宽。
服务端
在开发板上联网安装iperf3工具,执行如下命令:
root@linaro-alip:/# sudo apt update
root@linaro-alip:/# sudo apt install iperf3
开发板做服务端,执行以下命令:
root@linaro-alip:/# iperf3 -s
-----------------------------------------------------------
Server listening on 5201 (test #1)
-----------------------------------------------------------
客户端
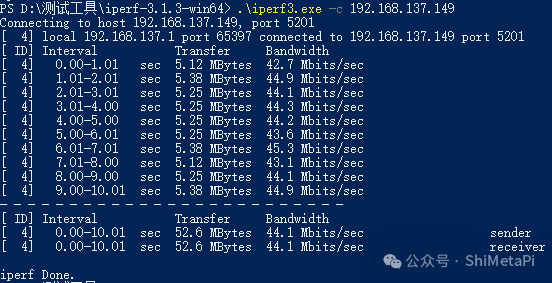
windows的iperf3工具可以在测试工具包中获取。
在windows系统中打开powershell,进入iperf3工具所在路径下windows做客户端发送数据,执行以下命令:
.\iperf3.exe -c 192.168.137.149 // 192.168.137.149 为服务端 IP 地址2.4 测试结果
服务端
root@linaro-alip:/# iperf3 -s
-----------------------------------------------------------
Server listening on 5201 (test #1)
-----------------------------------------------------------
Accepted connection from 192.168.137.1, port 65396
[  5] local 192.168.137.149 port 5201 connected to 192.168.137.1 port 65397
[ ID] Interval           Transfer     Bitrate
[  5]   0.00-1.00   sec  4.88 MBytes  40.9 Mbits/sec
[  5]   1.00-2.00   sec  5.40 MBytes  45.3 Mbits/sec
[  5]   2.00-3.00   sec  5.22 MBytes  43.8 Mbits/sec
[  5]   3.00-4.00   sec  5.36 MBytes  45.0 Mbits/sec
[  5]   4.00-5.00   sec  5.14 MBytes  43.1 Mbits/sec
[  5]   5.00-6.00   sec  5.22 MBytes  43.8 Mbits/sec
[  5]   6.00-7.00   sec  5.40 MBytes  45.3 Mbits/sec
[  5]   7.00-8.00   sec  5.12 MBytes  43.0 Mbits/sec
[  5]   8.00-9.00   sec  5.38 MBytes  45.1 Mbits/sec
[  5]   9.00-10.00  sec  5.24 MBytes  43.9 Mbits/sec
[  5]  10.00-10.05  sec   266 KBytes  45.9 Mbits/sec
- - - - - - - - - - - - - - - - - - - - - - - - -
[ ID] Interval           Transfer     Bitrate
[  5]   0.00-10.05  sec  52.6 MBytes  43.9 Mbits/sec                  receiver
-----------------------------------------------------------
客户端
3. 命令行WIFI配置
3.1 使用wpa_supplicant连接WIFI
1)扫描可用网络
# 启动 WIFI 接口
sudo ifconfig wlx78228877b4a5 up

# 扫描可用的 WIFI 网络
sudo iwlist wlx78228877b4a5 scan | grep ESSID

# 或使用 iw 命令
sudo iw dev wlx78228877b4a5 scan | grep SSID
2)创建wpa_supplicant配置文件
# 创建配置文件
sudo nano /etc/wpa_supplicant/wpa_supplicant.conf

# 添加以下内容
ctrl_interface=/var/run/wpa_supplicant
ctrl_interface_group=0
update_config=1
country=CN

# WPA/WPA2-PSK 网络配置
network={
    ssid="YourWiFiName"
    psk="YourPassword"
    key_mgmt=WPA-PSK
    priority=1
}

# 开放网络配置
network={
    ssid="OpenWiFi"
    key_mgmt=NONE
    priority=2
}

# WEP 网络配置
network={
    ssid="WEPNetwork"
    wep_key0="your_wep_key"
    key_mgmt=NONE
    wep_tx_keyidx=0
}
3)连接WIFI网络
# 启动 wpa_supplicant
sudo wpa_supplicant -B -i wlx78228877b4a5 -c /etc/wpa_supplicant/wpa_supplicant.conf

# 获取 IP 地址
sudo dhclient wlx78228877b4a5

# 检查连接状态
wpa_cli -i wlx78228877b4a5 status
3.2 NetworkManager管理WIFI
命令行工具nmcli
# 查看 WIFI 状态
nmcli radio wifi

# 扫描 WIFI 网络
nmcli dev wifi list

# 连接 WIFI 网络
nmcli dev wifi connect "SSID" password "PASSWORD"

# 查看已保存的连接
nmcli connection show

# 断开 WIFI 连接
nmcli dev disconnect wlx78228877b4a5

# 删除已保存的连接
nmcli connection delete "SSID"
4. WIFI热点模式(AP模式)
4.1 安装hostapd
sudo apt-get update
sudo apt-get install hostapd dnsmasq
4.2 配置hostapd
# 创建 hostapd 配置文件
sudo nano /etc/hostapd/hostapd.conf

# 添加以下内容
interface=wlx78228877b4a5
driver=nl80211
ssid=GM-3568JHF-AP
hw_mode=g
channel=7
wmm_enabled=0
macaddr_acl=0
auth_algs=1
ignore_broadcast_ssid=0
wpa=2
wpa_passphrase=12345678
wpa_key_mgmt=WPA-PSK
wpa_pairwise=TKIP
rsn_pairwise=CCMP
4.3 配置DHCP服务
# 备份原配置
sudo cp /etc/dnsmasq.conf /etc/dnsmasq.conf.backup
# 编辑 dnsmasq 配置
sudo nano /etc/dnsmasq.conf
# 添加以下内容
interface=wlx78228877b4a5
dhcp-range=192.168.4.2,192.168.4.20,255.255.255.0,24h
4.4 配置网络接口
# 设置静态 IP
sudo ifconfig wlx78228877b4a5 192.168.4.1 netmask 255.255.255.0

# 启用 IP 转发
echo 1 | sudo tee /proc/sys/net/ipv4/ip_forward

# 配置 NAT 规则
sudo iptables -t nat -A POSTROUTING -o end0 -j MASQUERADE
sudo iptables -A FORWARD -i end0 -o wlx78228877b4a5 -m state --state RELATED,ESTABLISHED -j ACCEPT
sudo iptables -A FORWARD -i wlx78228877b4a5 -o end0 -j ACCEPT
4.5 启动热点服务
# 启动 hostapd
sudo hostapd /etc/hostapd/hostapd.conf &
# 启动 dnsmasq
sudo systemctl start dnsmasq
# 检查服务状态
sudo systemctl status hostapd
sudo systemctl status dnsmasq
5. 故障排除
5.1 WIFI模块无法识别
检查步骤:
# 检查 USB 设备
lsusb | grep Realtek
# 检查内核模块
lsmod | grep rtl
# 手动加载驱动
sudo modprobe rtl8xxxu
# 检查固件文件
ls /lib/firmware/rtlwifi/
5.2 无法连接WIFI网络
可能原因和解决方案:
# 检查网络接口状态
ip link show wlx78228877b4a5
# 重启网络接口
sudo ifconfig wlx78228877b4a5 down
sudo ifconfig wlx78228877b4a5 up
# 检查 wpa_supplicant 日志
sudo journalctl -u wpa_supplicant
# 重新配置网络
sudo wpa_cli -i wlx78228877b4a5 reconfigure
5.3 信号弱或连接不稳定
优化建议:
# 检查信号强度
iwconfig wlx78228877b4a5 | grep "Signal level"
# 扫描信道使用情况
sudo iwlist wlx78228877b4a5 scan | grep Frequency
# 更换信道(AP 模式)
sudo iwconfig wlx78228877b4a5 channel 6
# 调整发射功率
sudo iwconfig wlx78228877b4a5 txpower 20
5.4 网络速度慢
诊断和优化:
# 检查当前连接速率
iwconfig wlx78228877b4a5 | grep "Bit Rate"
# 检查网络拥塞
ping -c 10 8.8.8.8
# 使用 iperf3 测试带宽
iperf3 -c speedtest.server.com
# 优化 TCP 窗口大小
echo 'net.core.rmem_max = 16777216' >> /etc/sysctl.conf
echo 'net.core.wmem_max = 16777216' >> /etc/sysctl.conf
5.5 热点模式问题
常见问题解决:
# 检查 hostapd 状态
sudo systemctl status hostapd
# 查看 hostapd 日志
sudo journalctl -u hostapd
# 检查防火墙设置
sudo iptables -L
# 重启相关服务
sudo systemctl restart hostapd
sudo systemctl restart dnsmasq原文链接:https://forum.shimetapi.cn/wiki/zh/fpga-arm/GM-3568JHF/Peripherals/ch04-WIFI.html


 1360
1360

 被折叠的 条评论
为什么被折叠?
被折叠的 条评论
为什么被折叠?
 到【灌水乐园】发言


