


着色(Shading)
曲面细分只是地球渲染的第一步。接下来是着色——通过模拟光线与材质的相互作用,计算每个像素的最终颜色。本节先回顾基础的光照与纹理映射,再讲解虚拟地球特有的经纬网格和夜景灯光效果。
6.1 光照(Lighting)
我们从最简“直通”着色器(Listing 1)开始,逐步加入漫反射与镜面反射。
/*----------------List 1----------------------*/
// Vertex shader
in vec4 position;
uniform mat4 ce_modelViewPerspectiveMatrix;

void main()
{
   gl_Position = ce_modelViewPerspectiveMatrix * position ;
}

// Fragment shader
out vec3 fragmentColor;
void main() {
   fragmentColor = vec3(0.0, 0.0, 0.0);
}
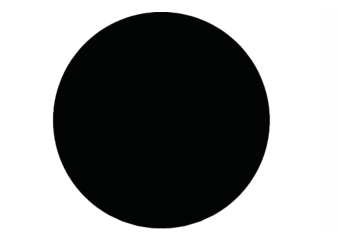
-
顶点着色器
使用自动变量ce_modelViewPerspective把顶点坐标变换到裁剪空间。
此时球体全黑。
-
光源位置
采用“眼旁点光源”:光源放在相机位置,仿佛用户提着一盏灯。
为简化,光照计算在世界坐标系完成(示例仅有一个坐标系)。 -
逐像素光照
在片元着色器计算 Phong 光照,可消除因插值导致的高光锯齿,也便于后续纹理特效。
漫反射
粗糙表面散射光线,强度仅与入射角有关:
Idiffuse=max(n^⋅l^,0)
I_{\text{diffuse}} = \max(\hat{\mathbf n}\cdot \hat{\mathbf l},0)
Idiffuse=max(n^⋅l^,0)
其中 n^\hat{\mathbf n}n^ 为法线,l^\hat{\mathbf l}l^ 为光源方向。
球面法线可直接归一化世界坐标得到;椭球需用 GeodeticSurfaceNormal。
镜面反射
光滑表面产生高光,强度与视线方向有关:
Ispec=(r^⋅v^)α,r^=2(n^⋅l^)n^−l^
I_{\text{spec}} = \left(\hat{\mathbf r}\cdot \hat{\mathbf v}\right)^\alpha,\quad \hat{\mathbf r}=2(\hat{\mathbf n}\cdot\hat{\mathbf l})\hat{\mathbf n}-\hat{\mathbf l}
Ispec=(r^⋅v^)α,r^=2(n^⋅l^)n^−l^
指数 α\alphaα 决定高光锐利度。
最终光照:
I=kdIdiffuse+ksIspec+ka
I = k_dI_{\text{diffuse}} + k_sI_{\text{spec}} + k_a
I=kdIdiffuse+ksIspec+ka
实现见 Listing 2(顶点)与 Listing 3(片元)。
/*-----------Listing 2--------------------*/
// Vertex shader for diffuse and specular lighting.
in vec4 position;
out vec3 worldPosition;
out vec3 positionToLight;
out vec3 positionToEye;

uniform mat4 ce_modelViewPerspectiveMatrix;
uniform vec3 ce_cameraEye;
uniform vec3 ce_cameraLightPosition;

void main()
{
	gl_Position = ce_modelViewPerspectiveMatrix * position;
	worldPosition = position.xyz;
	positioinToLight = ce_cameraLightPosition - worldPosition;
	positionToEye = ce_cameraEye - worldPosition;
}
/*-----------Listing 3--------------------*/
// Final Phong-lighting fragment shader.
in vec3 worldPosition;
in vec3 positionToLight;
in vec3 positionToEye;
out vec3 fragmentColor;

uniform vec4 ce_diffuseSpecularAmbientShininess;

float LightIntensity(vec3 normal, vec3 toLight, vec3 toEye, vec4 diffuseSpecularAmbientShininess)
{
    vec3 toReflectedLight = reflect(-toLight, normal);
    float diffuse = max(dot(toLight, normal), 0.0);
    float specular = max(dot(toReflectedLight, toEye), 0.0);
    specular = pow(specular, diffuseSpecularAmbientShininess.w);

    return (diffuseSpecularAmbientShininess.x * diffuse) +
           (diffuseSpecularAmbientShininess.y * specular) +
           diffuseSpecularAmbientShininess.z;
}

void main()
{
    vec3 normal = normalize(worldPosition);
    float intensity = LightIntensity(normal,
                                    normalize(positionToLight),
                                    normalize(positionToEye),
                                    ce_diffuseSpecularAmbientShininess);
    fragmentColor = vec3(intensity, intensity, intensity);
}
6.2 纹理映射(Texturing)
光照体现曲率,但地球真正魅力来自高分辨率影像。本节讲解逐像素计算纹理坐标(假设纹理一次性装入显存,且 float 精度足够)。
-
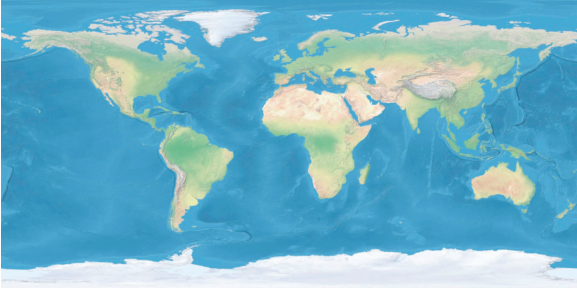
世界影像通常 2:1 宽高比,WGS84 坐标。
-
给定片元法线 n=(nx,ny,nz)∈[−1,1]\mathbf n=(n_x,n_y,n_z)\in[-1,1]n=(nx,ny,nz)∈[−1,1],计算 (s,t)∈[0,1](s,t)\in[0,1](s,t)∈[0,1]:
s=atan2(ny,nx)2π+0.5,t=arcsinnzπ+0.5. \begin{aligned} s &= \frac{\text{atan2}(n_y,n_x)}{2\pi}+0.5,\\[2pt] t &= \frac{\arcsin n_z}{\pi}+0.5. \end{aligned} st=2πatan2(ny,nx)+0.5,=πarcsinnz+0.5.
该公式把经纬度映射到纹理空间(Listing 4.11)。 -
光照×颜色:
finalColor=texture(uday,(s,t))×I \text{finalColor} = \text{texture}(u_{\text{day}},(s,t)) \times I finalColor=texture(uday,(s,t))×I
极点问题
纹理极区像素密度过高,过滤反而加剧失真。
EVE Online 采用“平面+球面”混合投影;也可改用立方体贴图避免极点拉伸,但在每个立方体面的边界处会引入轻微的畸变。
6.3 CPU / GPU 权衡
| 方案 | 优点 | 缺点 |
|---|---|---|
| 逐片元 计算法线/纹理坐标 | 节省显存;无插值误差;代码简洁;无 IDL 特殊处理 | GPU 反三角函数精度/速度低 |
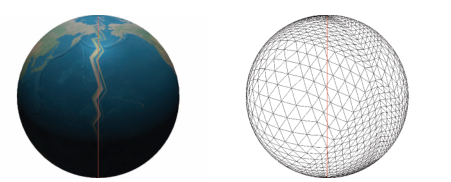
| 逐顶点 计算并存储 | 顶点着色器简单;一次计算多次使用 | 顶点数据翻倍;顶点插值导致 IDL 纹理跳变(下图) |
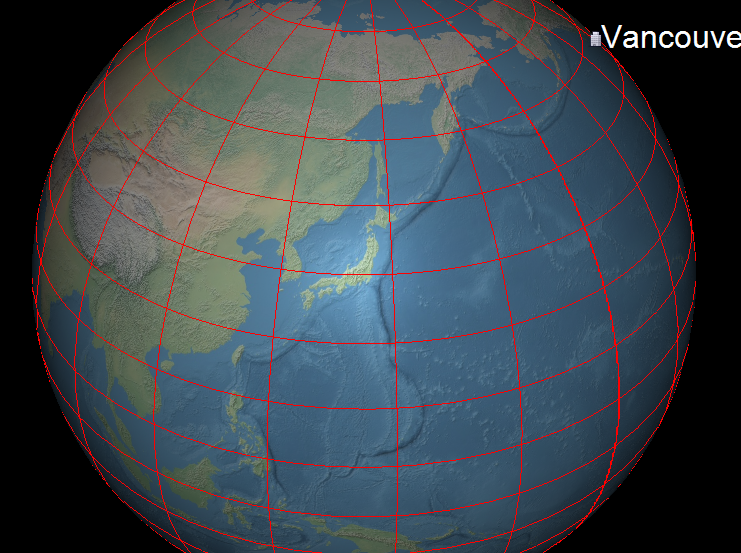
6.4 经纬网格(Latitude-Longitude Grid)
几乎所有虚拟地球都可叠加经纬网(图 4.13)。常见做法:
- CPU 生成折线;
- 缓存网格,视角移动时复用;
- 根据缩放级别动态增减分辨率(LOD)。
片元着色器方案
优点:
- 无 CPU 计算;
- 无额外显存/带宽;
- 无 Z-fighting;
- 无需额外 Pass。
缺点:
- 单 Pass 渲染耗时稍长;
- 受 32-bit float 精度限制;
- 文字标注需额外处理。
实现要点
- 通过纹理坐标
(s,t)判断是否在网格线附近; - 用
dFdx/dFdy获得屏幕空间梯度,实现像素恒定线宽(Listing 4); - 支持不同颜色、线宽、淡入淡出、抗锯齿及线型。
/*------------------------Listing 4-------------------------------*/
void main()
{
    vec3 normal = GeodeticSurfaceNormal(worldPosition, u_globeOneOverRadiiSquared);
    vec2 textureCoordinate = ComputeTextureCoordinates(normal);
    vec2 distanceToLine = mod(textureCoordinate, u_gridResolution);

    vec2 dx = abs(dFdx(textureCoordinate));
    vec2 dy = abs(dFdy(textureCoordinate));
    vec2 dF = vec2(max(dx.s, dy.s), max(dx.t, dy.t)) * u_gridLineWidth;

    if (any(lessThan(distanceToLine, dF)))
    {
        fragmentColor = vec3(1.0, 0.0, 0.0);
    }
    else
    {
        float intensity = LightIntensity(normal,
                                        normalize(positionToLight),
                                        normalize(positionToEye),
                                        ce_diffuseSpecularAmbientShininess);
        fragmentColor = intensity * texture(ce_texture0, textureCoordinate).rgb;
    }
}
LOD 控制
根据相机高度分段设置 u_gridResolution:
- 定义高度区间 → 网格分辨率映射表;
- 利用时间连续性,优先检查上一区间,查找几乎 O(1)。
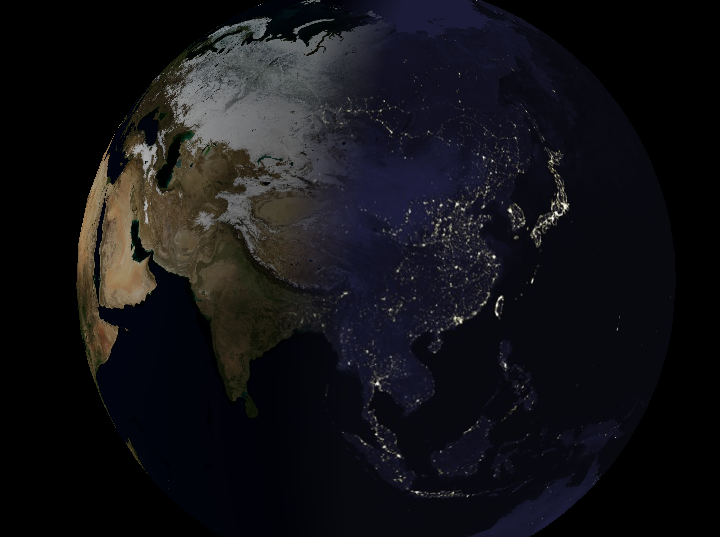
6.5 夜景灯光(Night Lights)
虚拟地球常在背阳面显示城市灯光——经典多重纹理应用:
白天纹理 + 夜间灯光纹理,按太阳照射角度混合。
片元着色器流程
- 顶点着色器传入太阳位置
og_sunPosition; - 新增 uniform:
u_dayTexture,u_nightTextureu_blendDuration过渡时长u_blendDurationScale = 1/(2u_blendDuration)(预计算)
- 片元着色器:
- 计算漫反射因子 d=max(n^⋅l^,0)d = \max(\hat{\mathbf n}\cdot\hat{\mathbf l},0)d=max(n^⋅l^,0)。
- 若 d>ublendDurationd > u_{\text{blendDuration}}d>ublendDuration:用白天纹理 + Phong 光照。
- 若 d<−ublendDurationd < -u_{\text{blendDuration}}d<−ublendDuration:用夜间纹理,无光照。
- 介于两者之间:线性混合昼夜颜色。
性能实验
- 仅看昼面 vs 仅看夜面:夜面帧率更高(夜间纹理分辨率低且无光照计算)。
- 游戏常用技巧:用纹理图集 + 旋转/镜像,少量纹理即可产生丰富夜景变化(EVE Online)。
多重纹理其他应用
- 云层纹理
- 水面高光贴图(gloss map)
早期硬件不支持多重纹理时,STK 采用多 Pass 实现夜景。
参考:
- Cozi, Patrick; Ring, Kevin. 3D Engine Design for Virtual Globes. CRC Press, 2011.


 4060
4060

 被折叠的 条评论
为什么被折叠?
被折叠的 条评论
为什么被折叠?
 到【灌水乐园】发言


