


一、基础方案介绍:
Linux和传感器同步的时间源是统一的,最终来自RTK。该方案省去了TimeMachine2000a及其布线。
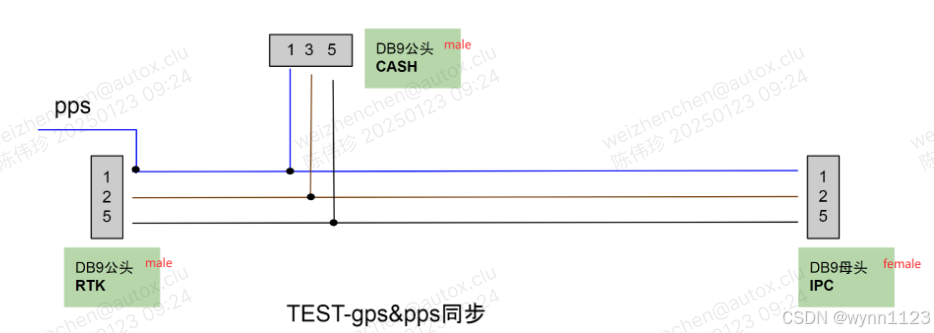
线束将RTK PPS+GPRMC连接到域控主板上的DB9。
DB9串行端口在Linux中应显示为/dev/ttyS0。如果没有,请检查BIOS设置以确保其已启用。
稍后,在我们安装了gpsd之后,PPS信号将在Linux中显示为/dev/pps0。如果没有,请检查Linux内核是否启用PPS内核模块。
二、使用GPSD将Linux与GNSS(PPS+GPRMC)同步
1.安装GPSD(3.23版本,避免未知错误)
gpsd代码构建参考链接:build.adoc · release-3.22 · gpsd / gpsd · GitLab
# sudo apt install gpsd gpsd-client # version 3.15 is old. We want 3.23 or above
cd /tmp/
curl -sS -L --retry 3 -O http://download-mirror.savannah.gnu.org/releases/gpsd/gpsd-3.23.zip
unzip gpsd-3.23.zip
cd gpsd-3.23
# prerequisites: pps-tools for improved timing. ncurses for cgps and gpsmon utility. see https://gitlab.com/gpsd/gpsd/-/blob/release-3.22/build.adoc#user-content-optional-build-components
sudo apt install scons pps-tools libncurses5-dev libncursesw5-dev
sudo scons && sudo scons check && sudo scons udev-install
gpsd --version
cgps --version
gpsmon --version
2.使用sudo vi /etc/default/gpsd 更新gpsd配置文件
 START_DAEMON="true"
 USBAUTO="true"
 DEVICES="/dev/ttyS0 /dev/pps0"
 GPSD_OPTIONS="-n --debug 2"
3.启用GPSD
sudo systemctl enable gpsd
sudo systemctl start gpsd
sudo systemctl status gpsd
4.安装chrony
sudo apt install linuxptp chrony5.重新配置chrony以适配gpsd,参考链接:GPSD Time Service HOWTO
1)最好是,将/etc/chrony/chrony.conf配置文件中的所有“maxpoll 10” 更新为“maxpoll 5” ,以优化轮询机制
sudo sed -i 's/maxpoll 10/maxpoll 5/g' /etc/chrony/chrony.conf # servers poll every 32s2)将/etc/chrony/chrony.conf配置文件中的所有云服务器注释掉,以防止chrony偶发的在不同的时间源间切换,
sudo sed -i 's/^server /#server /g' /etc/chrony/chrony.conf  # comment out servers
sudo sed -i 's/^pool /#server /g' /etc/chrony/chrony.conf  # comment out pools
3)在/etc/chrony/chrony.conf配置文件中增加以下配置
allow
# set larger delay to allow the NMEA source to overlap with
# the other sources and avoid the falseticker status
# refclock SHM 0 refid NMEA precision 1e-1 offset 0.9999 delay 0.2
# offset 0.11 comes from test with Bynav RTK. https://gpsd.gitlab.io/gpsd/gpsd-time-service-howto.html#_chrony_performance_tuning
refclock SHM 0 refid NMEA precision 1e-1 offset 0.11 delay 0.2
refclock SHM 1 refid PPS precision 1e-7
4)重启chrony服务
sudo systemctl restart chrony6.室外检查GPSD和chrony状态
sudo ppscheck /dev/ttyS0 # check is PPS signal can be received
gpsmon # check if GPRMC and PPS signal can be received
cgps # to check satellite signal
sudo ntpshmmon # outputs time with NTP0 and NTP1 if GPS receiver has good 3D lock
watch chronyc sources -v # if PPS is selected as time source, * will show up in front of PPS.
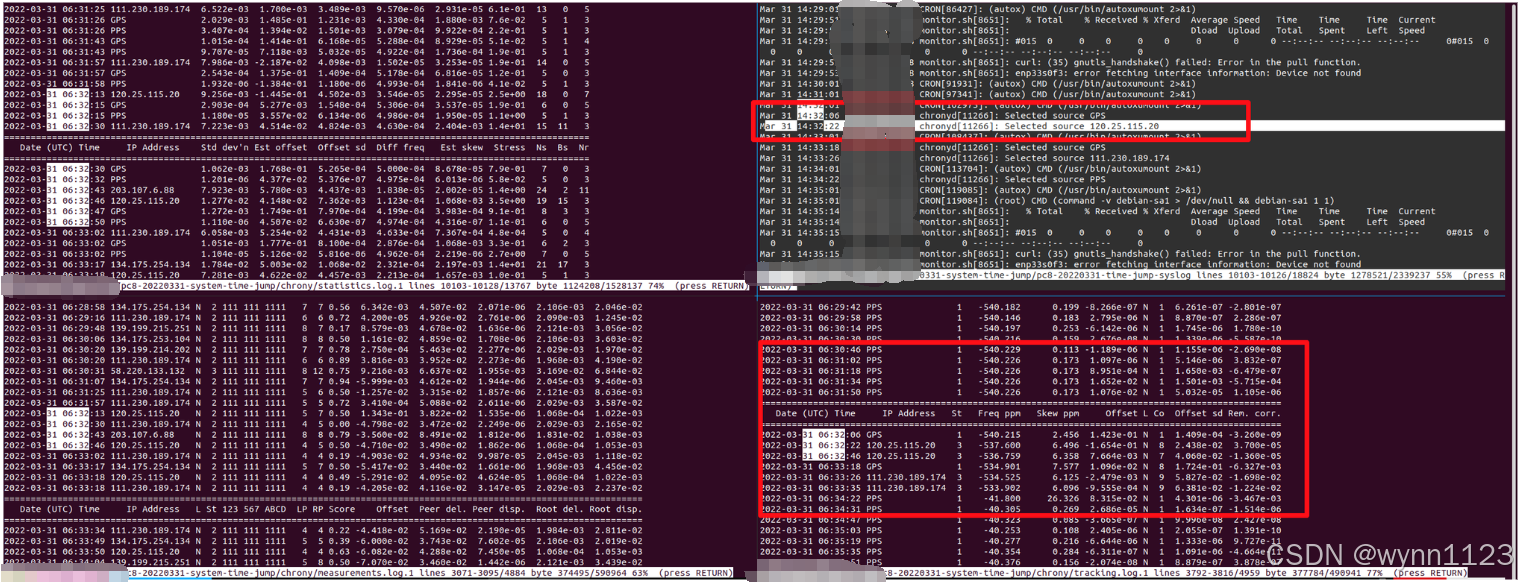
watch chronyc tracking当GNSS天线在空旷地带时,下述截图显示了3D信息
使用“chronyc sources -v ”检查pps前是否带有“*”

LastRx: 表示在多久以前从该时间源收到了最后一个好的时间数据。默认时间为秒,还可以是年月日等。
last sample:由三部分组成,方括号中的代表measured offset(即代表实际测得的offset),方框左侧为adjusted offset(也就是调整校正后最终采用的offset),最后面的是erro。
stratum:NTP表示层级;
poll:表示轮序频率,PPS的poll为4,代表每隔2^4=16秒,对该时间进行轮询;
Reach:表示接收到了多少,即可到达性,默认是8进制数,每次从时间源收到或丢包都会更新该值。377表示都接收到了。
Last offset:代表上一个最好的时间偏移量;大概是-15.9微秒;
RMS offset:则代表offset的长期均方根值;
Frequency:代表如果不矫正,系统时间出错率,单位是ppm(百万分之一)
Residual freq:参考时间源测量到的频率与当前使用的频率之间的差,单位ppm;
skew:频率上的估计误差范围
root delay: 表示stratum-1(也就是源)网络路径延迟总和
update interval:最后两次更新的式中间隔;
三、通过PTP给其他传感器作时间同步
1.设置传感器PTP同步方法,如lidar,需要在lidar网页配置里修改为PTP方式同步
2.开启ptp4l,将linux时间作为时间源同步给lidar
将以下信息复制到/etc/systemd/system/路径下
# /etc/systemd/system/ptp.service
[Unit]
Description=Lidar PTP synchronization using PTP
After = network.target network-online.target dbus.service
Wants = network-online.target
Requires = dbus.service

[Service]
Type=simple
User=root
Group=root
Restart=noExecStart=/usr/sbin/ptp4l -i 网口1 -i 网口2 -i 网口3 -SAm

[Install]
WantedBy=multi-user.target
sudo gedit /etc/systemd/system/ptp.service # check ethernet interface connecting sensors
sudo systemctl enable ptp.service
sudo systemctl start ptp.serviceptp4l参考:时间同步 - PTP-优快云博客
四、可能存在的问题
1.chrony切换时钟源
chrony可能在认为ipps信号不可靠时自动切换其他时钟源,此时,linux时间将慢慢调整为新时钟源的时间,此时,通过PTP同步时间的传感器将会受很大影响。
chrony切换时钟源参考:Clock Select Algorithm
解决方式:1)使用可靠的pps线束;2)更新chrony,使linux免受pps丢失的影响
参考链接:


 387
387

 被折叠的 条评论
为什么被折叠?
被折叠的 条评论
为什么被折叠?
 到【灌水乐园】发言


