策略路由:对接收和发布的路由进行过滤示例

学习精彩网络技术老师:华为、华三、锐捷、WLAN、IPv6等全套视频课程

网络中可根据通信需求,对接收和发布的路由请用过滤器。

组网需求

图1,运行OSPF协议的网络中,DeviceA从Internet网络接收路由,并为DeviceB提供了部分Internet路由。要求DeviceA仅提供172.16.17.0/24、172.16.18.0/24、172.16.19.0/24给DeviceB,DeviceC仅接收路由172.16.18.0/24,DeviceD接收DeviceB提供的全部路由。

图1 配置对接收和发布的路由过滤组网图

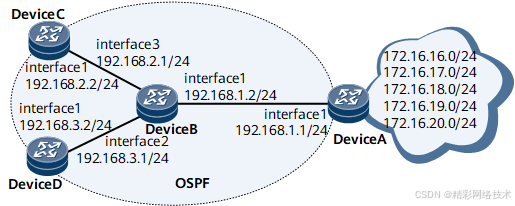
本例中interface1,interface2,interface3分别代表GE0/1/0,GE0/2/0,GE0/3/0。

配置注意事项

在配置过程中,需注意以下事项:

配置地址前缀列表时,需根据实际需求准确地指定地址前缀范围。

引用地址前缀列表时,需注意区分地址前缀列表名称的大小写。

配置思路

采用如下的思路配置对路由进行过滤:

在DeviceA、DeviceB、DeviceC和DeviceD上配置OSPF基本功能。

在DeviceA上配置静态路由,并将这些路由引入OSPF路由。

在DeviceA上配置路由发布策略,在DeviceB上查看过滤结果。

在DeviceC上配置路由接收策略,在DeviceC上查看过滤结果。

数据准备

为完成此配置例,需准备如下数据:

DeviceA引入的5条静态路由。

DeviceA、DeviceB、DeviceC和DeviceD位于OSPF骨干区域(Area0)。

地址前缀列表名称,待过滤路由。

操作步骤
  1. 配置各接口的IP地址(略)
  2. 配置OSPF协议

# DeviceA的配置。

[~DeviceA] ospf

[*DeviceA-ospf-1] area 0

[*DeviceA-ospf-1-area-0.0.0.0] network 192.168.1.0 0.0.0.255

[*DeviceA-ospf-1-area-0.0.0.0] commit

[~DeviceA-ospf-1-area-0.0.0.0] quit

[~DeviceA-ospf-1] quit

# DeviceB的配置。

[~DeviceB] ospf

[*DeviceB-ospf-1] area 0

[*DeviceB-ospf-1-area-0.0.0.0] network 192.168.1.0 0.0.0.255

[*DeviceB-ospf-1-area-0.0.0.0] network 192.168.2.0 0.0.0.255

[*DeviceB-ospf-1-area-0.0.0.0] network 192.168.3.0 0.0.0.255

[*DeviceB-ospf-1-area-0.0.0.0] commit

[~DeviceB-ospf-1-area-0.0.0.0] quit

# DeviceC的配置。

[~DeviceC] ospf

[*DeviceC-ospf-1] area 0

[*DeviceC-ospf-1-area-0.0.0.0] network 192.168.2.0 0.0.0.255

[*DeviceC-ospf-1-area-0.0.0.0] commit

[~DeviceC-ospf-1-area-0.0.0.0] quit

[~DeviceC-ospf-1] quit

# DeviceD的配置。

[~DeviceD] ospf

[*DeviceD-ospf-1] area 0

[*DeviceD-ospf-1-area-0.0.0.0] network 192.168.3.0 0.0.0.255

[*DeviceD-ospf-1-area-0.0.0.0] commit

[~DeviceD-ospf-1-area-0.0.0.0] quit

  1. 在DeviceA上配置5条静态路由,并将这些静态路由引入到OSPF协议中。

[~DeviceA] ip route-static 172.16.16.0 24 NULL0

[*DeviceA] ip route-static 172.16.17.0 24 NULL0

[*DeviceA] ip route-static 172.16.18.0 24 NULL0

[*DeviceA] ip route-static 172.16.19.0 24 NULL0

[*DeviceA] ip route-static 172.16.20.0 24 NULL0

[*DeviceA] ospf

[*DeviceA-ospf-1] import-route static

[*DeviceA-ospf-1] commit

[~DeviceA-ospf-1] quit

# 在DeviceB上查看IP路由表,可以看到OSPF引入的5条静态路由。

[~DeviceB] display ip routing-tableRoute Flags: R - relay, D - download to fib, T - to vpn-instance, B - black hole route

------------------------------------------------------------------------------

Routing Table : Public

         Destinations : 22       Routes : 22

Destination/Mask    Proto  Pre  Cost        Flags NextHop         Interface

        1.1.1.1/32  Direct 0    0             D  127.0.0.1       LoopBack1

      127.0.0.0/8   Direct 0    0             D  127.0.0.1       InLoopBack0

      127.0.0.1/32  Direct 0    0             D  127.0.0.1       InLoopBack0

127.255.255.255/32  Direct 0    0             D  127.0.0.1       InLoopBack0

255.255.255.255/32  Direct 0    0             D  127.0.0.1       InLoopBack0

   172.16.16.0/24  O_ASE  150  1             D  192.168.1.1     GigabitEthernet0/1/0

   172.16.17.0/24  O_ASE  150  1             D  192.168.1.1     GigabitEthernet0/1/0

   172.16.18.0/24  O_ASE  150  1             D  192.168.1.1     GigabitEthernet0/1/0

   172.16.19.0/24  O_ASE  150  1             D  192.168.1.1     GigabitEthernet0/1/0

   172.16.20.0/24  O_ASE  150  1             D  192.168.1.1     GigabitEthernet0/1/0

    192.168.1.0/24  Direct 0    0             D  192.168.1.2     GigabitEthernet0/1/0

    192.168.1.1/32  Direct 0    0             D  192.168.1.1     GigabitEthernet0/1/0

    192.168.1.2/32  Direct 0    0             D  127.0.0.1       GigabitEthernet0/1/0

  192.168.1.255/32  Direct 0    0             D  127.0.0.1       GigabitEthernet0/1/0

    192.168.2.0/24  Direct 0    0             D  192.168.2.1     GigabitEthernet0/3/0

    192.168.2.1/32  Direct 0    0             D  127.0.0.1       GigabitEthernet0/3/0

    192.168.2.2/32  Direct 0    0             D  192.168.2.2     GigabitEthernet0/3/0

  192.168.2.255/32  Direct 0    0             D  127.0.0.1       GigabitEthernet0/3/0

    192.168.3.0/24  Direct 0    0             D  192.168.3.1     GigabitEthernet0/2/0

    192.168.3.1/32  Direct 0    0             D  127.0.0.1       GigabitEthernet0/2/0

    192.168.3.2/32  Direct 0    0             D  192.168.3.2     GigabitEthernet0/2/0

  192.168.3.255/32  Direct 0    0             D  127.0.0.1       GigabitEthernet0/2/0

  1. 配置路由发布策略。

# 在DeviceA上配置地址前缀列表a2b。

[~DeviceA] ip ip-prefix a2b index 10 permit 172.16.17.0 24

[*DeviceA] ip ip-prefix a2b index 20 permit 172.16.18.0 24

[*DeviceA] ip ip-prefix a2b index 30 permit 172.16.19.0 24

[*DeviceA] commit

# 在DeviceA上配置发布策略,引用地址前缀列表a2b进行过滤。

[~DeviceA] ospf

[*DeviceA-ospf-1] filter-policy ip-prefix a2b export static

[*DeviceA-ospf-1] commit

[~DeviceA-ospf-1] quit

# 在DeviceB上查看IP路由表,可以看到DeviceB仅接收到列表a2b中定义的3条路由。

[~DeviceB] display ip routing-tableRoute Flags: R - relay, D - download to fib, T - to vpn-instance, B - black hole route

------------------------------------------------------------------------------

Routing Table : Public

         Destinations : 20       Routes : 20

Destination/Mask    Proto  Pre  Cost        Flags NextHop         Interface

        1.1.1.1/32  Direct 0    0             D  127.0.0.1       LoopBack1

      127.0.0.0/8   Direct 0    0             D  127.0.0.1       InLoopBack0

      127.0.0.1/32  Direct 0    0             D  127.0.0.1       InLoopBack0

127.255.255.255/32  Direct 0    0             D  127.0.0.1       InLoopBack0

255.255.255.255/32  Direct 0    0             D  127.0.0.1       InLoopBack0

   172.16.17.0/24  O_ASE  150  1             D  192.168.1.1     GigabitEthernet0/1/0

   172.16.18.0/24  O_ASE  150  1             D  192.168.1.1     GigabitEthernet0/1/0

   172.16.19.0/24  O_ASE  150  1             D  192.168.1.1     GigabitEthernet0/1/0

    192.168.1.0/24  Direct 0    0             D  192.168.1.2     GigabitEthernet0/1/0

    192.168.1.1/32  Direct 0    0             D  192.168.1.1     GigabitEthernet0/1/0

    192.168.1.2/32  Direct 0    0             D  127.0.0.1       GigabitEthernet0/1/0

  192.168.1.255/32  Direct 0    0             D  127.0.0.1       GigabitEthernet0/1/0

    192.168.2.0/24  Direct 0    0             D  192.168.2.1     GigabitEthernet0/3/0

    192.168.2.1/32  Direct 0    0             D  127.0.0.1       GigabitEthernet0/3/0

    192.168.2.2/32  Direct 0    0             D  192.168.2.2     GigabitEthernet0/3/0

  192.168.2.255/32  Direct 0    0             D  127.0.0.1       GigabitEthernet0/3/0

    192.168.3.0/24  Direct 0    0             D  192.168.3.1     GigabitEthernet0/2/0

    192.168.3.1/32  Direct 0    0             D  127.0.0.1       GigabitEthernet0/2/0

    192.168.3.2/32  Direct 0    0             D  192.168.3.2     GigabitEthernet0/2/0

  192.168.3.255/32  Direct 0    0             D  127.0.0.1       GigabitEthernet0/2/0

  1. 配置路由接收策略

# 在DeviceC上配置地址前缀列表in。

[~DeviceC] ip ip-prefix in index 10 permit 172.16.18.0 24

[*DeviceC] commit

# 在DeviceC上配置接收策略,引用地址前缀列表in进行过滤。

[~DeviceC] ospf

[*DeviceC-ospf-1] filter-policy ip-prefix in import

[*DeviceC-ospf-1] commit

# 查看DeviceC的IP路由表,可以看到DeviceC的本地核心路由表中,仅接收了列表in定义的1条路由。

[~DeviceC] display ip routing-tableRoute Flags: R - relay, D - download to fib, T - to vpn-instance, B - black hole route

------------------------------------------------------------------------------

Routing Table : Public

         Destinations : 12       Routes : 12

Destination/Mask    Proto  Pre  Cost        Flags NextHop         Interface

        1.1.1.1/32  O_ASE  10   1             D  192.168.2.1     GigabitEthernet0/1/0

      127.0.0.0/8   Direct 0    0             D  127.0.0.1       InLoopBack0

      127.0.0.1/32  Direct 0    0             D  127.0.0.1       InLoopBack0

127.255.255.255/32  Direct 0    0             D  127.0.0.1       InLoopBack0

255.255.255.255/32  Direct 0    0             D  127.0.0.1       InLoopBack0

   172.16.18.0/24  O_ASE  150  1             D  192.168.2.1     GigabitEthernet0/1/0

    192.168.1.0/24  O_ASE  10   2             D  192.168.2.1     GigabitEthernet0/1/0

    192.168.2.0/24  Direct 0    0             D  192.168.2.2     GigabitEthernet0/1/0

    192.168.2.1/32  Direct 0    0             D  192.168.2.1     GigabitEthernet0/1/0

    192.168.2.2/32  Direct 0    0             D  127.0.0.1       GigabitEthernet0/1/0

  192.168.2.255/32  Direct 0    0             D  127.0.0.1       GigabitEthernet0/1/0

    192.168.3.0/24  O_ASE  10   2             D  192.168.2.1     GigabitEthernet0/1/0

# 查看DeviceC的OSPF路由表,可以看到OSPF路由表中接收到3条列表a2b中定义的路由。因为在链路状态协议中,filter-policy import命令用于过滤从协议路由表加入本地核心路由表的路由。

[~DeviceC] display ospf routing

          OSPF Process 1 with Router ID 192.168.2.2

                   Routing Tables

 Routing for Network

 Destination        Cost       Type       NextHop         AdvRouter       Area

 1.1.1.1/32         1          Stub       192.168.2.1     1.1.1.1         0.0.0.0

 192.168.1.0/24     2          Transit    192.168.2.1     192.168.1.1     0.0.0.0

 192.168.3.0/24     2          Stub       192.168.2.1     1.1.1.1         0.0.0.0

 Routing for ASEs

 Destination        Cost       Type       Tag        NextHop         AdvRouter

 172.16.17.0/24    1          Type2      1          192.168.2.1     192.168.1.1

 172.16.18.0/24    1          Type2      1          192.168.2.1     192.168.1.1

 172.16.19.0/24    1          Type2      1          192.168.2.1     192.168.1.1

 Total Nets: 6

 Intra Area: 3  Inter Area: 0  ASE: 3  NSSA: 0

配置文件

DeviceA的配置文件

#

sysname DeviceA

#

interface GigabitEthernet0/1/0

 undo shutdown

 ip address 192.168.1.1 255.255.255.0

#

ospf 1

 filter-policy ip-prefix a2b export static

 import-route static

 area 0.0.0.0

  network 192.168.1.0 0.0.0.255

#

ip ip-prefix a2b index 10 permit 172.16.17.0 24

ip ip-prefix a2b index 20 permit 172.16.18.0 24

ip ip-prefix a2b index 30 permit 172.16.19.0 24

#

ip route-static 172.16.16.0 255.255.255.0 NULL0

ip route-static 172.16.17.0 255.255.255.0 NULL0

ip route-static 172.16.18.0 255.255.255.0 NULL0

ip route-static 172.16.19.0 255.255.255.0 NULL0

ip route-static 172.16.20.0 255.255.255.0 NULL0

#

return

DeviceB的配置文件

#

sysname DeviceB

#

interface GigabitEthernet0/1/0

 undo shutdown

 ip address 192.168.1.2 255.255.255.0

#

interface GigabitEthernet0/2/0

 undo shutdown

 ip address 192.168.3.1 255.255.255.0

#

interface GigabitEthernet0/3/0

 undo shutdown

 ip address 192.168.2.1 255.255.255.0

#

ospf 1

 area 0.0.0.0

  network 192.168.1.0 0.0.0.255

  network 192.168.2.0 0.0.0.255

  network 192.168.3.0 0.0.0.255

#

return

DeviceC的配置文件

#

sysname DeviceC

#

interface GigabitEthernet0/1/0

 undo shutdown

 ip address 192.168.2.2 255.255.255.0

#

ospf 1

 filter-policy ip-prefix in import

 area 0.0.0.0

  network 192.168.2.0 0.0.0.255

#

ip ip-prefix in index 10 permit 172.16.18.0 24

#

return

DeviceD的配置文件

#

sysname DeviceD

#

interface GigabitEthernet0/1/0

 undo shutdown

 ip address 192.168.3.2 255.255.255.0

#

ospf 1

 area 0.0.0.0

  network 192.168.3.0 0.0.0.255

#

return

评论
添加红包

请填写红包祝福语或标题

红包个数最小为10个

红包金额最低5元

当前余额3.43前往充值 >
需支付:10.00
成就一亿技术人!
领取后你会自动成为博主和红包主的粉丝 规则
hope_wisdom
发出的红包

打赏作者

精彩网络技术

你的鼓励将是我创作的最大动力

¥1 ¥2 ¥4 ¥6 ¥10 ¥20
扫码支付:¥1
获取中
扫码支付

您的余额不足,请更换扫码支付或充值

打赏作者

实付
使用余额支付
点击重新获取
扫码支付
钱包余额 0

抵扣说明:

1.余额是钱包充值的虚拟货币,按照1:1的比例进行支付金额的抵扣。
2.余额无法直接购买下载,可以购买VIP、付费专栏及课程。

余额充值