学习精彩网络技术老师:华为HCIA和HCIP数通eNSP实战视频课
学习精彩网络技术老师:华为、华三、锐捷、WLAN、IPv6等全套视频课程
学习全套视频课程:IPv6组网实战从入门到精通视频课程
IPv6网络中,利用IPv6静态路由,可以实现网络中任意两台设备之间的互通。
组网要求
如图1所示,图中所有IPv6地址的前缀长度都为64。要求使所有主机和路由器之间互通。
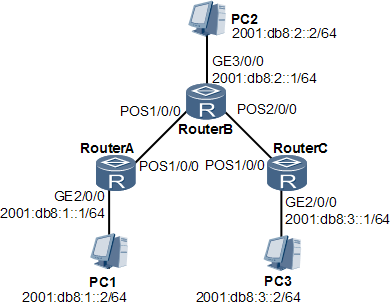
由于图1中的PC1、PC2和PC3不能配置动态路由协议,所以该例采用静态路由。路由器的POS接口使用IPv6链路本地地址。
配置思路
采用如下的思路配置IPv6静态路由:
首先配置各路由器各GE接口的IPv6地址,使网络互通。
在各路由器上配置到目的地址的IPv6静态路由及缺省路由。
在各主机上配置IPv6缺省网关,使任意两台主机可以互通。
数据准备
为完成此配置例,需准备如下的数据:
RouterA的出接口为POS1/0/0的缺省路由。
RouterB的目的地址为2001:db8:1:: 64,出接口为POS1/0/0的静态路由。
RouterB的目的地址为2001:db8:3:: 64,出接口为POS2/0/0的静态路由。
RouterC的出接口为POS1/0/0的缺省路由。
主机PC1的缺省网关2001:db8:1::1,主机PC2的缺省网关2001:db8:2::1,主机PC3的缺省网关2001:db8:3::1。
操作步骤
- 配置各接口的IPv6地址(略)
- 配置IPv6静态路由
# 在RouterA上配置IPv6缺省路由。
[RouterA] ipv6 route-static :: 0 pos 1/0/0
# 在RouterB上配置两条IPv6静态路由。
[RouterB] ipv6 route-static 2001:db8:1:: 64 pos 1/0/0
[RouterB] ipv6 route-static 2001:db8:3:: 64 pos 2/0/0
# 在RouterC上配置IPv6缺省路由。
[RouterC] ipv6 route-static :: 0 pos 1/0/0
- 配置主机地址和网关
根据组网图配置好各主机的IPv6地址,并将PC1的缺省网关配置为2001:db8:1::1,PC2的缺省网关配置为2001:db8:2::1,主机3的缺省网关配置为2001:db8:3::1。
- 查看配置结果
# 查看RouterA的IPv6路由表。
[RouterA] display ipv6 routing-table
Routing Table : Public
Destinations : 5 Routes : 5
Destination : :: PrefixLength : 0
NextHop : FE80::E0:FCD5:A2BF:401 Preference : 60
Cost : 0 Protocol : Static
RelayNextHop : :: TunnelID : 0x0
Interface : Pos1/0/0 Flags : D
Destination : ::1 PrefixLength : 128
NextHop : ::1 Preference : 0
Cost : 0 Protocol : Direct
RelayNextHop : :: TunnelID : 0x0
Interface : InLoopBack0 Flags : D
Destination : 2001:db8:1:: PrefixLength : 64
NextHop : 2001:db8:1::1 Preference : 0
Cost : 0 Protocol : Direct
RelayNextHop : :: TunnelID : 0x0
Interface : GigabitEthernet2/0/0 Flags : D
Destination : 2001:db8:1::1 PrefixLength : 128
NextHop : ::1 Preference : 0
Cost : 0 Protocol : Direct
RelayNextHop : :: TunnelID : 0x0
Interface : GigabitEthernet2/0/0 Flags : D
Destination : FE80:: PrefixLength : 10
NextHop : :: Preference : 0
Cost : 0 Protocol : Direct
RelayNextHop : :: TunnelID : 0x0
Interface : NULL0 Flags : D
# 在RouterA上使用Ping验证连通性。
[RouterA] ping ipv6 2001:db8:3::1
PING 2001:db8:3::1 : 56 data bytes, press CTRL_C to break
Reply from 2001:db8:3::1
bytes=56 Sequence=1 hop limit=254 time = 63 ms
Reply from 2001:db8:3::1
bytes=56 Sequence=2 hop limit=254 time = 62 ms
Reply from 2001:db8:3::1
bytes=56 Sequence=3 hop limit=254 time = 62 ms
Reply from 2001:db8:3::1
bytes=56 Sequence=4 hop limit=254 time = 63 ms
Reply from 2001:db8:3::1
bytes=56 Sequence=5 hop limit=254 time = 63 ms
--- 2001:db8:3::1 ping statistics ---
5 packet(s) transmitted
5 packet(s) received
0.00% packet loss
round-trip min/avg/max = 62/62/63 ms
# 在RouterA上使用Tracert验证连通性。
[RouterA] tracert ipv6 2001:db8:3::1
traceroute to 2001:db8:3::1 30 hops max,60 bytes packet
1 FE80::E0:FCD5:86D4:401 11 ms 3 ms 4 ms
2 2001:db8:3::1 4 ms 3 ms 3 ms
配置文件
RouterA的配置文件
#
sysname RouterA
#
ipv6
#
interface GigabitEthernet2/0/0
ipv6 enable
ipv6 address 2001:db8:1::1/64
#
interface Pos1/0/0
link-protocol ppp
ipv6 enable
ipv6 address auto link-local
#
ipv6 route-static :: 0 Pos 1/0/0
#
return
RouterB的配置文件
#
sysname RouterB
#
ipv6
#
interface GigabitEthernet3/0/0
ipv6 enable
ipv6 address 2001:db8:2::1/64
#
interface Pos1/0/0
link-protocol ppp
ipv6 enable
ipv6 address auto link-local
#
interface Pos2/0/0
link-protocol ppp
ipv6 enable
ipv6 address auto link-local
#
ipv6 route-static 2001:db8:1:: 64 Pos1/0/0
ipv6 route-static 2001:db8:3:: 64 Pos2/0/0
#
return
RouterC的配置文件
#
sysname RouterC
#
ipv6
#
interface GigabitEthernet2/0/0
ipv6 enable
ipv6 address 2001:db8:3::1/64
#
interface Pos1/0/0
link-protocol ppp
ipv6 enable
ipv6 address auto link-local
#
ipv6 route-static :: 0 Pos1/0/0
#
return