UEC++学习(八)Actor添加球形碰撞体

 在.h文件中定义一个USphereComponent组件 ,NotifyActorBeginOverlap是用于重载

	class USphereComponent* CollisionComponent;

	virtual void NotifyActorBeginOverlap(AActor* OtherActor) override;

常用编写套路:

CreateDefaultSubobject<>()

InitSphereRadius:初始范围

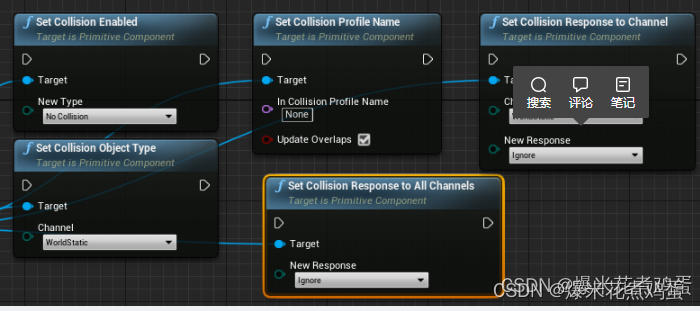
SetCollisionEnabled:设置碰撞启用类型

SetCollisionResponseToAllChannels:设置所有通道的碰撞响应类型

SetRootComponent:设置根组件

#include "Components/SphereComponent.h"

ASTUBasePickup::ASTUBasePickup()
{
	PrimaryActorTick.bCanEverTick = true;

	CollisionComponent = CreateDefaultSubobject<USphereComponent>("CollisionComponent");
	CollisionComponent->InitSphereRadius(50.0f);
	CollisionComponent->SetCollisionEnabled(ECollisionEnabled::QueryOnly);
	CollisionComponent->SetCollisionResponseToAllChannels(ECollisionResponse::ECR_Overlap);
	SetRootComponent(CollisionComponent);
}


void ASTUBasePickup::NotifyActorBeginOverlap(AActor* OtherActor)
{
	Super::NotifyActorBeginOverlap(OtherActor);
	Destroy();
}

对应在蓝图的函数

UEC++中,如果你想为Actor的静态网格包裹一个柱(圆柱),你需要通过编程来实现。这通常涉及到修改或添加组件到你的Actor类。下面是一个基本的步骤指南和示例代码,帮助你理解如何实现这一目标: 1. **创建或修改Actor类**:首先,确保你有一个自定义的Actor类,或者使用现有的Actor类。 2. **添加组件**:在你的Actor类中,添加一个`UStaticMeshComponent`来代表柱。你需要设置的尺寸、位置和旋转等属性,以便它正确地包裹你的静态网格。 3. **调整网格以适应柱**:如果需要,你可能还需要调整原始静态网格的位置和大小,以确保它完全位于柱内。 4. **编译并测试**:完成上述步骤后,编译你的项目并在编辑器中测试,确保柱正确包裹了静态网格。 下面是一个简单的示例代码,展示了如何在UEC++中为Actor的静态网格包裹一个柱: ```cpp // 假设这是在你的自定义Actor类的头文件中 #pragma once #include "CoreMinimal.h" #include "GameFramework/Actor.h" #include "Components/StaticMeshComponent.h" class MY_PROJECT_API AMyActor : public AActor { GENERATED_BODY() public: // Sets default values for this actor's properties AMyActor(); protected: // Called when the game starts or when spawned virtual void BeginPlay() override; public: // Called every frame virtual void Tick(float DeltaTime) override; // Declare your cylinder static mesh component here UPROPERTY(VisibleAnywhere, BlueprintReadWrite, Category = "My Category") class UStaticMeshComponent* CylinderComponent; }; ``` ```cpp // 在你的自定义Actor类的源文件中 #include "MyActor.h" #include "Components/PrimitiveComponent.h" // Sets default values AMyActor::AMyActor() { // Set this actor to call Tick() every frame. You can turn this off to improve performance if you don't need it. PrimaryActorTick.bCanEverTick = true; // Create and set up the cylinder component CylinderComponent = NewObject<UStaticMeshComponent>(this); CylinderComponent->SetupAttachment(RootComponent); CylinderComponent->SetStaticMesh(...); // Load your cylinder mesh here CylinderComponent->SetWorldScale3D(FVector(1.0f, 1.0f, 1.0f)); // Adjust scale as necessary } // Called when the game starts or when spawned void AMyActor::BeginPlay() { Super::BeginPlay(); } // Called every frame void AMyActor::Tick(float DeltaTime) { Super::Tick(DeltaTime); } ``` 请注意,上述代码是一个简化的示例,用于说明基本的概念。在实际项目中,你可能需要根据具需求调整网格的加载方式、位置、旋转和缩放等属性。此外,确保你有适当的圆柱网格资源,并且已经导入到你的项目中。
评论 1
添加红包

请填写红包祝福语或标题

红包个数最小为10个

红包金额最低5元

当前余额3.43前往充值 >
需支付:10.00
成就一亿技术人!
领取后你会自动成为博主和红包主的粉丝 规则
hope_wisdom
发出的红包
实付
使用余额支付
点击重新获取
扫码支付
钱包余额 0

抵扣说明:

1.余额是钱包充值的虚拟货币,按照1:1的比例进行支付金额的抵扣。
2.余额无法直接购买下载,可以购买VIP、付费专栏及课程。

余额充值