


以前龙之谷喜欢选战士,帅气。
战士的武器在甩动过程中会有扭曲拖尾。
自己测试项目中想给武器也添加这效果,所以顺便学习以下。
先来看看效果


还可以给拖尾添加着色、亮度、和一些扭曲强度的参数设置。
实现思路
- 按三个挂点的坐标来生成网格。
- 但生成网格是需要判断上次分段的位置,与现在移动位置差距是否到达某个值而生成一段网格。
- 生成分段是,设置好分段对应的颜色:
RGB控制头尾颜色,A控制扭曲强度与颜色alpha。 - 在Shader中,先通过
GrabPass获取ColorBuffer的内容,然后在frag shader中使用noiseTex来偏移uv,使用偏移后的UV来采样ColorBuffer的内容即可到达扭曲效果。
Unity带的TrailRender组件
在此前,我用过unity的TrailRenderer
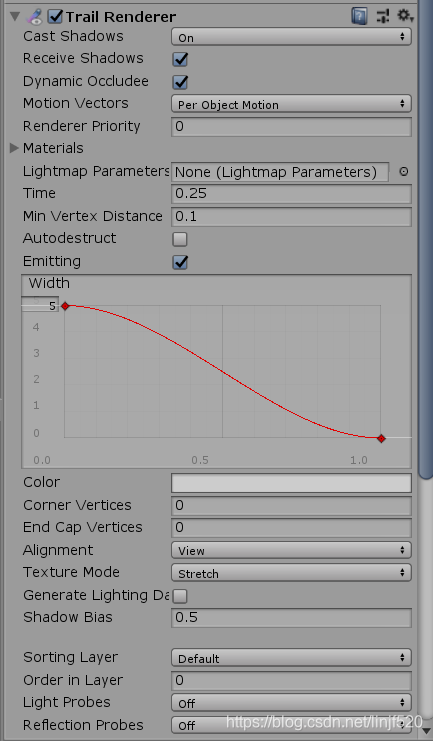
但是对我来说不好用,因为我需要将拖尾的头部可以与我的武器的位置吻合,如果用TrailRenderer挂到武器上,就算怎么调好起始对好的位置,运行后,你就会发现各种对不准,因为TrailRenderer是只一个坐标为对准拖尾头部的。
看看unity自带的制作效果
这效果不理想啊,所以啊,没办法下,就自己动手写个实时生成拖尾网格的脚本。
编写脚本实现
只要对齐三个坐标位置即可,原来只要两个坐标的,但是不好做拖尾边缘平滑过渡处理,所以调整为三个坐标。
生成网格,就是根据三个点,移动超过一定距离,就记录三个点的位置到一个段列表中。
段列表:每一段数据都记录点,与过去时间的信息。
    // 拖尾段数据
    public class TrailSegment
    {
        public Vector3 pos1;        // 三个坐标记录
        public Vector3 pos2;
        public Vector3 pos3;
        public float distortion1;   // 三个坐标扭曲程度
        public float distortion2;
        public float distortion3;
        public float elapsedTime;   // 保持不变时长,记录:已用时(秒)
        public float fadeTime;      // 当elapsedTime >= duration 时,将开始记录fade time,就是淡出的时间已用时(秒)
    }
然后update中遍历位置段列表的每一项。
根据每一段的前后数据,生成网格。
再根据时间更新网格位置,颜色,等参数即可。
线框模式查看过程
放慢一些时间,方便观察
CSharp
using System.Collections.Generic;
using UnityEngine;
#if UNITY_EDITOR
#endif

/// <summary>
/// authro      :   jave.lin
/// date        :   2020.03.06
/// 拖尾脚本
/// 建议放在一个空的GO上去使用,并且这个GO不会再调整Transform,不然会影响到MeshFilter的transform,
/// 如果你要放到一个容器下面,就不许保证这个容器不会有transform变化
/// (递归的父级都不能有改变,所以最好放在一个TrailRoot的容器,就好了,不要修改它的Transform,然后所有的TrailScript附加到的GO,都放它下面)
/// </summary>
public class TrailScript : MonoBehaviour
{
    // 拖尾段数据
    public class TrailSegment
    {
        public Vector3 pos1;        // 三个坐标记录
        public Vector3 pos2;
        public Vector3 pos3;
        public float distortion1;   // 三个坐标扭曲程度
        public float distortion2;
        public float distortion3;
        public float elapsedTime;   // 保持不变时长,记录:已用时(秒)
        public float fadeTime;      // 当elapsedTime >= duration 时,将开始记录fade time,就是淡出的时间已用时(秒)
    }

#if UNITY_EDITOR
    public bool debug;
    [Space(10)]
#endif

    public Transform trans1;                    // 拖尾头的三个挂点
    public Transform trans2;
    public Transform trans3;

    public float duration = 1;                  // 拖尾段保持不变的时长(秒)
    public float fadeOut = 1;                   // 拖尾段保持不变时长到时后,开始淡出的时长(秒)
    public Color startColor;                    // 拖尾头部的颜色
    public Color endColor;                      // 拖尾尾部颜色

    public Material mat;                        // 拖尾的材质

    public bool emit;                           // 是否发射拖尾
    public float emitDistance = 0.1f;           // 出发生成拖尾分段的最小距离

    private List<TrailSegment> segmentList;     // 扭曲分段的列表

    private Vector3[] vertics;                  // 顶点的 world space position
    private int[] indices;                      // 顶点的 索引
    //private Vector2[] uvs;
    private Color[] colors;                     // 顶点的颜色

    private MeshRenderer meshRender;
    private MeshFilter meshFilter;

    private Mesh mesh;

    private Vector3 lastPos1;
    private Vector3 lastPos2;
    private Vector3 lastPos3;
    private float lastTime;

    private void Start()
    {
        segmentList = new List<TrailSegment>();
        mesh = new Mesh();
        meshRender = gameObject.AddComponent<MeshRenderer>();
        meshFilter = gameObject.AddComponent<MeshFilter>();
        meshFilter.mesh = mesh;
        meshRender.material = mat;
        mesh.MarkDynamic(); // 文档说是底层会加速处理那些频繁更新网格信息时使用 https://docs.unity3d.com/ScriptReference/Mesh.MarkDynamic.html

        lastPos1 = trans1.position;
        lastPos2 = trans2.position;
        lastPos3 = trans3.position;
    }

    private void Update()
    {
        if (emitDistance < 0) emitDistance = 0;

        if (emit)
        {
            var deltaPos1 = trans1.position - lastPos1;
            var deltaPos2 = trans2.position - lastPos2;
            var deltaPos3 = trans3.position - lastPos3;

            if ((!IsZero(deltaPos1) && deltaPos1.magnitude > emitDistance) ||
                (!IsZero(deltaPos2) && deltaPos2.magnitude > emitDistance) ||
                (!IsZero(deltaPos3) && deltaPos3.magnitude > emitDistance))
            {
                float invEmitDistance = emitDistance == 0 ? 0 : 1f / emitDistance;
                segmentList.Add(new TrailSegment {
                    pos1 = trans1.position, pos2 = trans2.position, pos3 = trans3.position,
                    distortion1 = deltaPos1.magnitude * invEmitDistance,
                    distortion2 = deltaPos2.magnitude * invEmitDistance,
                    distortion3 = deltaPos3.magnitude * invEmitDistance,
                });
                lastPos1 = trans1.position;
                lastPos2 = trans2.position;
                lastPos3 = trans3.position;
            }
        }

        var count = segmentList.Count;
        var offset = 0;
        TrailSegment curSeg = null;
        TrailSegment nextSeg = null;

        if (segmentList.Count > 1)
        {
            // 更新追后一个段的位置为:当前最新的拖尾头的位置
            var lastOne = segmentList[segmentList.Count - 1];
            lastOne.pos1 = trans1.position;
            lastOne.pos2 = trans2.position;
            lastOne.pos3 = trans3.position;
        }

        if (segmentList.Count > 0)
        {
            vertics = new Vector3[count * 3];               // 顶点
            indices = new int[(count) * (4 * 3)];           // 索引
            //uvs = new Vector2[count * 3];                 // uv,暂时不用
            colors = new Color[count * 3];                  // 颜色

            var w2lMatrix = transform.worldToLocalMatrix;   // 世界坐标转本地坐标的矩阵

            do
            {
                curSeg = segmentList[offset];

                var etT = duration == 0 ? 0 : Mathf.Clamp01(curSeg.elapsedTime / duration);
                var fadeT = fadeOut == 0 ? 0 : Mathf.Clamp01(curSeg.fadeTime / fadeOut);
                var reverseFadeT = 1 - fadeT;

                // 要靠近的左边
                var closeToPos = (offset < (segmentList.Count - 1) ? segmentList[offset + 1].pos2 : trans2.position);
                vertics[offset * 3 + 0] = w2lMatrix.MultiplyPoint(Vector3.Lerp(curSeg.pos1, closeToPos, fadeT));
                vertics[offset * 3 + 1] = w2lMatrix.MultiplyPoint(Vector3.Lerp(curSeg.pos2, closeToPos, fadeT));
                vertics[offset * 3 + 2] = w2lMatrix.MultiplyPoint(Vector3.Lerp(curSeg.pos3, closeToPos, fadeT));

                nextSeg = (offset + 1) < segmentList.Count ? segmentList[offset] : null;
                if (nextSeg != null)
                {
                    indices[offset * 4 * 3 + 0] = offset * 3 + 0;
                    indices[offset * 4 * 3 + 1] = offset * 3 + 1;
                    indices[offset * 4 * 3 + 2] = (offset + 1) * 3 + 1;     // next seg

                    indices[offset * 4 * 3 + 3] = offset * 3 + 0;
                    indices[offset * 4 * 3 + 4] = (offset + 1) * 3 + 1;     // next seg
                    indices[offset * 4 * 3 + 5] = (offset + 1) * 3 + 0;     // next seg

                    indices[offset * 4 * 3 + 6] = offset * 3 + 1;
                    indices[offset * 4 * 3 + 7] = offset * 3 + 2;
                    indices[offset * 4 * 3 + 8] = (offset + 1) * 3 + 2;     // next seg

                    indices[offset * 4 * 3 + 9] = offset * 3 + 1;
                    indices[offset * 4 * 3 + 10] = (offset + 1) * 3 + 2;    // next seg
                    indices[offset * 4 * 3 + 11] = (offset + 1) * 3 + 1;    // next seg
                }
                //uvs[offset * 3 + 0] = new Vector2(etT, 0.0f);
                //uvs[offset * 3 + 1] = new Vector2(etT, 0.5f);
                //uvs[offset * 3 + 2] = new Vector2(etT, 1.0f);

                // rgb作为过渡颜色,a作为控制扭曲强度
                Color c1 = startColor;
                Color c2 = endColor;
                Color c3 = Color.Lerp(c1, c2, etT);
                c3.a *= Mathf.Clamp01(curSeg.distortion1 * reverseFadeT);
                colors[offset * 3 + 0] = c3;
                c3.a *= Mathf.Clamp01(curSeg.distortion2 * reverseFadeT);
                colors[offset * 3 + 1] = c3;
                c3.a *= Mathf.Clamp01(curSeg.distortion3 * reverseFadeT);
                colors[offset * 3 + 2] = c3;
            } while (++offset < count);
            mesh.Clear();
            mesh.vertices = vertics;
            mesh.triangles = indices;
            //mesh.uv = uvs;
            mesh.colors = colors;
            int fadeOutCount = 0;
            offset = 0;
            while (offset < count)
            {
                curSeg = segmentList[offset];
                var dt = Time.deltaTime;
                curSeg.elapsedTime += dt;
                if (curSeg.elapsedTime >= duration)
                {
                    curSeg.fadeTime = curSeg.elapsedTime - duration;
                    if (curSeg.fadeTime >= fadeOut) fadeOutCount++;
                }
                offset++;
            }
            segmentList.RemoveRange(0, fadeOutCount);
        }
    }
    private bool IsZero(Vector3 v) => v.x == 0 && v.y == 0 && v.z == 0;

#if UNITY_EDITOR
    private void OnDrawGizmos()
    {
        if (debug == false) return;
        float r = 0.5f;
        Gizmos.color = Color.red;
        Gizmos.DrawSphere(trans1.position, r);

        Gizmos.color = Color.green;
        Gizmos.DrawSphere(trans2.position, r);

        Gizmos.color = Color.blue;
        Gizmos.DrawSphere(trans3.position, r);
    }
#endif
}
Shader
// jave.lin 2020.03.06
Shader "Custom/DistortionTrail" {
    Properties {
        [MaterialToggle(DISTORTION)]  DISTORTION("Distortion", Float) = 1       // 是否开始深度的,浅水透视效果
        _NoiseTex ("NoiseTex", 2D) = "white" {}                                 // 噪点图
        _Brightness ("Brightness", Range(0, 4)) = 2                             // 拖尾亮度
        _DistortionIntensity ("DistortionIntensity", Range(0, 10)) = .5         // 扭曲强度
        _DistortionFrequency ("DistortionFrequency", Range(0, 100)) = 1         // 扭曲变化频率
    }
    SubShader {
        Tags { "RenderType"="Opaque" "Queue"="Transparent" } LOD 100
        GrabPass { "_wpTrailTexture" }
        Pass {
            ZWrite Off Cull Off Lighting Off Fog { Mode Off }
            //Blend SrcAlpha OneMinusSrcAlpha
            CGPROGRAM
            #pragma vertex vert
            #pragma fragment frag
            #pragma multi_compile _ DISTORTION
            #include "UnityCG.cginc"
            struct appdata {
                float4 vertex : POSITION;
                float2 uv : TEXCOORD0;
                fixed4 color : COLOR;
            };
            struct v2f {
                float4 vertex : SV_POSITION;
                float2 uv : TEXCOORD0;
                float4 grabPos : TEXCOORD1;
                fixed4 color : COLOR0;
            };
            sampler2D _wpTrailTexture;
            sampler2D _NoiseTex;
            float4 _NoiseTex_ST;
            fixed _Brightness;
            fixed _DistortionIntensity;
            fixed _DistortionFrequency;
            v2f vert (appdata v) {
                v2f o;
                o.vertex = UnityObjectToClipPos(v.vertex);
                o.uv = TRANSFORM_TEX(v.uv, _NoiseTex);
                o.grabPos = ComputeGrabScreenPos(o.vertex);
                o.color = v.color;
                return o;
            }
            fixed4 frag (v2f i) : SV_Target {
                i.grabPos.xy /= i.grabPos.w;

                #if DISTORTION
                float intensity = tex2D(_NoiseTex, i.grabPos.xy).r * sin(_Time.yw * _DistortionFrequency);
                i.grabPos.x += intensity * i.color.a * _DistortionIntensity;
                #endif

                fixed4 col = tex2D(_wpTrailTexture, i.grabPos.xy);

                col.rgb = lerp(col.rgb, col.rgb * i.color.rgb + col.rgb * _Brightness, i.color.a);
                col.a = i.color.a;
                return col;
            }
            ENDCG
        }
    }
}
参数
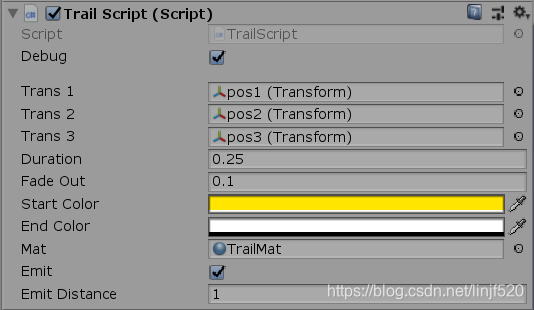
TrailScript的参数
-
Debug:是决定Scene视图下是否显示Trans1, Trans2, Trans3的position的Gizmo。
-
Trans1~3:是拖尾挂点的位置。
-
Duration:是拖尾分段的持续时长。
-
Fade Out:是拖尾分段消失时需要的时长。
-
Start Color:拖尾头部颜色,alpha可以控制颜色强弱。
-
End Color:拖尾尾部颜色,alpha可以控制颜色强弱。
-
Mat:拖尾网格渲染的材质(材质使用的shader就是上面分享的shader)。
-
Emit:是否持续发射分段。
-
Emit Distance:持续发射分段的最小移动距离。
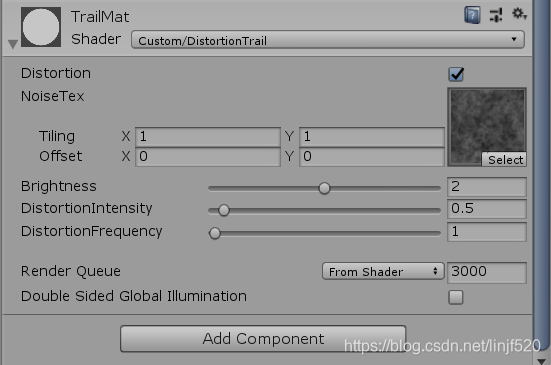
DistortionTrail材质参数 -
Distortion:是否开启扭曲。
-
NoiseTex:对ColorBuffer扭曲的uv的噪点图。
-
Brightness:对ColorBuffer的加亮强度。
-
DistortionIntensity:扭曲强度。
-
DistortionFrequency:扭曲的频率。
注意性能
之前写过一篇 GrabPass 注意的问题。
手机上的话,还是得用另一种方式来实现。
还可以优化
可能是终于有人吐槽 Mesh 类中,无 GC 更新 Vertex Buffer Data 的方式
今天 2021/08/02 偶然 在 Unity 官方发现:Mesh.SetVertexBufferData
该文档备注了:Publication Date :2021-07-25
Copyright © 2020 Unity Technologies. Publication Date: 2021-07-25.
有了这个 API,我们就可以先申请足够大的 NativeArray,然后再更新 NativeArray 并 Mesh.SetVertexBufferData 上传到 buffer,起码 GC 问题可以得到解决
总结
整体思路很简单,就是绘制热扭曲拖尾前,先拿到ColorBuffer的内容,然后回去拖尾是,偏移当前片段对应的uv来采样ColorBuffer的内容,即可达到效果。
我这个例子,还有很多优化空间:
ColorBuffer不使用GrabPass,改用Camera.Render(),或是CommandBuffer来优化输出到RT。(已实现:Unity Shader - 实现武器热扭曲拖尾效果(不需要GrabPass))- 热扭曲可以实现带方向的扭曲,从轨迹看出更明显的移动方向,与移动幅度。
Project
backup : UnityShader_WeaponDirtortionTrailTesting_2018.3.0f2


 被折叠的 条评论
为什么被折叠?
被折叠的 条评论
为什么被折叠?
 到【灌水乐园】发言


