


 本文深入解析Android属性动画原理,涵盖ValueAnimator、ObjectAnimator及AnimatorSet的使用技巧,包括自定义插值器、Evaluator,以及组合动画的实现方法。
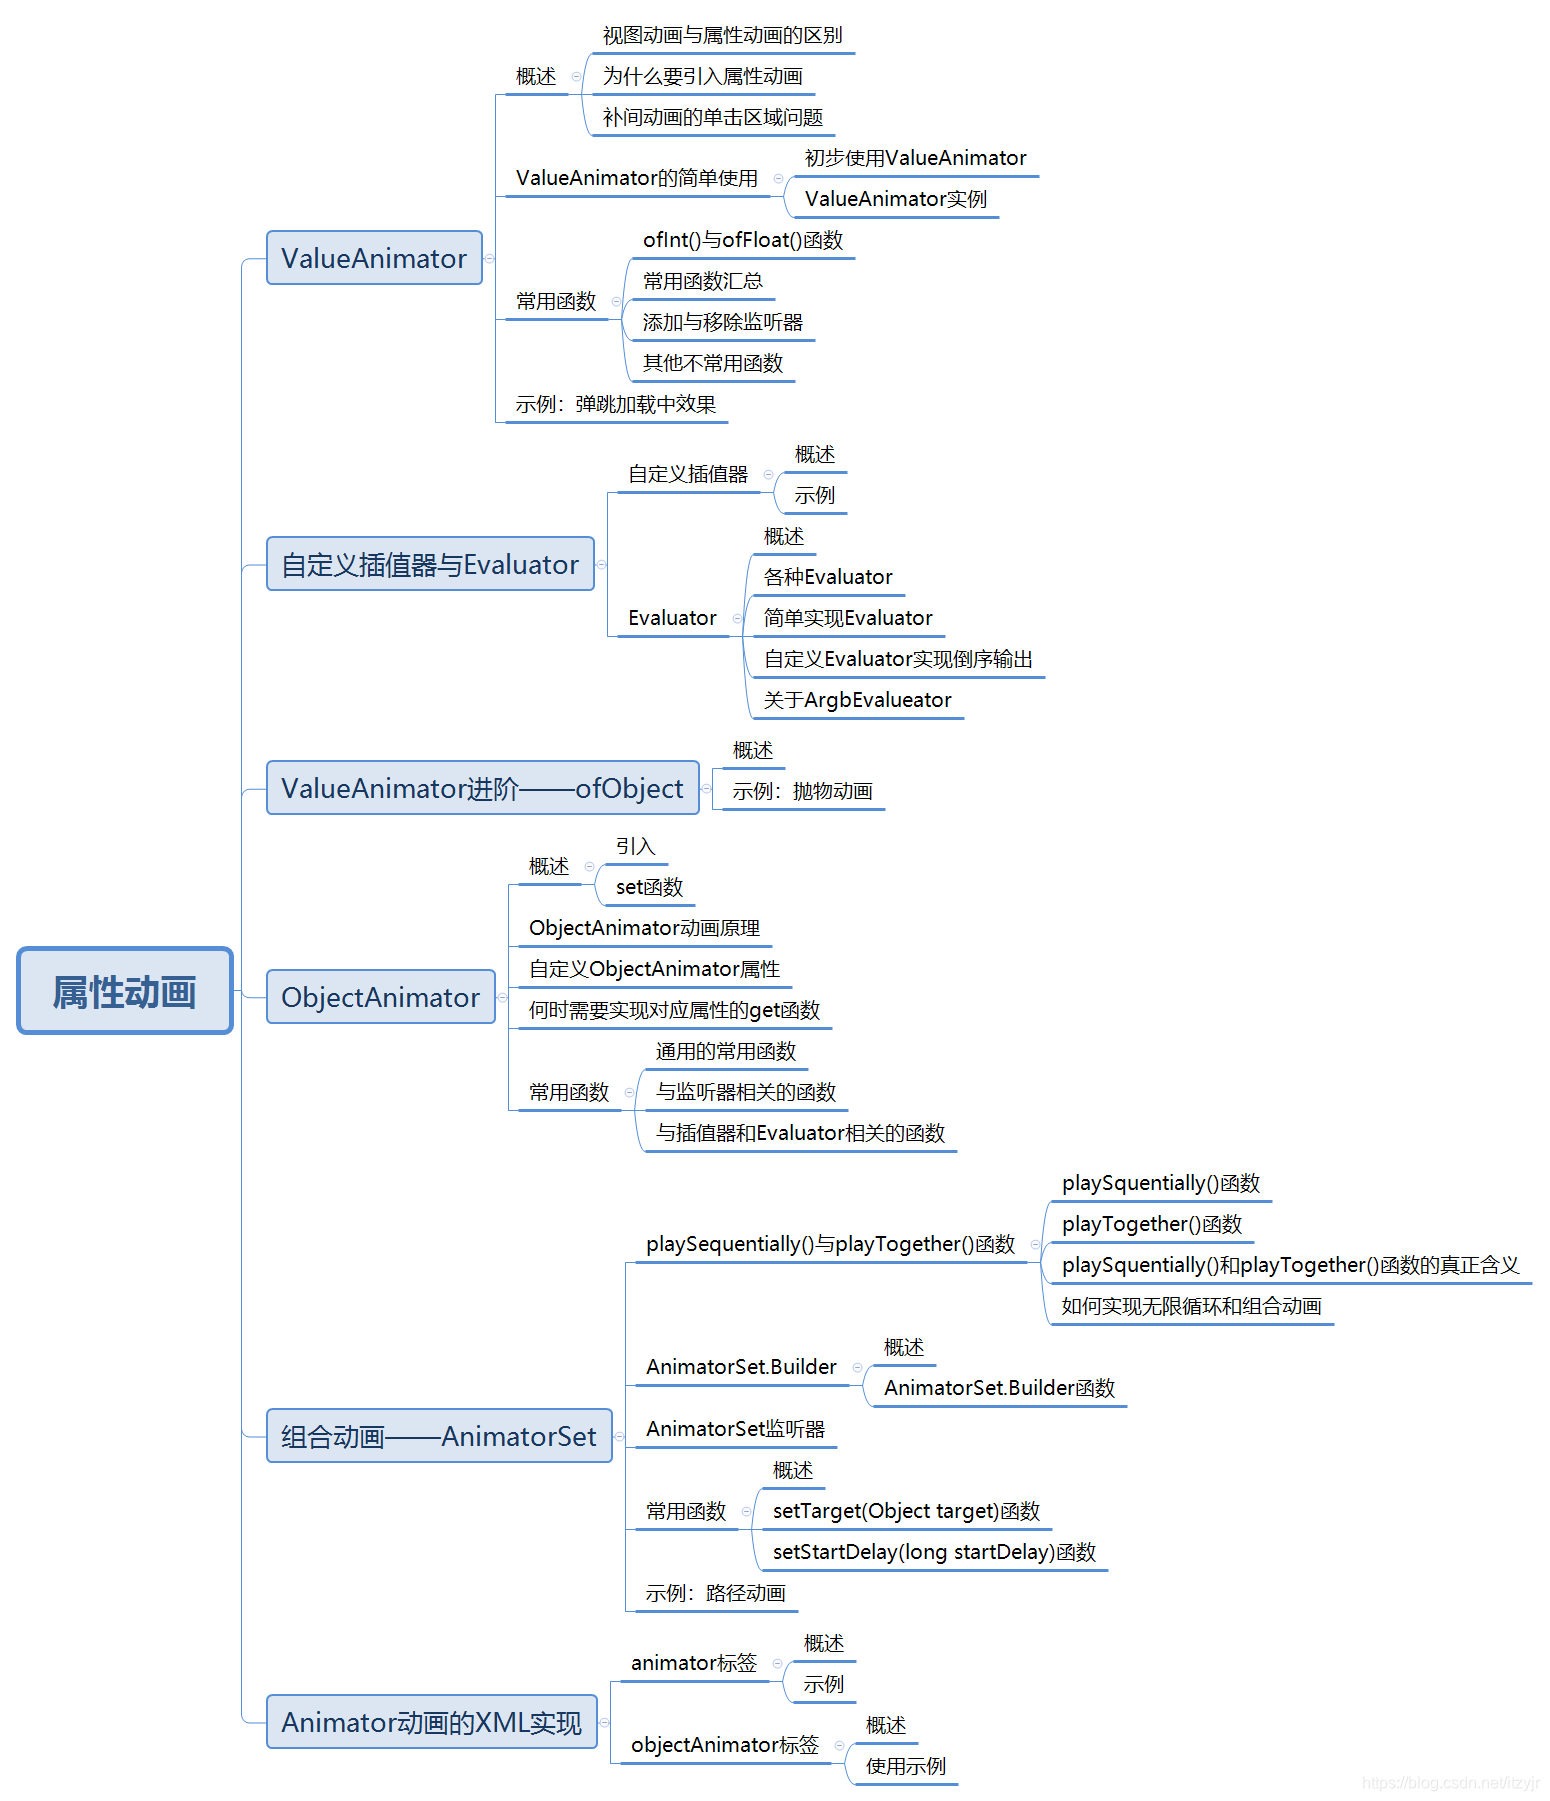
一、ValueAnimator的基本使用
概述:
![]()
1.视频动画与属性动画的区别
(1)View Animation是在API Level 1时引入的,Property Animation是在API Level 11时引入的。
(2)View Animation API在android.view.animation包中,Property Animation API在android.animation包中。
(3)View Animation中动画类命名都是XXXAnimation,Property Animation中动画命名都是XXXAnimator。
2.为什么要引入属性动画
如果利用补间动画来将一个控件的背景在1分钟内从绿色变为红色。这个效果是没办法仅仅通过改变控件的渐入渐出、移动、旋转和缩放来实现的,但却可以通过属性动画完美地实现。
属性动画是为了弥补视图动画的不足而设计的,能够实现补间动画无法实现的功能。
视图动画{补间动画,逐帧动画},只能对派生自View类的控件实例起作用。而属性动画不同,它是作用于控件属性。
正是因为属性动画能够只针对控件的某一属性来做动画,所以造就了它能单独改变控件某一个属性的值,比如颜色。这就是属性动画能实现补间动画无法实现的功能的最重要的原因。
所以,视图动画仅能对指定的控件做动画,而属性动画是通过改变控件的某一属性值来做动画的。
3.补间动画的单击区域问题
在移动前单击控件是可以作相应单击响应的,而控件在动画中移动后,单击控件没有响应的。这说明补间动画虽然能对控件做动画,但是并没有改变控件内部的属性值。
ValueAnimator的简单使用:
ValueAnimator,从名字可以看出,这个动画是针对值的。ValueAnimator不会对控件执行任何操作,我们可以给它设定从哪个值运动到哪个值,通过监听这些值的渐变过程来自己操作控件。
1.初步使用ValueAnimator
第一步,创建ValueAnimator实例
ValueAnimator animator = ValueAnimator.ofInt(0, 400);
animator.setDuration(1000);
animator.start();
第二步,添加监听事件
ValueAnimator animator = ValueAnimator.ofInt(0, 400);
animator.setDuration(1000);
animator.addUpdateListener(new ValueAnimator.AnimatorUpdateListener() {
    @Override
    public void onAnimationUpdate(ValueAnimator animation) {
        int curValue = (Integer) animator.getAnimatedValue();
        Log.d("animator", "curValue=" + curValue);
    }
});
animator.start();
动画开始后,就日志打印0~400之间的值。
这就是ValueAnimator的功能:对指定值区间进行动画运算,我们通过对运算进程进行监听来自己操作。总而言之就是两点:
• ValueAnimator只负责对指定值区间进行动画运算。
• 我们需要对运算过程进程监听,然后自己对控件执行动画操作。
2.ValueAnimator使用实例
private void doAnimation {
    ValueAnimator animator = ValueAnimator.ofInt(0, 400);
    animator.setDuration(1000);
    animator.addUpdateListener(new ValueAnimator.AnimatorUpdateListener() {
        @Override
        public void onAnimationUpdate(ValueAnimator animation) {
            int curValue = (Integer) animation.getAnimatedValue();
            tv.layout(curValue, curValue, curValue + tv.getWidth, curValue + tv.getHeight());
        }
    });
    animator.start();
}

在监听过程中,通过layout()函数来改变TextView的位置。我们是通过layout()函数来改变TextView的位置,而layout()函数在改变控件位置时是永久性的,即通过更改控件left、top、right、bottom这4个点的坐标来更改坐标位置,而不仅仅是从视觉上画出在哪个位置的,所以通过layout()函数更改控件位置后,控件在新位置上是可以响应单击事件的。
我们看下官方文档对layout()方法的描述:
java.lang.Object
   ↳ android.view.View
 	   ↳ android.view.ViewGroup
public final void layout (int l, int t, int r, int b)

Assign a size and position to a view and all of its descendants.

This is the second phase of the layout mechanism. (The first is measuring).
In this phase, each parent calls layout on all of its children to position them.
This is typically done using the child measurements that were stored in the measure pass().

Derived classes should not override this method. Derived classes with children should override onLayout.
In that method, they should call layout on each of their children.

Parameters
l int: Left position, relative to parent
t int: Top position, relative to parent
r int: Right position, relative to parent
b int: Bottom position, relative to parent
layout()函数上、下、左、右点的坐标是以屏幕坐标为标准的,所以从上面的效果图中也可以看出,TextView的运动轨迹是从屏幕左上角(0,0)点运行到(400,400)点。
常用函数:
1.ofInt()与ofFloat()函数
public static ValueAnimator ofInt(int... values)
public static ValueAnimator ofFloat(float... values)
它们的参数是可变长参数。比如ofInt(2, 90, 45)就表示数字从2变化到90再变化到45.
我们看下getAnimatedValue()函数的声明,就知道为什么要强制转换为Integer/Float。
Object getAnimatedValue();
2.常用函数汇总
ValueAnimator setDuration(long duration) ←设置动画时长
Object getAnimatedValue() ←获取ValueAnimator在运动时当前运动点的值
void start() ←开始动画
void setRepeatCount(int value) ←设置循环次数,0表示不循环,INFINITE表示无限循环
void setRepeatMode(int value) ←设置循环模式,取值{RESTART, REVERSE}
void cancle() ←取消动画
private ValueAnimator doRepeatAnim() {
    ValueAnimator animator = ValueAnimator.ofInt(0, 400);
    animator.addUpdateListener(new ValueAnimator.AnimatorUpdateListener() {
        @Override
        public void onAnimationUpdate(ValueAnimator animation) {
            int curValue = (Integer) animation.getAnimatedValue();
            tv.layout(tv.getLeft(), curValue, tv.getRight(), curValue + tv.getHeight());
        }
    });
    animator.setRepeatMode(ValueAnimator.REVERSE);
    animator.setRepeatCount(ValueAnimator.INFINITE);
    animator.setDuration(1000);
    animator.start();
    return animator;
}

由于在取消动画时还需要我们构造的这个ValueAnimator实例,所以将animator返回。
注意:重复次数为INFINITE(无限循环)的动画,当Activity结束的时候,必须调用cancle()取消动画,否则动画将无限循环,从而导致View无法释放,进一步导致整个Activity无法释放,最终引起内存泄漏。
3.添加与移除监听器
1)添加监听器
在ValueAnimator中共有两个监听器:
// 监听器一:监听动画过程中值的实时变化
public static interface AnimatorUpdateListener {
    void onAnimationUpdate(ValueAnimator animation);
}
// 添加方法:
public void addUpdateListener(AnimatorUpdateListener listener)
———————————————————————————————————————————————————————————————
// 监听器二:监听动画变化时的4个状态
public static interface AnimatorListener {
    void onAnimationStart(Animator animation);
    void onAnimationEnd(Animator animation);
    void onAnimationCancle(Animator animation);
    void onAnimationRepeat(Animator animation);
}
// 添加方法:
public void addListener(AnimatorListener listener)
2)移除监听器
// 移除AnimatorUpdateListener
void removeUpdateListener(AnimatorUpdateListener listener);
void removeAllUpdateListeners();
————————————————————————————————————————————————————————————
// 移除AnimatorListener
void removeListener(AnimatorListener listener);
void removeAllListeners();
4.其他不常用函数
// 延时多久开始
public void setStartDelay(long startDelay)
// 完全克隆一个ValueAnimator实例,包括它所有的设置以及所有对监听器代码的处理
public ValueAnimator clone()
示例:弹跳加载中效果
图片素材:
public class LoadingImageView extends ImageView {
    private int mTop;
    private int mCurImgIndex = 0; //当前动画图片索引
    private static int mImgCount = 3; //动画图片总张数

    public LoadingImageView(Context context) {
        super(context);
        init();
    }

    public LoadingImageView(Context context, AttributeSet attrs) {
        super(context, attrs);
        init();
    }

    public LoadingImageView(Context context, AttributeSet attrs, int defStyle) {
        super(context, attrs, defStyle);
        init();
    }

    @Override
    protected void onLayout(boolean changed, int left, int top, int right, int bottom) {
        super.onLayout(changed, left, top, right, bottom);
        mTop = top;
    }

    private void init() {
        ValueAnimator valueAnimator = ValueAnimator.ofInt(0, 100, 0);
        valueAnimator.setRepeatMode(ValueAnimator.RESTART);
        valueAnimator.setRepeatCount(ValueAnimator.INFINITE);
        valueAnimator.setDuration(2000);
        valueAnimator.setInterpolator(new AccelerateDecelerateInterpolator());

        valueAnimator.addUpdateListener(new ValueAnimator.AnimatorUpdateListener() {
            public void onAnimationUpdate(ValueAnimator animation) {
                Integer dx = (Integer) animation.getAnimatedValue();
                setTop(mTop - dx);
            }
        });
        valueAnimator.addListener(new Animator.AnimatorListener() {
            public void onAnimationStart(Animator animation) {
                setImageDrawable(getResources().getDrawable(R.drawable.pic_1));
            }
            public void onAnimationRepeat(Animator animation) {
                mCurImgIndex++;
                switch (mCurImgIndex % mImgCount) {
                    case 0:
                        setImageDrawable(getResources().getDrawable(R.drawable.pic_1));
                        break;
                    case 1:
                        setImageDrawable(getResources().getDrawable(R.drawable.pic_2));
                        break;
                    case 2:
                        setImageDrawable(getResources().getDrawable(R.drawable.pic_3));
                        break;
                }
            }
            public void onAnimationEnd(Animator animation) {
            }
            public void onAnimationCancel(Animator animation) {
            }
        });
        valueAnimator.start();
    }
}
<?xml version="1.0" encoding="utf-8"?>
<LinearLayout xmlns:android="http://schemas.android.com/apk/res/android"
              android:orientation="vertical"
              android:layout_width="match_parent"
              android:layout_height="match_parent"
              android:gravity="center_horizontal">

    <com.harvic.ValueAnimator.LoadingImageView
            android:layout_width="50dp"
            android:layout_height="50dp"
            android:layout_marginTop="100dp"
            android:src="@drawable/pic_1"/>

    <TextView
            android:layout_width="wrap_content"
            android:layout_height="wrap_content"
            android:layout_marginTop="10dp"
            android:text="加载中……"/>
</LinearLayout>

下面看下android.view包下的setTop函数,还有setLeft、setBottom、setRight都类似。
public final void setTop (int top)
Sets the top position of this view relative to its parent.
This method is meant to be called by the layout system and
should not generally be called otherwise, because the property may be changed at any time by the layout.
(通常不应以其他方式调用,因为布局可能随时更改属性。)

Parameters
top int: The top of this view, in pixels.
二、自定义插值器与Evaluator
在View Animation中,仅允许我们通过setInterpolator()函数来设置插值器;但是对于Animator而言,不仅可以设置插值器,还可以设置Evaluator。
自定义插值器:
1.概述
先来看看系统自带的插值器是如何实现的,比如LinearInterpolator。代码如下:
public class LinearInterpolator implements Interpolator {
    public LinearInterpoloator() {
    }
    public LinearInterpoloator(Context context, AttributeSet attrs) {
    }
    public float getInterpoloator(float input) {
        return input;
    }
}

public interface Interpolator extends TimeInterpolator {
}
——————————————————————————————————————————————————————————————————————
public interface TimeInterpolator {
    float getInterpolation(float input);
}
• input:它的取值范围是0~1,表示当前动画的进度,取0时表示动画刚开始,取1时表示动画结束,
         取0.5时表示动画中间的位置,其他以此类推。
• 返回值:表示当初实际想要显示的进度。取值可以超过1,也可以小于0,
         超过1表示已经超过目标值,小于0表示小于开始位置。
input参数表示当前动画的进度是匀速增加的。动画进度就是动画在时间上的进度,与任何设置无关,随着时间的推移,动画的进度自然从0到1逐渐增加。input参数相当于时间的概念,我们通过setDuration()函数指定了动画的时长,在这个时间范围内,动画进度肯定是一点点增加的,就相当于我们播放一首歌,这首歌的进度是从0到1。
返回值则表示动画的数值进度,它对应的数值范围是我们通过ofInt()、ofFloat()函数来指定的。
ValueAnimator anim = ValueAnimator.ofInt(100, 400);
anim.setDuration(1000);
anim.addUpdateListener(new ValueAnimator.AnimatorUpdateListener() {
    @Override
    public void onAnimationUpdate(ValueAnimator animation) {
        float currentValue = (float) animation.getAnimatedValue();
        Log.d("TAG", "current value is " + currentValue);
    }
});
anim.start();
如上代码当前的值是怎么来的呢?看下面的计算公式(目前先这么理解,后续会讲解真实情况):
当前值 = 100 + (400 - 100) × 显示进度
—————————————————————————————————————
其中100、400就是我们设置的ofInt(100, 400)
从100向400跑,跑到全程距离的20%位置,则:当前位置=100+(400-100)×0.2
从这里可以看到,显示进度表示的是当前的位置。但由于我们可以通过指定getInterpolator()函数的返回值来指定当前显示值的进度,所以,随着时间的推移,我们可以让值处在任意的位置。
再重复一次:input 参数与任何我们设定的值没有关系,只与时间有关,随着时间的推移,动画的进度也自然地增加,input 参数就代表了当前动画的进度,而返回值则表示动画的当前数值进度。
2.示例
从上面的讲解中也可以看到,我们自定义插值器,只需实现TimeInterpolator接口就可以了。
public class MyInterpolator implements TimeInterpolator {
    @Override
    public float getInterpolation(float input) {
        return 1 - input;
    }
}
我们将进度反转过来,当传入0时,让它的数值进度在完成的位置;当完成时,让它的数值进度在开始的位置。
ValueAnimator animator = ValueAnimator.ofInt(0, 300);
animator.addUpdateListener(new ValueAnimator.AnimatorUpdateListener() {
    @Override
    public void onAnimationUpdate(ValueAnimator animation) {
        int curValue = (Integer) animation.getAnimatedValue();
        tv.layout(tv.getLeft(), curValue, tv.getRight(), curValue + tv.getHeight());
    }
});
animator.setDuration(1000);
animator.setInterpolator(new MyInterpolator());
animator.start();

Evaluator:
1.概述
这4个步骤的具体含义如下 。
(1)oflnt(0, 400):表示指定动画的数值区间,从0运动到400 。
(2)插值器:在动画开始后,通过插值器会返回当前动画进度所对应的数值进度,但这个数值进度是以小数表示的,如0.2。
(3)Evaluator:我们通过监听器拿到的是当前动画所对应的具体数值,而不是用小数表示的数值。
               那么必须有一个地方会根据当前的数值进度将其转换为对应的数值,这个地方就是Evaluator。
               Evaluator用于将从插值器返回的数值进度转换成对应的数值。
(4)监听器返回:我们通过在AnimatorUpdateListener监听器中使用animation.getAnimatedValue()函数拿到Evaluator中返回的数值。
讲了这么多,Evaluator 其实就是一个转换器,它能把小数进度转换成对应的数值位置。
2.各种Evaluator
插值器返回的小数值表示的是当前动画的数值进度,这对于无论是使用ofFloat()函数还是使用oflnt()函数定义的动面都是适用的。因为无论是什么动画,它的进度必然在0~1之间 。0 表示还没开始,1表示动画结束,这对于任何动画都是适用的。
而 Evaluator 则不一样,它把插值器返回 的小数进度转换成当前数值进度所对应的值 。
oflnt()函数对应的Evaluator类名为IntEvaluator,而ofFloat()函数对应的Evaluator类名为FloatEvaluator。
ValueAnimator animator = ValueAnimator.ofInt(0, 600);
animator.addUpdateListener(new AnimatorUpdateListener() {
    @Override
    public void onAnimationUpdate(ValueAnimator animation) {
        int curValue = (int) animation.getAnimatedValue();
        tv.layout(tv.getLeft(), curValue, tv.getRight(), curValue + tv.getHeight());
    }
});
animator.setDuration(1000);
animator.setEvaluator(new IntEvaluator());
animator.setInterpolator(new BounceInterpolator());
animator.start();
从来没有定义IntEvaluator来转换值,也能正常运行?这是因为ofInt()和ofFloat()都是系统直接提供的函数,所以会有默认的插值器和Evaluator可供使用。
我们看一下IntEvaluator内部实现:
public class IntEvaluator implements TypeEvaluator<Integer> {
    @Override
    public Integer evaluate(float fraction, Integer startValue, Integer endValue) {
        int startInt = startValue;
        return (int)(startInt + fraction * (endValue - startInt));
    }
}
—————————————————————————————————————————————————————————————————————————————————————
• fraction:插值器中的返回值,表示当前动画的数值进度,以百分制的小数表示。
• startValue/endValue:对应ofInt(int start, int end)函数中的start/end的数值。
• 返回值:当前数值进度所对应的具体数值,这个数值就是AnimatorUpdateListener监听器中
          通过animation.getAnimatedValue()函数得到的数值。
__________________________________________________________
return (int)(startInt + fraction * (endValue - startInt));
与:【当前值 = 100 + (400 - 100) × 显示进度】,是一样的。
3.简单实现Evaluator
public class MyEvaluator implements TypeEvaluator<Integer> {
    @Override
    public Integer evaluate(float fraction, Integer startValue, Integer endValue) {
        int startInt = startValue;
        return (int)(200 + startInt + fraction * (endValue - startInt));
    }
}
注:只有定义动画时的数值类型与Evaluator的返回值类型一样,才能使用这个Evaluator。所以这里定义的MyEvaluator只适用于ofInt()函数。
我们让它返回值时增加了200,所以,当我们定义的区间是ofInt(0, 400)时,它的实际返回值区间应该是(200, 600)。
ValueAnimator animator = ValueAnimator.ofInt(0, 400);
animator.addUpdateListener(new AnimatorUpdateListener() {
    @Override
    public void onAnimationUpdate(ValueAnimator animation) {
        int curValue = (int) animation.getAnimatedValue();
        tv.layout(tv.getLeft(), curValue, tv.getRight(), curValue + tv.getHeight());
    }
});
animator.setDuration(1000);
animator.setEvaluator(new MyEvaluator());
animator.start();
设置MyEvaluator前、后的动画效果: (前)
(前)  (后)
(后)
再回过头来看看下面这幅流程图:
在插值器中,可以通过自定义插值器返回的数值进度来改变返回数值的位置;在Evaluator中,又可以通过改变数值进度所对应的具体数值来改变数值的位置。所以,结论来了:既可以通过重写插值器改变数值进度来改变数值位置,也可以通过改变Evaluator中数值进度所对应的具体数值来改变数值位置。
4.自定义Evaluator实现倒序输出
public class ReverseEvaluator implements TypeEvaluator<Integer> {
    @Override
    public Integer evaluate(float fraction, Integer startValue, Integer endValue) {
        int startInt = startValue;
        return (int) (endValue - fraction * (endValue - startInt));
    }
}
fraction*(endValue-startInt)表示动画实际运动的距离。用endValue减去实际运动距离就表示随着运动距离的增加,离终点越来越远(离起点越来越近),这也就实现从终点出发,最终运动到起点的效果。
ValueAnimator animator = ValueAnimator.ofInt(0, 300);
animator.addUpdateListener(new AnimatorUpdateListener() {
    @Override
    public void onAnimationUpdate(ValueAnimator animation) {
        int curValue = (int) animation.getAnimatedValue();
        tv.layout(tv.getLeft(), curValue, tv.getRight(), curValue + tv.getHeight());
    }
});
animator.setDuration(1000);
animator.setEvaluator(new ReverseEvaluator());
animator.start();
这与自定义插值器时通过重写插值器所实现的倒序输出效果一致。
5.关于ArgbEvaluator
1)使用ArgbEvaluator
除IntEvaluator和FloatEvaluator外,在android.animation包下还有另一个Evaluator,名为ArgbEvaluator,它是用来实现颜色值过渡转换的。
ValueAnimator animator = ValueAnimator.ofInt(0xffffff00, 0xff0000ff);
animator.setEvaluator(new ArgbEvaluator());
animator.setDuration(3000);
animator.addUpdateListener(new AnimatorUpdateListener() {
    @Override
    public void onAnimationUpdate(ValueAnimator animation) {
        int curValue = (int) animation.getAnimatedValue();
        tv.setBackgroundColor(curValue);
    }
});
animator.start();

2)ArgbEvaluator的实现原理
来看一下ArgbEvaluator的源码:
public class ArgbEvaluator implements TypeEvaluator {
    @Override
    public Object evaluate(float fraction, Object startValue, Object endValue) {
        int startInt = (Integer) startValue;
        int startA = (startInt >> 24);
        int startR = (startInt >> 16) & 0xff;
        int startG = (startInt >> 8) & 0xff;
        int startB = startInt & 0xff;

        int endInt = (Integer) endValue;
        int endA = (endInt >> 24);
        int endR = (endInt >> 16) & 0xff;
        int endG = (endInt >> 8) & 0xff;
        int endB = endInt & 0xff;

        return (int) ((startA + (int) (fraction * (endA - startA))) << 24) |
               (int) ((startR + (int) (fraction * (endR - startR))) << 16) |
               (int) ((startG + (int) (fraction * (endG - startG))) << 8) |
               (int) ((startB + (int) (fraction * (endB - startB))));
    }
}

startA + (int)(fraction * (endA - startA)):对于这个公式很容易理解,与IntEvaluator中的计算公式一样,就是根据透明度A的初始值、结束值求得当前进度下透明度A对应的数值。
同理:
• startR + (int)(fraction * (endR - startR)表示当前进度下的红色值。
• startG + (int)(fraction * (endG - startG)表示当前进度下的绿色值。
• startB + (int)(fraction * (endB - startB)表示当前进度下的蓝色值。
然后通过位移和或运算将当前进度下的A、R、G、B组合起来就是当前的颜色值了。
三、ValueAnimator进阶——ofObject
概述:
ofInt()函数只能传入Integer类型的值,ofFloat()函数只能传入Float类型的值。如果我们需要操作其他类型的变量该怎么办?
其实ValueAnimator还有一个函数ofObject(),可以传入任何类型的变量。
public static ValueAnimator ofObject(TypeEvaluator evaluator, Object... values)
• evaluator:自定义的Evaluator
• values:可变长参数,属于Object类型
为什么要强制传入自定义的Evaluator?我们知道,Evaluator作用是根据当前动画的数值进度计算出当前进度所对应的值。既然Object对象是我们自定义的,那么必然从进度到值的转换过程也必须由我们来做,否则系统也不可能知道我们要将数值进度转换出来的具体值是什么。
public class CharEvaluator implements TypeEvaluator<Character> {
    @Override
    public Character evaluate(float fraction, Character startValue, Character endValue) {
        int startInt = (int) startValue;
        int endInt = (int) endValue;
        int curInt = (int) (startInt + fraction * (endInt - startInt));
        char result = (char) curInt;
        return result;
    }
}
ValueAnimator animator = ValueAnimator.ofObject(new CharEvaluator(), new Character('A'), new Character('Z'));
animator.addUpdateListener(new AnimatorUpdateListener() {
    @Override
    public void onAnimationUpdate(ValueAnimator animation) {
        char ch = (Character) animation.getAnimatedValue();
        tv.setText(String.valueof(ch));
    }
});
animator.setDuration(10 * 1000);
animator.setInterpolator(new AccelerateInterpolator());
animator.start();
![]()
在ASCII码表中,字母A~Z对应数字65~90。
char temp = (char)65; // temp = 'A'

char ch = 'A';
int num = (int)ch; // num = 65
示例:抛物动画
1.框架实现
drawable/cirlce.xml:
<shape
    android:shape="oval">
    <solid android:color="#ff0000"/>
</shape>
<LinearLayout>
    <ImageView
        android:id="@+id/ball_img"
        android:layout_width="50dp"
        android:layout_height="50dp"
        android:src="@drawable/cirlce"/>
    <Button
        android:id="@+id/start_anim"
        android:text="开始动画"/>
</LinearLayout>
2.动画实现
public class FallingBallEvaluator implements TypeEvaluator<Point> {
    private Point point = new Point();
    @Override
    public Point evaluate(float fraction, Point startValue, Point endValue) {
        point.x = (int) (startValue.x + fraction * (endValue.x - startValue.x));
        if (fraction * 2 <= 1) {
            point.y = (int) (startValue.x + fraction * 2 * (endValue.x - startValue.x));
        } else {
            point.y = endValue.y;
        }
        return point;
    }
}
ValueAnimator animator = ValueAnimator.ofObject(new FallingBallEvaluator(), new Point(0,0), new Point(500,500));
animator.addUpdateListener(new AnimatorUpdateListener() {
    @Override
    public void onAnimationUpdate(ValueAnimator animation) {
        mCurPoint = (Point) animation.getAnimatedValue();
        ballImg.layout(mCurPoint.x, mCurPoint.y, mCurPoint.x + ballImg.getWidth(), mCurPoint.y + ballImg.getHeight());
    }
});
animator.setDuration(2000);
animator.start();

在抛物运动中,物体在X轴方向的速度是不变的,所以在X轴方向上它的实时位置是:
point.x = (int) (startValue.x + fraction * (endValue.x - startValue.x));
Y轴方向是s = v0*t+g*t*t(其中,v0是初速度,g是重力加速度,t表示当前时间)。而这里没有时间概念,这里用一个简单例子,折中公式:将实时进度乘以2作为当前进度。很显然,Y轴的进度会首先完成(变成1),这时X轴还是会继续前进,所以在视觉上会产生落地后继续滚动的效果。
四、ObjectAnimator
概述:
1.引入
ValueAnimator有一个缺点,就是只能对动画中的数值进行计算。如果想对哪个控件执行操作,就需要监听ValueAnimator的动画过程,相比补间动画要烦琐得多。
为了能让动画直接与对应控件相关联,以使我们从监听动画过程中解放出来,在ValueAnimator的基础上派生了一个类ObjectAnimator。由于ObjectAnimator是派生自ValueAnimator的,所以ValueAnimator中所能使用的函数在ObjectAnimator中都可以正常使用。
但ObjectAnimator也重写了几个函数,比如ofInt()、ofFloat()等。利用ObjectAnimator重写的ofFloat()函数来实现一个动画(改变透明度):
ObjectAnimator animator = ObjectAnimator.ofFloat(tv, "alpha", 1, 0, 1);
animator.setDuration(2000);
animator.start();

从效果图看到,TextView的透明度从1变成0再变成1的过程。
public static ObjectAnimator ofFloat(Object target, String propertyName, float... values)
• target:指定这个动画要操作的控件
• propertyName:指定这个动画要操作的控件的哪个属性
• values:可变长参数,是指这个属性值如何变化
ObjectAnimator animator = ObjectAnimator.ofFloat(tv, "rotation", 0, 180, 0);
animator.setDuration(2000);
animator.start();

2.set函数
回过头来看看构造改变rotation值的ObjectAnimator的方法:
ObjectAnimator animator = ObjectAnimator.ofFloat(tv, "rotation", 0, 180, 0);
TextView控件有rotation这个属性吗?没有,不光TextView没有,连它的父类View中也没有这个属性。
其实,ObjectAnimator做动画,并不是根据控件XML中的属性来改变的,而是通过指定属性所对应的set函数来改变的。比如上面指定的改变rotation属性值,ObjectAnimator在做动画时就会到指定控件(TextView)中去找对应的setRotation()函数来改变控件中对应的值。
在View中,有关动画共有下面几组set函数:
// 1.透明度:alpha
public void setAlpha(float alpha)

// 2.旋转度数:rotation、rotationX、rotationY
public void setRotation(float rotation) /* 绕Z轴旋转 */
public void setRotationX(float rotationX) /* 绕X轴旋转 */
public void setRotationY(float rotationY) /* 绕Y轴旋转 */

// 3.平移:translationX、translationY
public void setTranslationX(float translationX)
public void setTranslationY(float translationY)

// 4.缩放:scaleX、scaleY
public void setScaleX(float scaleX)
public void setScaleY(float scaleY)
下面分别是绕X轴、Y轴、Z轴旋转的动画:
![]() (绕X轴)
(绕X轴) ![]() (绕Y轴)
(绕Y轴) ![]() (绕Z轴)
(绕Z轴)
ObjectAnimator动画原理:

可以看到,唯一不同的是最后一步,在ValueAnimator中,需要通过添加监听器来监听当前的数值;而在ObjectAnimator中,则先根据属性值拼装成对应的set函数名字(比如scaleY的拼装方法就是将属性的第一个字母强制大写后,与set拼装,得到setScaleY(),然后通过反射找到对应控件的setScaleY(float scaleY)函数,并将当前的数值作为setScaleY(float scaleY)函数的参数传入。
来看看View中的setScaleY()函数的实现:
public void setScaleY(float scaleY) {
    ensureTransformationinfo();
    final Transformationlnfo info = mTransformationinfo;
    if (info.mScaleY != scaleY) {
        invalidateParentCaches();
        //Double-invalidation is necessary to capture view's old and new areas
        invalidate(false);
        info.mScaleY = scaleY;
        info.mMatrixDirty = true;
        mPrivateFlags |= DRAWN; // force another invalidation with the new orientation
        invalidate(false);
    }
}
这段代码分为两部分:(1)重新设置当前控件的参数;(2)调用invalidate()函数强制重绘。
所以,在重绘时,控件就会根据最新的控件参数来绘制了,我们就会看到当前控件被缩放了。
set函数的调用频率是多少?由于动画在进行时每隔十几毫秒会刷新一次,所以set函数也会每隔十几毫秒被调用一次。
自定义ObjectAnimator属性:
ObjectAnimator中有三个构造函数:
public static ObjectAnimator ofFloat(Object target, String propertyName, float... values)
public static ObjectAnimator ofInt(Object target, String propertyName, int... values)
public static ObjectAnimator ofObject(Object target, String propertyName, TypeEvaluator evaluator, Object... values)
为了自由控制控件的实现,在自定义控件中,肯定存在一个set函数来与我们自定义的属性相对应。
public class FallingBallImageView extends ImageView {
    @Override
    public FallingBallImageView(Context context, AttributeSet attrs) {
        super(context, attrs);
    }
    public void setFallingPos(Point pos) {
        layout(pos.x, pos.y, pos.x + getWidth(), pos.y + getHeight());
    }
}
在这段代码中,只有一个set函数,这里有两点需要注意:
● 这个set函数所对应的属性应该是fallingPos 或者 FallingPos
● 在setFallingPos()函数中,参数类型是Point对应,所以在构造ObjectAnimator时必须使用ofObject()函数
ObjectAnimator animator = ObjectAnimator.ofObject(ballImg, "fallingPos", new FallingBallEvaluator(), new Point(0, 0), new Point(500, 500));
animator.setDuration(2000);
animator.start();
何时需要实现对应属性的get函数:
public class CustomTextView extends TextView {
    @Override
    public CustomTextView(Context context, AttributeSet attrs) {
        super(context, attrs);
    }
    public void setScaleSize(float num) {
        setScaleX(num);
    }
}
ObjectAnimator animator = ObjectAnimator.ofFloat(tv, "ScaleSize", 6);
animator.setDuration(2000);
animator.start();
这里只传递了一个变化值6,那么它是从哪里开始变化的呢?从运行效果图中可以看出它是从0开始变化的,但在日志中已经发出警告:
Method getScaleSize() with type float not found on target class com.harvic.ObjectAnimator.CustomTextView
意思就是没找到scaleSize属性所对应的getScaleSize()函数。
如果动画没有初始值,就会使用系统默认值。
如果给自定义控件CustomTextView设置get函数,那么将会以get函数的返回值作为初始值。
public class CustomTextView extends TextView {
    ...

    public float getScaleSize() {
        return 0.5f;
    }
}
以上当指定一个动画值时,动画就会通过get函数来获取初始值。这里的动画缩放是从0.5倍开始。
总结:当且仅当动画只有一个过渡值时,系统才会调用对应属性的get函数来得到动画的初始值。当不存在get函数时,则会取动画参数类型的默认值作为初始值;当无法取得动画参数类型的默认值时,则会直接崩渍。
常用函数:
由于ObjectAnimator的函数都是从ValueAnimator中继承而来,所以用法和效果与ValueAnimator函数完全一样。这里再列出常用的,不再缀述。
ValueAnimator setDuration(long duration)
Object getAnimatedValue()
void start()
void setRepeatCount(int value)
void setRepeatMode(int value)
void cancel()
————————————————————————————————————————
public static interface AnimatorUpdateListener {
    void onAnimationUpdate(ValueAnimator animation);
}
public void addUpdateListener(AnimatorUpdateListener listener) // 添加监听
——————————————————————————————————————————————————————————————
public static interface AnimatorListener {
    void onAnimationStart(Animator animation);
    void onAnimationEnd(Animator animation);
    void onAnimationCancel(Animator animation);
    void onAnimationRepeat(Animator animation);
}
public void addListener(AnimatorListener listener)// 添加监听
—————————————————————————————————————————————————————————————
public void setInterpolator(TimeInterpolator value)
public void setEvaluator(TypeEvaluator value)
五、组合动画——AnimatorSet
ValueAnimator和ObjectAnimator都只能单独实现一个动画,如果想要使用一个组合动画,就需要用到AnimatorSet。
playSequentially()与playTogether()函数:
在AnimatorSet中提供了两个函数:
playSequentially():动画依次播放;playTogether():所有动画一直开始。
1.playSequentially()函数
public void playSequentially(Animator... items);
public void playSequentially(List<Animator> items);
ObjectAnimator tvlBgAnimator = ObjectAnimator.ofint(mTv1, "BackgroundColor", 0xffff00ff, 0xffffff00, 0xffff00ff);
ObjectAnimator tvlTranslateY = ObjectAnimator.ofFloat(mTvl, "translationY", 0, 300, 0);
ObjectAnimator tv2TranslateY = ObjectAnimator.ofFloat(mTv2, "translationY", 0, 400, 0);
AnimatorSet animatorSet = new AnimatorSet();
animatorSet.playSequentially(tv1BgAnimator, tv1TranslateY, tv2TranslateY);
animatorSet.setDuration(lOOO);
animatorSet.start();

2.playTogether()函数
public void playTogether(Animator... items);
public void playTogether(Collection<Animator> items);
ObjectAnimator tvlBgAnimator = ObjectAnimator.ofint(mTv1, "BackgroundColor", 0xffff00ff, 0xffffff00, 0xffff00ff);
ObjectAnimator tvlTranslateY = ObjectAnimator.ofFloat(mTvl, "translationY", 0, 300, 0);
ObjectAnimator tv2TranslateY = ObjectAnimator.ofFloat(mTv2, "translationY", 0, 400, 0);
AnimatorSet animatorSet = new AnimatorSet();
animatorSet.playTogether(tv1BgAnimator, tv1TranslateY, tv2TranslateY);
animatorSet.setDuration(lOOO);
animatorSet.start();

3.playSquentially()与playTogether()函数的真正含义
playSquentially()函数的含义就是:在激活一个动画之后,动画之后的操作就由动画自己来负责了,这个动画结束之后,再激活下一个动画。如果上一个动画没有结束,那么下一个动画就永远不会被激活。
playTogether()函数的含义就是:在激活所有动画之后,动画之后的操作就由动画自己来负责,至于动画结不结束,也只有动画自己知道。
加深理解,看下面这个使用playTogether()的例子:
ObjectAnimator tvlBgAnimator = ObjectAnimator.ofint(mTvl,"BackgroundColor",0xffff00ff,0xffffff00,0xffff00ff);
ObjectAnimator tvlTranslateY = ObjectAnimator.ofFloat(mTvl,"translationY",0,400,0);
tv1TranslateY.setStartDelay(2000);
tvlTranslateY.setRepeatCount(ValueAnimator.INFINITE);
ObjectAnimator tv2TranslateY = ObjectAnimator.ofFloat(mTv2,"translationY",0,400);
tv2TranslateY.setStartDelay(2000);
AnimatorSet animatorSet = new AnimatorSet();
animatorSet.playTogether(tvlBgAnimator,tv1TranslateY,tv2TranslateY);
animatorSet.setDuration(2000);
animatorSet.start();
将tv1TranslateY设置为延迟2000ms开始,并且无限循环;将tv2TranslateY设置为延迟2000ms开始;而对tv1BgAnimator没有进行任何设置,所以默认直接开始。

从这个例子可以看到,playTogether()函数只负责在同一时间点把门打开,门打开以后,马跑不跑,那是它自己的事;马回不回来,门也管不着。
将上面例子的playTogether()换成playSquentially(),其他不变,效果如下:

首先是tv1BgAnimator,在开始之后,这个动画会延时2000ms再开始;结束之后,激活tv1TranslateY,这个动画是无限循环,也就是说它永远不会结束,那么第三个动画tv2TranslateY也永远不会开始。
4.如何实现无限循环的组合动画
ObjectAnimator tvlBgAnimator = ObjectAnimator.ofint(mTvl,"BackgroundColor",0xffff00ff,0xffffff00,0xffff00ff);
tvBgAnimator.setRepeatCount(ValueAnimator.INFINITE);
ObjectAnimator tvlTranslateY = ObjectAnimator.ofFloat(mTvl,"translationY",0,400,0);
tvlTranslateY.setRepeatCount(ValueAnimator.INFINITE);
ObjectAnimator tv2TranslateY = ObjectAnimator.ofFloat(mTv2,"translationY",0,400);
tv2TranslateY.setRepeatCount(ValueAnimator.INFINITE);
AnimatorSet animatorSet = new AnimatorSet();
animatorSet.playTogether(tvlBgAnimator,tv1TranslateY,tv2TranslateY);
animatorSet.setDuration(2000);
animatorSet.start();

AnimatorSet.Builder:
1.概述
为了更方便地组合动画,提供了另一个类Animator.Builder
使用Animator.Builder类实现两个控件一起开始的动画效果。关键部分代码如下:
AnimatorSet.Builder builder = animatorSet.play(tv1BgAnimator);
builder.with(tv1TranslateY);
首先构造一个AnimatorSet对象,然后调用animatorSet.play(tv1BgAnimator)函数生成一个AnimatorSet.Builder对象,最后直接调用build.with()函数就能实现两个控件同时开始动画了。

2.AnimatorSet.Builder的函数
AnimatorSet.Builder是通过animatorSet.play(xxxAnimator)函数生成的,也是生成Animator.Builder对象的唯一途径。
public Builder play(Animator anim) ←表示要播放的【当前动画】

public Builder with(Animator anim) ←和【当前动画】一起执行

public Builder before(Animator anim) ←before执行该动画前,先执行【当前动画】

public Builder after(Animator anim) ←after执行该动画后,再执行【当前动画】

public Builder after(long delay) ←延迟n毫秒之后执行动画
第个函数的返回值都是Builder对象。也就是说,有两种方式使用它们。
方式一:使用Builder对象逐个添加动画
AnimatorSet.Builder builder = animatorSet.play(tv1TranslateY);
builder.with(tv2TranslateY);
builder.after(tv1BgAnimator);

方式二:串行方式
animator.play(tv1TranslateY).with(tv2TranslateY).after(tv1BgAnimator);
实现效果:在TextView-1颜色变化后,两个控件一起开始位移动画。
ObjectAnimator tv1BgAnimator = ObjectAnimator.ofInt(mTv1, "BackgroundColor", 0xffff00ff, 0xffffff00, 0xffff00ff);
ObjectAnimator tv1TranslateY = ObjectAnimator.ofFloat(mTv1, "translationY", 0, 400, 0);
ObjectAnimator tv2TranslateY = ObjectAnimator.ofFloat(mTv2, "translationY", 0, 400, 0);

AnimatorSet animatorSet = new AnimatorSet();
animatorSet.play(tv1TranslateY).with(tv2TranslateY).after(tv1BgAnimator);
animatorSet.setDuration(2000);
animatorSet.start();

play(Animator anim)表示当前在播放哪个动画,而with(Animator anim)、before(Animator anim)、after(Animator anim)都是以play()中当前所播放的动画为基准的。
比如,当play(playAnim)与before(beforeAnim)共用时,则表示在播放beforeAnim动画之前,先播放playAnim动画;同样,当play(playAnim与after怕erAnim共用时,则表示在播放afterAnim动画之后,再播放playAnim动画。
AnimatorSet监听器:
public static interface AnimatorListener {
    void onAnimationStart(Animator animation);
    void onAnimationEnd(Animator animation);
    void onAnimationCancel(Animator animation);
    void onAnimationRepeat(Animator animation);
}
添加方法:(这个监听器与ValueAnimator的监听器一模一样,因为它们都是从Animator类继承而来的)
public void addListener(AnimatorListener listener);
总结一下AnimatorSet的监听器:
(1)AnimatorSet的监听函数只是用来监听AnimatorSet的状态的,与其中的动画无关。
(2)AnimatorSet中并没有设置循环的函数,所以动画执行一次就结束了,永远无法执行到onAnimationRepeat()函数中。
常用函数:
1.概述
public AnimatorSet setDuration(long duration);
public void setInterpolator(TimeInterpolator interpolator);
public void setTarget(Object target)// 设置ObjectAnimator动画目标控件
public void setStartDelay(long startDelay)
在ObjectAnimator中也有这几个函数。区别在于:在AnimationSet中设置以后,会覆盖单个ObjectAnimator中的设置。也就是说,如果在AnimatorSet中没有设置,那么以ObjectAnimator中的设置为准;在AnimatorSet中设置以后,ObjectAnimator中的设置就会无效。
ObjectAnimator tvlTranslateY = ObjectAnimator.ofFloat(mTvl,"translationY",400,0);
tvlTranslateY.setDuration(500000000);
tvlTranslateY.setinterpolator(new Bounceinterpolator());
ObjectAnimatortv2TranslateY = ObjectAnimator.ofFloat(mTv2,"translationY",0,400,0);
tv2TranslateY.setinterpolator(new AccelerateDecelerateinterpolator());
AnimatorSet animatorSet = new AnimatorSet();
animatorSet.play(tv2TranslateY).with(tvlTranslateY);
animatorSet.setDuration(2000);
animatorSet.start();
由于AnimatorSet设置了setDuration(2000),所以tvlTranslateY.setDuration(500000000)无效,即每个动画音效动画时长为2000ms。假如给AnimatorSet设置了插值器,那么tv1和tv2单个动画所设置的插值器无效,以AnimatorSet中的插值器为准。

2.setTarget(Object target)函数
只要通过AnimatorSet的setTarget()函数设置了目标控件,那么单个动画中的目标控件都以AnimatorSet设置的为准。
animatorSet.setTarget()函数的作用就是将动画的目标控件统一设置为当前控件,AnimatorSet中的所有动画都将作用在所设置的目标控件上。其他控件上设置的动画都无效。
ObjectAnimator tvlBgAnimator = ObjectAnimator.ofint(mTvl,"BackgroundColor",0xffff00ff,0xffffff00,0xffff00ff);
ObjectAnimator tv2TranslateY = ObjectAnimator.ofFloat(mTv2,"translationY",0,400,0);
AnimatorSet animatorSet = new AnimatorSet();
animatorSet.playTogether(tv1BgAnimator,tv2TranslateY);
animatorSet.setDuration(2000);
animatorSet.setTarget(mTv2);
animatorSet.start();
给tv1设置了改变背景色,给tv2设置了上下移动。但由于通过animatorSet.setTarget(mTv2);将各个动画的目标控件设置为mTv2,所以tv1将不会有任何动画,所有动画都会发生在tv2上。

3.setStartDelay(long startDelay)函数
当AnimatorSet所拥有的函数与单个动画所拥有的函数冲突时,就以AnimatorSet设置为准。
但唯一的例外就是setStartDelay()函数。
setStartDelay()函数不会覆盖单个动画的延时,而且仅针对性地延长AnimatorSet的激活时间,单个动画所设置的setStartDelay()函数仍对单个动画起作用。
ObjectAnimator tvlTranslateY = ObjectAnimator.ofFloat(mTvl,"translationY",0,400,0);
ObjectAnimator tv2TranslateY = ObjectAnimator.ofFloat(mTv2,"translationY",0,400,0);
tv2TranslateY.setStartDelay(2000);
AnimatorSet animatorSet = new AnimatorSet();
animatorSet.play(tvlTranslateY).with(tv2TranslateY);
animatorSet.setStartDelay(2000);
animatorSet.setDuration(2000);
animatorSet.start();

可以看到,Animator的延时仅针对性地延长AnimatorSet的激活时间。对单个动画的延时设置没有影响。
如果将动画顺序颠倒一下:
animatorSet.play(tv2TranslateY).with(tv1TranslateY);
效果与上面完全不一样了。
这是因为:AnimatorSet真正【激活】延时 = AnimatorSet.startDelay + 第一个动画.startDelay
如果给tv2加上延时会怎样?
ObjectAnimator tvlTranslateY = ObjectAnimator.ofFloat(mTvl,"translationY",0,400,0);
ObjectAnimator tv2TranslateY = ObjectAnimator.ofFloat(mTv2,"translationY",0,400,0);
tv1TranslateY.setStartDelay(2000);
tv2TranslateY.setStartDelay(2000);
AnimatorSet animatorSet = new AnimatorSet();
animatorSet.play(tv2TranslateY).with(tv1TranslateY);
animatorSet.setStartDelay(2000);
animatorSet.setDuration(2000);
animatorSet.start();

由于Animator真正激活延时=AnimatorSet.startDelay+第一个动画.startDelay,所以在4000ms后,【动画被激活】。所以,2000ms+2000ms=4000ms后动画被激活,tv2开始动画,tv1延时2000ms后开始动画。
结论:
•AnimatorSet的延时仅针对性地延长AnimatorSet的激活时间,对单个动画的延时设置没有影响。
•AnimatorSet真正激活延时=AnimatorSet.startDelay+第一个动画.startDelay。
•在AnimatorSet被激活之后,第一个动画绝对会开始运行,后面的动画则根据自己是否延时自行处理。
示例:路径动画
1.原理
根据圆半径来定位每张图片的位置,如下图:

夹角а的度数为90°/4=22°
Math类中,Math.PI不仅代表圆周率л,也代表180°角所对应的弧度值。
Math类中还有一个根据度数获得弧度值的函数:
double toRadians(double angdeg)
● angdeg:度数
● 返回值:对应的弧度值
2.布局
<?xmlversion="1.0"encoding="utf-8"?>
<FrameLayout xmlns:android="http://schemas.android.com/apk/res/android"
	android:layout_width="match_parent"
	android:layout_height="match_parent"
	android:layout_marginBottom="l0dp"
	android:layout_marginRight="l0dp">
	<Button
		android:id="@+id/menu"
		style="@style/MenuStyle"
		android:background="@drawable/menu"/>
	<Button
		android:id="@+id/iteml"
		style="@style/MenuItemStyle"
		android:background="@drawable/circlel"
		android:visibility="gone"/>
	<!--其他btn代码与iteml相同,只是背景图片不一样,不再列出-->
</FrameLayout>
其中的style代码如下:
<resources>
	<style name="MenuStyle">
		<item name=android:layoutwidth">50dp</item>
		<item name=android:layout_height>50dp</item>
		<item name=android:layout_gravity>right|bottom</item>
	</style>
	<style name="MenuItemStyle">
		<item name=android:layout_width>45dp</item>
		<item name=android:layout_height>45dp</item>
		<item name=android:layout_gravity>right|bottom</item>
	</style>
</resources>
3.代码处理
public class MainActivity extends Activity implements View.OnClickListener {
    private Button mMenuButton;
    private Button mItemButton1;
    private Button mItemButton2;
    private Button mItemButton3;
    private Button mItemButton4;
    private Button mItemButton5;

    private boolean mIsMenuOpen = false;

    @Override
    public void onCreate(Bundle savedInstanceState) {
        super.onCreate(savedInstanceState);
        setContentView(R.layout.path_menu_activity);
        initView();
    }

    private void initView() {
        mMenuButton = (Button) findViewById(R.id.menu);
        mMenuButton.setOnClickListener(this);

        mItemButton1 = (Button) findViewById(R.id.item1);
        mItemButton1.setOnClickListener(this);

        mItemButton2 = (Button) findViewById(R.id.item2);
        mItemButton2.setOnClickListener(this);

        mItemButton3 = (Button) findViewById(R.id.item3);
        mItemButton3.setOnClickListener(this);

        mItemButton4 = (Button) findViewById(R.id.item4);
        mItemButton4.setOnClickListener(this);

        mItemButton5 = (Button) findViewById(R.id.item5);
        mItemButton5.setOnClickListener(this);
    }

    public void onClick(View v) {
        if (!mIsMenuOpen) {
            mIsMenuOpen = true;
            openMenu();
        } else {
            Toast.makeText(this, "你点击了" + v, Toast.LENGTH_SHORT).show();
            mIsMenuOpen = false;
            closeMenu();
        }
    }

    private void openMenu() {
        doAnimateOpen(mItemButton1, 0, 5, 300);
        doAnimateOpen(mItemButton2, 1, 5, 300);
        doAnimateOpen(mItemButton3, 2, 5, 300);
        doAnimateOpen(mItemButton4, 3, 5, 300);
        doAnimateOpen(mItemButton5, 4, 5, 300);
    }

    private void closeMenu() {
        doAnimateClose(mItemButton1, 0, 5, 300);
        doAnimateClose(mItemButton2, 1, 5, 300);
        doAnimateClose(mItemButton3, 2, 5, 300);
        doAnimateClose(mItemButton4, 3, 5, 300);
        doAnimateClose(mItemButton5, 4, 5, 300);
    }

    /**
     * 打开菜单的动画
     *
     * @param view   执行动画的view
     * @param index  view在动画序列中的顺序,从0开始
     * @param total  动画序列的个数
     * @param radius 动画半径
     *               Math.sin(x):x -- 为number类型的弧度,角度乘以0.017(2π/360)可以转变为弧度
     */
    private void doAnimateOpen(View view, int index, int total, int radius) {
        if (view.getVisibility() != View.VISIBLE) {
            view.setVisibility(View.VISIBLE);
        }
        double degree = Math.toRadians(90) / (total - 1) * index;
        int translationX = -(int) (radius * Math.sin(degree));
        int translationY = -(int) (radius * Math.cos(degree));
        AnimatorSet set = new AnimatorSet();
        //包含平移、缩放和透明度动画
        set.playTogether(
                ObjectAnimator.ofFloat(view, "translationX", 0, translationX),
                ObjectAnimator.ofFloat(view, "translationY", 0, translationY),
                ObjectAnimator.ofFloat(view, "scaleX", 0f, 1f),
                ObjectAnimator.ofFloat(view, "scaleY", 0f, 1f),
                ObjectAnimator.ofFloat(view, "alpha", 0f, 1));
        //动画周期为500ms
        set.setDuration(500).start();
    }

    /**
     * 关闭菜单的动画
     *
     * @param view   执行动画的view
     * @param index  view在动画序列中的顺序
     * @param total  动画序列的个数
     * @param radius 动画半径
     */
    private void doAnimateClose(final View view, int index, int total,
                                int radius) {
        if (view.getVisibility() != View.VISIBLE) {
            view.setVisibility(View.VISIBLE);
        }
        double degree = Math.PI * index / ((total - 1) * 2);
        int translationX = -(int) (radius * Math.sin(degree));
        int translationY = -(int) (radius * Math.cos(degree));
        AnimatorSet set = new AnimatorSet();
        //包含平移、缩放和透明度动画
        set.playTogether(
                ObjectAnimator.ofFloat(view, "translationX", translationX, 0),
                ObjectAnimator.ofFloat(view, "translationY", translationY, 0),
                ObjectAnimator.ofFloat(view, "scaleX", 1f, 0.1f),
                ObjectAnimator.ofFloat(view, "scaleY", 1f, 0.1f),
                ObjectAnimator.ofFloat(view, "alpha", 1f, 0f));

        /**
         * 解决方案二
         */
//        set.addListener(new Animator.AnimatorListener() {
//            public void onAnimationStart(Animator animation) {
//            }
//            public void onAnimationEnd(Animator animation) {
//                view.setScaleX(1.0f);
//                view.setScaleY(1.0f);
//            }
//            public void onAnimationCancel(Animator animation) {
//            }
//            public void onAnimationRepeat(Animator animation) {
//            }
//        });
        set.setDuration(500).start();
    }
}

这里的动画存在问题:当菜单关闭以后,再单击菜单展开时所处的位置,仍然会响应单击事件,把菜单再次打开。
问题在于在将菜单关闭时的代码有问题:
set.playTogether(
    ...
    ObjectAnimator.ofFloat(view, "scaleX", 1f, 0f),
    ObjectAnimator.ofFloat(view, "scaleX", 1f, 0f));
在系统通过setScaleX()和setScaleY()函数做动画时,我们将控件缩小到0,但在控件被缩小到0以后,对它所做的属性动画并不会实际改变控件的位置。就像视图动画一样,虽然动画把控件移走了,但是响应单击事件的位置仍是原来的位置。这是Android系统的一个缺陷。针对这个问题,有两种解决方案。
第一种方案比较简单,既然在将控件缩小到0以后存在缺陷,那么我们只需要不把控件缩小到0就可以了。上面代码中,把view缩小到0.1倍大小,在视觉上看不出来,也正好规避了缩小到0以后不会实际改变控件位置的问题。第二种方案是监听动画状态,在动画结束时,将控件放大。
六、Animator动画的XML实现
在XML中与Animator对应的有三个标签:
● <animator/>:对应ValueAnimator
● <objectAnimator/>:对应ObjectAnimator
● <set/>:对应AnimatorSet
animator标签:
<animator
    android:duration="int"
    android:valueFrom="float | int | color"
    android:valueTo="float | int | color"
    android:startOffset="int"
    android:repeatCount="int"
    android:repeatMode=["repeat" | "reverse"]
    android:valueType=["intType" | "floatType"]
    android:interpolator=["@android:interpolator/XXX"] />
——————————————————————————————————————————————————————————
● duration:每次动画播放的时长
● valueFrom:初始动画值
● valueTo:动画结束值
● startOffset:动画激活延时(对应代码中的startDelay(long delay)函数)
● repeatCount:动画重复次数
● repeatMode:动画重复模式
● valueType:参数值类型,与valueFrom和valueTo相对应。注:当valueFrom、valueTo设置为color类型则不需要设置这个参数
● interpolator:设置插值器
// 从res/animator文件夹下加载动画的XML文件
ValueAnimator valueAnimator = (ValueAnimator) AnimatorInflater.loadAnimator(MyActivity.this, R.animator.animator);
valueAnimator.start();
<animator xmlns:android="http://schemas.android.com/apk/res/android"
    android:valueFrom="0"
    android:valueTo="300"
    android:duration="1000"
    android:valueType="intType"
    android:interpolator="@android:anim/bounce_interpolator"/>
ValueAnimator valueAnimator = (ValueAnimator)AnimatorInflater.loadAnimator(MyActivity.this, R.animator.animator);
valueAnimator.addUpdateListener(new ValueAnimator.AnimatorUpdateListener() {
    @Override
    public void onAnimationUpdate(ValueAnimator animation) {
        int offset = (Integer) animation.getAnimatedValue();
        mTv.layout(offset, offset, mTv.getWidth() + offset, mTv.getHeight() + offset);
    }
});
valueAnimator.start();

objectAnimator标签:
<objectAnimator
    android:propertyName="string"
    android:duration="int"
    android:valueFrom="float | int | color"
    android:valueTo="float | int | color"
    android:startOffset="int"
    android:repeatCount="int"
    android:repeatMode=["repeat" | "reverse"]
    android:valueType=["intType" | "floatType"]
    android:interpolator=["@android:interpolator/XXX"] />
<objectAnimator xmlns:android="http://schemas.android.com/apk/res/android"
    android:propertyName="TranslationY"
    android:duration="2000"
    android:valueFrom="0.0"
    android:valueTo="400.0"
    android:interpolator="@android:anim/accelerate_interpolator"
    android:valueType="floatType"
    android:repeatCount="1"
    android:repeatMode="reverse"
    android:startOffset="2000" />
之所以使用Float类型,是因为setTranslationY()函数的参数是Float类型。该函数的声明如下:
public void setTranslationY(float translationY)
同时,设置重复次数为1次,重复模式为倒序;将动画激活延时设置为2000ms。
ObjectAnimator animator = (ObjectAnimator) AnimatorInflater.loadAnimator(MyActivity.this, R.animator.object_animator);
animator.setTarget(mTv);
animator.start();


 5336
5336

 被折叠的 条评论
为什么被折叠?
被折叠的 条评论
为什么被折叠?
 到【灌水乐园】发言


