


 本文深入探讨Android视图动画的五大类型:alpha、scale、translate、rotate和set,详细解析XML配置方法,代码实现技巧,插值器使用,以及逐帧动画的实现,附带多个实用示例。


一、视图动画标签
概述:
Android的视图动画由5种类型组成:alpha、scale、translate、rotate、set
1.配置XML动画文件
• alpha:渐变透明度动画效果
• scale:渐变尺寸伸缩动画效果
• translate:画面变换位置移动动画效果
• rotate:画面转移旋转动画效果
• set:定义动画集
R.anim.scaleanim:
<scale xlmns:android="http://schemas.android.com/apk/res/android"
    android:fromXScale="0.0"
    android:toXScale="1.4"
    android:fromYScale="0.0"
    android:toYScale="1.4"
    android:duration="700" />
TextView tv = (TextView) findViewById(R.id.tv);
// 首先加载动画
Animation animation = AnimationUtils.loadAnimation(MyActivity.this, R.anim.scaleanim);
// 开始动画
tv.startAnimation(animation);

scale标签:
• android:fromXScale:动画起始时,控件在X轴方向上相对自身的缩放比例,浮点值。
• android:toXScale:动画结束时,控件在X轴方向上相对自身的缩放比例,浮点值。
• android:fromYScale
• android:toYScale
• android:pivotX:缩放起始点X轴坐标,可以是数值、百分数、百分数p 三种样式,如:50、50%、50%p。
                  如果是数值,则表示在当前视图的左上角,即原点处加上50px,作为缩放起始点X轴坐标。
                  如果是50%,则表示在当前控件的左上角加上自己宽度的50%作为缩放起始点X轴坐标。
                  如果是50%p,则表示在当前控件的左上角加上父控件宽度的50%作为缩放起始点X轴坐标。
• android:pivotY:缩放起始点Y轴坐标。
1.scale标签的相关参数
<scale xlmns:android="http://schemas.android.com/apk/res/android"
    android:fromXScale="1.0"
    android:toXScale="0.4"
    android:fromYScale="1.2"
    android:toYScale="0.6"
    android:duration="700" />
起始时,在X轴方向上,从原宽度1倍大小开始缩放到0.4倍大小,1倍大小就是原大小;而在Y轴方向上,则从原高度1.2倍大小开始缩放到0.6倍大小。

2.pivotX和pivotY取不同值的含义
在scale标签中,pivotX和pivotY用于指定动画的起始点坐标。
1)取值为数值时(50)
<scale xmlns:android="http://schemas.android.com/apk/res/android"
    android:fromXScale="0.0"
    android:toXScale="1.4"
    android:fromYScale="0.0"
    android:toYScale="1.4"
    android:pivotX="50"
    android:pivotY="50"
    android:duration="700" />
在默认情况下,动画的起始点是控件左上角的坐标原点,而pivotX、pivotY用于指定动画的起始点与坐标原点的相对位置。
在这里指的是起始点在坐标原点的基础上在X轴正方向和Y轴正方向上都加上50px。


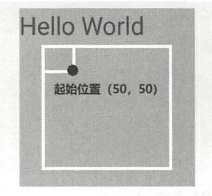
通过对比上面的效果,会明显地发现,只添加了pivotX=50,pivotY=50属性,但动画结束时的状态是一样的,只是动画起始时的点不一样。当添加了pivotX=50,pivotY=50属性后,【动画起始位置】就变成了以控件的左上角为原点、坐标为(50,50)的位置。
下图是一张动画结束时的效果图,白色框表示控件初始态,黑点位置是动画起始时的位置。可见,动画的结束位置是相同的,只是会根据起始位置的不同,动态调节X轴、Y轴的缩放速度。
2)取值为百分数时(50%)
<scale xmlns:android="http://schemas.android.com/apk/res/android"
    android:fromXScale="0.0"
    android:toXScale="1.4"
    android:fromYScale="0.0"
    android:toYScale="1.4"
    android:pivotX="50%"
    android:pivotY="50%"
    android:duration="700" />
 动画起始点位置:
它的位置是在坐标原点的基础上,增加自身宽度的50%和自身高度的50%。由于这里TextView控件宽度和高度相等,所以起始点在控件中心点的位置。
3)取值为百分数p时(50%p)
当取值在百分数后面加上一个字母p时,表示取值的基数是父控件,即在原点的基础上增加的值是父控件的百分值。
<scale xmlns:android="http://schemas.android.com/apk/res/android"
    android:fromXScale="0.0"
    android:toXScale="1.4"
    android:fromYScale="0.0"
    android:toYScale="1.4"
    android:pivotX="50%p"
    android:pivotY="50%p"
    android:duration="700" />


起始点坐标是在控件坐标原点的基础上加上父控件宽度的50%和父控件高度的50%。
从这些效果图中可以看出,无论pivotX、pivotY取任何值,影响的只是动画的起始位置,结束位置始终是不会变的。
3.Animation继承属性
android.view.animation.Animation
public abstract class Animation extends Object implements Cloneable
————————————————————————————————————————————————————————————————————
Known direct subclasses:
AlphaAnimation, AnimationSet, RotateAnimation, ScaleAnimation, TranslateAnimation
所有的动画都继承自Animation类,即Animation类是所有动画(scale、alpha、translate、rotate)的基类。
• android:duration:用于设置完成一次动画的持续时间,以毫秒为单位。
• android:fillAfter:如果设置为true,则控件动画结束时,将保持动画结束时的状态。
• android:fillBefore:如果设置为true,则控件动画结束时,将还原到初始化状态。
• android:fillEnabled:与android:fillBefore效果相同,都是在控件动画结束时,将还原到初始化状态。
• android:repeatCount:用于指定动画的重复次数,当取值为infinite时,表示无限循环。
• android:repeatMode:用于设定重复的类型,有reverse和restart两个值。其中,reverse表示倒序回放;
                      restart表示重放,并且必须与repeatCount一起使用才能看到效果。
• android:interpolator:用于设定插值器,其实就是指定的动画效果,比如弹跳效果等。
1)android:fillAfter

2)android:fillBefore

3)android:repeatMode="restart"

4)android:repeatMode="reverse"
alpha标签:
<alpha xmlns:android="http://schemas.android.com/apk/res/android"
    android:fromAlpha="1.0"
    android:toAlpha="0.1"
    android:duration="3000"
    android:fillBefore="true" />

rotate标签:
1.android:fromDegrees与android:toDegrees属性
• android:fromDegrees:动画开始旋转时的角度位置,正值顺时针,负值逆时针
• android:toDegrees
• android:pivotX
• android:pivotY
<rotate xmlns:android="http://schemas.android.com/apk/res/android"
    android:fromDegrees="0"
    android:toDegrees="-650"
    android:duration="3000"
    android:fillBefore="true" />

2.android:pivotX与android:pivotY属性
这两属性取值依然有有三种:数值、百分数、百分数p。它们在rotate标签中用于指定动画旋转中心点坐标。
<rotate xmlns:android="http://schemas.android.com/apk/res/android"
    android:fromDegrees="0"
    android:toDegrees="-650"
    android:pivotX="100%"
    android:pivotY="100%"
    android:duration="3000"
    android:fillBefore="true" />

translate标签:
除从Animation类继承而来的属性外,该标签自带的属性如下:
• android:fromXDelta:起始点X轴坐标,可以是数值、百分数、百分数p三种样式。
• android:fromYDelta:起始点Y轴坐标
• android:toXDelta:终点X轴坐标
• android:toYDelta:终点Y轴坐标
<translate xmlns:android="http://schemas.android.com/apk/res/android"
    android:fromXDelta="0"
    android:toXDelta="-80"
    android:fromYDelta="0"
    android:toYDelta="-80"
    android:duration="2000" />

set标签:
<set xmlns:android="http://schemas.android.com/apk/res/android"
    android:duration="3000"
    android:fillAfter="true">
    <alpha
        android:fromAlpha="0.0"
        android:toAlpha="1.0" />
    <scale
        android:fromXScale="0.0"
        android:toXScale="1.4"
        android:fromYScale="0.0"
        android:toYScale="1.4"
        android:pivotX="50%"
        android:pivotY="50%" />
    <rotate
        android:fromDegrees="0"
        android:toDegrees="720"
        android:pivotX="50%"
        androdi:pivotY="50%" />
</set>
上述代码完成了将控件从小到大,旋转出场,而且透明度从0变成1的组合效果。
注意:在set标签中设置repeatCount属性是无效的,必须对每个动画单独设置才有作用。
二、视图动画的代码实现
➊概述:
标签与所对应的类如下表所示:

这些动画都派生自Animation类,Animation类里的方法是这些动画所共用的。
Animation类里的标签属性与方法的对应关系如下表所示:

➋ScaleAnimation:
ScaleAnimation类的构造函数有如下几个:
ScaleAnimation(Context context, AttributeSet attrs)
ScaleAnimation(float fromX, float toX, float fromY, float toY)
ScaleAnimation(float fromX, float toX, float fromY, float toY, float pivotX, float pivotY)
ScaleAnimation(float fromX, float toX, float fromY, float toY,
               int pivotXType, float pivotXValue, int pivotYType, float pivotYValue)
第一个构造函数用于从本地XML文件中加载动画,基本上用不到。
标签android:pivotX有三种取值:数值、百分数、百分数p,体现在构造函数中,就是pivotXType参数,它的取值有三个:Animation.ABSOLUTE(对应具体数值)、Animation.RELATIVE_TO_SELF(对应百分数)、Animation.RELATIVE_TO_PARENT(对应百分数p)。
<scale xmlns:android="http://schemas.android.com/apk/res/android"
    android:fromXScale="0.0"
    android:toXScale="1.4"
    android:fromYScale="0.0"
    android:toYScale="1.4"
    android:pivotX="50%"
    android:pivotY="50%"
    android:duration="700" />
用代码构造同样的效果:
TextView tv = (TextView) findViewById(R.id.tv);
ScaleAnimation scaleAnim = new ScaleAnimation(0.0f, 1.4f, 0.0f, 1.4f,
                                              Animation.RELATIVE_TO_SELF, 0.5f,
                                              Animation.RELATIVE_TO_SELF, 0.5f);
scaleAnim.setDuration(700);
tv.startAnimation(scaleAnim);
➌AlphaAnimation:
AlphaAnimation(Context context, AttributeSet attrs)
AlphaAnimation(float fromAlpha, float toAlpha)
<alpha xmlns:android="http://schemas.android.com/apk/res/android"
    android:fromAlpha="1.0"
    android:toAlpha="0.1"
    android:duration="3000"
    android:fillBefore="true" />
用代码构造同样的效果:
TextView tv = (TextView) findViewById(R.id.tv);
AlphaAnimation alphaAnim = new AlphaAnimation(1.0f, 0.1f);
alphaAnim.setDuration(3000);
alphaAnim.setFillBefore(true);
tv.startAnimation(alphaAnim);
➍RotateAnimation:
RotateAnimation(Context context, AttributeSet attrs)
RotateAnimation(float fromDegrees, float toDegrees)
RotateAnimation(float fromDegrees, float toDegrees, float pivotX, float pivotY)
RotateAnimation(float fromDegrees, float toDegrees,
                int pivotXType, float pivotXValue,
                int pivotYType, float pivotYValue)
<rotate xmlns:android="http://schemas.android.com/apk/res/android"
    android:fromDegrees="0"
    android:toDegrees="-650"
    android:pivotX="50%"
    android:pivotY="50%"
    android:duration="3000"
    android:fillBefore="true" />
用代码构造同样的效果:
TextView tv = (TextView) findViewById(R.id.tv);
RotateAnimation rotateAnim = new RotateAnimation(0, -650,
                                                 Animation.RELATIVE_TO_SELF, 0.5f,
                                                 Animation.RELATIVE_TO_SELF, 0.5f);
rotateAnim.setDuration(3000);
rotateAnim.setFillAfter(true);
tv.startAnimation(rotateAnim);
➎TranslateAnimation:
TranslateAnimation(Context context, AttributeSet attrs)
TranslateAnimation(float fromXDelta, float toXDelta, float fromYDelta, float toYDelta)
TranslateAnimation(int fromXType, float fromXValue, int toXType, float toXValue,
                   int fromYType, float fromYValue, int toYType, float toYValue)
<translate xmlns:android="http://schemas.android.com/apk/res/android"
    android:fromXDelta="0"
    android:toXDelta="-80"
    android:fromYDelta="0"
    android:toYDelta="-80"
    android:duration="2000"
    android:fillBefore="true" />
用代码构造同样的效果:
TextView tv = (TextView) findViewById(R.id.tv);
TranslateAnimation translateAnim = new TranslateAnimation(Animation.ABSOLUTE, 0,
                                                          Animation.ABSOLUTE, -80,
                                                          Animation.ABSOLUTE, 0,
                                                          Animation.ABSOLUTE, -80);
translateAnim.setDuration(2000);
translateAnim.setFillBefore(true);
tv.startAnimation(translateAnim);
➏AnimationSet:
AnimationSet(Context context, AttributeSet attrs)
AnimationSet(boolean shareInterpolator)
—————————————————————————————————————————————————
• shareInterpolator:true表示其下面的所有动画共用该插值器;
                     false表示其下面的动画定义各自的插值器。
<set xmlns:android="http://schemas.android.com/apk/res/android"
    android:duration="3000"
    android:fillAfter="true">
    <alpha
        android:fromAlpha="0.0"
        android:toAlpha="1.0" />
    <scale
        android:fromXScale="0.0"
        android:toXScale="1.4"
        android:fromYScale="0.0"
        android:toYScale="1.4"
        android:pivotX="50%"
        android:pivotY="50%" />
    <rotate
        android:fromDegrees="0"
        android:toDegrees="720"
        android:pivotX="50%"
        androdi:pivotY="50%" />
</set>
用代码构造同样的效果:
TextView tv = (TextView) findViewById(R.id.tv);
Animation alphaAnim = new AlphaAnimation(1.0f, 0.1f);
Animation scaleAnim = new ScaleAnimation(0.0f, 1.4f, 0.0f, 1.4f,
                                         Animation.RELATIVE_TO_SELF, 0.5f,
                                         Animation.RELATIVE_TO_SELF, 0.5f);
Animation rotateAnim = new RotateAnimation(0, 720,
                                           Animation.RELATIVE_TO_SELF, 0.5f,
                                           Animation.RELATIVE_TO_SELF, 0.5f);
AnimationSet setAnim = new AnimationSet(true);
setAnim.addAnimation(alpahAnim);
setAnim.addAnimation(scaleAnim);
setAnim.addAnimation(rotateAnim);

setAnim.setDuration(3000);
setAnim.setFillAfter(true);

tv.startAnimation(setAnim);
➐Animation:
其实Animation类除具有一些属性外,还有一些函数可供我们使用。
void cancle() // 取消动画
void reset() // 将控件重置到动画开始前的状态
void setAnimationListener(Animation.AnimationListener listener) // 设置动画监听器
————————————————————————————————————————————————————————————————————————————————
Animation.AnimationListener中的回调函数如下:
abstract void onAnimationEnd(Animation animation) // 动画结束时回调
abstract void onAnimationRepeat(Animation animation) // 动画重复时回调
abstract void onAnimationStart(Animation animation) // 动画开始时回调
final RotateAnimation rotateAnim = new RotateAnimation(0, -650,
                                                       Animation.RELATIVE_TO_SELF, 0.5f,
                                                       Animation.RELATIVE_TO_SELF, 0.5f);
rotateAnim.setDuration(3000);
rotateAnim.setFillAfter(true);
ScaleAnimation scaleAnim = new ScaleAnimation(0.0f, 1.4f, 0.0f, 1.4f,
                                              Animation.RELATIVE_TO_SELF, 0.5f,
                                              Animation.RELATIVE_TO_SELF, 0.5f);
scaleAnim.setDuration(700);
scaleAnim.setAnimationListener(new Animation.AnimationListener() {
    public void onAnimationStart(Animation animation) {
    }

    public void onAnimationEnd(Animation animation) {
        tv.startAnimation(rotateAnim);
    }

    public void onAnimationRepeat(Animation animation) {
    }
});
tv.startAnimation(scaleAnim);
}
让控件先实现缩放动画,再实现旋转动画。

三、插值器初探
动画的变化速率是匀速的吗?动画变化速率是怎么指定的?
有关动画的变化速率问题是由Interpolator类来决定的。Interpolator叫插值器,也叫加速器,是用来指定动画如何变化的变量。
Interpolator只是一个接口,通过实现这个接口就可以自定义动画的变化速率。
系统提供了如下几个已经实现了插值器的类:

关于插值器,有两种使用方法:
方法一:在XML文件中引用插值器
<alpha xmlns:android="http://schemas.android.com/apk/res/android"
    android:fromAlpha="1.0"
    android:toAlpha="0.1"
    android:duration="3000"
    android:fillBefore="true"
    android:interpolator="@android:anim/accelerate_interpolator" />
方法二:通过setInterpolator()函数设置插值器
TextView tv = (TextView) findViewById(R.id.tv);
AlphaAnimation alphaAnim = new AlphaAnimation(1.0f, 0.1f);
alphaAnim.setDuration(3000);
alphaAnim.setFillBefore(true);
alphaAnim.setInterpolator(new LinearInterpolator());
tv.startAnimation(alphaAnim);
➊AccelerateDecelerateInterpolator
加速减速插值器,表示开始与结束的地方速率改变比较慢,在中间的时候加速。
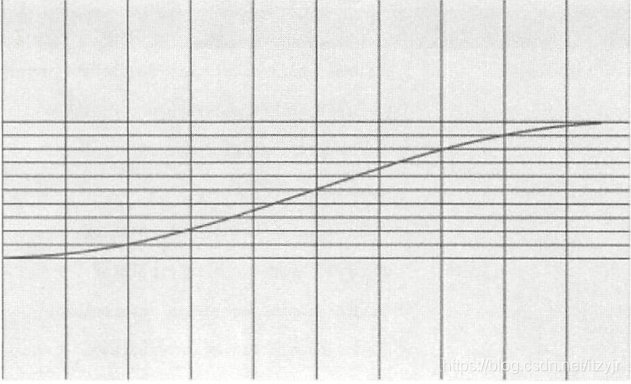
 (曲线斜率切线代表速度值)
TextView tv = (TextView) findViewById(R.id.tv);
Animation tranlateAnim = AnimationUtils.loadAnimation(MyActivity.this, R.anim.translateanim);
tranlateAnim.setInterpolator(new AccelerateDecelerateInterpolator());
tv.startAnimation(tranlateAnim);

对于旋转动画、透明度变化、缩放动画,也是初始加快,后期变慢。
➋AccelerateInterpolater
加速插值器。


➌DecelerateInterpolator
减速插值器。


➍LinearInterpolator
线性插值器,即匀速加速器。


➎BounceInterpolator
弹跳插值器。模拟了控件自由落体后回弹的效果。


➏AnticipateInterpolator
初始偏移插值器。表示在动画开始时向前偏移一段距离,然后应用动画。


AnticipateInterpolator还有一个带参构造函数:
public AnticipateInterpolator(float tension)
• tension:表示张力值,默认值为2,值越大,初始偏移量越大,而且速度越快。

➐OvershootInterpolator
是结束偏移插值器,表示在动画结束时,沿动画方向继续运动一段距离后再结束动画。


➑AnticipateOvershootInterpolator
AnticipateOvershootInterpolator = AnticipateInterpolator + OvershootInterpolator。


AnticipateOvershootInterpolator有两其他带参构造函数:
public AnticipateOvershootInterpolator(float tension)
public AnticipateOvershootInterpolator(float tension, float extraTension)
• tension:张力值,默认值为2,值越大,起始和结束时的偏移量越大,而且速度越快
• extraTension:额外张力值,默认值为1.5

➒CycleInterpolator
循环插值器。表示动画循环播放特定的次数,速率沿正弦曲线改变。
public CycleInterpolator(float cycles)
• cycles:循环次数
 (循环两次的数学曲线,虚线框起来的部分是一次循环)

四、动画示例
1.镜头由远及近效果
<LinearLayout>
    <ImageView
        android:id="@+id/img"
        android:layout_width="fill_parent"
        android:layout_height="fill_parent"
        android:src="@drawable/scenery"
        android:scaleType="fitXY" />
</LinearLayout>
ImageView imgView = (ImageView) findViewById(R.id.img);
ScaleAnimation scaleAnim = nwe ScaleAnimation(1.0f, 1.2f, 1.0f, 1.2f,
                                              Animation.RELATIVE_TO_SELF, 0.5f,
                                              Animation.RELATIVE_TO_SELF, 0.5f);
scaleAnim.setFillAfter(true);
scaleAnim.setInterpolator(new BounceInterpolator());
scaleAnim.setDuration(6000);
imgView.startAnimation(scaleAnim);

2.加载框效果
<LinearLayout>
    <ImageView
        android:id="@+id/loading"
        android:layout_width="wrap_content"
        android:layout_height="wrap_content"
        android:src="@drawable/loading" />
</LinearLayout>
 (loading.png)
ImageView imgView = (ImageView) findViewById(R.id.loading);
RotateAnimation rotateAnim = nwe RotateAnimation(0, 360,
                                                 Animation.RELATIVE_TO_SELF, 0.5f,
                                                 Animation.RELATIVE_TO_SELF, 0.5f);
rotateAnim.setRepeatCount(Animation.INFINITE);
rotateAnim.setDuration(2000);
rotateAnim.setInterpolator(new LinearInterpolator());
imgView.startAnimation(rotateAnim);

3.扫描动画
<FrameLayout
    android:background="#f8f8f8">
    <ImageView
        android:id="@+id/circle1"
        android:layout_width="140dp"
        android:layout_height="140dp"
        android:layout_gravity="center"
        android:layout_marginTop="30dp"
        android:src="@drawable/scan_circle"/>
    <ImageView
        android:id="@+id/circle2"
        android:layout_width="140dp"
        android:layout_height="140dp"
        android:layout_gravity="center"
        android:layout_marginTop="30dp"
        android:clickable="true"
        android:src="@drawable/scan_circle"/>
    <ImageView
        android:id="@+id/circle3"
        android:layout_width="140dp"
        android:layout_height="140dp"
        android:layout_gravity="center"
        android:layout_marginTop="30dp"
        android:clickable="true"
        android:src="@drawable/scan_circle"/>
    <ImageView
        android:id="@+id/circle4"
        android:layout_width="140dp"
        android:layout_height="140dp"
        android:layout_gravity="center"
        android:layout_marginTop="30dp"
        android:clickable="true"
        android:src="@drawable/scan_circle"/>
    <ImageView
        android:id="@+id/start_can"
        android:layout_width="155dp"
        android:layout_height="155dp"
        android:layout_gravity="center"
        android:layout_marginTop="30dp"
        android:src="@drawable/scan_cover"/>
</FrameLayout>
从布局来看,4个ImageView控件是隐藏在按钮后面的,它们的背景是利用shape标签构造的圆形,填充色为黄色(scan_circle.xml)
<shape android:shape="oval">
    <solid android:color="#FF6C2F" />
</shape>
再看动画内容(scale_alpha_anim.xml),动画效果是边放大边降低透明度。
<set android:duration="3000">
    <scale
        android:repeatCount="infinite"
        android:fromXScale="1.0"
        android:fromYScale="1.0"
        android:pivotX="50%"
        android:pivotY="50%"
        android:toXScale="3"
        android:toYScale="3" />
    <alpha
        android:repeatCount="infinite"
        android:fromAlpha="0.4"
        android:toAlpha="0" />
</set>
在单击按钮时,对各个ImageView控件间隔着做动画效果。
final Animation animation1 = AnimationUtils.loadAnimation(ScannerDemo.this,R.anim.scale_alpha_anim);
final Animation animation2 = AnimationUtils.loadAnimation(ScannerDemo.this,R.anim.scale_alpha_anim);
final Animation animation3 = AnimationUtils.loadAnimation(ScannerDemo.this,R.anim.scale_alpha_anim);
final Animation animation4 = AnimationUtils.loadAnimation(ScannerDemo.this,R.anim.scale_alpha_anim);

final ImageView circle1 = (ImageView)findViewById(R.id.circle1);
final ImageView circle2 = (ImageView)findViewById(R.id.circle2);
final ImageView circle3 = (ImageView)findViewById(R.id.circle3);
final ImageView circle4 = (ImageView)findViewById(R.id.circle4);

findViewById(R.id.start_can).setOnClickListener(new View.OnClickListener() {
    public void onClick(View v) {
        circle1.startAnimation(animation1);

        animation2.setStartOffset(600);
        circle2.startAnimation(animation2);

        animation3.setStartOffset(1200);
        circle3.startAnimation(animation3);

        animation4.setStartOffset(1800);
        circle4.startAnimation(animation4);
    }
});

从效果图可看出各个圆形是间隔着做动画效果,所以使用:
Animation.setStartOffset(int time);
————————————————————————————————————
用于延迟动画的开始时间
延迟各个动画的开始时间,使各个动画可以相互间隔。
五、逐帧动画
XML实现:
1.概述
使用XML定义逐帧动画时,一般有下面几个步骤。
1)定义XML动画文件
通过XML定义逐帧动画,语法如下:
<animation-list
    android:oneshot=["true" | "false"] >
    <item
        android:drawable="@[package:]drawable/drawable_resource_name"
        android:duration="integer" />
</animation-list>
2)设置ImageView
既可以通过android:src实现,也可以通过android:background实现。
// 通过设置为图片资源:
<ImageView
    android:layout_width="wrap_content"
    android:layout_height="wrap_content"
    android:src="@drawable/playing_ani"/>
// 通过设置为图片背景:
<ImageView
    android:layout_width="wrap_content"
    android:layout_height="wrap_content"
    android:background="@drawable/playing_ani"/>
3)AnimationDrawable开始动画
ImageView image = (ImageView) findViewById(R.id.frame_image);
AnimationDrawable anim = (AnimationDrawable) image.getDrawable();
anim.start();
如果通过android:src设置动画资源,对应取出方式是:image.getDrawable();
如果通过android:background设置动画资源,对应取出方式是:image.getBackground();
2.示例:音乐播放效果
图片素材:

playing_ani.xml:
<?xml version="1.0" encoding="UTF-8"?>
<animation-list xmlns:android="http://schemas.android.com/apk/res/android"
    android:oneshot="false">
    <item android:drawable="@drawable/list_icon_gif_playing1" android:duration="60"/>
    <item android:drawable="@drawable/list_icon_gif_playing2" android:duration="60"/>
    <item android:drawable="@drawable/list_icon_gif_playing3" android:duration="60"/>
    <item android:drawable="@drawable/list_icon_gif_playing4" android:duration="60"/>
    <item android:drawable="@drawable/list_icon_gif_playing5" android:duration="60"/>
    <item android:drawable="@drawable/list_icon_gif_playing6" android:duration="60"/>
    <item android:drawable="@drawable/list_icon_gif_playing7" android:duration="60"/>
    <item android:drawable="@drawable/list_icon_gif_playing8" android:duration="60"/>
    <item android:drawable="@drawable/list_icon_gif_playing9" android:duration="60"/>
    <item android:drawable="@drawable/list_icon_gif_playing10" android:duration="60"/>
    <item android:drawable="@drawable/list_icon_gif_playing11" android:duration="60"/>
    <item android:drawable="@drawable/list_icon_gif_playing12" android:duration="60"/>
    <item android:drawable="@drawable/list_icon_gif_playing13" android:duration="60"/>
    <item android:drawable="@drawable/list_icon_gif_playing14" android:duration="60"/>
</animation-list>
<?xml version="1.0" encoding="utf-8"?>
<LinearLayout xmlns:android="http://schemas.android.com/apk/res/android"
              android:orientation="vertical"
              android:layout_width="fill_parent"
              android:layout_height="fill_parent"
              android:gravity="center_horizontal">

    <ImageView
            android:id="@+id/frame_image"
            android:layout_marginTop="20dp"
            android:layout_width="wrap_content"
            android:layout_height="wrap_content"
            android:background="@drawable/playing_ani"/>
</LinearLayout>
ImageView image = (ImageView) findViewById(R.id.frame_image);
AnimationDrawable anim = (AnimationDrawable) image.getBackground();
anim.start();

3.AnimationDrawable类
在Android中,逐帧动画需要得到AnimationDrawable类的支持,它位于android.graphics.drawable.AnimationDrawable包下,是Drawable的间接子类。它主要用来创建一个逐帧动画,并且可以对帧进行拉伸,把它设置为View的背景,即可使用AnimationDrawable.start()方法播放。
AnimationDrawable有下面几个常用函数:
• void start():开始播放逐帧动画
• void stop():停止播放逐帧动画
• int getDuration(int index):得到指定index的帧的持续时间
• Drawable getFrame(int index):得到指定index的帧所对应的Drawable对象
• int getNumberOfFrames():得到当前AnimationDrawable的所有帧数量
• boolean isRunning():判断当前AnimationDrawable是否正在播放
• void setOneShot(boolean oneShot):设置AnimationDrawable是否只执行一次,true:执行一次;false:循环播放
• boolean isOneShot():判断当前AnimationDrawable是否执行一次
• void addFrame(Drawable frame, int duration):为AnimatinDrawable添加1帧,并设置持续时间
代码实现:
首先来看一个函数getIdentifier():
int getIdentifier(String name, String defType, String defPackage)
• name:所要查找资源ID的资源名称
• defType:资源所在的文件类型
           drawable系列文件夹下就是"drawable",
           anim文件夹下就是"anim",
           string.xml就是"string",
           array.xml就是"array"
• defPackage:应用包名
返回资源ID,如果没有指定资源就返回0。
ImageView image = (ImageView) findViewById(R.id.frame_image);
AnimationDrawable anim = new AnimationDrawable();
for (int i=1; i<=14; i++) {
    int id = getResources().getIdentifier("list_icon_gif_playing" + i, "drawable", getPackageName();
    Drawable drawable = getResources().getDrawable(id);
    anim.addFrame(drawable, 60);
}
anim.setOneShot(false);
image.setBackgroundDrawable(anim);
anim.start();


 485
485

 被折叠的 条评论
为什么被折叠?
被折叠的 条评论
为什么被折叠?
 到【灌水乐园】发言


