


1、前 言
有朋友留言:能出一个抽奖转盘的教程吗 网上好像没有鸿蒙做圆形扇形的源码,最好做个可以选择自增的 类似于根据数组元素自增扇形切割圆形面积的。
这里咱们就讨论下这个实现方案。先看效果(文末有源代码):
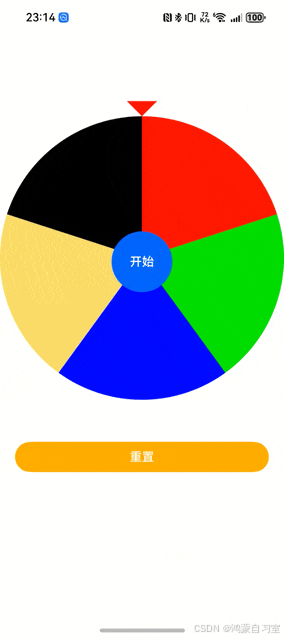
中间有一个大圆盘,圆盘顶部有一个指针,圆盘正中央有一个圆形的“开始/结束”控制按钮。
2、需求分析
通过这位朋友的留言,我们可以分析出两个核心能力:1、实现一个抽奖圆盘;2、元素个数可以支持动态添加。
❓ 如何实现一个抽奖圆盘?
考虑到圆盘内容是动态的,因此我们考虑使用Canvas来进行动态绘制【之前我们有讨论过Canvas的使用,详见 👉🏻 鸿蒙UI系统组件15——画布(Canvas)】
一般情况下,我们圆盘是允许“控制结果”的,即,我们可以通过变量控制让圆盘指定落在哪个扇区范围。
3、技术实现
3.1、画一个圆盘
圆盘正上方上有一个三角形指针,指针下方就是圆盘本身,我们使用Canvas来绘制一个圆盘,核心代码如下(其中ItemList是一个动态数组,根据数组的个数切割圆盘):
// ...itemList: Array<DrawItem> = [{ color: 'red' }, { color: 'green' }, { color: 'blue' }, { color: '#F5DC62' }, { color: 'black' }];// ...drawPanel() {this.context.clearRect(0, 0, this.context.width, this.context.height);if (this.itemList.length === 0) {return;}// 中心点和半径尺寸信息const x = this.context.width / 2;const y = this.context.height / 2 + this.canvasMarginTop;const r = this.context.width / 2;const itemAngle = 360 / this.itemList.length; // 平均分配角度// 绘制三角形指针this.context.fillStyle = 'red';this.context.beginPath();this.context.moveTo(x, y - r);this.context.lineTo(x + this.canvasTriangleSize, y - r - this.canvasTriangleSize);this.context.lineTo(x - this.canvasTriangleSize, y - r - this.canvasTriangleSize);this.context.fill();this.context.closePath();for (let i = 0; i < this.itemList.length; i++) {const element = this.itemList[i];this.context.fillStyle = element.color;this.context.beginPath();this.context.moveTo(x, y);this.context.arc(x, y, r, this.angle(i * itemAngle), this.angle((i + 1) * itemAngle));this.context.fill();this.context.closePath();}}
3.2、圆盘中央添加一个“启动/停止”按钮
我们使用层叠布局(Stack),在圆盘顶部添加一个圆形按钮,代码如下:
build() {Column() {Row() {Stack({ alignContent: Alignment.Center }) {//在canvas中调用CanvasRenderingContext2D对象。Canvas(this.context).width('100%').height('100%').onReady(() => this.drawPanel())Flex({ alignItems: ItemAlign.Center, justifyContent: FlexAlign.Center }) {Button(this.buttonText).width(this.centerButtonSize).height(this.centerButtonSize).type(ButtonType.Circle).margin({ top: this.centerButtonSize / 2 + this.canvasMarginTop }).onClick(() => this.onButtonClick())}.width('100%').height('100%')}}.height('70%')Row() {Button('重置').width('100%').backgroundColor(Color.Orange).onClick(() => this.reset());}.padding({ left: 20, right: 20 }).width('100%')}}
3.3、让圆盘转起来
我们在鸿蒙UI开发——自定义UI绘制帧率文章中讨论过,我们可以使用自定义绘制帧率来控制我们的Canvas动态绘制。
如果想让我们的圆盘动起来,则需要用到此能力,实现自定义渲染(下文代码中的frameCall方法以及21行代码)。
除了自定义渲染外,我们还需要让圆盘转动,这个相对比较简单,我们只需要让圆盘的初始角度根据时间发生累加即可(下文代码中的8行)。
代码如下(请注意31行代码):
private frameCall = () => {if (this.canvasStatus !== CanvasStatus.stopping) {this.currentSpeed = this.speed;} else {this.currentSpeed -= this.slowDownSpeed;}// draw callthis.startAngle = (this.startAngle + this.currentSpeed) % 360;this.drawPanel();if (this.currentSpeed <= 0) {this.releaseDisplaySync();this.canvasStatus = CanvasStatus.stopped;}};startDisplaySync() {this.releaseDisplaySync(); // 取消上次的记录,如果有的话this.backDisplaySyncFast = displaySync.create(); // 创建DisplaySync实例this.backDisplaySyncFast.setExpectedFrameRateRange(this.range); // 设置帧率this.backDisplaySyncFast.on("frame", this.frameCall); // 订阅frame事件和注册订阅函数this.backDisplaySyncFast.start(); // DisplaySync使能开启this.buttonText = '停止';this.canvasStatus = CanvasStatus.running;}onButtonClick() {// ...if (this.backDisplaySyncFast == undefined) {this.startDisplaySync();}// ...}
3.4、让圆盘停在指定扇形范围
我们在实现时,减速算法是固定的,那么在用户点击停止后,减速过程经过的度数我们也是知道的,因此,可以倒推在停止前,我们应该将圆盘从什么角度开始减速。代码如下(靠expectedIndex变量控制):
// 计算期望停止的扇区,此时的startAngle应该是多少。let len = (this.speed - this.slowDownSpeed + 0) * (this.speed / this.slowDownSpeed) / 2;len %= 360;const itemAngle = 360 / this.itemList.length; // 平均分配角度const min = (this.itemList.length - 1 - this.expectedIndex) * itemAngle;const angle = min + Math.random() * itemAngle; // 在指定扇形区域生成一个随机数if (angle < len) {this.startAngle = 360 + angle - len;} else {this.startAngle = angle - len;}
4、源代码
源代码如下,可直接粘贴运行。
import { displaySync } from '@kit.ArkGraphics2D';interface DrawItem {color: string;}enum CanvasStatus {normal = 0, // 画布初始状态running = 1, // 画布正在轮转(点击了开始抽奖)stopping = 2, // 画布正在停止中(点击了停止抽奖)stopped = 3, // 已经停止(惯性停止完毕)}@Entry@Componentstruct Index {//用来配置CanvasRenderingContext2D对象的参数,包括是否开启抗锯齿,true表明开启抗锯齿。private settings: RenderingContextSettings = new RenderingContextSettings(true)//用来创建CanvasRenderingContext2D对象,通过在canvas中调用CanvasRenderingContext2D对象来绘制。private context: CanvasRenderingContext2D = new CanvasRenderingContext2D(this.settings)private backDisplaySyncFast: displaySync.DisplaySync | undefined = undefined;// 以下是一些配置信息private range: ExpectedFrameRateRange = { expected: 90, min: 0, max: 120 };private canvasMarginTop: number = 30;private centerButtonSize = 80;private canvasTriangleSize = 20;private startAngle: number = 0;private speed: number = 20; // 每帧转多少度private currentSpeed: number = this.speed;private canvasStatus: CanvasStatus = CanvasStatus.normal;private expectedIndex = 2; // 期望选中的内容(从0开始,这里的2表示永远选中蓝色区域)private slowDownSpeed = 0.2;@State buttonText: string = '开始';private frameCall = () => {if (this.canvasStatus !== CanvasStatus.stopping) {this.currentSpeed = this.speed;} else {this.currentSpeed -= this.slowDownSpeed;}// draw callthis.startAngle = (this.startAngle + this.currentSpeed) % 360;this.drawPanel();if (this.currentSpeed <= 0) {this.releaseDisplaySync();this.canvasStatus = CanvasStatus.stopped;}};itemList: Array<DrawItem> =[{ color: 'red' }, { color: 'green' }, { color: 'blue' }, { color: '#F5DC62' }, { color: 'black' }];startDisplaySync() {this.releaseDisplaySync(); // 取消上次的记录,如果有的话this.backDisplaySyncFast = displaySync.create(); // 创建DisplaySync实例this.backDisplaySyncFast.setExpectedFrameRateRange(this.range); // 设置帧率this.backDisplaySyncFast.on("frame", this.frameCall); // 订阅frame事件和注册订阅函数this.backDisplaySyncFast.start(); // DisplaySync使能开启this.buttonText = '停止';this.canvasStatus = CanvasStatus.running;}releaseDisplaySync() {if (this.backDisplaySyncFast) {this.backDisplaySyncFast.stop(); // DisplaySync失能关闭this.backDisplaySyncFast = undefined; // 实例置空}this.buttonText = '开始';this.canvasStatus = CanvasStatus.normal;}aboutToDisappear() {this.releaseDisplaySync();}// 将垂直上方视为0度angle(n: number) {return Math.PI / 180 * (this.startAngle + n - 90);}drawPanel() {this.context.clearRect(0, 0, this.context.width, this.context.height);if (this.itemList.length === 0) {return;}// 中心点和半径尺寸信息const x = this.context.width / 2;const y = this.context.height / 2 + this.canvasMarginTop;const r = this.context.width / 2;const itemAngle = 360 / this.itemList.length; // 平均分配角度// 绘制三角形指针this.context.fillStyle = 'red';this.context.beginPath();this.context.moveTo(x, y - r);this.context.lineTo(x + this.canvasTriangleSize, y - r - this.canvasTriangleSize);this.context.lineTo(x - this.canvasTriangleSize, y - r - this.canvasTriangleSize);this.context.fill();this.context.closePath();for (let i = 0; i < this.itemList.length; i++) {const element = this.itemList[i];this.context.fillStyle = element.color;this.context.beginPath();this.context.moveTo(x, y);this.context.arc(x, y, r, this.angle(i * itemAngle), this.angle((i + 1) * itemAngle));this.context.fill();this.context.closePath();}}build() {Column() {Row() {Stack({ alignContent: Alignment.Center }) {//在canvas中调用CanvasRenderingContext2D对象。Canvas(this.context).width('100%').height('100%').onReady(() => this.drawPanel())Flex({ alignItems: ItemAlign.Center, justifyContent: FlexAlign.Center }) {Button(this.buttonText).width(this.centerButtonSize).height(this.centerButtonSize).type(ButtonType.Circle).margin({ top: this.centerButtonSize / 2 + this.canvasMarginTop }).onClick(() => this.onButtonClick())}.width('100%').height('100%')}}.height('70%')Row() {Button('重置').width('100%').backgroundColor(Color.Orange).onClick(() => this.reset());}.padding({ left: 20, right: 20 }).width('100%')}}onButtonClick() {if (this.canvasStatus === CanvasStatus.running) {this.canvasStatus = CanvasStatus.stopping;// 计算期望停止的扇区,此时的startAngle应该是多少。let len = (this.speed - this.slowDownSpeed + 0) * (this.speed / this.slowDownSpeed) / 2;len %= 360;const itemAngle = 360 / this.itemList.length; // 平均分配角度const min = (this.itemList.length - 1 - this.expectedIndex) * itemAngle;const angle = min + Math.random() * itemAngle; // 在指定扇形区域生成一个随机数if (angle < len) {this.startAngle = 360 + angle - len;} else {this.startAngle = angle - len;}} else {if (this.backDisplaySyncFast == undefined) {this.startDisplaySync();}}}reset() {this.releaseDisplaySync();this.startAngle = 0;this.drawPanel();}}
5、尾巴
当前案例仅实现了非常核心的内容,不同的业务场景可能转盘的样式不同,但实现方式是一致的。未来我们还可以有以下几方面的改进:
1. 组件抽象
将实现包装成一个独立组件,外部业务直接使用。
2. 圆盘上绘制更多内容
可以支持更多内容绘制,例如:文字、图片等
3. 动画效果
可以进一步优化轮盘转动效果与停止的阻尼效果。
代码仓库
https://gitee.com/lantingshuxu/harmony-class-room-demos/tree/feat%2Fwheel/


 1万+
1万+

 被折叠的 条评论
为什么被折叠?
被折叠的 条评论
为什么被折叠?
 到【灌水乐园】发言


