


如果你也对鸿蒙开发感兴趣,加入“Harmony自习室”吧!扫描下方名片,关注公众号,公众号更新更快,同时也有更多学习资料和技术讨论群。

1、概述
开发者经常需要在应用中显示一些图片,例如:按钮中的icon、网络图片、本地图片等。在应用中显示图片需要使用Image组件实现,Image支持多种图片格式,包括png、jpg、bmp、svg和gif。
Image通过调用接口来创建,接口调用形式如下:
Image(src: string | Resource | media.PixelMap)
该接口通过图片数据源获取图片,支持本地图片和网络图片的渲染展示。其中,src是图片的数据源。
2、加载图片资源
Image支持加载存档图、多媒体像素图两种类型。
2.1、存档图类型数据源
存档图类型的数据源可以分为本地资源、网络资源、Resource资源、媒体库资源和base64,分别介绍如下:
-
本地资源
创建文件夹,将本地图片放入ets文件夹下的任意位置。
Image组件引入本地图片路径,即可显示图片(根目录为ets文件夹)。
Image('images/view.jpg').width(200)
-
网络资源
引入网络图片需申请权限ohos.permission.INTERNET。此时,Image组件的src参数为网络图片的链接。
Image('https://www.example.com/example.JPG') // 实际使用时请替换为真实地址
-
Resource资源
使用资源格式可以跨包/跨模块引入图片,resources文件夹下的图片都可以通过$r资源接口读取到并转换到Resource格式。例如有如下资源:

调用方式:
Image($r('app.media.icon'))
另外,图片还可以放在rawfile文件夹下面,例如:

调用方式:
Image($rawfile('snap'))
-
媒体库file://data/storage
支持file://路径前缀的字符串,用于访问通过媒体库提供的图片路径。
-
调用接口获取图库的照片url。
import picker from '@ohos.file.picker';@Entry@Componentstruct Index {@State imgDatas: string[] = [];// 获取照片url集getAllImg() {let result = new Array<string>();try {let PhotoSelectOptions = new picker.PhotoSelectOptions();PhotoSelectOptions.MIMEType = picker.PhotoViewMIMETypes.IMAGE_TYPE;PhotoSelectOptions.maxSelectNumber = 5;let photoPicker = new picker.PhotoViewPicker();photoPicker.select(PhotoSelectOptions).then((PhotoSelectResult) => {this.imgDatas = PhotoSelectResult.photoUris;console.info('PhotoViewPicker.select successfully, PhotoSelectResult uri: ' + JSON.stringify(PhotoSelectResult));}).catch((err) => {console.error(`PhotoViewPicker.select failed with. Code: ${err.code}, message: ${err.message}`);});} catch (err) {console.error(`PhotoViewPicker failed with. Code: ${err.code}, message: ${err.message}`); }}// aboutToAppear中调用上述函数,获取图库的所有图片url,存在imgDatas中async aboutToAppear() {this.getAllImg();}// 使用imgDatas的url加载图片。build() {Column() {Grid() {ForEach(this.imgDatas, item => {GridItem() {Image(item).width(200)}}, item => JSON.stringify(item))}}.width('100%').height('100%')}}
b. 从媒体库获取的url格式通常如下:
Image('file://media/Photos/5').width(200)
-
base64
路径格式为data:image/[png|jpeg|bmp|webp];base64,[base64 data],其中[base64 data]为Base64字符串数据。
Base64格式字符串可用于存储图片的像素数据,在网页上使用较为广泛。
2.2、多媒体像素图
PixelMap是图片解码后的像素图。以下示例将加载的网络图片返回的数据解码成PixelMap格式,再显示在Image组件上,步骤如下:
step1: 创建PixelMap状态变量。
@State image: PixelMap = undefined;
step2: 引用多媒体。
请求网络图片请求,解码编码PixelMap。
-
引用网络权限与媒体库权限
import http from '@ohos.net.http';import ResponseCode from '@ohos.net.http';import image from '@ohos.multimedia.image';
b. 填写网络图片地址,加载图片数据。
http.createHttp().request("https://www.example.com/xxx.png",(error, data) => {if (error){console.error(`http reqeust failed with. Code: ${error.code}, message: ${error.message}`);} else {}})
c. 将网络地址成功返回的数据,编码转码成pixelMap的图片格式。
let code = data.responseCode;if (ResponseCode.ResponseCode.OK === code) {let res: any = data.resultlet imageSource = image.createImageSource(res);let options = {alphaType: 0, // 透明度editable: false, // 是否可编辑pixelFormat: 3, // 像素格式scaleMode: 1, // 缩略值size: { height: 100, width: 100}} // 创建图片大小imageSource.createPixelMap(options).then((pixelMap) => {this.image = pixelMap})}
d. 显示图片
Button("获取网络图片").onClick(() => {this.httpRequest()})Image(this.image).height(100).width(100)
3、显示矢量图
Image组件可显示矢量图(svg格式的图片),支持的svg标签为:svg、rect、circle、ellipse、path、line、polyline、polygon和animate。
svg格式的图片可以使用fillColor属性改变图片的绘制颜色。
Image($r('app.media.cloud')).width(50).fillColor(Color.Blue)
原始图片

设置绘制颜色后的svg图片

3.1、添加属性
给Image组件设置属性可以使图片显示更灵活,达到一些自定义的效果。以下是几个常用属性的使用示例。
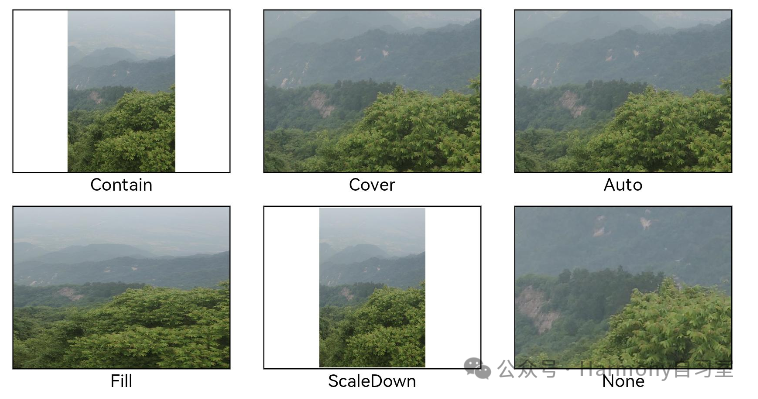
👉🏻示例1: 设置图片缩放类型
通过objectFit属性使图片缩放到高度和宽度确定的框内。
@Entry@Componentstruct MyComponent {scroller: Scroller = new Scroller()build() {Scroll(this.scroller) {Row() {Image($r('app.media.img_2')).width(200).height(150).border({ width: 1 }).objectFit(ImageFit.Contain).margin(15) // 保持宽高比进行缩小或者放大,使得图片完全显示在显示边界内。.overlay('Contain', { align: Alignment.Bottom, offset: { x: 0, y: 20 } })Image($r('app.media.ic_img_2')).width(200).height(150).border({ width: 1 }).objectFit(ImageFit.Cover).margin(15)// 保持宽高比进行缩小或者放大,使得图片两边都大于或等于显示边界。.overlay('Cover', { align: Alignment.Bottom, offset: { x: 0, y: 20 } })Image($r('app.media.img_2')).width(200).height(150).border({ width: 1 })// 自适应显示。.objectFit(ImageFit.Auto).margin(15).overlay('Auto', { align: Alignment.Bottom, offset: { x: 0, y: 20 } })}Row() {Image($r('app.media.img_2')).width(200).height(150).border({ width: 1 }).objectFit(ImageFit.Fill).margin(15)// 不保持宽高比进行放大缩小,使得图片充满显示边界。.overlay('Fill', { align: Alignment.Bottom, offset: { x: 0, y: 20 } })Image($r('app.media.img_2')).width(200).height(150).border({ width: 1 })// 保持宽高比显示,图片缩小或者保持不变。.objectFit(ImageFit.ScaleDown).margin(15).overlay('ScaleDown', { align: Alignment.Bottom, offset: { x: 0, y: 20 } })Image($r('app.media.img_2')).width(200).height(150).border({ width: 1 })// 保持原有尺寸显示。.objectFit(ImageFit.None).margin(15).overlay('None', { align: Alignment.Bottom, offset: { x: 0, y: 20 } })}}}}
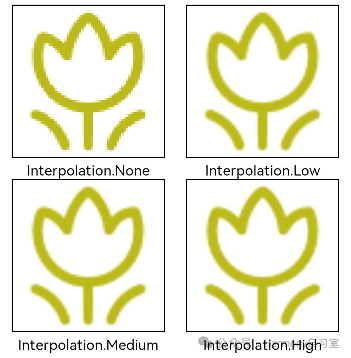
👉🏻示例2: 图片插值
当原图分辨率较低并且放大显示时,图片会模糊出现锯齿。这时可以使用interpolation属性对图片进行插值,使图片显示得更清晰。
@Entry@Componentstruct Index {build() {Column() {Row() {Image($r('app.media.grass')).width('40%').interpolation(ImageInterpolation.None).borderWidth(1).overlay("Interpolation.None", { align: Alignment.Bottom, offset: { x: 0, y: 20 } }).margin(10)Image($r('app.media.grass')).width('40%').interpolation(ImageInterpolation.Low).borderWidth(1).overlay("Interpolation.Low", { align: Alignment.Bottom, offset: { x: 0, y: 20 } }).margin(10)}.width('100%').justifyContent(FlexAlign.Center)Row() {Image($r('app.media.grass')).width('40%').interpolation(ImageInterpolation.Medium).borderWidth(1).overlay("Interpolation.Medium", { align: Alignment.Bottom, offset: { x: 0, y: 20 } }).margin(10)Image($r('app.media.grass')).width('40%').interpolation(ImageInterpolation.High).borderWidth(1).overlay("Interpolation.High", { align: Alignment.Bottom, offset: { x: 0, y: 20 } }).margin(10)}.width('100%').justifyContent(FlexAlign.Center)}.height('100%')}}
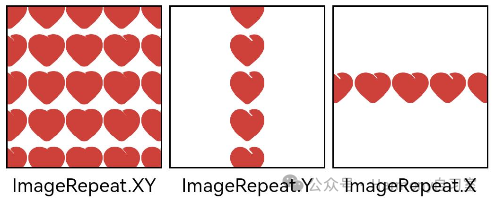
👉🏻示例3: 设置图片重复样式
通过objectRepeat属性设置图片的重复样式方式.
@Entry@Componentstruct MyComponent {build() {Column({ space: 10 }) {Row({ space: 5 }) {Image($r('app.media.ic_public_favor_filled_1')).width(110).height(115).border({ width: 1 }).objectRepeat(ImageRepeat.XY).objectFit(ImageFit.ScaleDown)// 在水平轴和竖直轴上同时重复绘制图片.overlay('ImageRepeat.XY', { align: Alignment.Bottom, offset: { x: 0, y: 20 } })Image($r('app.media.ic_public_favor_filled_1')).width(110).height(115).border({ width: 1 }).objectRepeat(ImageRepeat.Y).objectFit(ImageFit.ScaleDown)// 只在竖直轴上重复绘制图片.overlay('ImageRepeat.Y', { align: Alignment.Bottom, offset: { x: 0, y: 20 } })Image($r('app.media.ic_public_favor_filled_1')).width(110).height(115).border({ width: 1 }).objectRepeat(ImageRepeat.X).objectFit(ImageFit.ScaleDown)// 只在水平轴上重复绘制图片.overlay('ImageRepeat.X', { align: Alignment.Bottom, offset: { x: 0, y: 20 } })}}.height(150).width('100%').padding(8)}}
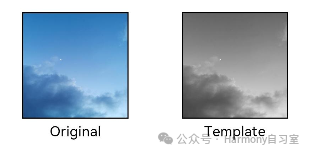
👉🏻示例4: 设置图片渲染模式
通过renderMode属性设置图片的渲染模式为原色或黑白(灰度图)
@Entry@Componentstruct MyComponent {build() {Column({ space: 10 }) {Row({ space: 50 }) {Image($r('app.media.example'))// 设置图片的渲染模式为原色.renderMode(ImageRenderMode.Original).width(100).height(100).border({ width: 1 })// overlay是通用属性,用于在组件上显示说明文字.overlay('Original', { align: Alignment.Bottom, offset: { x: 0, y: 20 } })Image($r('app.media.example'))// 设置图片的渲染模式为黑白.renderMode(ImageRenderMode.Template).width(100).height(100).border({ width: 1 }).overlay('Template', { align: Alignment.Bottom, offset: { x: 0, y: 20 } })}}.height(150).width('100%').padding({ top: 20,right: 10 })}}
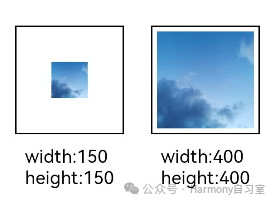
👉🏻示例5: 设置图片解码尺寸
通过sourceSize属性设置图片解码尺寸,降低图片的分辨率。
原图尺寸为1280*960,该示例将图片解码为150*150和400*400。
@Entry@Componentstruct Index {build() {Column() {Row({ space: 20 }) {Image($r('app.media.example')).sourceSize({width: 150,height: 150}).objectFit(ImageFit.ScaleDown).width('25%').aspectRatio(1).border({ width: 1 }).overlay('width:150 height:150', { align: Alignment.Bottom, offset: { x: 0, y: 40 } })Image($r('app.media.example')).sourceSize({width: 400,height: 400}).objectFit(ImageFit.ScaleDown).width('25%').aspectRatio(1).border({ width: 1 }).overlay('width:400 height:400', { align: Alignment.Bottom, offset: { x: 0, y: 40 } })}.height(150).width('100%').padding(20)}}}
👉🏻示例6: 为图片添加滤镜效果
通过colorFilter修改图片的像素颜色,为图片添加滤镜。
@Entry@Componentstruct Index {build() {Column() {Row() {Image($r('app.media.example')).width('40%').margin(10)Image($r('app.media.example')).width('40%').colorFilter([1, 1, 0, 0, 0,0, 1, 0, 0, 0,0, 0, 1, 0, 0,0, 0, 0, 1, 0]).margin(10)}.width('100%').justifyContent(FlexAlign.Center)}}}
👉🏻示例7: 同步加载图片
一般情况下,图片加载流程会异步进行,以避免阻塞主线程,影响UI交互。但是特定情况下,图片刷新时会出现闪烁,这时可以使用syncLoad属性,使图片同步加载,从而避免出现闪烁。不建议图片加载较长时间时使用,会导致页面无法响应。
Image($r('app.media.icon')).syncLoad(true)
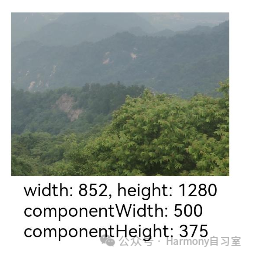
4、事件调用
通过在Image组件上绑定onComplete事件,图片加载成功后可以获取图片的必要信息。如果图片加载失败,也可以通过绑定onError回调来获得结果。
@Entry@Componentstruct MyComponent {@State widthValue: number = 0@State heightValue: number = 0@State componentWidth: number = 0@State componentHeight: number = 0build() {Column() {Row() {Image($r('app.media.ic_img_2')).width(200).height(150).margin(15).onComplete(msg => {if(msg){this.widthValue = msg.widththis.heightValue = msg.heightthis.componentWidth = msg.componentWidththis.componentHeight = msg.componentHeight}})// 图片获取失败,打印结果.onError(() => {console.info('load image fail')}).overlay('\nwidth: ' + String(this.widthValue) + ', height: ' + String(this.heightValue) + '\ncomponentWidth: ' + String(this.componentWidth) + '\ncomponentHeight: ' + String(this.componentHeight), {align: Alignment.Bottom,offset: { x: 0, y: 60 }})}}}}


 7398
7398

 被折叠的 条评论
为什么被折叠?
被折叠的 条评论
为什么被折叠?
 到【灌水乐园】发言


