


DeepSeek-V3.2 Agent 开发入门
本篇将依次从 DeepSeek-V3.2 模型简介、快速上手使用方法以及与 LangChain 集成三个方面展开介绍,并包含可运行示例供大家学习实验。
一、DeepSeek-V3.2 模型简介
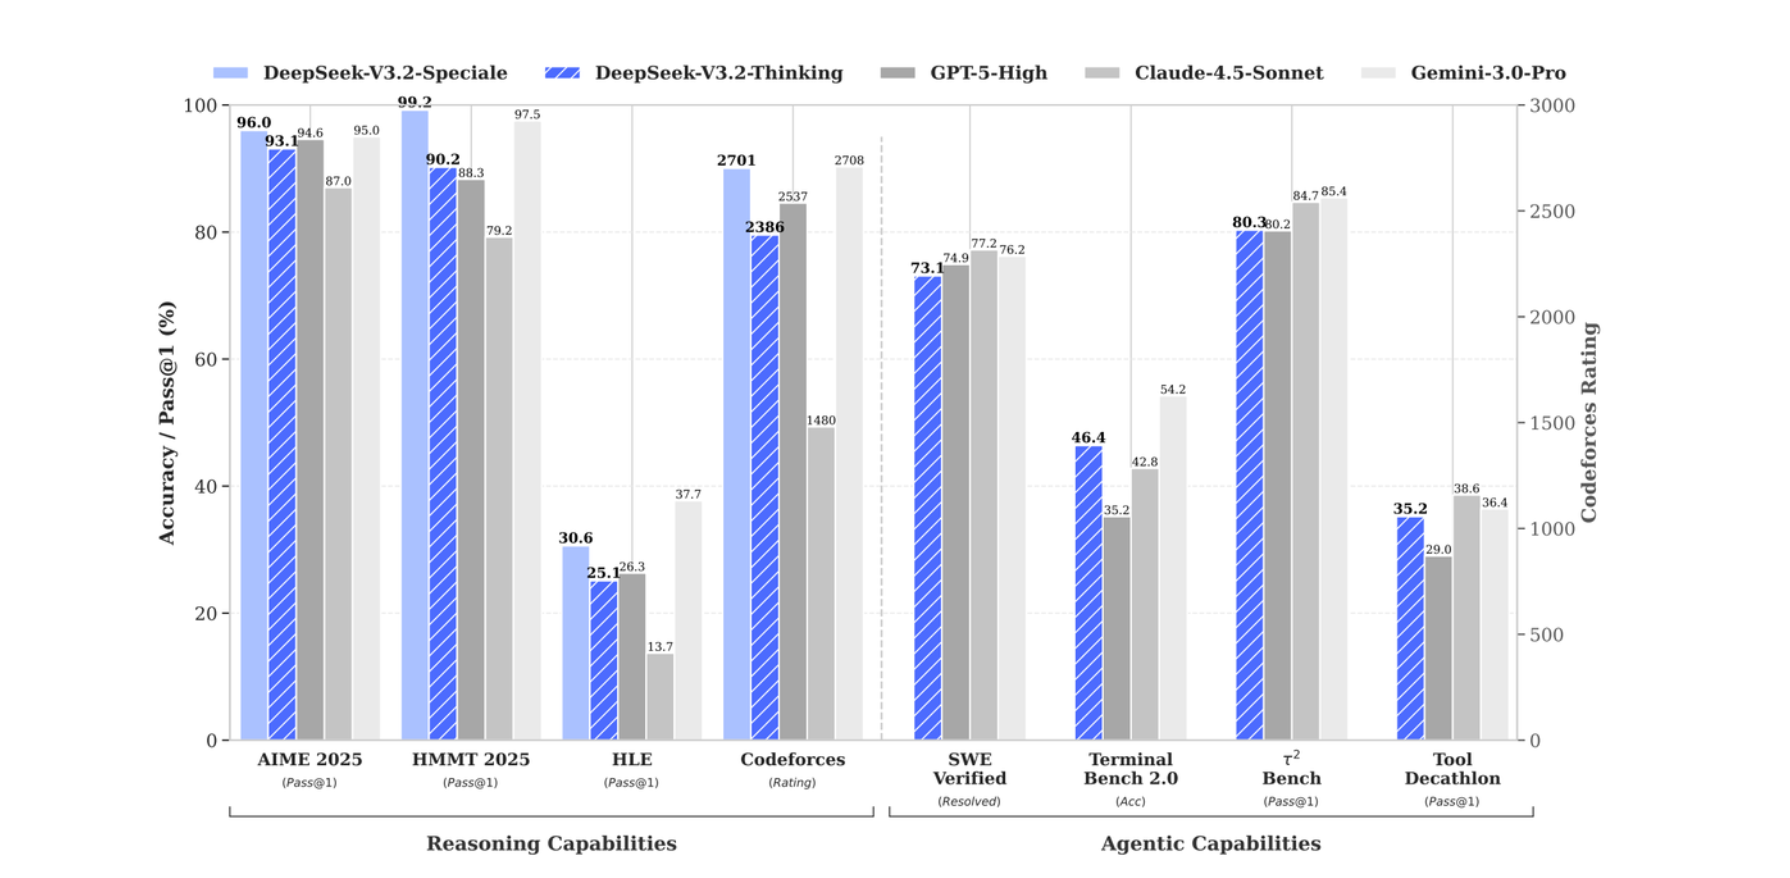
DeepSeek-V3.2 作为目前 国内最强模型,通过引入可拓展的 GRPO 训练框架搭配大规模合成 Agent 任务数据集,借助海量强化学习后训练,让模型一举突破性能极限。在数学、编程、Agent 性能方面全面领先,整体追平全球性能最强大模型 Gemini 3.0 Pro。
DeepSeek-V3.2 模型价格也是非常香:

DeepSeek-V3.2 模型的 API 已全面上线,模型权重也已全面开源。
- 模型权重:https://huggingface.co/deepseek-ai/DeepSeek-V3.2

-
模型详解视频地址:https://www.bilibili.com/video/BV13rSHBBEoG/
-
LangChain 1.0 快速入门指南:https://www.bilibili.com/video/BV1uV1yBHE2o/
二、DeepSeek V3.2 快速上手使用
加入👉赋范空间 免费领取 完整项目代码及示例,还有更多Agent 开发实战内容等你来拿
1. 基础配置
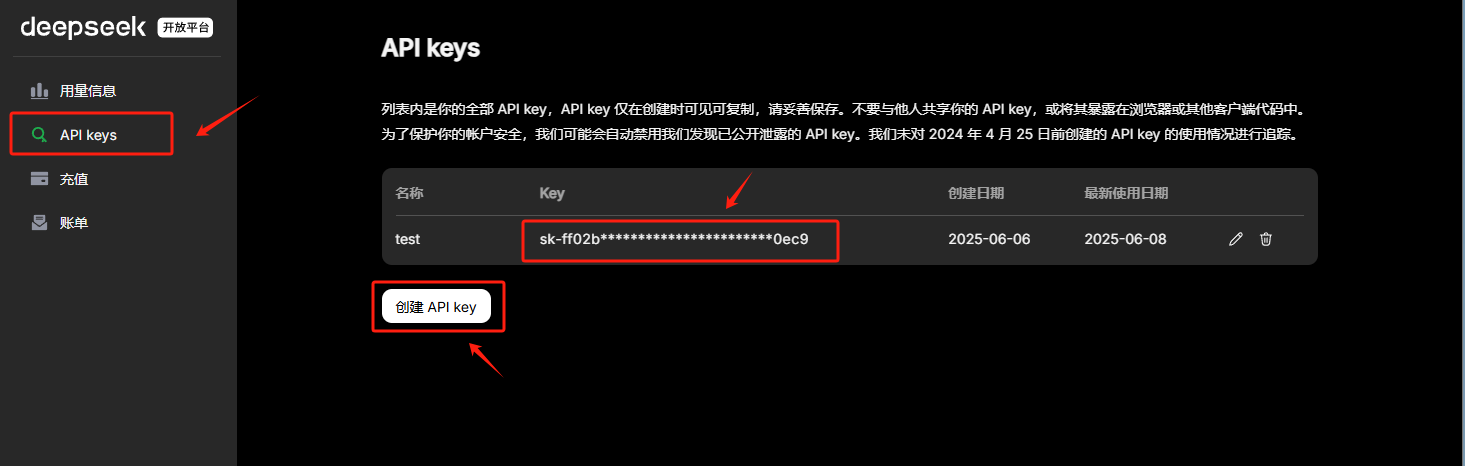
首先注册 DeepSeek 账号并获取 API Key( https://platform.deepseek.com/usage )。
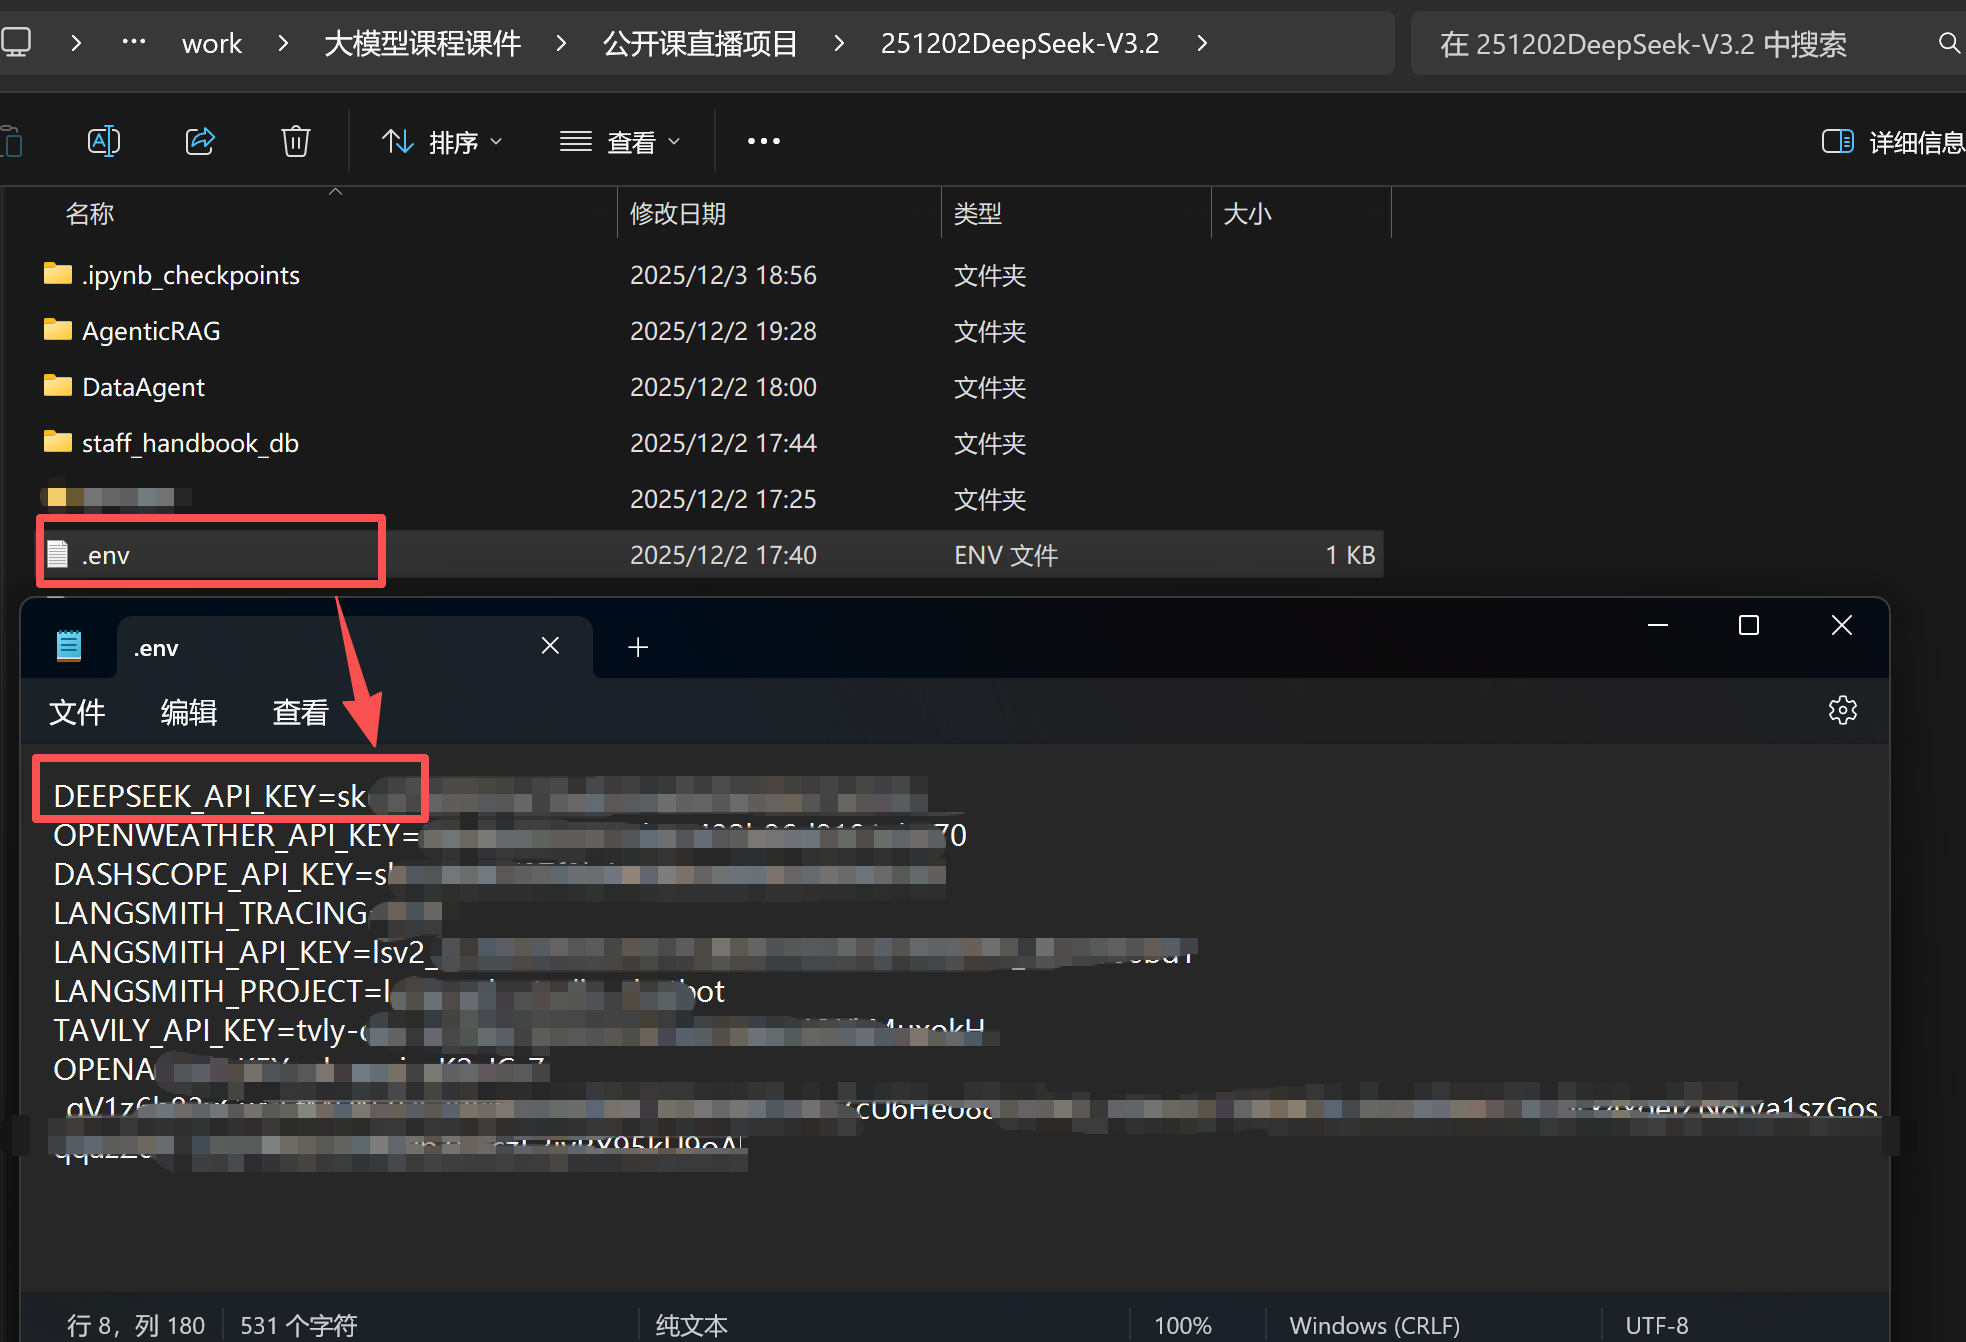
在项目根目录创建 .env 文件存储 API Key:
2. 基础调用示例
加入👉赋范空间 免费领取 完整项目代码及示例,还有更多Agent 开发实战内容等你来拿
"""
DeepSeek API 基础调用示例
该脚本展示了如何配置环境并调用 DeepSeek 对话接口。
"""
import os
from dotenv import load_dotenv
from openai import OpenAI

# 加载环境变量
load_dotenv(override=True)
DeepSeek_API_KEY = os.getenv("DEEPSEEK_API_KEY")

def basic_chat_demo():
    """
    演示基础对话功能
    """
    # 初始化 DeepSeek 的 API 客户端
    # 参数注释:
    # api_key: 从环境变量获取的 DeepSeek API 密钥
    # base_url: DeepSeek 官方 API 地址
    client = OpenAI(api_key=DeepSeek_API_KEY, base_url="https://api.deepseek.com")

    # 调用 DeepSeek 的 API,生成回答
    response = client.chat.completions.create(
        model="deepseek-chat",
        messages=[
            {"role": "system", "content": "你是乐于助人的助手,请根据用户的问题给出回答"},
            {"role": "user", "content": "你好,请你介绍一下你自己。"},
        ],
    )

    # 打印模型最终的响应结果
    print(response.choices[0].message.content)

if __name__ == "__main__":
    basic_chat_demo()
三、DeepSeek-V3.2 Function Calling 调用流程
Function Calling 是大模型调用外部工具的关键技术。
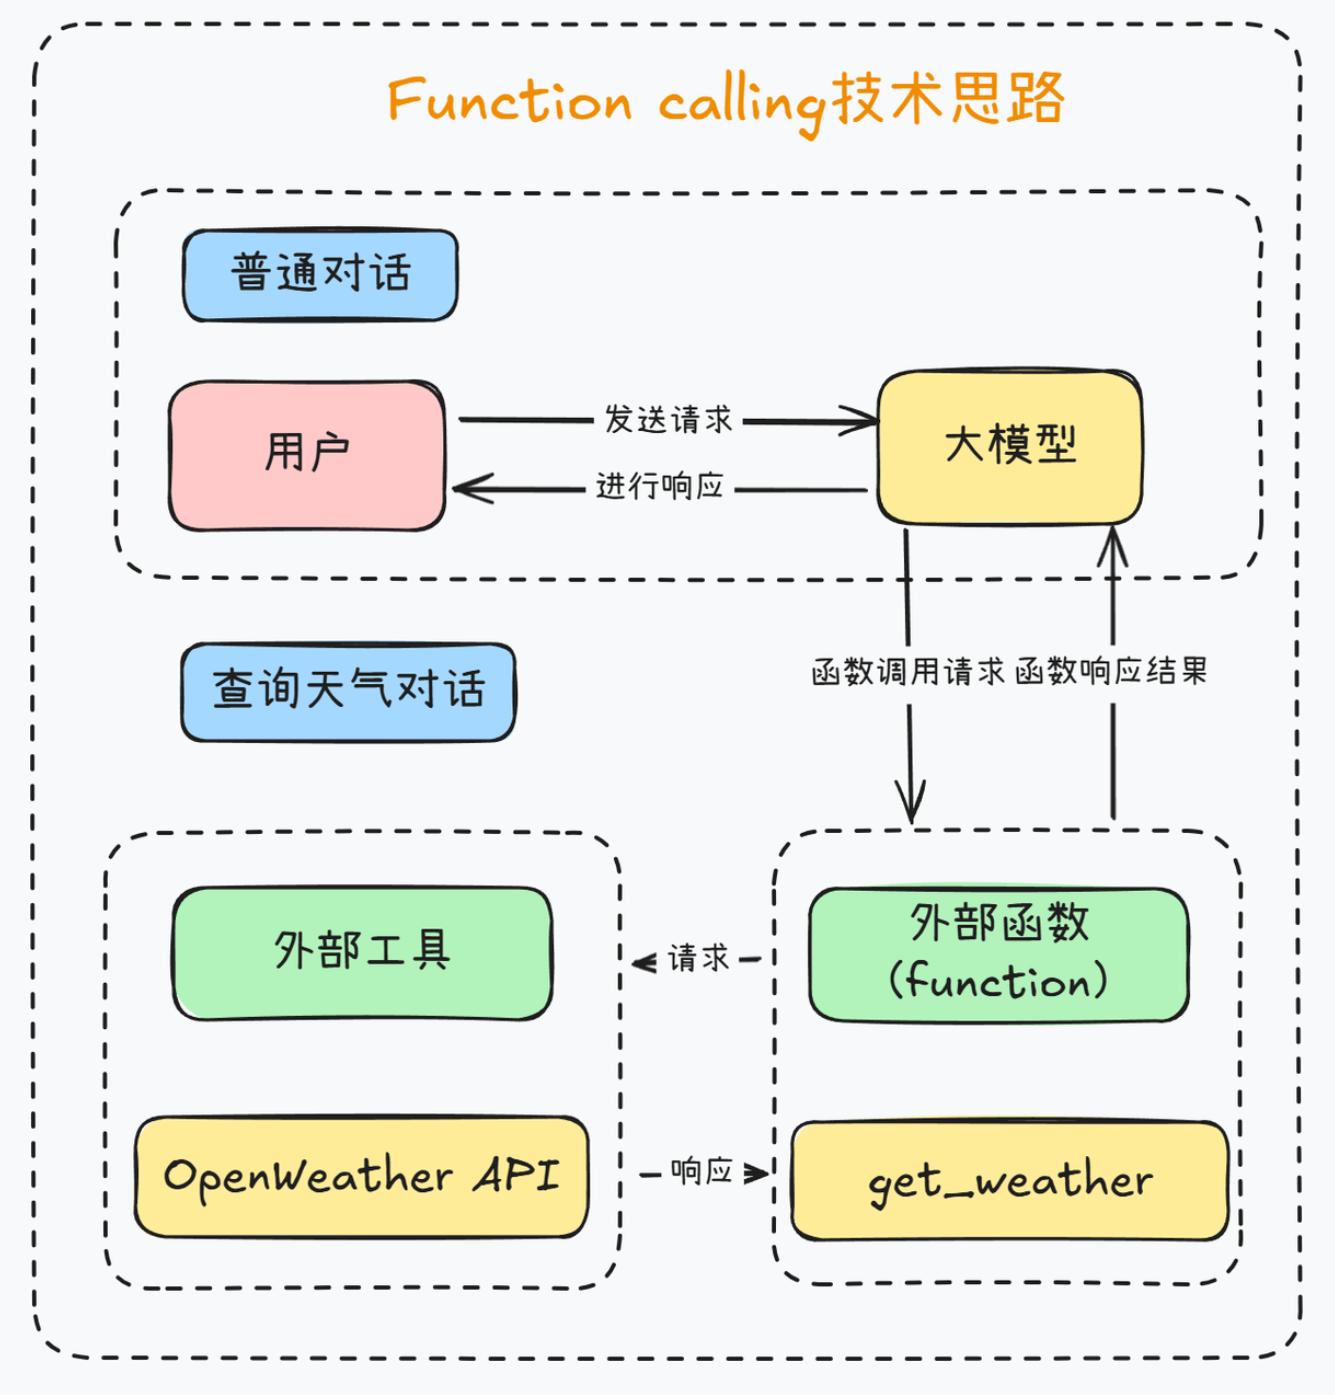
1. 定义外部函数与工具描述
import json
import requests
import os

def get_weather(loc):
    """
    查询即时天气函数

    :param loc: 必要参数,字符串类型,用于表示查询天气的具体城市名称。
                注意:中国的城市需要用对应城市的英文名称代替,例如查询北京市天气,loc 输入 'Beijing'。
    :return: OpenWeather API 查询即时天气的结果(JSON 字符串)。
    :raises Exception: 当网络请求失败或 API Key 错误时可能抛出异常。
    """
    api_key = os.getenv("OPENWEATHER_API_KEY") # 请确保已设置此环境变量
    url = "https://api.openweathermap.org/data/2.5/weather"
    params = {
        "q": loc,
        "appid": api_key,
        "units": "metric",            # 使用摄氏度
        "lang": "zh_cn"               # 输出语言为简体中文
    }
    response = requests.get(url, params=params)
    return json.dumps(response.json())

# 定义工具描述,供模型理解
tools = [
    {
        "type": "function",
        "function": {
            'name': 'get_weather',
            'description': '查询即时天气函数,根据输入的城市名称,查询对应城市的实时天气',
            'parameters': {
                'type': 'object',
                'properties': {
                    'loc': {
                        'description': "城市名称(英文),如 'Beijing'",
                        'type': 'string'
                    }
                },
                'required': ['loc']
            }
        }
    }
]
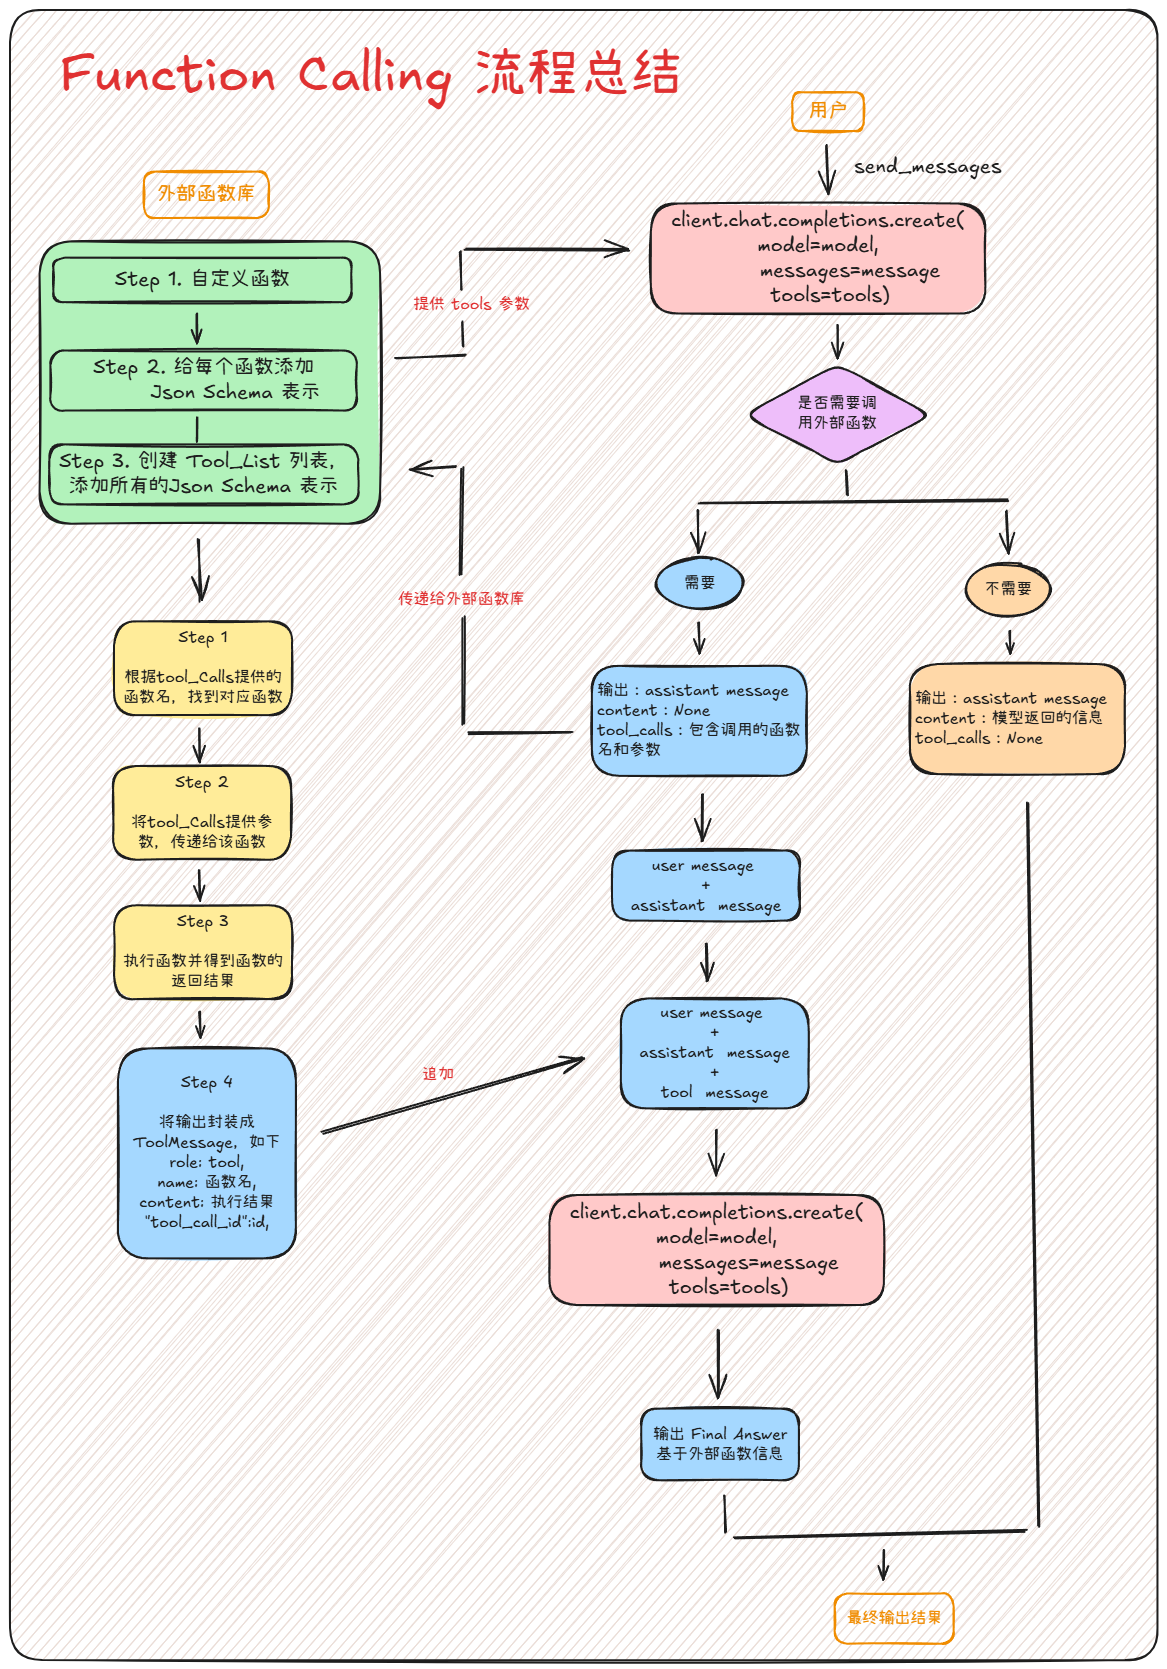
2. 执行 Function Calling 完整流程
以下代码展示了如何处理模型返回的工具调用请求,执行函数,并生成最终回答。
def run_function_calling_demo():
    """
    演示 DeepSeek Function Calling 完整流程
    """
    client = OpenAI(api_key=os.getenv("DEEPSEEK_API_KEY"), base_url="https://api.deepseek.com")

    messages = [{"role": "user", "content": "请问北京今天天气如何?"}]

    # 第一次调用:模型判断是否需要调用工具
    response = client.chat.completions.create(
        model="deepseek-reasoner",  # 使用 reasoner 模型体验思考过程
        messages=messages,
        tools=tools,
    )

    # 获取工具调用信息
    tool_calls = response.choices[0].message.tool_calls

    if tool_calls:
        # 将模型的响应(包含工具调用意图)加入历史消息
        messages.append(response.choices[0].message.model_dump())

        # 遍历所有工具调用请求
        available_functions = {"get_weather": get_weather}
        for tool_call in tool_calls:
            function_name = tool_call.function.name
            function_args = json.loads(tool_call.function.arguments)

            # 执行函数
            function_to_call = available_functions[function_name]
            function_response = function_to_call(**function_args)

            # 将函数执行结果加入历史消息
            messages.append({
                "role": "tool",
                "content": function_response,
                "tool_call_id": tool_call.id,
            })

        # 第二次调用:模型根据函数执行结果生成最终回答
        final_response = client.chat.completions.create(
            model="deepseek-reasoner",
            messages=messages,
            tools=tools,
        )

        print("最终回答:", final_response.choices[0].message.content)
        if hasattr(final_response.choices[0].message, 'reasoning_content'):
            print("思考过程:", final_response.choices[0].message.reasoning_content)

if __name__ == "__main__":
    run_function_calling_demo()
四、LangChain 集成与 DeepSeek Reasoner 兼容性解决方案
这里就不过多展开讲解LangChain集成了,详情可以参考 LangChain1.0实战教学 只需将其中模型API替换即可。
这里主要讲解目前 LangChain 1.1 版本与 DeepSeek-V3.2 Reasoner 推理模型的兼容性解决方案。
LangChain 提供了便捷的 Agent 开发接口,但 LangChain 1.1 目前与 DeepSeek-V3.2 Reasoner 模型的兼容性存在一定问题(主要在于推理内容的流式处理和工具调用的解析)。

自定义 DeepSeekReasonerChatModel
通过继承 BaseChatModel 创建自定义的 DeepSeekReasonerChatModel,实现:
- 与 LangChain 1.0 的
create_agent完全兼容 - 正确处理
reasoning_content字段 - 支持完整的工具调用流程
- 可以查看模型的推理过程

- 创建核心类:DeepSeekReasonerChatModel
from typing import Optional, List, Dict, Any
from langchain_core.language_models.chat_models import BaseChatModel

class DeepSeekReasonerChatModel(BaseChatModel):
    """
    自定义 DeepSeek Reasoner 模型

    关键特性:
    1. 保留 reasoning_content 在 additional_kwargs 中
    2. 消息转换时恢复 reasoning_content
    3. 完整支持工具绑定和调用
    """

    api_key: str
    base_url: str = "https://api.deepseek.com"
    model_name: str = "deepseek-reasoner"
    temperature: float = 0.7
    bound_tools: Optional[List[Dict]] = None
- 创建关键方法:
_convert_messages_to_openai_format
def _convert_messages_to_openai_format(self, messages):
    """LangChain 消息 → OpenAI 格式"""
    openai_messages = []

    for msg in messages:
        if isinstance(msg, AIMessage):
            msg_dict = {
                "role": "assistant",
                "content": msg.content or "",
            }

            # 添加 tool_calls
            if msg.tool_calls:
                msg_dict["tool_calls"] = [...]

            # 【关键】恢复 reasoning_content
            if 'reasoning_content' in msg.additional_kwargs:
                msg_dict["reasoning_content"] = msg.additional_kwargs['reasoning_content']

            openai_messages.append(msg_dict)

    return openai_messages
- 优化响应处理:
_create_ai_message_from_response
def _create_ai_message_from_response(self, response):
    """OpenAI 响应 → LangChain AIMessage"""
    message = response.choices[0].message

    # 处理 tool_calls
    tool_calls = [...]

    # 【关键】保存 reasoning_content 到 additional_kwargs
    additional_kwargs = {}
    if hasattr(message, 'reasoning_content'):
        additional_kwargs['reasoning_content'] = message.reasoning_content

    return AIMessage(
        content=message.content or "",
        tool_calls=tool_calls if tool_calls else None,  # 不能是 None
        additional_kwargs=additional_kwargs
    )
- 进行工具绑定:
bind_tools
from langchain_core.tools import BaseTool
def bind_tools(self, tools: List[BaseTool], **kwargs):
    """绑定 LangChain 工具"""
    # 转换为 OpenAI 格式
    openai_tools = []
    for tool in tools:
        openai_tools.append({
            "type": "function",
            "function": {
                "name": tool.name,
                "description": tool.description,
                "parameters": tool.args_schema.model_json_schema()
            }
        })

    # 返回新实例
    return self.__class__(
        api_key=self.api_key,
        base_url=self.base_url,
        model_name=self.model_name,
        temperature=self.temperature,
        bound_tools=openai_tools,  # 保存绑定的工具
        **kwargs
    )
- 优化生成响应格式:
_generate
def _generate(self, messages, stop=None, run_manager=None, **kwargs):
    """核心生成方法"""
    # 转换消息
    openai_messages = self._convert_messages_to_openai_format(messages)

    # 准备请求
    request_params = {
        "model": self.model_name,
        "messages": openai_messages,
        "temperature": self.temperature,
    }

    # 添加工具
    if self.bound_tools:
        request_params["tools"] = self.bound_tools

    # 调用 API
    response = self._client.chat.completions.create(**request_params)

    # 创建响应
    ai_message = self._create_ai_message_from_response(response)

    return ChatResult(generations=[ChatGeneration(message=ai_message)])
- 创建自定义模型
import os
from dotenv import load_dotenv
from langchain_core.tools import tool
from langchain.agents import create_agent

load_dotenv()
# 导入自定义模型
from deepseek_reasoner_chat_model import DeepSeekReasonerChatModel
# 创建自定义模型
model = DeepSeekReasonerChatModel(
    api_key=os.environ.get("DEEPSEEK_API_KEY"),
    model_name="deepseek-reasoner",
    temperature=0.7
)
tools = [get_weather, write_file]
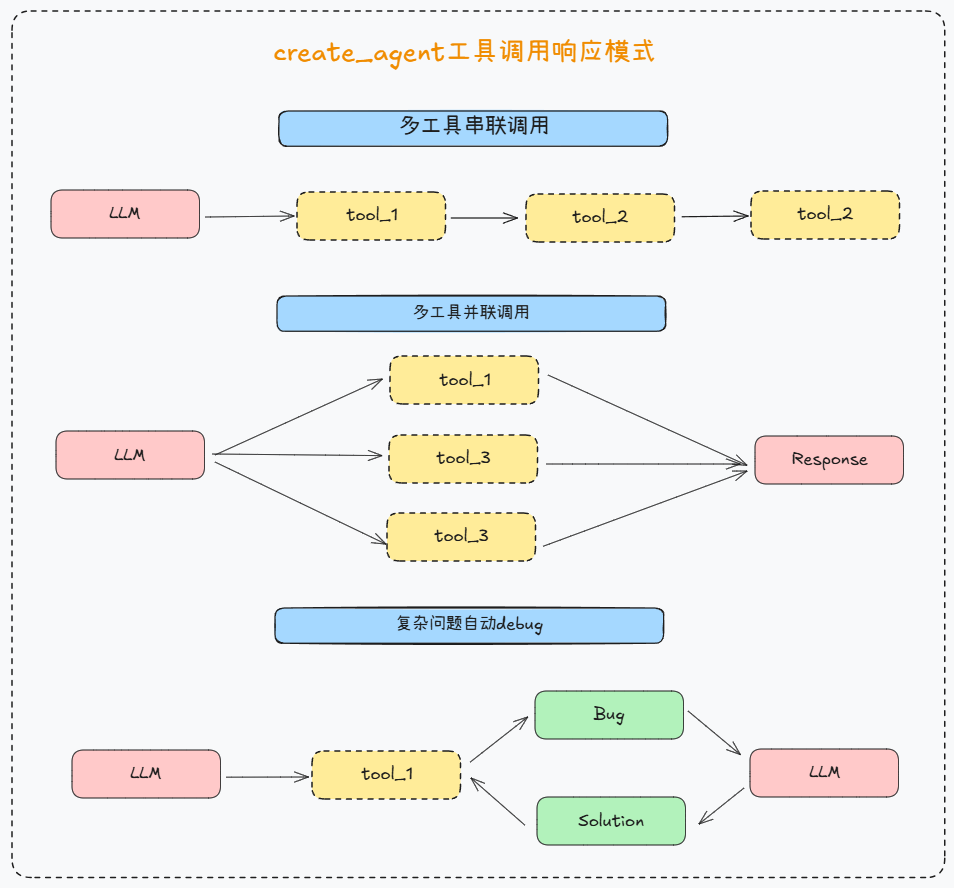
agent = create_agent(
    model=model,
    tools=tools,
    system_prompt="你是一个有用的助手,可以使用工具来回答问题。"
)
result = agent.invoke(
    {"messages": [{"role": "user", "content": "请帮我查询北京天气信息。"}]}
)
result['messages'][-1].content
五、结语
本篇我们从 0 到 1 走完了 DeepSeek-V3.2 Agent 开发的基础路径:先整体认识模型能力与价格优势,再完成 API Key 配置与基础调用示例,接着通过 Function Calling 打通「模型 ↔ 外部工具」的完整闭环,最后给出了一套 LangChain 对推理模型 的兼容性解决方案。
欢迎加入👉赋范空间 免费领取 完整项目教程及源码,还有更多Agent 开发实战内容等你来拿


 1883
1883

 被折叠的 条评论
为什么被折叠?
被折叠的 条评论
为什么被折叠?
 到【灌水乐园】发言


