


总结
这里是B站up主你可是处女座啊发布的手把手带你实战HuggingFace Transformer模型入门篇的知识笔记,我整理记录了课堂的代码,并做了注释
点击观看:跳转观看
引入
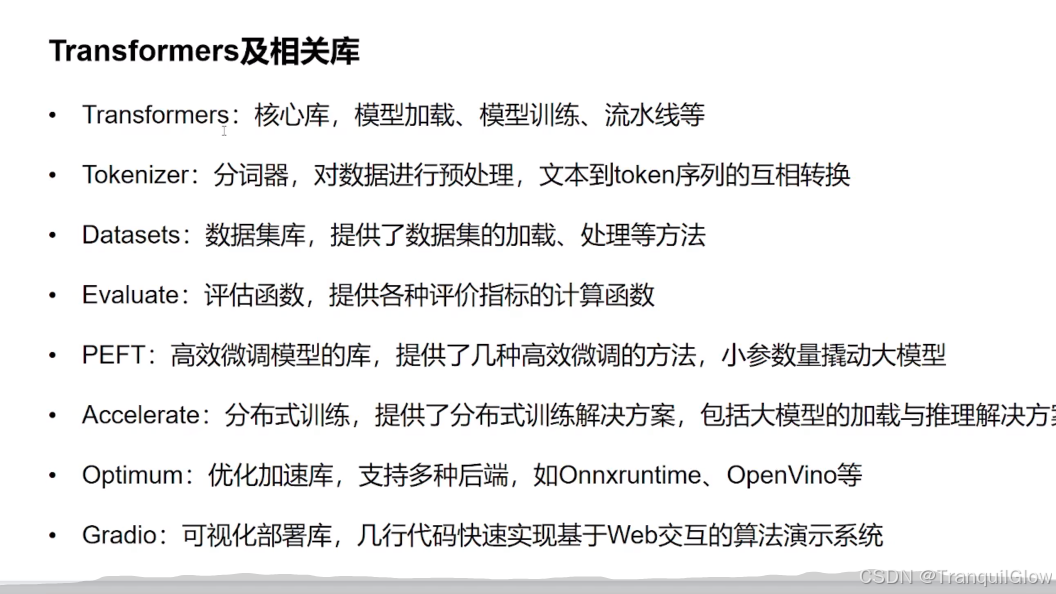
常见库
基本使用情况
conda create -n transformers python=3.9 创建环境,最好使3.9,版本太高了,可能会出现不兼容的情况
pip config set global.index-url https://mirrors.tuna.tsinghua.edu.cn/pypi/web/simple 将这个清华源设置为默认
pip install torch==1.7.1+cu110 torchvision==0.8.2+cu110 torchaudio==0.7.2 -f https://download.pytorch.org/whl/torch_stable.html 安装pytorch命令
判断是否安装成功

安装环境的相关库
pip install transformers datasets evaluate peft accelerate gradio optimum sentencepiece
pip install jupyterlab scikit-learn pandas matplotlib tensorboard nltk rouge
注意这个vscode的终端我们要调成这个cmd版本的,不要调乘powershell,因为powershell不设置的话,无法激活环境
判断环境是否安装成功
from transformers import *
修改一下这个host文件,防止机器从github中下载模型出现问题
两个小案例
问题处理
gr.Interface.from_pipeline(pipeline("question-answering", model="uer/roberta-base-chinese-extractive-qa")).launch()
语言判断
gr.Interface.from_pipeline(pipeline("text-classification", model="uer/roberta-base-finetuned-dianping-chinese")).launch()
# 这个代码的意思是导入这个gradio并取别名gr
# gradio是一个把机器学习模型快速打包成可交互网页界面的工具,我们可以直接通过这个名字来调用其中的方法
import gradio as gr

# 这个代码的意思是从transformers库中导入这个pipeline,pipeline是一站式API,给定任务名和模型名,它会自动下载分词器,模型并封装成可调用对象
from transformers import pipeline

# 分为两部分
# 第一部分pipeline("question-answering", model="uer/roberta-base-chinese-extractive-qa")
#     定义任务名的名字question-answering,定义模型uer/roberta-base-chinese-extractive-qa,一个针对中文微调的 RoBERTa-base 模型
# 第二部分gr.Interface.from_pipeline().launch()
# Gradio 提供的快捷方法,直接把 pipeline 对象转成可交互网页界面。会自动根据 pipeline 的任务类型生成两个输入框(context、question)和一个输出框(答案)
gr.Interface.from_pipeline(pipeline("question-answering", model="uer/roberta-base-chinese-extractive-qa")).launch()
基础组件Pipeline
总结
- PipeLine就是一个可以快速使用别人模型的一个东西,使用的时候需要导入from transformers.pipelines
- 使用pipeline只需要关注下面几个地方,模型是什么,参数是什么,如何使用即可,具体的使用方法可以参考这个文档
什么是Pipeline
-
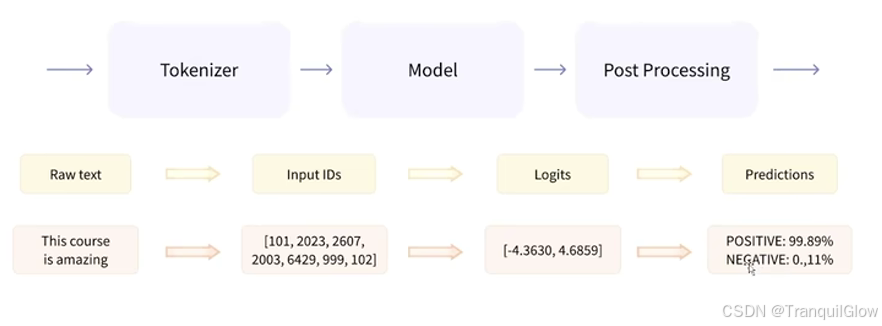
将数据预处理,模型调用,结果后处理三部分组装成的流水线
-
是我们能够直接输入文本便获得最终答案
-
预处理就是将文本转化为ID,模型调用就是获取评分,结果后处理,就是得出结果
Pipeline支持的任务类型
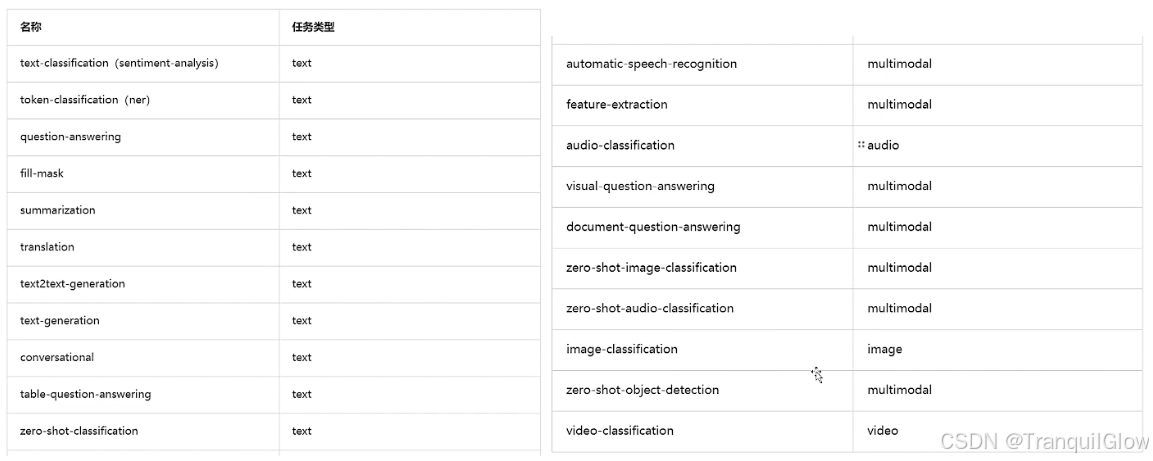
这些任务类型,我们并不能够都记住,我们可以通过代码的方式获取这个任务
#从这个transformers包中导入这个任务
#如果提示更新的话,就是pip install -U xxx
from transformers.pipelines import SUPPORTED_TASKS

#导入这个pprint,pprint是"pretty-printer"的缩写,它提供了一个可以以美观、可读的方式打印复杂数据结构的功能。
#与普通的print函数相比,pprint能够更好地格式化输出,特别是对于嵌套的数据结构如字典和列表
from pprint import pprint
pprint(SUPPORTED_TASKS.keys())

for k, v in SUPPORTED_TASKS.items():
    print(k, v)
Pipeline的创建与使用方式
文本检测
在使用这个Pipeline之前我们需要导包,一般需要什么导入什么就可以,但是我还不太清楚都需要什么,就直接导入全部from transformers import *
之后我们可以根据任务类型,直接创建这个PipeLine。比如说我们创建一个文本分类的pipeline对象,系统会自动根据这个名称自动取下载基础模型。 不过这种方式都是默认英文模型
pipe = pipeline("text-classification")
然后我们执行,可以向里面传入多个参数
pipe(["very good!", "vary bad!","you are beautiful"])
即可得出结果评分
[{

   'label': 'POSITIVE', 'score': 0.9998525381088257},
 {

   'label': 'NEGATIVE', 'score': 0.9991207718849182},
 {

   'label': 'POSITIVE', 'score': 0.9998794794082642}]
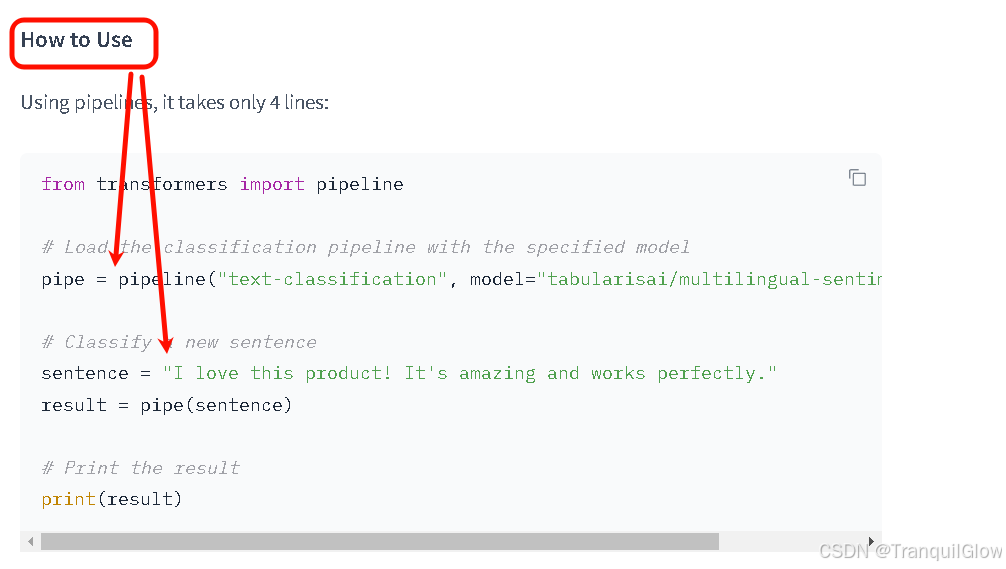
如果我们想用中文模型的话,需要我们手动去指定
# https://huggingface.co/models
可以去huggingface网站中去查找这个模型,找到自己要做的任务,然后找到这个任务中支持的语言,然后点进去模型看一下使用方法
注意在从hugging face下载模型的时候,可能需要安装 hf_xet 包,它是 Hugging Face 用来优化模型下载的新依赖项,否则可能会下载失败
pipe = pipeline("text-classification", model="tabularisai/multilingual-sentiment-analysis")
pipe(["我喜欢你","我喜欢刘亦菲","我好帅","我是煞笔"])
除此之外我们还可以先加载模型和分词器,最后在指定这个管道,这种方式必须同时指定这个分词器和模型,如果只指定模型,不指定分词器的话,这个代码会报错
from transformers import AutoModelForSequenceClassification, AutoTokenizer

# 这种方式,必须同时指定model和tokenizer
模型
model = AutoModelForSequenceClassification.from_pretrained("uer/roberta-base-finetuned-dianping-chinese")
分词器
tokenizer = AutoTokenizer.from_pretrained("uer/roberta-base-finetuned-dianping-chinese")
管道
pipe = pipeline("text-classification", model=model, tokenizer=tokenizer)
如果我们想要让这个pipeline在执行的时候用gpu进行推理,我们可以手动指定这个pipeline
device=0,表示第一张显卡,1表示第二张显卡
pipe = pipeline("text-classification", model="uer/roberta-base-finetuned-dianping-chinese", device=0)

pipe = pipeline("text-classification", model="uer/roberta-base-finetuned-dianping-chinese", device="cpu")
对于pipeline而言,当我们需要获取了一个模型的时候,不同的模型的参数是不一样的,比如说文本分类就是传递一个字符串,文本推理确实传递两个字符串,一个文本,一个问题。所以对于不同的模型如何获取这些模型的使用参数呢。
-
如果我们使用的是hugging face的库,里面会有参数介绍
-
但是transformers本身也有一个包,可以实现这个功能
我们直接定义一个管道,然后直接在文档中输出这个管道,它就会提示你这个管道是什么样的。
qa_pipe = pipeline("question-answering", model="uer/roberta-base-chinese-extractive-qa")
qa_pipe
输出:<transformers.pipelines.question_answering.QuestionAnsweringPipeline at 0x20990ddda80>
发现它已经指出来了这个pipelines的功能就是question_answering,具体管道就是QuestionAnsweringPipeline

把这个管道复制到代码中,然后ctrl加点击跳转到源码,源码中会给出举例
QuestionAnsweringPipeline
>>> from transformers import pipeline
>>> oracle = pipeline(model="deepset/roberta-base-squad2")
>>> oracle(question="Where do I live?", context="My name is Wolfgang and I live in Berlin")
{

     'score': 0.9191, 'start': 34, 'end': 40, 'answer': 'Berlin'}

除了可以看示例信息之外,还可以看到这个管道中的其它参数
Args:
question (`str` or `list[str]`):
    One or several question(s) (must be used in conjunction with the `context` argument).
context (`str` or `list[str]`):
    One or several context(s) associated with the question(s) (must be used in conjunction
max_answer_len (`int`, *optional*, defaults to 15):
    The maximum length of predicted answers (e.g., only answers with a shorter length are considered).
等等等
这个max_answer_len是指这个答案的最大长度

qa_pipe(question="刘亦菲是谁", context="刘亦菲,1987年8月8日出生于湖北省武汉市,中国内地女演员,毕业于中央戏剧学院表演系2002班。")
{

     'score': 0.6130275130271912, 'start': 23, 'end': 30, 'answer': '中国内地女演员'}
目标检测
这个是一个零目标的目标检测算法
创建模型和管道
checkpoint = "google/owlvit-base-patch32"
detector = pipeline(model=checkpoint, task="zero-shot-object-detection")

导入图片
import requests
from PIL import Image
url = "https://www4.bing.com//th?id=OHR.HappySunflower_ZH-CN5840993161_1920x1080.jpg&rf=LaDigue_1920x1080.jpg&pid=hp"
im = Image.open(requests.get(url, stream=True).raw)
展示图片
im
由于模型可以检测到的类别不确定,所以我们有种方法可以确定这个图像可以检测的类别
print(detector.model.config.id2label)
利用这个方法即可检测这个模型支持的类别

不过这个checkpoint = "google/owlvit-base-patch32"模型比较特殊,这个是零样本目标检测,这类模型(如 OWL-ViT)不是固定类别的检测器,而是根据你输入的文本提示动态生成类别。
predictions = detector(
    im,
    candidate_labels=["flower", "bird"],
)
predictions

[{

   'score': 0.17662185430526733,
  'label': 'bird',
  'box': {

   'xmin': 66, 'ymin': 104, 'xmax': 156, 'ymax': 179}},
 {

   'score': 0.10747422277927399,
  'label': 'bird',
  'box': {

   'xmin': 168, 'ymin': 72, 'xmax': 265, 'ymax': 109}}]
如果我们想要观测这个图像中检测出来的位置,我们可以为图片添加边框
为图片添加这个边框
from PIL import ImageDraw # 导入 PIL 的绘图工具 ImageDraw,用于在图片上画框和写字。
draw = ImageDraw.Draw(im) #创建一个“画笔”对象 draw,绑定到图片 im 上,之后所有绘图都作用在这张图上

参考上面的输出对应的字典
for prediction in predictions: #遍历模型返回的每一个预测结果(每个目标一个字典)
    box = prediction["box"]
    label = prediction["label"]
    score = prediction["score"]
    #把 box 字典里的四个值解包成变量,方便后面画矩形框
    xmin, ymin, xmax, ymax = box.values()
    #在图片上画一个红色矩形框,标出目标位置
    draw.rectangle((xmin, ymin, xmax, ymax), outline="red", width=1)
    #在框的左上角写上类别名和置信度(保留两位小数),颜色也是红色
    draw.text((xmin, ymin), f"{

     label}: {

     round(score,2)}", fill="red")

im
Pipeline的背后实现
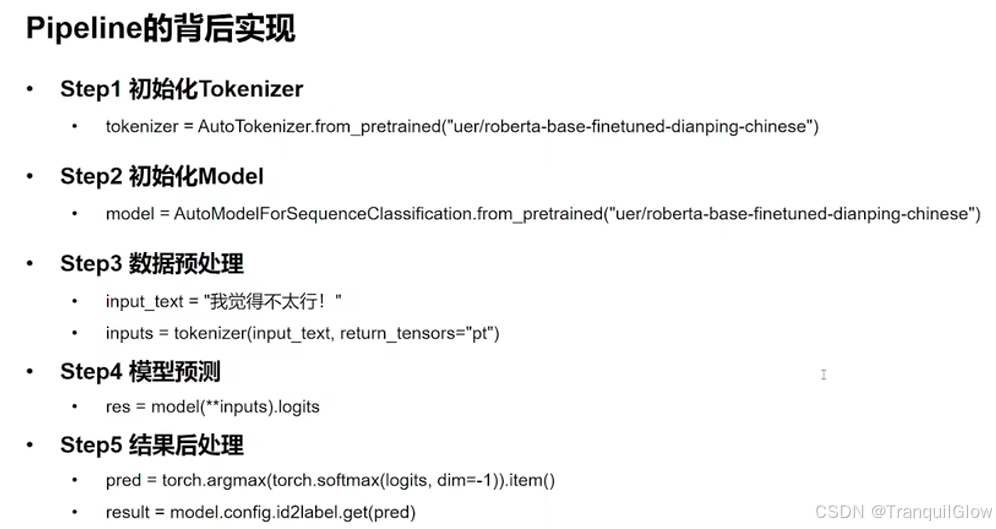
分为5步
初始化Tokenizer,利用Tokenizer进行预处理
tokenizer = AutoTokenizer.from_pretrained("uer/roberta-base-finetuned-dianping-chinese")
初始化Model,利用model将进行预测
model = AutoModelForSequenceClassification.from_pretrained("uer/roberta-base-finetuned-dianping-chinese")
数据预处理
input_text = "我觉得不太行!"
inputs = tokenizer(input_text, return_tensors="pt")
inputs
模型预测,将上一步模型处理结果塞
 最低0.47元/天 解锁文章


 1万+
1万+

 被折叠的 条评论
为什么被折叠?
被折叠的 条评论
为什么被折叠?
 到【灌水乐园】发言


