


本文来源公众号“OpenCV与AI深度学习”,仅用于学术分享,侵权删,干货满满。
原文链接:https://mp.weixin.qq.com/s/HNEtgb_meJP2AxoIPsP_7g
计数物体是一项我们认为理所当然的人类任务。这看起来很简单,但要实现它需要进行大量处理,并且在能够计数目标方面需要获得非常有用的信息。
想象一下,一个农民走过他的田地,在一棵树下停下来,问自己:“这棵树上有多少苹果?这个问题看似普通,但却蕴含着巨大的价值。
了解计数有助于农民估计产量、管理收获和计划分配。然而,人类计数是不可能大规模的。
这就是计算机视觉自动物体计数的强大功能:教机器快速准确地查看和计数。
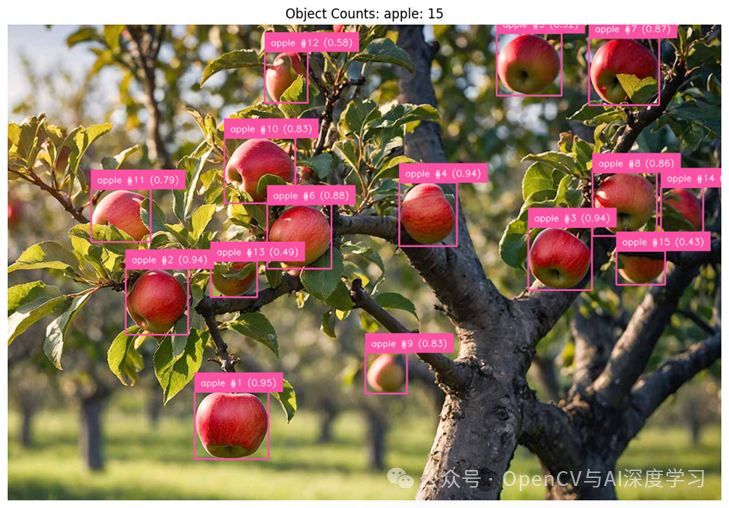
计算图像中的苹果数量
使用计算机视觉进行目标计数概述
在本文中,我们将探索使用计算机视觉进行目标计数,从基本概念到实际应用。您将学习:
-
-
什么是目标计数以及为什么它很重要。
-
图像计数与视频计数之间的区别。
-
机器面临的挑战(例如遮挡、重叠和重复)。
-
制造、医疗保健、农业和仓储等领域的实际行业应用。
-
如何使用 Roboflow 等工具简化了从数据集创建到模型部署的过程。
-
为什么基于变压器的 RF-DETR 模型在具有挑战性的条件下进行计数特别强大。
-
最后,如何构建目标计数应用程序:
-
-
-
-
基于图像的物体计数
-
-
-
基于视频的物体计数
-
-
-
视频中基于区域的计数
-
-
-
实时摄像机馈送中的目标计数
-
-
什么是目标计数?
计算机视觉中的目标计数是系统自动识别和计算图像或视频帧中特定目标实例的任务。核心目标是检测和枚举图像或视频中场景中出现的感兴趣目标(例如,人、车辆、产品)的数量。
这种方法适用于不同的设置:
-
-
在图像中,系统会一次计算所有可见实例。
-
在视频片段中,它会跟踪和计数物体在场景中移动,例如穿过门口的人或通过检查站的汽车。
-
我们将在本文后面探讨图像和视频中的计数目标。
目标计数的核心概念
计算机视觉中的物体计数围绕着一个基本问题:
“图像或视频中存在多少特定类型的目标?”
对于人类来说,这项任务是第二天性。在计算机视觉中,目标是训练机器以自动化和可靠的方式复制人类的这种能力。
目标计数的本质在于三个主要步骤:
-
-
了解要计算的内容:系统首先需要定义什么算作感兴趣目标。这可以是任何东西,从人和汽车到动物、工具或制造零件。
-
找到每个实例:定义目标类型后,系统必须识别场景中该目标的每个单独出现。每个检测到的目标都被视为一个单独的实例。
-
保持准确计数:对于找到的每个目标实例,系统都会递增一个计数器。最终输出是一个数字,表示存在多少个此类目标。
-
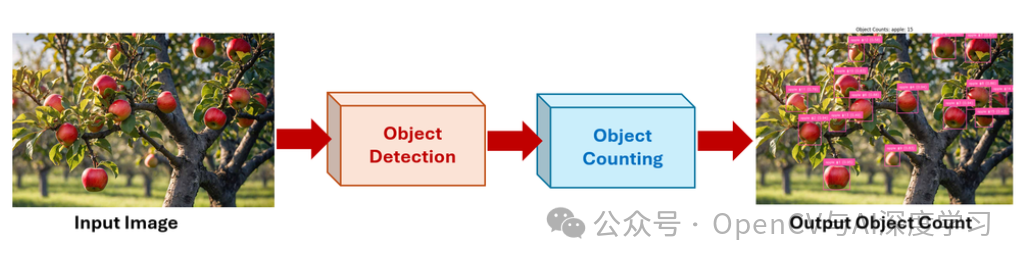
如何计算图像中的目标
对图像中的目标进行计数的过程通常涉及以下关键步骤:
-
-
图像采集:以静止图像的形式捕获输入数据。这用作进一步处理的原始输入。
-
目标检测或定位:应用计算机视觉模型来识别和定位图像中感兴趣的目标。此步骤在每个目标周围输出边界框或分割蒙版。
-
目标计数:通过对各个检测相加来计算检测到的目标的总数。每个有效的边界框或分段实例都被视为一个计数。
-
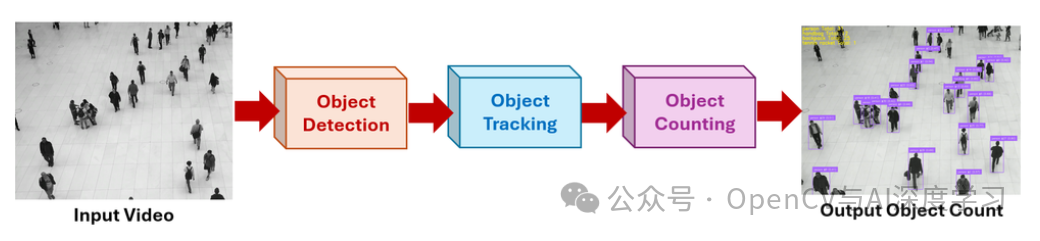
如何计算视频中的目标
对视频中的目标进行计数不仅涉及检测单个帧中的目标,还涉及随着时间的推移跟踪它们以避免重复。该过程通常包括以下阶段:
-
-
检测:将预训练的目标检测模型应用于每个视频帧。它通过在感兴趣的目标周围绘制边界框来识别和定位感兴趣的目标,提供当前帧中每个目标的位置和类标签。
-
跟踪:检测到目标后,跟踪算法(例如 SORT、DeepSORT 或 ByteTrack)会为每个目标分配一个唯一的 ID,并在后续帧中跟踪它。这可确保在整个视频中始终识别相同的目标,即使在它移动时也是如此。
-
计数:系统维护目标 ID 的注册表,并且仅对每个目标进行一次计数。在以下情况下可以触发计数:
-
-
-
-
目标穿过预定义的线或区域(线交叉逻辑)。
-
-
-
场景中将显示一个新的目标 ID。
-
-
-
目标完成特定路径或退出帧。
-
-
这种方法通过防止重复计数同一目标并随着时间的推移保持一致性来确保准确、实时的计数。
物体计数的挑战
尽管物体计数概念看似简单,但一些挑战使物体计数成为机器的一项不平凡的任务。这些都是:
-
-
区分相似目标:相同类型的目标可能看起来非常接近、重叠或看起来几乎相同。系统必须准确识别并分离它们。
-
避免重复计数:特别是在视频流中,系统必须确保移动目标不会被计数不止一次。
-
处理遮挡和杂乱:目标的一部分可能隐藏在其他目标后面或部分超出帧,需要系统进行智能猜测。
-
适应可变性:照明变化、摄像机角度、物体大小和背景复杂性都会影响计数的准确性。
-
目标计数是识别和统计图像或视频中单个目标数量的自动化过程。核心目标是检测每个不同的目标实例并生成准确的计数,类似于人的方式,但由具有一致性和规模的机器完成。简单来说,这就像训练计算机看着一个场景并说:
“有 7 个人”或“12 辆车经过”。
这项基础任务是许多实际应用的支柱,在这些应用中,理解数量至关重要。
如何使用计算机视觉对物体进行计数(4 个示例)
用 RF-DETR,并为以下任务构建示例:
-
-
图像中的目标计数
-
视频中的物体计数
-
区域内物体计数(基于视频)
-
实时摄像机源中的目标计数
-
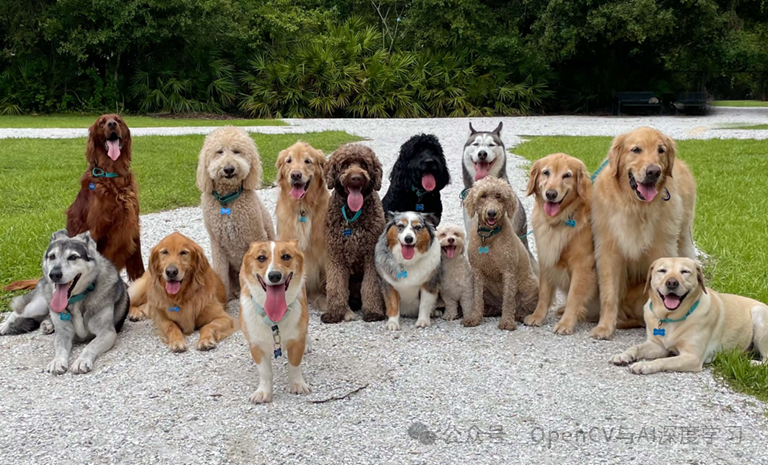
示例 #1:图像中的目标计数
在此示例中,我们将使用 RF-DETR 基本模型接受图像并检测目标。
import cv2import numpy as npimport supervision as svfrom collections import Counterimport matplotlib.pyplot as pltfrom PIL import Imagefrom inference_sdk import InferenceHTTPClient# Load original imageimage_path = "dogs.png"image_bgr = cv2.imread(image_path)image_rgb = cv2.cvtColor(image_bgr, cv2.COLOR_BGR2RGB)client = InferenceHTTPClient(api_url="https://serverless.roboflow.com",api_key="YOUR_API_KEY")result = client.run_workflow(workspace_name="tim-4ijf0",workflow_id="object-counting-image",images={"image": image_path},use_cache=False)# Parse predictionspredictions = result[0]["output"]["predictions"]xyxy = []confidences = []class_names = []for pred in predictions:conf = pred["confidence"]cls = pred["class"]x_c, y_c = pred["x"], pred["y"]w, h = pred["width"], pred["height"]x1 = x_c - w / 2y1 = y_c - h / 2x2 = x_c + w / 2y2 = y_c + h / 2xyxy.append([x1, y1, x2, y2])confidences.append(conf)class_names.append(cls)xyxy = np.array(xyxy, dtype=float)confidences = np.array(confidences, dtype=float)class_names = np.array(class_names)# Assign per-class object numbersper_class_counter = Counter()labels = []for cls, conf in zip(class_names, confidences):per_class_counter[cls] += 1count = per_class_counter[cls]labels.append(f"{cls} #{count} ({conf:.2f})")# Supervision Detections objectdetections = sv.Detections(xyxy=xyxy,confidence=confidences,class_id=np.zeros(len(xyxy), dtype=int))# Visualizeannotated = image_rgb.copy()box_annotator = sv.BoxAnnotator(thickness=2)label_annotator = sv.LabelAnnotator(text_scale=0.5, text_thickness=1)annotated = box_annotator.annotate(scene=annotated, detections=detections)annotated = label_annotator.annotate(scene=annotated, detections=detections, labels=labels)# Displayplt.figure(figsize=(12, 10))plt.imshow(annotated)plt.axis("off")plt.title("Object Counts: " + ", ".join(f"{k}: {v}" for k, v in per_class_counter.items()))plt.show()
在以下输入图像上运行脚本:
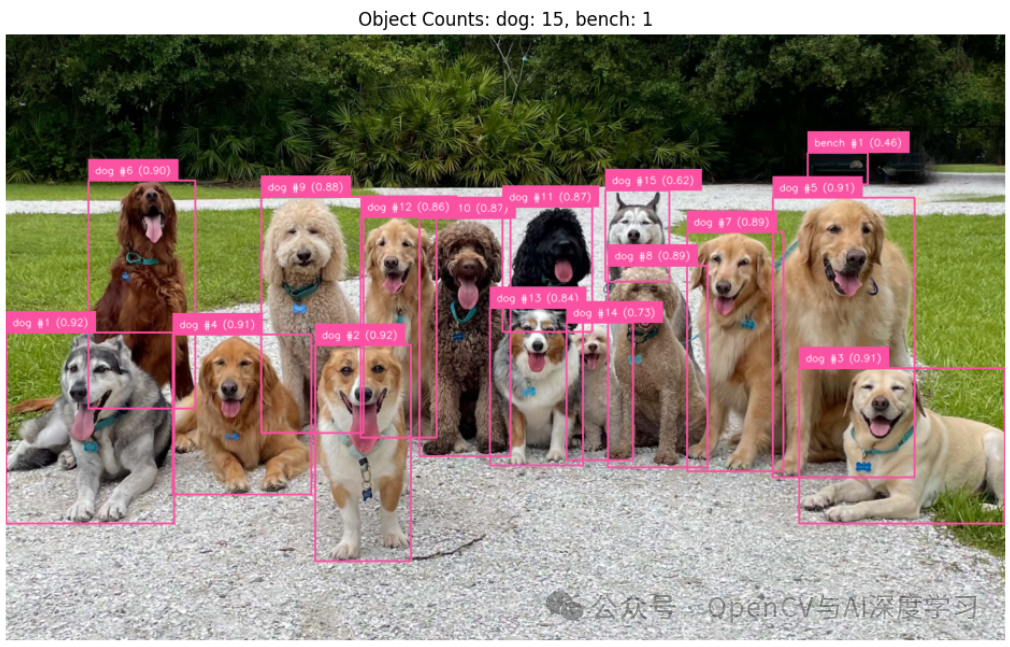
将生成类似于以下内容的输出:
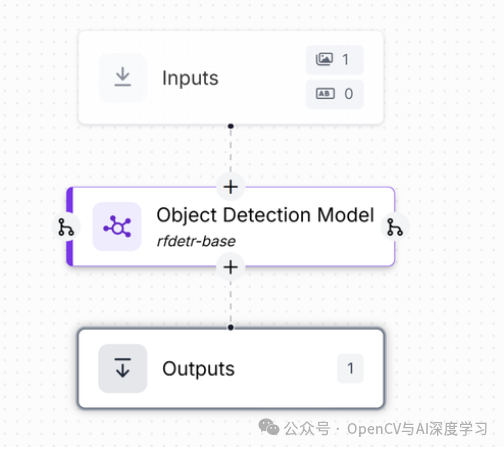
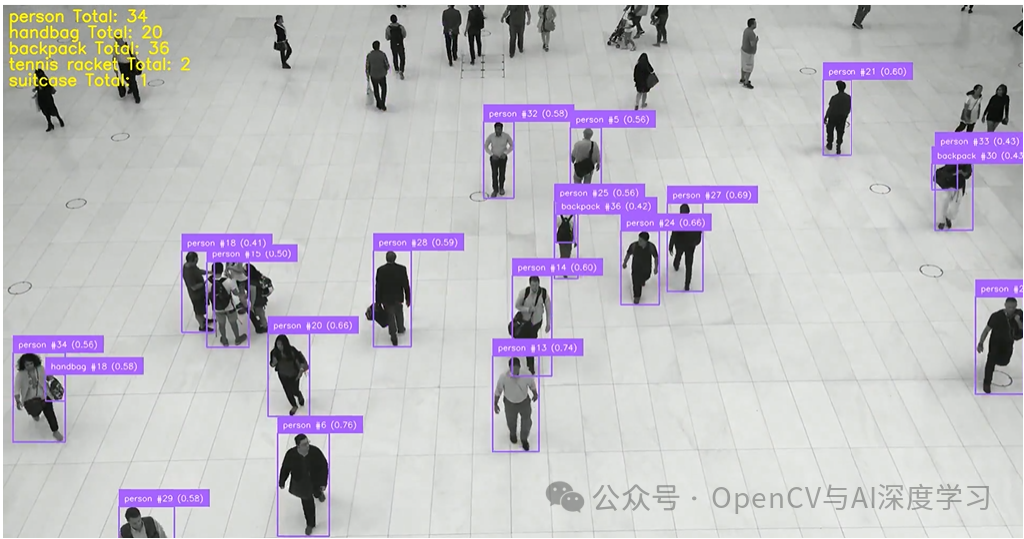
示例 #2:视频中的目标计数
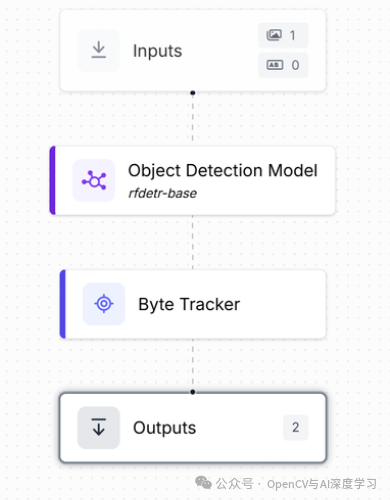
此工作流结合了对象检测模型 (rf-detr-base) 和 ByteTrack 块。检测模型识别每个视频帧中的对象(如人、狗等),而 ByteTrack 为每个对象分配一个唯一的 ID 并跨帧跟踪它。
此设置对于对象计数至关重要,因为它可以确保对象无论在视频中出现多长时间,都只计数一次。该工作流程输出原始预测和跟踪信息,使其可用于累积计数应用程序。
from inference import InferencePipelineimport supervision as svimport cv2import numpy as npfrom google.colab.patches import cv2_imshowfrom collections import defaultdict# === Output video config ===output_path = "output_object_counting.mp4"video_writer = Noneoutput_fps = 30output_size = None# Object ID and count stateid_registry = {} # (class_name, tracker_id) -> object_numbernext_object_number = defaultdict(int) # class_name -> next id (starting from 1)total_class_counts = defaultdict(int) # class_name -> total seen ever# Annotatorsbox_annotator = sv.BoxAnnotator(thickness=2)label_annotator = sv.LabelAnnotator(text_scale=0.5, text_thickness=1)def my_sink(result, video_frame):global video_writer, output_sizeframe = video_frame.imagetracked = result["byte_tracker"]["tracked_detections"]# Data extractionxyxy = tracked.xyxyclass_names = tracked.data["class_name"]tracker_ids = tracked.tracker_idconfidences = tracked.confidencelabels = []per_frame_counter = defaultdict(int)# Assign IDs and prepare labelsfor i, (cls_name, trk_id, conf) in enumerate(zip(class_names, tracker_ids, confidences)):key = (cls_name, int(trk_id))if key not in id_registry:next_object_number[cls_name] += 1id_registry[key] = next_object_number[cls_name]total_class_counts[cls_name] += 1obj_number = id_registry[key]per_frame_counter[cls_name] += 1labels.append(f"{cls_name} #{obj_number} ({conf:.2f})")# Build supervision Detections objectdetections = sv.Detections(xyxy=xyxy,confidence=confidences,class_id=np.zeros(len(xyxy), dtype=int),tracker_id=tracker_ids)# Annotate with supervisionannotated = box_annotator.annotate(scene=frame.copy(), detections=detections)annotated = label_annotator.annotate(scene=annotated, detections=detections, labels=labels)# Draw global count summary (cumulative)y0 = 30for i, (cls, cnt) in enumerate(total_class_counts.items()):text = f"{cls} Total: {cnt}"cv2.putText(annotated, text,(10, y0 + i * 30),cv2.FONT_HERSHEY_SIMPLEX, 1.0, (0, 255, 255), 2, cv2.LINE_AA)# Init video writerif video_writer is None:h, w = annotated.shape[:2]output_size = (w, h)fourcc = cv2.VideoWriter_fourcc(*'mp4v')video_writer = cv2.VideoWriter(output_path, fourcc, output_fps, output_size)# Show + save framecv2_imshow(annotated)video_writer.write(annotated)# Roboflow inference pipelinepipeline = InferencePipeline.init_with_workflow(api_key="YOUR_API_KEY",workspace_name="tim-4ijf0",workflow_id="object-counting-video",video_reference="/content/people-walking.mp4",max_fps=30,on_prediction=my_sink)pipeline.start()pipeline.join()# Final cleanupif video_writer:video_writer.release()cv2.destroyAllWindows()

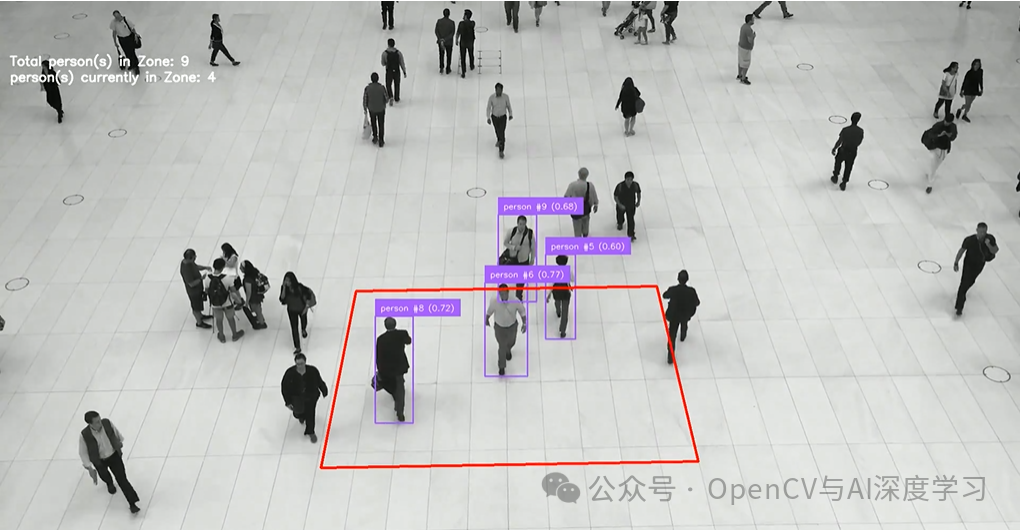
示例 #3:带视频的区域中的物体计数
from inference import InferencePipelineimport supervision as svimport cv2import numpy as npfrom google.colab.patches import cv2_imshowfrom collections import defaultdict# Output configoutput_path = "output_zone_count_filtered.mp4"video_writer = Noneoutput_fps = 30output_size = None# Tracking stateid_registry = {}next_object_number = defaultdict(int)total_class_counts = defaultdict(int)# Target classTARGET_CLASS = "person"# Zone polygonpolygon = np.array([[604, 876], [1313, 864], [1235, 535], [670, 544]])zone = sv.PolygonZone(polygon=polygon)# Manual polygon drawer (removes supervision’s default center ID)def draw_polygon(scene, polygon, color=(255, 255, 255), thickness=2):points = polygon.reshape((-1, 1, 2)).astype(int)return cv2.polylines(scene, [points], isClosed=True, color=color, thickness=thickness)# Annotatorsbox_annotator = sv.BoxAnnotator(thickness=2)label_annotator = sv.LabelAnnotator(text_scale=0.5, text_thickness=1)def my_sink(result, video_frame):global video_writer, output_sizeframe = video_frame.imagetracked = result["byte_tracker"]["tracked_detections"]xyxy = tracked.xyxyclass_names = tracked.data["class_name"]tracker_ids = tracked.tracker_idconfidences = tracked.confidence# Supervision detectionsdetections = sv.Detections(xyxy=xyxy,confidence=confidences,class_id=np.zeros(len(xyxy), dtype=int),tracker_id=tracker_ids)# Filter: by zonein_zone_mask = zone.trigger(detections)detections = detections[in_zone_mask]filtered_class_names = class_names[in_zone_mask]filtered_tracker_ids = tracker_ids[in_zone_mask]filtered_confidences = confidences[in_zone_mask]# Filter: by target classfinal_mask = np.array([cls == TARGET_CLASS for cls in filtered_class_names])detections = detections[final_mask]filtered_class_names = filtered_class_names[final_mask]filtered_tracker_ids = filtered_tracker_ids[final_mask]filtered_confidences = filtered_confidences[final_mask]# Tracking logiccurrent_ids_in_zone = set()labels = []for cls_name, trk_id, conf in zip(filtered_class_names, filtered_tracker_ids, filtered_confidences):key = (cls_name, int(trk_id))current_ids_in_zone.add(key)if key not in id_registry:next_object_number[cls_name] += 1id_registry[key] = next_object_number[cls_name]total_class_counts[cls_name] += 1 # Cumulative countobj_number = id_registry[key]labels.append(f"{cls_name} #{obj_number} ({conf:.2f})")# Annotate frameannotated = box_annotator.annotate(scene=frame.copy(), detections=detections)annotated = label_annotator.annotate(scene=annotated, detections=detections, labels=labels)annotated = draw_polygon(annotated, polygon)# Draw text on framecv2.putText(annotated,f"Total {TARGET_CLASS}(s) in Zone: {total_class_counts.get(TARGET_CLASS, 0)}",(20, 120),cv2.FONT_HERSHEY_SIMPLEX,0.8,(255, 255, 255),2,cv2.LINE_AA)cv2.putText(annotated,f"{TARGET_CLASS}(s) currently in Zone: {len(current_ids_in_zone)}",(20,150),cv2.FONT_HERSHEY_SIMPLEX,0.8,(255, 255, 255),2,cv2.LINE_AA)# Video outputif video_writer is None:h, w = annotated.shape[:2]output_size = (w, h)fourcc = cv2.VideoWriter_fourcc(*'mp4v')video_writer = cv2.VideoWriter(output_path, fourcc, output_fps, (w, h))cv2_imshow(annotated)video_writer.write(annotated)# Start pipelinepipeline = InferencePipeline.init_with_workflow(api_key="YOUR_API_KEY",workspace_name="tim-4ijf0",workflow_id="object-counting-video",video_reference="/content/people-walking.mp4",max_fps=30,on_prediction=my_sink)pipeline.start()pipeline.join()if video_writer:video_writer.release()cv2.destroyAllWindows(
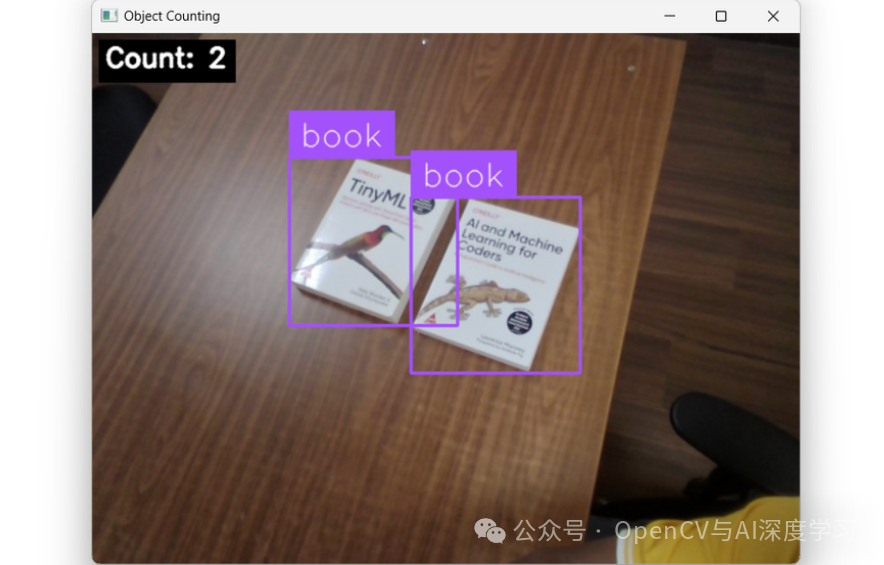
示例 #4:实时摄像机中的对象计数
from inference import InferencePipelineimport cv2def my_sink(result, video_frame):# Start from the visualization imageframe = result["label_visualization"].numpy_image.copy()# Read count safelycount = int(result.get("count", 0))text = f"Count: {count}"# Text stylingfont = cv2.FONT_HERSHEY_SIMPLEXfont_scale = 0.8thickness = 2margin = 12# Compute background box for readability(text_w, text_h), baseline = cv2.getTextSize(text, font, font_scale, thickness)x, y = margin, margin + text_h# Draw filled background rectangle (black) then white textcv2.rectangle(frame,(x - 6, y - text_h - 6),(x + text_w + 6, y + baseline + 6),(0, 0, 0),-1)cv2.putText(frame, text, (x, y), font, font_scale, (255, 255, 255), thickness, cv2.LINE_AA)# Show the framecv2.imshow("Object Counting", frame)cv2.waitKey(1)# initialize a pipeline objectpipeline = InferencePipeline.init_with_workflow(api_key="YOUR_API_KEY",workspace_name="tim-4ijf0",workflow_id="object-counting-camera",video_reference=0,max_fps=30,on_prediction=my_sink)pipeline.start()pipeline.join()
THE END !
文章结束,感谢阅读。您的点赞,收藏,评论是我继续更新的动力。大家有推荐的公众号可以评论区留言,共同学习,一起进步。


 913
913

 被折叠的 条评论
为什么被折叠?
被折叠的 条评论
为什么被折叠?
 到【灌水乐园】发言


