


文章目录
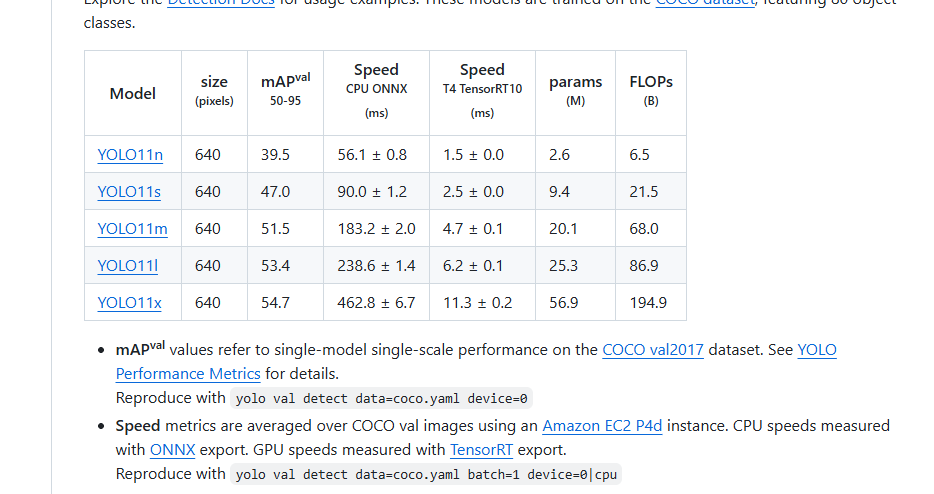
YOLOv8代码下载
https://github.com/ultralytics/ultralytics
1.数据集制作
1.1 数据集准备
- 自制数据集
- 公开数据集:极市平台

1.2 数据标注
-
下载安装Labelimg:Labelimg

-
新建label文件夹保存标签

-
打开数据集文件进行标注

快捷键w进行标注,输入标签名,比如说mask,保存,然后继续下一张,直到标注完成。

生成的标签文件为xml文件:


包含图片信息和标注的object信息(坐标、类别)
注意:如果是包含多个类别,请注意每个类型的顺序:比如说 0:类别1,1:类别2.
1.3数据集划分
将数据集划分为训练集、测试集、验证集。训练集:验证集:测试集=8:1:1
在YOLOv8代码ultralytics/目录下新建data.py文件,将数据集的data和label文件夹进行拆分:
import os
import random
import shutil

# 原数据集目录(相对目录)
root_dir = 'datasets'
# 划分比例:训练集:验证集:测试集=8:1:1
train_ratio = 0.8
valid_ratio = 0.1
test_ratio = 0.1

# 设置随机种子
random.seed(42)

# 拆分后数据集目录
split_dir = 'datasets/traffic'
os.makedirs(os.path.join(split_dir, 'train/images'), exist_ok=True)
os.makedirs(os.path.join(split_dir, 'train/labels'), exist_ok=True)
os.makedirs(os.path.join(split_dir, 'valid/images'), exist_ok=True)
os.makedirs(os.path.join(split_dir, 'valid/labels'), exist_ok=True)
os.makedirs(os.path.join(split_dir, 'test/images'), exist_ok=True)
os.makedirs(os.path.join(split_dir, 'test/labels'), exist_ok=True)

# 获取图片文件列表
image_files = os.listdir(os.path.join(root_dir, 'images'))
label_files = os.listdir(os.path.join(root_dir, 'labels'))

# 随机打乱文件列表
combined_files = list(zip(image_files, label_files))#图片、标签转化为列表
random.shuffle(combined_files)#打乱
image_files_shuffled, label_files_shuffled = zip(*combined_files)#重新获取

# 根据比例计算划分的边界索引
train_bound = int(train_ratio * len(image_files_shuffled))#图片总数*训练集比例
valid_bound = int((train_ratio + valid_ratio) * len(image_files_shuffled))

# 将图片和标签文件移动到相应的目录
for i, (image_file, label_file) in enumerate(zip(image_files_shuffled, label_files_shuffled)):
    if i < train_bound:
        shutil.copy(os.path.join(root_dir, 'images', image_file), os.path.join(split_dir, 'train/images', image_file))
        shutil.copy(os.path.join(root_dir, 'labels', label_file), os.path.join(split_dir, 'train/labels', label_file))
    elif i < valid_bound:
        shutil.copy(os.path.join(root_dir, 'images', image_file), os.path.join(split_dir, 'valid/images', image_file))
        shutil.copy(os.path.join(root_dir, 'labels', label_file), os.path.join(split_dir, 'valid/labels', label_file))
    else:
        shutil.copy(os.path.join(root_dir, 'images', image_file), os.path.join(split_dir, 'test/images', image_file))
        shutil.copy(os.path.join(root_dir, 'labels', label_file), os.path.join(split_dir, 'test/labels', label_file))
最后生成的目录文件:

1.4 新建.yaml配置文件
在ultralytics/datasets/下新建xx.yaml文件。

2.网络训练
权重文件
- 新建文件夹,放置下载的yolov8/yolov11权重文件。下载链接


参数配置
ultralytics/cfg/default.yaml:这个文件里保存了我们模型训练的所有超参数。- 可以复制一份default.yaml重命名后修改里面的参数,比如说:
- 一些训练的参数:
# Train settings -------------------------------------------------------------------------------------------------------
model: ultralytics/pt/yolov8n.pt # (str, optional) path to model file, i.e. yolov8n.pt, yolov8n.yaml
data: ultralytics/datasets/traffic.yaml # (str, optional) path to data file, i.e. coco8.yaml
epochs: 600 # (int) number of epochs to train for
time: # (float, optional) number of hours to train for, overrides epochs if supplied
patience: 100 # (int) epochs to wait for no observable improvement for early stopping of training
batch: 16 # (int) number of images per batch (-1 for AutoBatch)
imgsz: 640 # (int | list) input images size as int for train and val modes, or list[h,w] for predict and export modes
save: True # (bool) save train checkpoints and predict results
save_period: -1 # (int) Save checkpoint every x epochs (disabled if < 1)
cache: False # (bool) True/ram, disk or False. Use cache for data loading
device: 0 # (int | str | list) device: CUDA device=0 or [0,1,2,3] or "cpu/mps" or -1 or [-1,-1] to auto-select idle GPUs
workers: 4 # (int) number of worker threads for data loading (per RANK if DDP)
project: road # (str, optional) project name
name: # (str, optional) experiment name, results saved to 'project/name' directory
- 一些数据增强的参数:
scale: 0.5 # (float) image scale (+/- gain)
shear: 0.0 # (float) image shear (+/- deg)
perspective: 0.0 # (float) image perspective (+/- fraction), range 0-0.001
flipud: 0.0 # (float) image flip up-down (probability)
fliplr: 0.5 # (float) image flip left-right (probability)
bgr: 0.0 # (float) image channel BGR (probability)
mosaic: 1.0 # (float) image mosaic (probability)
mixup: 0.0 # (float) image mixup (probability)
cutmix: 0.0 # (float) image cutmix (probability)
训练方式
YOLO命令
- 可以直接通过YOLO 命令来进行训练。
yolo train data=ultralytics/datasets/traffic.yaml model=yolov8n.pt epochs=600 lr0=0.01 batch=32 - 参数必须以
arg=val对,用等号分割=符号,每对之间用空格分隔。不要使用--参数 , 参数之间。
新建py文件运行
- 新建
yolov8.py进行训练。 - 在代码根目录新建
yolo.py,直接在代码里重写参数,会默认覆盖ultralytics/cfg/default.yaml里面的参数。 这种方式可以对网络结构进行修改。
(yaml文件和pt文件一一对应,如果想训练YOLO的其他系列,切换模型就可以了。)
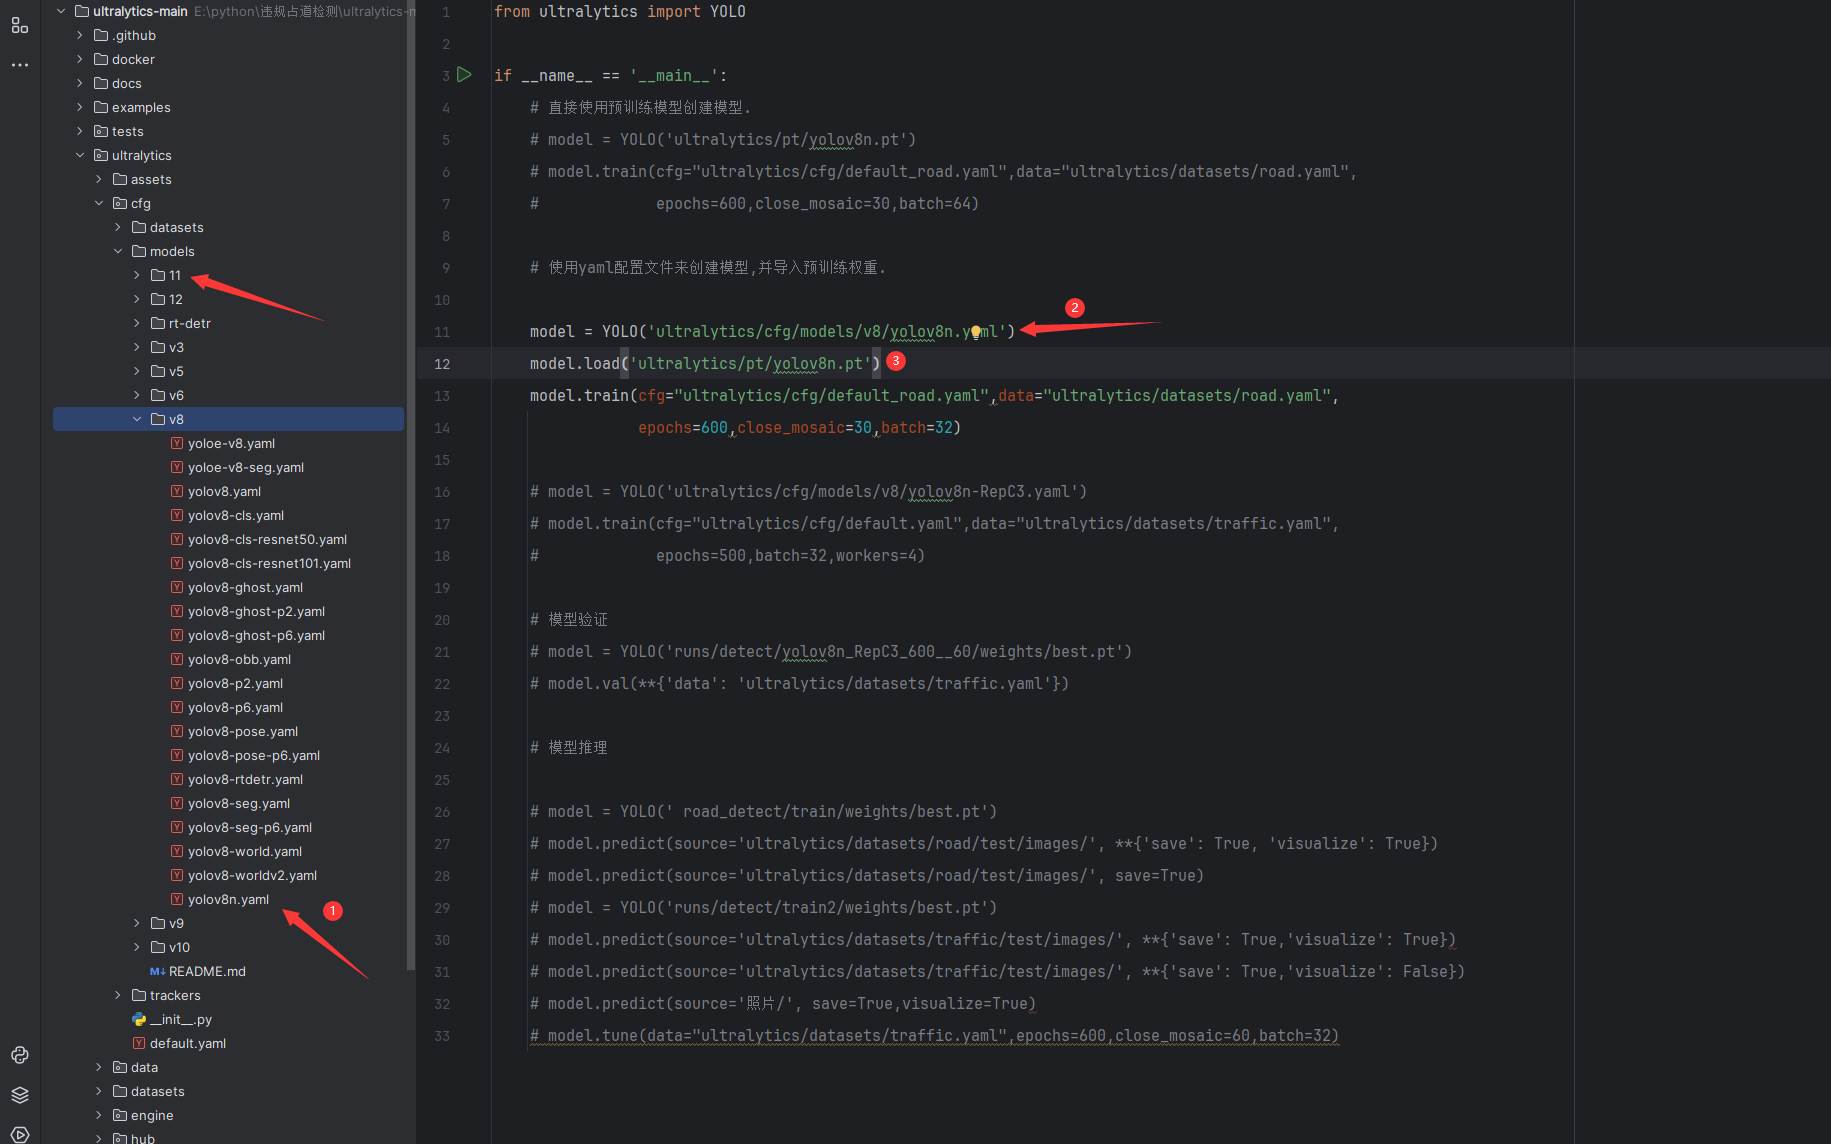
有两种训练方式:
- 利用预训练权重,比如说
yolov8n.pt进行训练
from ultralytics import YOLO

if __name__ == '__main__':
   # 直接使用预训练模型创建模型.
    model = YOLO('ultralytics/pt/yolov8n.pt')
    model.train(cfg="ultralytics/cfg/default.yaml",data="ultralytics/datasets/traffic.yaml",
                epochs=600,close_mosaic=30,batch=64)
- 不使用预训练权重,从零开始训练(如果对网络结构进行了修改,推荐从零开始训练)
from ultralytics import YOLO

if __name__ == '__main__':
    # 使用yaml配置文件来创建模型,并导入预训练权重.
    model = YOLO('ultralytics/cfg/models/v8/yolov8n.yaml')
    model.train(cfg="ultralytics/cfg/default.yaml",data="ultralytics/datasets/traffic.yaml",
                epochs=200,batch=2,workers=2)
3. 网络验证
需要加载训练好的best.pt权重模型,data参数需要传入数据集对应的yaml文件
    # 模型验证
    model = YOLO('runs/train/weights/best.pt')
    model.val(data='ultralytics/datasets/traffic.yaml' )
4. 模型预测
需要加载训练好的best.pt权重模型,source参数需要传入你想要预测的图片或者视频或者文件夹
    # 模型推理
    model = YOLO(' runs/train/weights/best.pt')
    model.predict(source='ultralytics/datasets/traffic/test/images/', save= True)
注意:网络训练和验证、推理(预测)不能同时进行,必须要训练完之后才能进行验证、推理(预测)
完整代码:
from ultralytics import YOLO

if __name__ == '__main__':
   # 1.直接使用预训练模型创建模型.
   #  model = YOLO('ultralytics/pt/yolov8n.pt')
   #  model.train(cfg="ultralytics/cfg/default.yaml",data="ultralytics/datasets/traffic.yaml",
   #              epochs=600,close_mosaic=30,batch=64)

    # 2.使用yaml配置文件来创建模型,并导入预训练权重.

    model = YOLO('ultralytics/cfg/models/v8/yolov8n.yaml')
    model.train(cfg="ultralytics/cfg/default.yaml",data="ultralytics/datasets/traffic.yaml",
                epochs=600,close_mosaic=30,batch=32)

    # model = YOLO('ultralytics/cfg/models/v8/yolov8n-RepC3.yaml')
    # model.train(cfg="ultralytics/cfg/default.yaml",data="ultralytics/datasets/traffic.yaml",
    #             epochs=500,batch=32,workers=4)
#————————————————————————————————————————————————————————————————————————————————————
   #训练完之后才能验证与推理
    # # 3.模型验证
    # model = YOLO('runs/train/weights/best.pt')
    # model.val(data='ultralytics/datasets/traffic.yaml' )
    #
    # # 4.模型推理
    # model = YOLO(' runs/train/weights/best.pt')
    # model.predict(source='ultralytics/datasets/traffic/test/images/', save= True)
5.网络结构修改
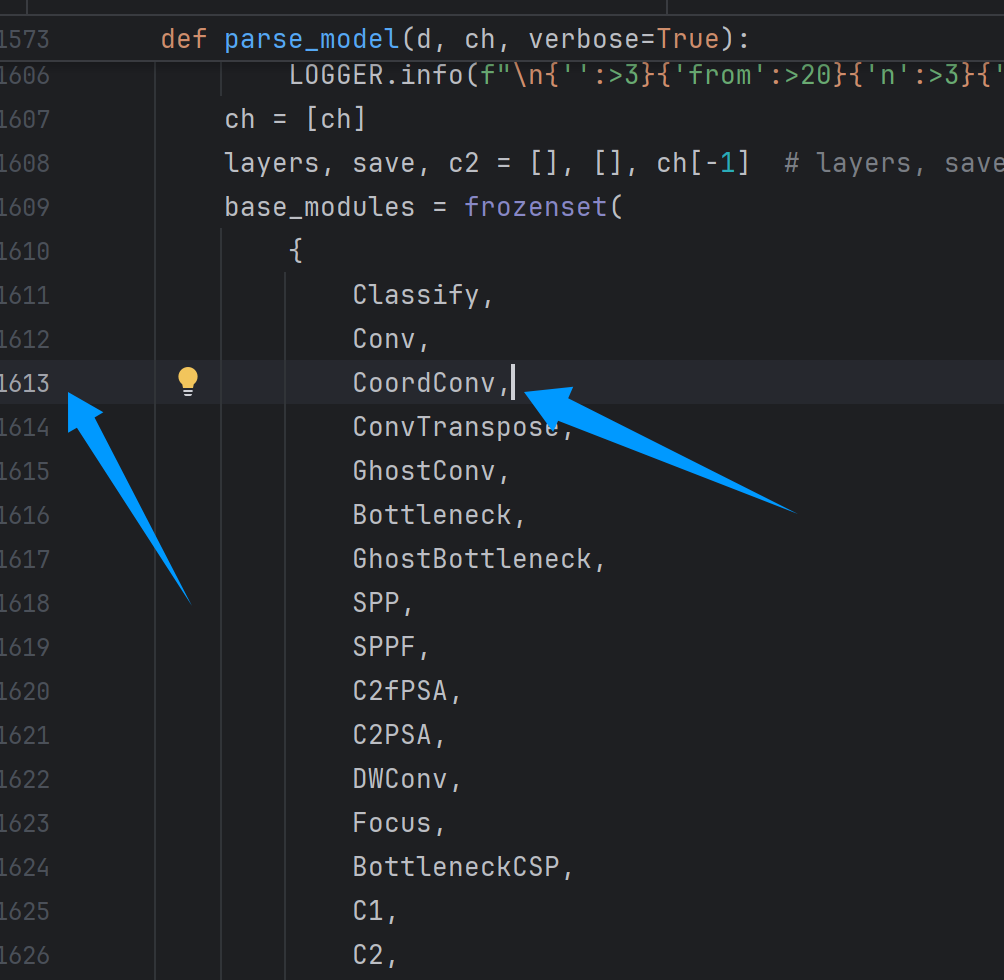
- 将想要用的卷积或者模块代码复制粘贴到
ultralytics/nn/modules/conv.py或者ultralytics/nn/modules/block.py。比如说新加一个CoordConv
###################################################
class AddCoords(nn.Module):
    def __init__(self, with_r=False):
        super().__init__()
        self.with_r = with_r

    def forward(self, input_tensor):
        """
        Args:
            input_tensor: shape(batch, channel, x_dim, y_dim)
        """
        batch_size, _, x_dim, y_dim = input_tensor.size()

        xx_channel = torch.arange(x_dim).repeat(1, y_dim, 1)
        yy_channel = torch.arange(y_dim).repeat(1, x_dim, 1).transpose(1, 2)

        xx_channel = xx_channel.float() / (x_dim - 1)
        yy_channel = yy_channel.float() / (y_dim - 1)

        xx_channel = xx_channel * 2 - 1
        yy_channel = yy_channel * 2 - 1

        xx_channel = xx_channel.repeat(batch_size, 1, 1, 1).transpose(2, 3)
        yy_channel = yy_channel.repeat(batch_size, 1, 1, 1).transpose(2, 3)

        ret = torch.cat([
            input_tensor,
            xx_channel.type_as(input_tensor),
            yy_channel.type_as(input_tensor)], dim=1)

        if self.with_r:
            rr = torch.sqrt(torch.pow(xx_channel.type_as(input_tensor) - 0.5, 2) + torch.pow(yy_channel.type_as(input_tensor) - 0.5, 2))
            ret = torch.cat([ret, rr], dim=1)

        return ret

class CoordConv(nn.Module):
    def __init__(self, in_channels, out_channels, kernel_size=1, stride=1, with_r=False):
        super().__init__()
        self.addcoords = AddCoords(with_r=with_r)
        in_channels += 2
        if with_r:
            in_channels += 1
        self.conv = Conv(in_channels, out_channels, k=kernel_size, s=stride)

    def forward(self, x):
        x = self.addcoords(x)
        x = self.conv(x)
        return x
    ########################################################
- 然后在
ultralytics/nn/tasks.py:将新模块加进去。
 if m in (Classify, Conv, ConvTranspose, GhostConv,RepConv,DeformConv2d,CoordConv, Bottleneck, GhostBottleneck, SPP, SPPF, DWConv, Focus,
                 BottleneckCSP, C1, C2, C2f, C3, C3TR, C3Ghost, nn.ConvTranspose2d, DWConvTranspose2d, C3x, RepC3):
            c1, c2 = ch[f], args[0]
            if c2 != nc:  # if c2 not equal to number of classes (i.e. for Classify() output)
                c2 = make_divisible(min(c2, max_channels) * width, 8)

            args = [c1, c2, *args[1:]]
            if m in (BottleneckCSP, C1, C2, C2f, C3, C3TR, C3Ghost, C3x, RepC3):
                args.insert(2, n)  # number of repeats
                n = 1

新版本在此处增加:
- 在
ultralytics/cfg/models/v8/yolov8.yaml保存着模型的网络结构,我们可以复制该yaml文件,重命名为yolov8n-CoordConv.yaml,可以在这使用CoorConv对卷积块进行替换。


4. 在yolov8.py文件里修改模型的yaml文件
    # 使用yaml配置文件来创建模型,并导入预训练权重.
    model = YOLO('ultralytics/cfg/models/v8/yolov8n-CoordConv.yaml')
    model.train(cfg="ultralytics/cfg/default.yaml",data="ultralytics/datasets/traffic.yaml",
                epochs=200,batch=2,workers=2)
6. 训练结果
tensorboard
找到tensorboard文件所在路径
- 查看训练命令:
tensorboard --logdir=tensorboard文件路径 - tensorboard记录了很多训练曲线,可以直接下载图片,也可以导出数据为csv格式,自己通过python绘图绘制曲线(推荐)

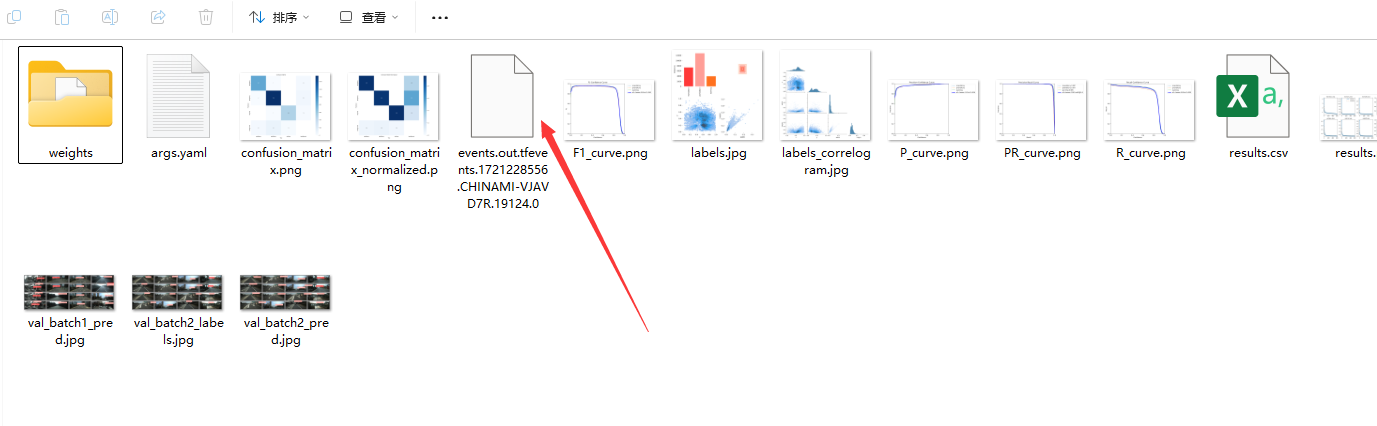
Yolo训练自带结果


预测图片效果


7.热力图可视化
用来显示某一层网络之后的输出特征图。
import warnings

from ultralytics.utils.ops import xywh2xyxy

from ultralytics.utils.torch_utils import intersect_dicts

warnings.filterwarnings('ignore')
warnings.simplefilter('ignore')
import torch, yaml, cv2, os, shutil
import numpy as np

np.random.seed(0)
import matplotlib.pyplot as plt
from tqdm import trange
from PIL import Image
from ultralytics.nn.tasks import DetectionModel as Model

# from ultralytics.yolo.data.augment import LetterBox

from pytorch_grad_cam import GradCAMPlusPlus, GradCAM, XGradCAM
from pytorch_grad_cam.utils.image import show_cam_on_image
from pytorch_grad_cam.activations_and_gradients import ActivationsAndGradients


def letterbox(im, new_shape=(640, 640), color=(114, 114, 114), auto=True, scaleFill=False, scaleup=True, stride=32):
    # Resize and pad image while meeting stride-multiple constraints
    shape = im.shape[:2]  # current shape [height, width]
    if isinstance(new_shape, int):
        new_shape = (new_shape, new_shape)

    # Scale ratio (new / old)
    r = min(new_shape[0] / shape[0], new_shape[1] / shape[1])
    if not scaleup:  # only scale down, do not scale up (for better val mAP)
        r = min(r, 1.0)

    # Compute padding
    ratio = r, r  # width, height ratios
    new_unpad = int(round(shape[1] * r)), int(round(shape[0] * r))
    dw, dh = new_shape[1] - new_unpad[0], new_shape[0] - new_unpad[1]  # wh padding
    if auto:  # minimum rectangle
        dw, dh = np.mod(dw, stride), np.mod(dh, stride)  # wh padding
    elif scaleFill:  # stretch
        dw, dh = 0.0, 0.0
        new_unpad = (new_shape[1], new_shape[0])
        ratio = new_shape[1] / shape[1], new_shape[0] / shape[0]  # width, height ratios

    dw /= 2  # divide padding into 2 sides
    dh /= 2

    if shape[::-1] != new_unpad:  # resize
        im = cv2.resize(im, new_unpad, interpolation=cv2.INTER_LINEAR)
    top, bottom = int(round(dh - 0.1)), int(round(dh + 0.1))
    left, right = int(round(dw - 0.1)), int(round(dw + 0.1))
    im = cv2.copyMakeBorder(im, top, bottom, left, right, cv2.BORDER_CONSTANT, value=color)  # add border
    return im, ratio, (dw, dh)


class yolov8_heatmap:
    def __init__(self, weight, cfg, device, method, layer, backward_type, conf_threshold, ratio):
        device = torch.device(device)
        ckpt = torch.load(weight)
        model_names = ckpt['model'].names
        csd = ckpt['model'].float().state_dict()  # checkpoint state_dict as FP32
        model = Model(cfg, ch=3, nc=len(model_names)).to(device)
        csd = intersect_dicts(csd, model.state_dict(), exclude=['anchor'])  # intersect
        model.load_state_dict(csd, strict=False)  # load
        model.eval()
        print(f'Transferred {len(csd)}/{len(model.state_dict())} items')

        target_layers = [eval(layer)]
        method = eval(method)

        colors = np.random.uniform(0, 255, size=(len(model_names), 3)).astype(int)
        self.__dict__.update(locals())

    def post_process(self, result):
        logits_ = result[:, 4:]
        boxes_ = result[:, :4]
        sorted, indices = torch.sort(logits_.max(1)[0], descending=True)
        return torch.transpose(logits_[0], dim0=0, dim1=1)[indices[0]], torch.transpose(boxes_[0], dim0=0, dim1=1)[
            indices[0]], xywh2xyxy(torch.transpose(boxes_[0], dim0=0, dim1=1)[indices[0]]).cpu().detach().numpy()

    def draw_detections(self, box, color, name, img):
        xmin, ymin, xmax, ymax = list(map(int, list(box)))
        cv2.rectangle(img, (xmin, ymin), (xmax, ymax), tuple(int(x) for x in color), 2)
        cv2.putText(img, str(name), (xmin, ymin - 5), cv2.FONT_HERSHEY_SIMPLEX, 0.8, tuple(int(x) for x in color), 2,
                    lineType=cv2.LINE_AA)
        return img

    def __call__(self, img_path, save_path):
        # remove dir if exist
        if os.path.exists(save_path):
            shutil.rmtree(save_path)
        # make dir if not exist
        os.makedirs(save_path, exist_ok=True)

        # img process
        img = cv2.imread(img_path)
        img = letterbox(img)[0]
        img = cv2.cvtColor(img, cv2.COLOR_BGR2RGB)
        img = np.float32(img) / 255.0
        tensor = torch.from_numpy(np.transpose(img, axes=[2, 0, 1])).unsqueeze(0).to(self.device)

        # init ActivationsAndGradients
        grads = ActivationsAndGradients(self.model, self.target_layers, reshape_transform=None)

        # get ActivationsAndResult
        result = grads(tensor)
        activations = grads.activations[0].cpu().detach().numpy()

        # postprocess to yolo output
        post_result, pre_post_boxes, post_boxes = self.post_process(result[0])
        for i in trange(int(post_result.size(0) * self.ratio)):
            if float(post_result[i].max()) < self.conf_threshold:
                break

            self.model.zero_grad()
            # get max probability for this prediction
            if self.backward_type == 'class' or self.backward_type == 'all':
                score = post_result[i].max()
                score.backward(retain_graph=True)

            if self.backward_type == 'box' or self.backward_type == 'all':
                for j in range(4):
                    score = pre_post_boxes[i, j]
                    score.backward(retain_graph=True)

            # process heatmap
            if self.backward_type == 'class':
                gradients = grads.gradients[0]
            elif self.backward_type == 'box':
                gradients = grads.gradients[0] + grads.gradients[1] + grads.gradients[2] + grads.gradients[3]
            else:
                gradients = grads.gradients[0] + grads.gradients[1] + grads.gradients[2] + grads.gradients[3] + \
                            grads.gradients[4]
            b, k, u, v = gradients.size()
            weights = self.method.get_cam_weights(self.method, None, None, None, activations,
                                                  gradients.detach().numpy())
            weights = weights.reshape((b, k, 1, 1))
            saliency_map = np.sum(weights * activations, axis=1)
            saliency_map = np.squeeze(np.maximum(saliency_map, 0))
            saliency_map = cv2.resize(saliency_map, (tensor.size(3), tensor.size(2)))
            saliency_map_min, saliency_map_max = saliency_map.min(), saliency_map.max()
            if (saliency_map_max - saliency_map_min) == 0:
                continue
            saliency_map = (saliency_map - saliency_map_min) / (saliency_map_max - saliency_map_min)

            # add heatmap and box to image
            cam_image = show_cam_on_image(img.copy(), saliency_map, use_rgb=True)
            cam_image = self.draw_detections(post_boxes[i], self.colors[int(post_result[i, :].argmax())],
                                             f'{self.model_names[int(post_result[i, :].argmax())]} {float(post_result[i].max()):.2f}',
                                             cam_image)
            cam_image = Image.fromarray(cam_image)
            cam_image.save(f'{save_path}/{i}.png')


def get_params():
    params = {
        'weight': 'ultralytics/runs/detect/yolov8n/train/weights/best.pt',
        'cfg': 'ultralytics/cfg/models/v8/yolov8.yaml',
        'device': 'cuda:0',
        'method': 'GradCAM',  # GradCAMPlusPlus, GradCAM, XGradCAM
        'layer': 'model.model[9]',
        'backward_type': 'all',  # class, box, all
        'conf_threshold': 0.6,  # 0.6
        'ratio': 0.02  # 0.02-0.1
    }
    return params


if __name__ == '__main__':
    model = yolov8_heatmap(**get_params())
    model(r'test.jpg', 'result')
参数设置在:
def get_params():
    params = {
        'weight': 'ultralytics/runs/detect/yolov8n/train/weights/best.pt',
        'cfg': 'ultralytics/cfg/models/v8/yolov8.yaml',
        'device': 'cuda:0',
        'method': 'GradCAM',  # GradCAMPlusPlus, GradCAM, XGradCAM
        'layer': 'model.model[9]',
        'backward_type': 'all',  # class, box, all
        'conf_threshold': 0.6,  # 0.6
        'ratio': 0.02  # 0.02-0.1
    }
    return params
需要修改对应的权重文件
热力图结果:


 6万+
6万+


 到【灌水乐园】发言


