


文章的目的为了记录使用Objective-C 进行IOS app 开发学习的经历。本职为嵌入式软件开发,公司安排开发app,临时学习,完成app的开发。开发流程和要点有些记忆模糊,赶紧记录,防止忘记。
相关链接:
开源 Objective-C IOS 应用开发(一)macOS 的使用
开源 Objective-C IOS 应用开发(二)Xcode安装
开源 Objective-C IOS 应用开发(三)第一个iPhone的APP
开源 Objective-C IOS 应用开发(四)Xcode工程文件结构
开源 Objective-C IOS 应用开发(五)iOS操作(action)和输出口(Outlet)
开源 Objective-C IOS 应用开发(六)Objective-C 和 C语言
开源 Objective-C IOS 应用开发(七)Objective-C核心代码示例
开源 Objective-C IOS 应用开发(八)常见控件UI
开源 Objective-C IOS 应用开发(九)复杂控件-tableview
开源 Objective-C IOS 应用开发(十)数据持久化--文件
开源 Objective-C IOS 应用开发(十一)数据持久化--sqlite
开源 Objective-C IOS 应用开发(十二)通讯--ble
开源 Objective-C IOS 应用开发(十三)通讯--Http访问
开源 Objective-C IOS 应用开发(十四)传感器--陀螺仪和gps
开源 Objective-C IOS 应用开发(十五)通讯--蓝牙ble扫描
开源 Objective-C IOS 应用开发(十六)Storyboard模式下的纯代码界面
开源 Objective-C IOS 应用开发(十七)CAF音频的录制
开源 Objective-C IOS 应用开发(十八)音频的播放
开源 Objective-C IOS 应用开发(十九)视频的播放
开源 Objective-C IOS 应用开发(二十)多线程处理
开源 Objective-C IOS 应用开发(二十一)自定义控件--示波器
开源 Objective-C IOS 应用开发(二十二)自定义控件--车速仪表盘
推荐链接:
开源 Arkts 鸿蒙应用 开发(一)工程文件分析-优快云博客
开源 Arkts 鸿蒙应用 开发(二)封装库.har制作和应用-优快云博客
开源 Arkts 鸿蒙应用 开发(三)Arkts的介绍-优快云博客
开源 Arkts 鸿蒙应用 开发(四)布局和常用控件-优快云博客
开源 Arkts 鸿蒙应用 开发(五)控件组成和复杂控件-优快云博客
开源 Arkts 鸿蒙应用 开发(六)数据持久--文件和首选项存储-优快云博客
开源 Arkts 鸿蒙应用 开发(七)数据持久--sqlite关系数据库-优快云博客
开源 Arkts 鸿蒙应用 开发(八)多媒体--相册和相机-优快云博客
开源 Arkts 鸿蒙应用 开发(九)通讯--tcp客户端-优快云博客
开源 Arkts 鸿蒙应用 开发(十)通讯--Http-优快云博客
开源 Arkts 鸿蒙应用 开发(十一)证书和包名修改-优快云博客
开源 Arkts 鸿蒙应用 开发(十二)传感器的使用-优快云博客
开源 Arkts 鸿蒙应用 开发(十三)音频--MP3播放_arkts avplayer播放音频 mp3-优快云博客
开源 Arkts 鸿蒙应用 开发(十四)线程--任务池(taskpool)-优快云博客
开源 Arkts 鸿蒙应用 开发(十五)自定义绘图控件--仪表盘-优快云博客
开源 Arkts 鸿蒙应用 开发(十六)自定义绘图控件--波形图-优快云博客
开源 Arkts 鸿蒙应用 开发(十七)通讯--http多文件下载-优快云博客
开源 Arkts 鸿蒙应用 开发(十八)通讯--Ble低功耗蓝牙服务器-优快云博客
推荐链接:
开源 java android app 开发(一)开发环境的搭建-优快云博客
开源 java android app 开发(二)工程文件结构-优快云博客
开源 java android app 开发(三)GUI界面布局和常用组件-优快云博客
开源 java android app 开发(四)GUI界面重要组件-优快云博客
开源 java android app 开发(五)文件和数据库存储-优快云博客
开源 java android app 开发(六)多媒体使用-优快云博客
开源 java android app 开发(七)通讯之Tcp和Http-优快云博客
开源 java android app 开发(八)通讯之Mqtt和Ble-优快云博客
开源 java android app 开发(九)后台之线程和服务-优快云博客
开源 java android app 开发(十)广播机制-优快云博客
开源 java android app 开发(十一)调试、发布-优快云博客
开源 java android app 开发(十二)封库.aar-优快云博客
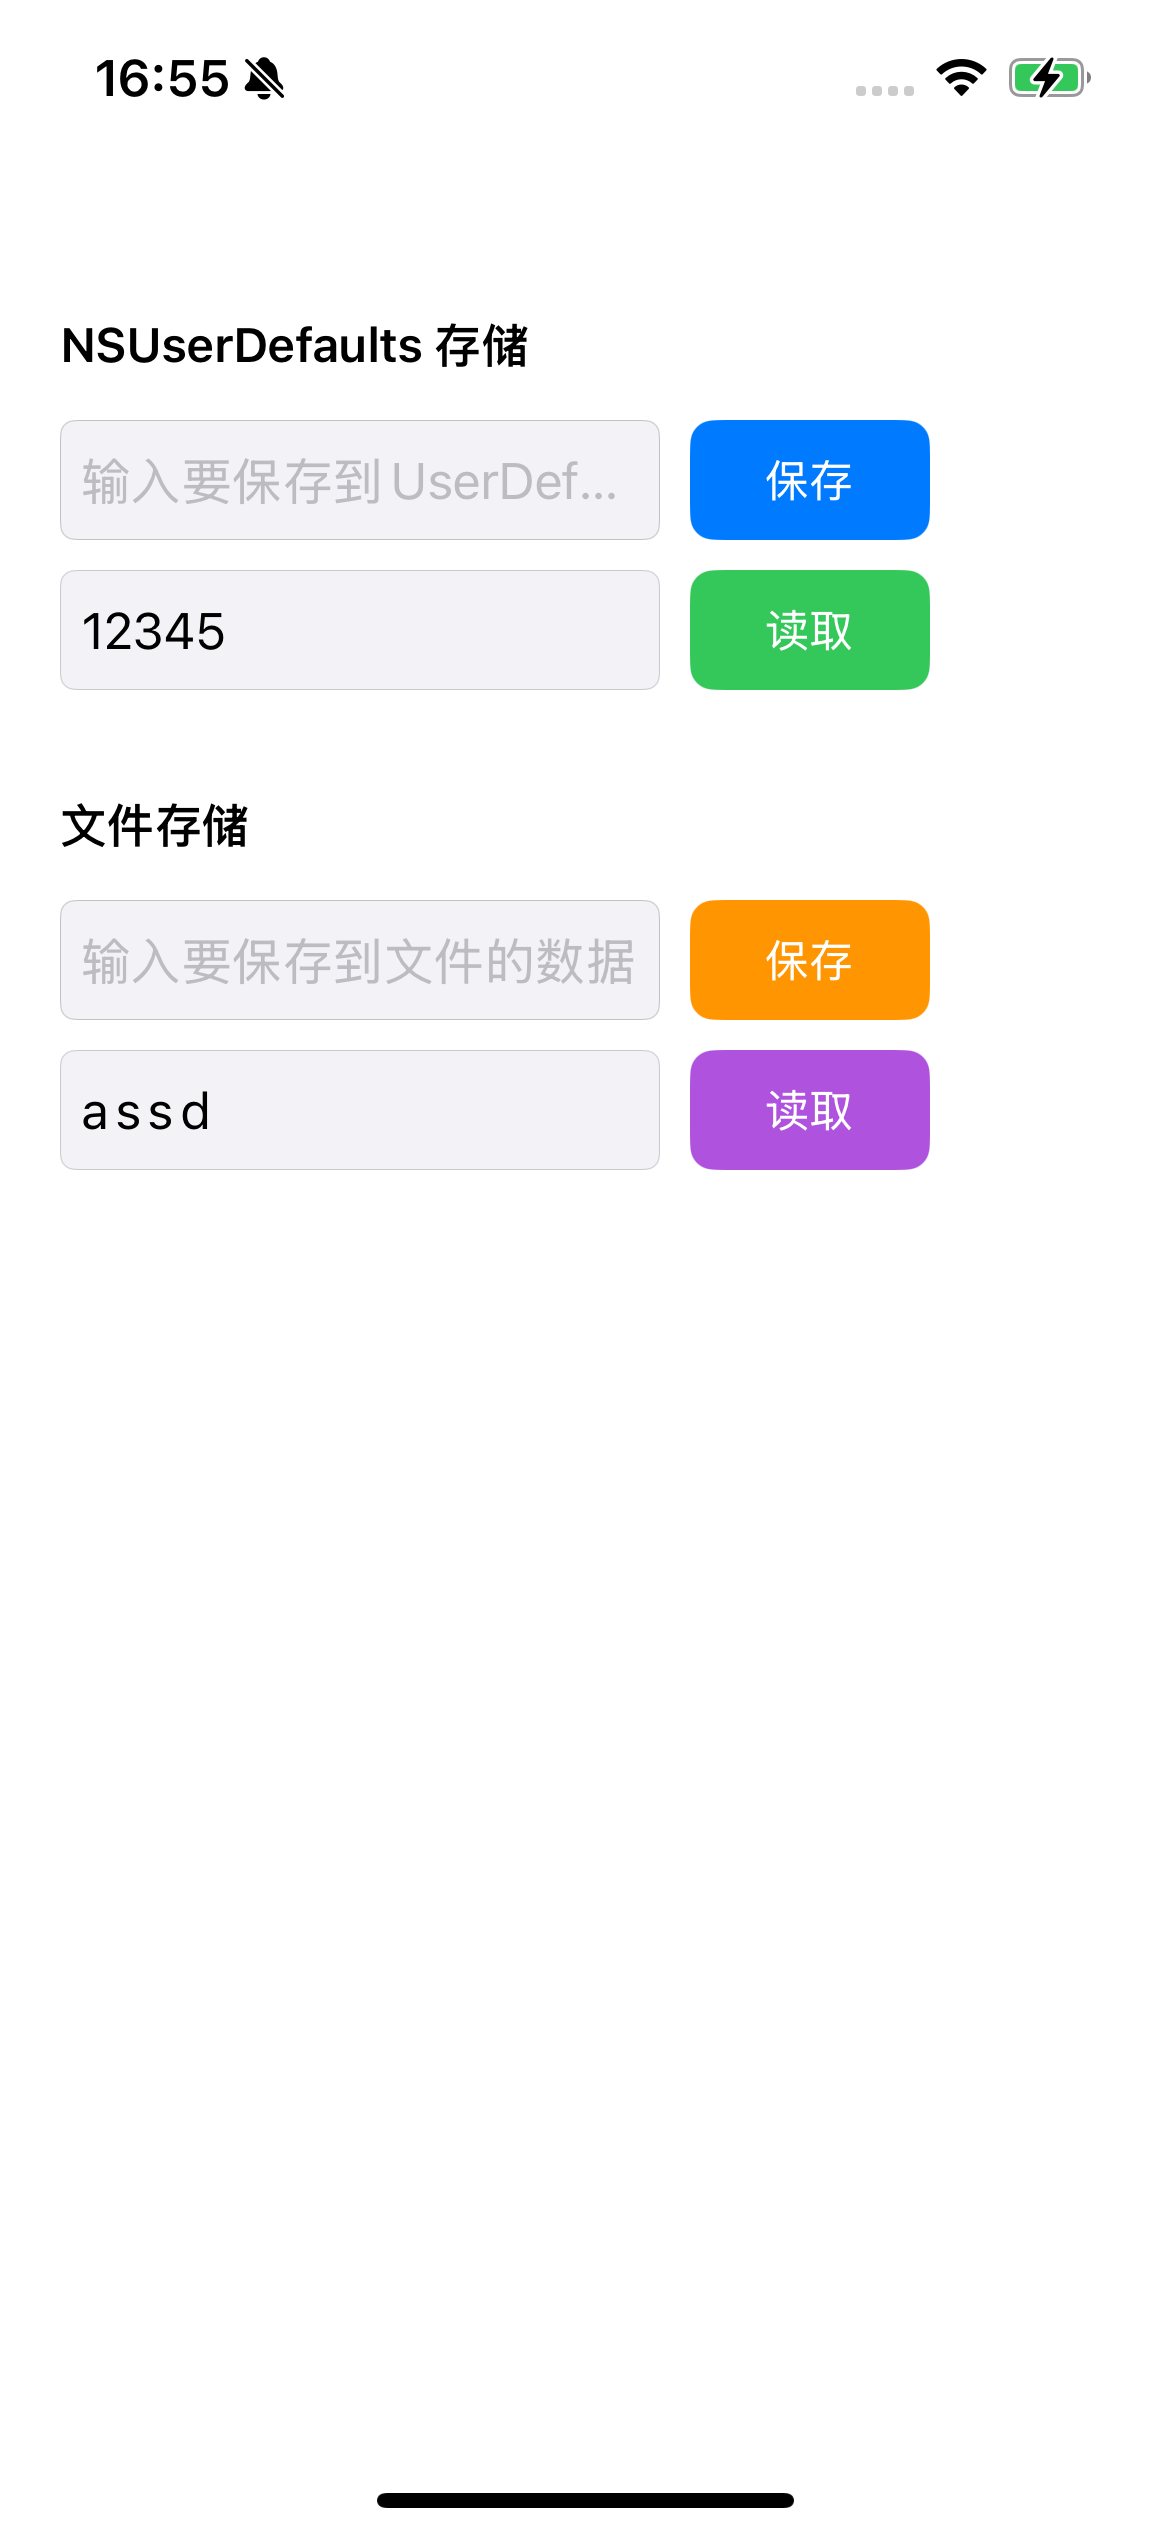
本章内容主要是演示了两种数据存储方式:NSUserDefaults 和文件存储。
目录:
1.手机演示
2.所有源码
3.源码分析
一、手机演示
二、所有源码
AppDelegate.h
//
//  AppDelegate.h
//  file
//
//  Created by Mixic2025 on 2025/11/12.
//

#import <UIKit/UIKit.h>

@interface AppDelegate : UIResponder <UIApplicationDelegate>
@end
AppDelegate.m
//
//  AppDelegate.m
//  file
//
//
//

#import "AppDelegate.h"
#import "ViewController.h"

@interface AppDelegate ()

@end

@implementation AppDelegate


- (BOOL)application:(UIApplication *)application didFinishLaunchingWithOptions:(NSDictionary *)launchOptions {
    // Override point for customization after application launch.


    // 直接创建并显示窗口,不使用属性
    UIWindow *window = [[UIWindow alloc] initWithFrame:[UIScreen mainScreen].bounds];

    ViewController *mainVC = [[ViewController alloc] init];
    UINavigationController *navController = [[UINavigationController alloc] initWithRootViewController:mainVC];

    window.rootViewController = navController;
    [window makeKeyAndVisible];


    return YES;
}


#pragma mark - UISceneSession lifecycle


- (UISceneConfiguration *)application:(UIApplication *)application configurationForConnectingSceneSession:(UISceneSession *)connectingSceneSession options:(UISceneConnectionOptions *)options {
    // Called when a new scene session is being created.
    // Use this method to select a configuration to create the new scene with.
    return [[UISceneConfiguration alloc] initWithName:@"Default Configuration" sessionRole:connectingSceneSession.role];
}


- (void)application:(UIApplication *)application didDiscardSceneSessions:(NSSet<UISceneSession *> *)sceneSessions {
    // Called when the user discards a scene session.
    // If any sessions were discarded while the application was not running, this will be called shortly after application:didFinishLaunchingWithOptions.
    // Use this method to release any resources that were specific to the discarded scenes, as they will not return.
}


@end
SceneDelegate.h
//
//  SceneDelegate.h
//  file
//
//
//

#import <UIKit/UIKit.h>

@interface SceneDelegate : UIResponder <UIWindowSceneDelegate>

@property (strong, nonatomic) UIWindow * window;

@end
SceneDelegate.m
//
//  SceneDelegate.m
//  file
//
//
//

#import "SceneDelegate.h"

@interface SceneDelegate ()

@end

@implementation SceneDelegate


- (void)scene:(UIScene *)scene willConnectToSession:(UISceneSession *)session options:(UISceneConnectionOptions *)connectionOptions {
    // Use this method to optionally configure and attach the UIWindow `window` to the provided UIWindowScene `scene`.
    // If using a storyboard, the `window` property will automatically be initialized and attached to the scene.
    // This delegate does not imply the connecting scene or session are new (see `application:configurationForConnectingSceneSession` instead).
}


- (void)sceneDidDisconnect:(UIScene *)scene {
    // Called as the scene is being released by the system.
    // This occurs shortly after the scene enters the background, or when its session is discarded.
    // Release any resources associated with this scene that can be re-created the next time the scene connects.
    // The scene may re-connect later, as its session was not necessarily discarded (see `application:didDiscardSceneSessions` instead).
}


- (void)sceneDidBecomeActive:(UIScene *)scene {
    // Called when the scene has moved from an inactive state to an active state.
    // Use this method to restart any tasks that were paused (or not yet started) when the scene was inactive.
}


- (void)sceneWillResignActive:(UIScene *)scene {
    // Called when the scene will move from an active state to an inactive state.
    // This may occur due to temporary interruptions (ex. an incoming phone call).
}


- (void)sceneWillEnterForeground:(UIScene *)scene {
    // Called as the scene transitions from the background to the foreground.
    // Use this method to undo the changes made on entering the background.
}


- (void)sceneDidEnterBackground:(UIScene *)scene {
    // Called as the scene transitions from the foreground to the background.
    // Use this method to save data, release shared resources, and store enough scene-specific state information
    // to restore the scene back to its current state.
}


@end
ViewController.h
//
//  ViewController.h
//  file
//
//
//

#import <UIKit/UIKit.h>

@interface ViewController : UIViewController

// NSUserDefaults 相关的 UI 组件
@property (nonatomic, strong) UITextField *userDefaultsWriteField;
@property (nonatomic, strong) UITextField *userDefaultsReadField;
@property (nonatomic, strong) UIButton *userDefaultsSaveButton;
@property (nonatomic, strong) UIButton *userDefaultsLoadButton;

// 文件存储相关的 UI 组件
@property (nonatomic, strong) UITextField *fileWriteField;
@property (nonatomic, strong) UITextField *fileReadField;
@property (nonatomic, strong) UIButton *fileSaveButton;
@property (nonatomic, strong) UIButton *fileLoadButton;

// 操作方法
- (void)saveToUserDefaults;
- (void)loadFromUserDefaults;
- (void)saveToFile;
- (void)loadFromFile;

@end
ViewController.m
//
//  ViewController.m
//  file
//
//
//

/*


#import "ViewController.h"

@interface ViewController ()

@end

@implementation ViewController

- (void)viewDidLoad {
    [super viewDidLoad];
    // Do any additional setup after loading the view.
}


@end

*/

#import "ViewController.h"

@interface ViewController ()

@end

@implementation ViewController

- (void)viewDidLoad {
    [super viewDidLoad];

    self.view.backgroundColor = [UIColor whiteColor];
    self.title = @"数据存储演示";

    [self setupUI];
}

#pragma mark - UI 设置
- (void)setupUI {
    // NSUserDefaults 部分标题
    UILabel *userDefaultsLabel = [[UILabel alloc] initWithFrame:CGRectMake(20, 100, 200, 30)];
    userDefaultsLabel.text = @"NSUserDefaults 存储";
    userDefaultsLabel.font = [UIFont boldSystemFontOfSize:16];
    userDefaultsLabel.textColor = [UIColor darkTextColor];
    [self.view addSubview:userDefaultsLabel];

    // NSUserDefaults 写入文本框
    self.userDefaultsWriteField = [[UITextField alloc] initWithFrame:CGRectMake(20, 140, 200, 40)];
    self.userDefaultsWriteField.placeholder = @"输入要保存到UserDefaults的数据";
    self.userDefaultsWriteField.borderStyle = UITextBorderStyleRoundedRect;
    self.userDefaultsWriteField.backgroundColor = [UIColor systemGray6Color];
    [self.view addSubview:self.userDefaultsWriteField];

    // NSUserDefaults 保存按钮
    self.userDefaultsSaveButton = [UIButton buttonWithType:UIButtonTypeSystem];
    self.userDefaultsSaveButton.frame = CGRectMake(230, 140, 80, 40);
    [self.userDefaultsSaveButton setTitle:@"保存" forState:UIControlStateNormal];
    [self.userDefaultsSaveButton addTarget:self action:@selector(saveToUserDefaults) forControlEvents:UIControlEventTouchUpInside];
    self.userDefaultsSaveButton.backgroundColor = [UIColor systemBlueColor];
    self.userDefaultsSaveButton.tintColor = [UIColor whiteColor];
    self.userDefaultsSaveButton.layer.cornerRadius = 8;
    [self.view addSubview:self.userDefaultsSaveButton];

    // NSUserDefaults 读取文本框
    self.userDefaultsReadField = [[UITextField alloc] initWithFrame:CGRectMake(20, 190, 200, 40)];
    self.userDefaultsReadField.placeholder = @"显示从UserDefaults读取的数据";
    self.userDefaultsReadField.borderStyle = UITextBorderStyleRoundedRect;
    self.userDefaultsReadField.backgroundColor = [UIColor systemGray6Color];
    self.userDefaultsReadField.enabled = NO; // 只读
    [self.view addSubview:self.userDefaultsReadField];

    // NSUserDefaults 读取按钮
    self.userDefaultsLoadButton = [UIButton buttonWithType:UIButtonTypeSystem];
    self.userDefaultsLoadButton.frame = CGRectMake(230, 190, 80, 40);
    [self.userDefaultsLoadButton setTitle:@"读取" forState:UIControlStateNormal];
    [self.userDefaultsLoadButton addTarget:self action:@selector(loadFromUserDefaults) forControlEvents:UIControlEventTouchUpInside];
    self.userDefaultsLoadButton.backgroundColor = [UIColor systemGreenColor];
    self.userDefaultsLoadButton.tintColor = [UIColor whiteColor];
    self.userDefaultsLoadButton.layer.cornerRadius = 8;
    [self.view addSubview:self.userDefaultsLoadButton];

    // 文件存储部分标题
    UILabel *fileLabel = [[UILabel alloc] initWithFrame:CGRectMake(20, 260, 200, 30)];
    fileLabel.text = @"文件存储";
    fileLabel.font = [UIFont boldSystemFontOfSize:16];
    fileLabel.textColor = [UIColor darkTextColor];
    [self.view addSubview:fileLabel];

    // 文件写入文本框
    self.fileWriteField = [[UITextField alloc] initWithFrame:CGRectMake(20, 300, 200, 40)];
    self.fileWriteField.placeholder = @"输入要保存到文件的数据";
    self.fileWriteField.borderStyle = UITextBorderStyleRoundedRect;
    self.fileWriteField.backgroundColor = [UIColor systemGray6Color];
    [self.view addSubview:self.fileWriteField];

    // 文件保存按钮
    self.fileSaveButton = [UIButton buttonWithType:UIButtonTypeSystem];
    self.fileSaveButton.frame = CGRectMake(230, 300, 80, 40);
    [self.fileSaveButton setTitle:@"保存" forState:UIControlStateNormal];
    [self.fileSaveButton addTarget:self action:@selector(saveToFile) forControlEvents:UIControlEventTouchUpInside];
    self.fileSaveButton.backgroundColor = [UIColor systemOrangeColor];
    self.fileSaveButton.tintColor = [UIColor whiteColor];
    self.fileSaveButton.layer.cornerRadius = 8;
    [self.view addSubview:self.fileSaveButton];

    // 文件读取文本框
    self.fileReadField = [[UITextField alloc] initWithFrame:CGRectMake(20, 350, 200, 40)];
    self.fileReadField.placeholder = @"显示从文件读取的数据";
    self.fileReadField.borderStyle = UITextBorderStyleRoundedRect;
    self.fileReadField.backgroundColor = [UIColor systemGray6Color];
    self.fileReadField.enabled = NO; // 只读
    [self.view addSubview:self.fileReadField];

    // 文件读取按钮
    self.fileLoadButton = [UIButton buttonWithType:UIButtonTypeSystem];
    self.fileLoadButton.frame = CGRectMake(230, 350, 80, 40);
    [self.fileLoadButton setTitle:@"读取" forState:UIControlStateNormal];
    [self.fileLoadButton addTarget:self action:@selector(loadFromFile) forControlEvents:UIControlEventTouchUpInside];
    self.fileLoadButton.backgroundColor = [UIColor systemPurpleColor];
    self.fileLoadButton.tintColor = [UIColor whiteColor];
    self.fileLoadButton.layer.cornerRadius = 8;
    [self.view addSubview:self.fileLoadButton];

    // 添加手势隐藏键盘
    UITapGestureRecognizer *tapGesture = [[UITapGestureRecognizer alloc] initWithTarget:self action:@selector(hideKeyboard)];
    [self.view addGestureRecognizer:tapGesture];
}

#pragma mark - NSUserDefaults 操作
- (void)saveToUserDefaults {
    NSString *textToSave = self.userDefaultsWriteField.text;

    if (textToSave.length == 0) {
        [self showAlertWithTitle:@"提示" message:@"请输入要保存的数据"];
        return;
    }

    // 使用 NSUserDefaults 保存数据
    NSUserDefaults *defaults = [NSUserDefaults standardUserDefaults];
    [defaults setObject:textToSave forKey:@"savedText"];
    [defaults synchronize]; // 立即保存

    NSLog(@"数据已保存到 NSUserDefaults: %@", textToSave);
    [self showAlertWithTitle:@"成功" message:@"数据已保存到 NSUserDefaults"];

    // 清空输入框
    self.userDefaultsWriteField.text = @"";
    [self hideKeyboard];
}

- (void)loadFromUserDefaults {
    // 从 NSUserDefaults 读取数据
    NSUserDefaults *defaults = [NSUserDefaults standardUserDefaults];
    NSString *savedText = [defaults objectForKey:@"savedText"];

    if (savedText) {
        self.userDefaultsReadField.text = savedText;
        NSLog(@"从 NSUserDefaults 读取数据: %@", savedText);
    } else {
        self.userDefaultsReadField.text = @"暂无数据";
        [self showAlertWithTitle:@"提示" message:@"没有找到保存的数据"];
    }
}

#pragma mark - 文件操作
- (void)saveToFile {
    NSString *textToSave = self.fileWriteField.text;

    if (textToSave.length == 0) {
        [self showAlertWithTitle:@"提示" message:@"请输入要保存的数据"];
        return;
    }

    // 获取 Documents 目录路径
    NSString *documentsPath = [NSSearchPathForDirectoriesInDomains(NSDocumentDirectory, NSUserDomainMask, YES) firstObject];
    NSString *filePath = [documentsPath stringByAppendingPathComponent:@"savedData.txt"];

    NSError *error = nil;
    BOOL success = [textToSave writeToFile:filePath atomically:YES encoding:NSUTF8StringEncoding error:&error];

    if (success) {
        NSLog(@"数据已保存到文件: %@", filePath);
        [self showAlertWithTitle:@"成功" message:@"数据已保存到文件"];

        // 清空输入框
        self.fileWriteField.text = @"";
        [self hideKeyboard];
    } else {
        NSLog(@"保存文件失败: %@", error);
        [self showAlertWithTitle:@"错误" message:@"保存文件失败"];
    }
}

- (void)loadFromFile {
    // 获取 Documents 目录路径
    NSString *documentsPath = [NSSearchPathForDirectoriesInDomains(NSDocumentDirectory, NSUserDomainMask, YES) firstObject];
    NSString *filePath = [documentsPath stringByAppendingPathComponent:@"savedData.txt"];

    NSError *error = nil;
    NSString *savedText = [NSString stringWithContentsOfFile:filePath encoding:NSUTF8StringEncoding error:&error];

    if (savedText) {
        self.fileReadField.text = savedText;
        NSLog(@"从文件读取数据: %@", savedText);
    } else {
        self.fileReadField.text = @"暂无数据";
        [self showAlertWithTitle:@"提示" message:@"没有找到保存的文件或文件为空"];
    }
}

#pragma mark - 辅助方法
- (void)showAlertWithTitle:(NSString *)title message:(NSString *)message {
    UIAlertController *alert = [UIAlertController alertControllerWithTitle:title
                                                                   message:message
                                                            preferredStyle:UIAlertControllerStyleAlert];

    UIAlertAction *okAction = [UIAlertAction actionWithTitle:@"确定" style:UIAlertActionStyleDefault handler:nil];
    [alert addAction:okAction];

    [self presentViewController:alert animated:YES completion:nil];
}

- (void)hideKeyboard {
    [self.view endEditing:YES];
}

@end
三、源码分析
1. AppDelegate.m - 应用入口
objc
- (BOOL)application:(UIApplication *)application didFinishLaunchingWithOptions:(NSDictionary *)launchOptions {
// 手动创建窗口(不使用Storyboard)
UIWindow *window = [[UIWindow alloc] initWithFrame:[UIScreen mainScreen].bounds];
ViewController *mainVC = [[ViewController alloc] init];
UINavigationController *navController = [[UINavigationController alloc] initWithRootViewController:mainVC];
window.rootViewController = navController;
[window makeKeyAndVisible];
return YES;
}
关键点:
-
纯代码创建 UI,不使用 Storyboard
-
创建了
UINavigationController作为根控制器 -
makeKeyAndVisible使窗口可见并成为关键窗口
2. SceneDelegate.m - 场景管理(iOS 13+)
这个文件包含了场景生命周期的回调方法,但在这个应用中实际没有使用,因为窗口是在 AppDelegate 中手动创建的。
3. ViewController.h - 界面定义
定义了两种存储方式对应的 UI 组件:
-
NSUserDefaults 组件:写入字段、读取字段、保存按钮、加载按钮
-
文件存储组件:类似的四个组件
-
操作方法:四种对应的操作方怯
4. ViewController.m - 主要实现
UI 设置 (setupUI 方法)
创建了两组对称的 UI 组件:
-
标签:说明各部分功能
-
文本框:用于输入和显示数据
-
按钮:触发保存和读取操作
布局特点:
-
使用绝对坐标布局(CGRectMake)
-
为按钮设置了不同的背景色和圆角
-
添加了手势识别器用于隐藏键盘
NSUserDefaults 操作
保存数据 (saveToUserDefaults):
objc
NSUserDefaults *defaults = [NSUserDefaults standardUserDefaults];
[defaults setObject:textToSave forKey:@"savedText"];
[defaults synchronize]; // 立即保存
读取数据 (loadFromUserDefaults):
objc
NSUserDefaults *defaults = [NSUserDefaults standardUserDefaults];
NSString *savedText = [defaults objectForKey:@"savedText"];
NSUserDefaults 特点:
-
适合存储小量数据(偏好设置、配置信息)
-
数据存储在 plist 文件中
-
读写速度快
-
应用删除时数据也会被清除
文件存储操作
保存数据 (saveToFile):
objc
NSString *documentsPath = [NSSearchPathForDirectoriesInDomains(NSDocumentDirectory, NSUserDomainMask, YES) firstObject];
NSString *filePath = [documentsPath stringByAppendingPathComponent:@"savedData.txt"];
[textToSave writeToFile:filePath atomically:YES encoding:NSUTF8StringEncoding error:&error];
读取数据 (loadFromFile):
objc
NSString *savedText = [NSString stringWithContentsOfFile:filePath encoding:NSUTF8StringEncoding error:&error];
文件存储特点:
-
适合存储大量数据或复杂数据结构
-
数据存储在应用的 Documents 目录
-
应用删除时数据会被清除
-
可以存储各种格式的数据


 1954
1954

 被折叠的 条评论
为什么被折叠?
被折叠的 条评论
为什么被折叠?
 到【灌水乐园】发言


