


文章的目的为了记录使用Objective-C 进行IOS app 开发学习的经历。本职为嵌入式软件开发,公司安排开发app,临时学习,完成app的开发。开发流程和要点有些记忆模糊,赶紧记录,防止忘记。
相关链接:
开源 Objective-C IOS 应用开发(一)macOS 的使用
开源 Objective-C IOS 应用开发(二)Xcode安装
开源 Objective-C IOS 应用开发(三)第一个iPhone的APP
开源 Objective-C IOS 应用开发(四)Xcode工程文件结构
开源 Objective-C IOS 应用开发(五)iOS操作(action)和输出口(Outlet)
开源 Objective-C IOS 应用开发(六)Objective-C 和 C语言
开源 Objective-C IOS 应用开发(七)Objective-C核心代码示例
开源 Objective-C IOS 应用开发(八)常见控件UI
开源 Objective-C IOS 应用开发(九)复杂控件-tableview
开源 Objective-C IOS 应用开发(十)数据持久化--文件
开源 Objective-C IOS 应用开发(十一)数据持久化--sqlite
开源 Objective-C IOS 应用开发(十二)通讯--ble
开源 Objective-C IOS 应用开发(十三)通讯--Http访问
开源 Objective-C IOS 应用开发(十四)传感器--陀螺仪和gps
开源 Objective-C IOS 应用开发(十五)通讯--蓝牙ble扫描
开源 Objective-C IOS 应用开发(十六)Storyboard模式下的纯代码界面
开源 Objective-C IOS 应用开发(十七)CAF音频的录制
开源 Objective-C IOS 应用开发(十八)音频的播放
开源 Objective-C IOS 应用开发(十九)视频的播放
开源 Objective-C IOS 应用开发(二十)多线程处理
开源 Objective-C IOS 应用开发(二十一)自定义控件--示波器
开源 Objective-C IOS 应用开发(二十二)自定义控件--车速仪表盘
推荐链接:
开源 Arkts 鸿蒙应用 开发(一)工程文件分析-优快云博客
开源 Arkts 鸿蒙应用 开发(二)封装库.har制作和应用-优快云博客
开源 Arkts 鸿蒙应用 开发(三)Arkts的介绍-优快云博客
开源 Arkts 鸿蒙应用 开发(四)布局和常用控件-优快云博客
开源 Arkts 鸿蒙应用 开发(五)控件组成和复杂控件-优快云博客
开源 Arkts 鸿蒙应用 开发(六)数据持久--文件和首选项存储-优快云博客
开源 Arkts 鸿蒙应用 开发(七)数据持久--sqlite关系数据库-优快云博客
开源 Arkts 鸿蒙应用 开发(八)多媒体--相册和相机-优快云博客
开源 Arkts 鸿蒙应用 开发(九)通讯--tcp客户端-优快云博客
开源 Arkts 鸿蒙应用 开发(十)通讯--Http-优快云博客
开源 Arkts 鸿蒙应用 开发(十一)证书和包名修改-优快云博客
开源 Arkts 鸿蒙应用 开发(十二)传感器的使用-优快云博客
开源 Arkts 鸿蒙应用 开发(十三)音频--MP3播放_arkts avplayer播放音频 mp3-优快云博客
开源 Arkts 鸿蒙应用 开发(十四)线程--任务池(taskpool)-优快云博客
开源 Arkts 鸿蒙应用 开发(十五)自定义绘图控件--仪表盘-优快云博客
开源 Arkts 鸿蒙应用 开发(十六)自定义绘图控件--波形图-优快云博客
开源 Arkts 鸿蒙应用 开发(十七)通讯--http多文件下载-优快云博客
开源 Arkts 鸿蒙应用 开发(十八)通讯--Ble低功耗蓝牙服务器-优快云博客
推荐链接:
开源 java android app 开发(一)开发环境的搭建-优快云博客
开源 java android app 开发(二)工程文件结构-优快云博客
开源 java android app 开发(三)GUI界面布局和常用组件-优快云博客
开源 java android app 开发(四)GUI界面重要组件-优快云博客
开源 java android app 开发(五)文件和数据库存储-优快云博客
开源 java android app 开发(六)多媒体使用-优快云博客
开源 java android app 开发(七)通讯之Tcp和Http-优快云博客
开源 java android app 开发(八)通讯之Mqtt和Ble-优快云博客
开源 java android app 开发(九)后台之线程和服务-优快云博客
开源 java android app 开发(十)广播机制-优快云博客
开源 java android app 开发(十一)调试、发布-优快云博客
开源 java android app 开发(十二)封库.aar-优快云博客
本章内容主要是iphone中的多线程处理,创建停止,通讯等。
目录:
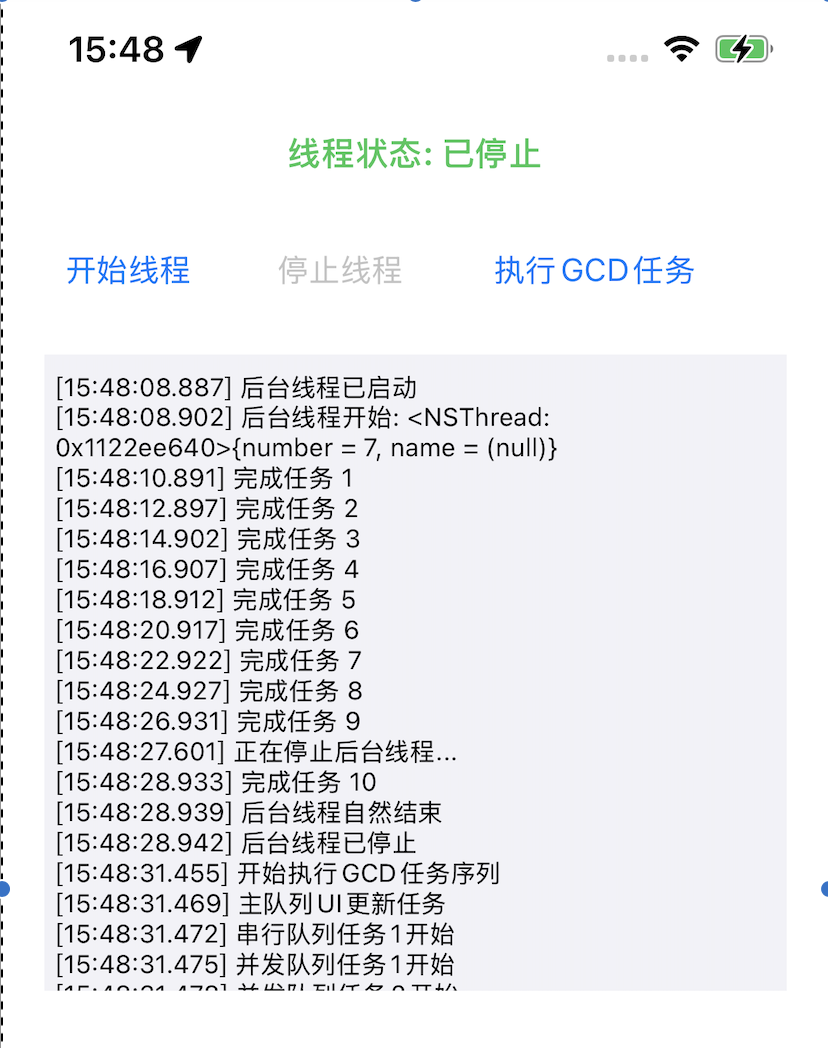
1.手机演示
2.所有源码
3.源码分析
一、手机演示
二、所有源码
#import <UIKit/UIKit.h>

@class CustomViewController;

@interface AppDelegate : UIResponder <UIApplicationDelegate>

@property (strong, nonatomic) UIWindow *window;
@property (strong, nonatomic) CustomViewController *viewController;

@end
#import "AppDelegate.h"
#import "CustomViewController.h"

@implementation AppDelegate

- (BOOL)application:(UIApplication *)application didFinishLaunchingWithOptions:(NSDictionary *)launchOptions {
    // 创建主窗口
    self.window = [[UIWindow alloc] initWithFrame:[[UIScreen mainScreen] bounds]];

    // 创建自定义视图控制器
    self.viewController = [[CustomViewController alloc] init];

    // 设置根视图控制器
    self.window.rootViewController = self.viewController;

    // 设置窗口背景色并显示
    self.window.backgroundColor = [UIColor whiteColor];
    [self.window makeKeyAndVisible];

    return YES;
}

@end
#import <UIKit/UIKit.h>

@interface CustomViewController : UIViewController

// 线程控制相关属性
@property (nonatomic, strong) NSThread *backgroundThread;
@property (nonatomic, assign) BOOL shouldKeepRunning;
@property (nonatomic, strong) dispatch_queue_t serialQueue;
@property (nonatomic, strong) dispatch_queue_t concurrentQueue;

// UI 组件
@property (nonatomic, strong) UILabel *statusLabel;
@property (nonatomic, strong) UIButton *startButton;
@property (nonatomic, strong) UIButton *stopButton;
@property (nonatomic, strong) UIButton *dispatchButton;
@property (nonatomic, strong) UITextView *logTextView;
@property (nonatomic, strong) UIActivityIndicatorView *activityIndicator;

// 线程控制方法
- (void)startBackgroundThread;
- (void)stopBackgroundThread;
- (void)performTaskOnMainThread;
- (void)performTaskOnGlobalQueue;
- (void)performTaskOnSerialQueue;
- (void)updateUIWithText:(NSString *)text;

@end
#import "CustomViewController.h"

@interface CustomViewController ()

@property (nonatomic, strong) NSMutableString *logContent;

@end

@implementation CustomViewController

- (void)viewDidLoad {
    [super viewDidLoad];

    [self setupUI];
    [self setupQueues];
    self.logContent = [NSMutableString string];
}

- (void)setupUI {
    self.view.backgroundColor = [UIColor systemBackgroundColor];

    // 状态标签
    self.statusLabel = [[UILabel alloc] initWithFrame:CGRectMake(20, 60, self.view.bounds.size.width - 40, 30)];
    self.statusLabel.text = @"线程状态: 就绪";
    self.statusLabel.textAlignment = NSTextAlignmentCenter;
    self.statusLabel.font = [UIFont boldSystemFontOfSize:16];
    [self.view addSubview:self.statusLabel];

    // 开始按钮
    self.startButton = [UIButton buttonWithType:UIButtonTypeSystem];
    self.startButton.frame = CGRectMake(20, 110, 80, 40);
    [self.startButton setTitle:@"开始线程" forState:UIControlStateNormal];
    [self.startButton addTarget:self action:@selector(startBackgroundThread) forControlEvents:UIControlEventTouchUpInside];
    [self.view addSubview:self.startButton];

    // 停止按钮
    self.stopButton = [UIButton buttonWithType:UIButtonTypeSystem];
    self.stopButton.frame = CGRectMake(120, 110, 80, 40);
    [self.stopButton setTitle:@"停止线程" forState:UIControlStateNormal];
    [self.stopButton addTarget:self action:@selector(stopBackgroundThread) forControlEvents:UIControlEventTouchUpInside];
    self.stopButton.enabled = NO;
    [self.view addSubview:self.stopButton];

    // GCD 任务按钮
    self.dispatchButton = [UIButton buttonWithType:UIButtonTypeSystem];
    self.dispatchButton.frame = CGRectMake(220, 110, 120, 40);
    [self.dispatchButton setTitle:@"执行GCD任务" forState:UIControlStateNormal];
    [self.dispatchButton addTarget:self action:@selector(performGCDTasks) forControlEvents:UIControlEventTouchUpInside];
    [self.view addSubview:self.dispatchButton];

    // 活动指示器
    self.activityIndicator = [[UIActivityIndicatorView alloc] initWithActivityIndicatorStyle:UIActivityIndicatorViewStyleMedium];
    self.activityIndicator.frame = CGRectMake(self.view.bounds.size.width - 60, 115, 30, 30);
    [self.view addSubview:self.activityIndicator];

    // 日志文本框
    self.logTextView = [[UITextView alloc] initWithFrame:CGRectMake(20, 170, self.view.bounds.size.width - 40, 300)];
    self.logTextView.editable = NO;
    self.logTextView.font = [UIFont systemFontOfSize:12];
    self.logTextView.backgroundColor = [UIColor secondarySystemBackgroundColor];
    self.logTextView.text = @"线程日志:\n";
    [self.view addSubview:self.logTextView];
}

- (void)setupQueues {
    // 创建串行队列
    self.serialQueue = dispatch_queue_create("com.example.serialQueue", DISPATCH_QUEUE_SERIAL);

    // 创建并发队列
    self.concurrentQueue = dispatch_queue_create("com.example.concurrentQueue", DISPATCH_QUEUE_CONCURRENT);
}

#pragma mark - 线程控制方法

- (void)startBackgroundThread {
    if (self.backgroundThread && !self.backgroundThread.isFinished) {
        [self updateLog:@"后台线程已在运行"];
        return;
    }

    self.shouldKeepRunning = YES;
    self.backgroundThread = [[NSThread alloc] initWithTarget:self selector:@selector(backgroundThreadMain) object:nil];
    [self.backgroundThread start];

    self.startButton.enabled = NO;
    self.stopButton.enabled = YES;
    [self.activityIndicator startAnimating];

    [self updateLog:@"后台线程已启动"];
    self.statusLabel.text = @"线程状态: 运行中";
}

- (void)stopBackgroundThread {
    self.shouldKeepRunning = NO;

    // 给线程一些时间来清理和退出
    [self performSelector:@selector(forceStopThread) onThread:self.backgroundThread withObject:nil waitUntilDone:NO];

    [self updateLog:@"正在停止后台线程..."];
}

- (void)forceStopThread {
    // 在线程内部执行清理操作
    [self updateLog:@"后台线程正在清理..."];

    // 回到主线程更新UI
    [self performSelectorOnMainThread:@selector(threadStopped) withObject:nil waitUntilDone:NO];
}

- (void)threadStopped {
    self.startButton.enabled = YES;
    self.stopButton.enabled = NO;
    [self.activityIndicator stopAnimating];

    [self updateLog:@"后台线程已停止"];
    self.statusLabel.text = @"线程状态: 已停止";
}

- (void)backgroundThreadMain {
    @autoreleasepool {
        NSThread *currentThread = [NSThread currentThread];
        [self updateLog:[NSString stringWithFormat:@"后台线程开始: %@", currentThread]];

        int taskCount = 0;
        while (self.shouldKeepRunning && taskCount < 10) {
            @autoreleasepool {
                taskCount++;

                // 模拟后台任务
                [NSThread sleepForTimeInterval:2.0];

                // 更新UI必须在主线程
                [self performSelectorOnMainThread:@selector(updateTaskProgress:) withObject:@(taskCount) waitUntilDone:NO];

                if (!self.shouldKeepRunning) {
                    break;
                }
            }
        }

        [self updateLog:@"后台线程自然结束"];
        [self performSelectorOnMainThread:@selector(threadStopped) withObject:nil waitUntilDone:NO];
    }
}

- (void)updateTaskProgress:(NSNumber *)progress {
    self.statusLabel.text = [NSString stringWithFormat:@"任务进度: %d/10", progress.intValue];
    [self updateLog:[NSString stringWithFormat:@"完成任务 %d", progress.intValue]];
}

- (void)performGCDTasks {
    [self updateLog:@"开始执行GCD任务序列"];

    // 在串行队列上执行任务
    dispatch_async(self.serialQueue, ^{
        [self updateLog:@"串行队列任务1开始"];
        [NSThread sleepForTimeInterval:1.0];
        [self updateLog:@"串行队列任务1完成"];
    });

    dispatch_async(self.serialQueue, ^{
        [self updateLog:@"串行队列任务2开始"];
        [NSThread sleepForTimeInterval:1.0];
        [self updateLog:@"串行队列任务2完成"];
    });

    // 在并发队列上执行任务
    for (int i = 0; i < 3; i++) {
        dispatch_async(self.concurrentQueue, ^{
            [self updateLog:[NSString stringWithFormat:@"并发队列任务%d开始", i+1]];
            [NSThread sleepForTimeInterval:1.5];
            [self updateLog:[NSString stringWithFormat:@"并发队列任务%d完成", i+1]];
        });
    }

    // 在主队列执行UI更新
    dispatch_async(dispatch_get_main_queue(), ^{
        [self updateLog:@"主队列UI更新任务"];
        self.statusLabel.textColor = [UIColor systemBlueColor];
    });

    // 组任务示例
    dispatch_group_t group = dispatch_group_create();

    for (int i = 0; i < 2; i++) {
        dispatch_group_async(group, self.concurrentQueue, ^{
            [self updateLog:[NSString stringWithFormat:@"组任务%d执行中", i+1]];
            [NSThread sleepForTimeInterval:1.0];
        });
    }

    dispatch_group_notify(group, dispatch_get_main_queue(), ^{
        [self updateLog:@"所有组任务已完成"];
        self.statusLabel.textColor = [UIColor systemGreenColor];
    });
}

#pragma mark - 工具方法

- (void)updateLog:(NSString *)message {
    // 确保UI更新在主线程执行
    if (![NSThread isMainThread]) {
        [self performSelectorOnMainThread:@selector(updateLog:) withObject:message waitUntilDone:NO];
        return;
    }

    NSString *timestamp = [self currentTimestamp];
    NSString *logMessage = [NSString stringWithFormat:@"[%@] %@\n", timestamp, message];

    [self.logContent appendString:logMessage];
    self.logTextView.text = self.logContent;

    // 自动滚动到底部
    if (self.logContent.length > 0) {
        NSRange bottom = NSMakeRange(self.logContent.length - 1, 1);
        [self.logTextView scrollRangeToVisible:bottom];
    }
}

- (NSString *)currentTimestamp {
    NSDateFormatter *formatter = [[NSDateFormatter alloc] init];
    [formatter setDateFormat:@"HH:mm:ss.SSS"];
    return [formatter stringFromDate:[NSDate date]];
}

- (void)dealloc {
    self.shouldKeepRunning = NO;
}

@end
info.plist中去掉manifest选项

三、源码分析
1. AppDelegate 类
application:didFinishLaunchingWithOptions: 方法
objective-c
- (BOOL)application:(UIApplication *)application didFinishLaunchingWithOptions:(NSDictionary *)launchOptions {
// 创建主窗口 - 应用程序的根窗口
self.window = [[UIWindow alloc] initWithFrame:[[UIScreen mainScreen] bounds]];
// 创建自定义视图控制器 - 应用程序的主界面
self.viewController = [[CustomViewController alloc] init];
// 设置根视图控制器 - 建立窗口与控制器的关系
self.window.rootViewController = self.viewController;
// 设置窗口背景色并显示 - 使窗口可见并准备好接收事件
self.window.backgroundColor = [UIColor whiteColor];
[self.window makeKeyAndVisible];
return YES;
}
功能:应用程序启动入口点,负责初始化主窗口和根视图控制器。
2. CustomViewController 类
viewDidLoad 方法
objective-c
- (void)viewDidLoad {
[super viewDidLoad];
[self setupUI]; // 初始化用户界面组件
[self setupQueues]; // 创建GCD队列
self.logContent = [NSMutableString string]; // 初始化日志内容存储
}
功能:视图控制器加载完成后的初始化工作。
setupUI 方法
objective-c
- (void)setupUI {
// 设置视图背景色
self.view.backgroundColor = [UIColor systemBackgroundColor];
// 创建状态标签 - 显示线程运行状态
self.statusLabel = [[UILabel alloc] initWithFrame:CGRectMake(20, 60, self.view.bounds.size.width - 40, 30)];
self.statusLabel.text = @"线程状态: 就绪";
self.statusLabel.textAlignment = NSTextAlignmentCenter;
self.statusLabel.font = [UIFont boldSystemFontOfSize:16];
// 创建开始按钮 - 启动后台线程
self.startButton = [UIButton buttonWithType:UIButtonTypeSystem];
self.startButton.frame = CGRectMake(20, 110, 80, 40);
[self.startButton setTitle:@"开始线程" forState:UIControlStateNormal];
[self.startButton addTarget:self action:@selector(startBackgroundThread) forControlEvents:UIControlEventTouchUpInside];
// 创建停止按钮 - 停止后台线程(初始禁用)
self.stopButton = [UIButton buttonWithType:UIButtonTypeSystem];
self.stopButton.frame = CGRectMake(120, 110, 80, 40);
[self.stopButton setTitle:@"停止线程" forState:UIControlStateNormal];
[self.stopButton addTarget:self action:@selector(stopBackgroundThread) forControlEvents:UIControlEventTouchUpInside];
self.stopButton.enabled = NO;
// 创建GCD任务按钮 - 执行GCD演示任务
self.dispatchButton = [UIButton buttonWithType:UIButtonTypeSystem];
self.dispatchButton.frame = CGRectMake(220, 110, 120, 40);
[self.dispatchButton setTitle:@"执行GCD任务" forState:UIControlStateNormal];
[self.dispatchButton addTarget:self action:@selector(performGCDTasks) forControlEvents:UIControlEventTouchUpInside];
// 创建活动指示器 - 显示线程运行状态
self.activityIndicator = [[UIActivityIndicatorView alloc] initWithActivityIndicatorStyle:UIActivityIndicatorViewStyleMedium];
self.activityIndicator.frame = CGRectMake(self.view.bounds.size.width - 60, 115, 30, 30);
// 创建日志文本框 - 显示线程执行日志
self.logTextView = [[UITextView alloc] initWithFrame:CGRectMake(20, 170, self.view.bounds.size.width - 40, 300)];
self.logTextView.editable = NO;
self.logTextView.font = [UIFont systemFontOfSize:12];
self.logTextView.backgroundColor = [UIColor secondarySystemBackgroundColor];
self.logTextView.text = @"线程日志:\n";
}
功能:创建和配置所有UI组件,包括标签、按钮、活动指示器和日志显示区域。
setupQueues 方法
objective-c
- (void)setupQueues {
// 创建串行队列 - 任务按顺序执行
self.serialQueue = dispatch_queue_create("com.example.serialQueue", DISPATCH_QUEUE_SERIAL);
// 创建并发队列 - 任务可以并行执行
self.concurrentQueue = dispatch_queue_create("com.example.concurrentQueue", DISPATCH_QUEUE_CONCURRENT);
}
功能:初始化GCD队列,为后续的多线程任务做准备。
3. 线程控制核心方法
startBackgroundThread 方法
objective-c
- (void)startBackgroundThread {
// 检查线程是否已在运行
if (self.backgroundThread && !self.backgroundThread.isFinished) {
[self updateLog:@"后台线程已在运行"];
return;
}
// 设置线程运行标志
self.shouldKeepRunning = YES;
// 创建并启动新线程,执行backgroundThreadMain方法
self.backgroundThread = [[NSThread alloc] initWithTarget:self selector:@selector(backgroundThreadMain) object:nil];
[self.backgroundThread start];
// 更新UI状态
self.startButton.enabled = NO;
self.stopButton.enabled = YES;
[self.activityIndicator startAnimating];
[self updateLog:@"后台线程已启动"];
self.statusLabel.text = @"线程状态: 运行中";
}
功能:启动新的后台线程,更新UI状态,设置线程运行标志。
backgroundThreadMain 方法
objective-c
- (void)backgroundThreadMain {
@autoreleasepool { // 创建自动释放池,管理内存
// 获取当前线程信息并记录日志
NSThread *currentThread = [NSThread currentThread];
[self updateLog:[NSString stringWithFormat:@"后台线程开始: %@", currentThread]];
int taskCount = 0;
// 主循环:检查运行标志并执行任务
while (self.shouldKeepRunning && taskCount < 10) {
@autoreleasepool { // 内层自动释放池,每次循环释放资源
taskCount++;
// 模拟耗时任务 - 线程休眠2秒
[NSThread sleepForTimeInterval:2.0];
// 在主线程更新任务进度
[self performSelectorOnMainThread:@selector(updateTaskProgress:) withObject:@(taskCount) waitUntilDone:NO];
// 检查是否应该停止
if (!self.shouldKeepRunning) {
break;
}
}
}
// 线程自然结束处理
[self updateLog:@"后台线程自然结束"];
[self performSelectorOnMainThread:@selector(threadStopped) withObject:nil waitUntilDone:NO];
}
}
功能:后台线程的主循环,执行模拟任务,通过主线程更新UI。
stopBackgroundThread 方法
objective-c
- (void)stopBackgroundThread {
// 设置停止标志
self.shouldKeepRunning = NO;
// 在线程内部执行清理操作(不等待完成)
[self performSelector:@selector(forceStopThread) onThread:self.backgroundThread withObject:nil waitUntilDone:NO];
[self updateLog:@"正在停止后台线程..."];
}
功能:请求停止后台线程,设置停止标志并在目标线程执行清理。
forceStopThread 和 threadStopped 方法
objective-c
- (void)forceStopThread {
// 在线程内部执行清理操作
[self updateLog:@"后台线程正在清理..."];
// 回到主线程更新UI
[self performSelectorOnMainThread:@selector(threadStopped) withObject:nil waitUntilDone:NO];
}
- (void)threadStopped {
// 更新UI状态
self.startButton.enabled = YES;
self.stopButton.enabled = NO;
[self.activityIndicator stopAnimating];
[self updateLog:@"后台线程已停止"];
self.statusLabel.text = @"线程状态: 已停止";
}
功能:线程停止的清理工作和UI状态更新。
4. GCD任务演示方法
performGCDTasks 方法
objective-c
- (void)performGCDTasks {
[self updateLog:@"开始执行GCD任务序列"];
// 串行队列演示 - 任务按顺序执行
dispatch_async(self.serialQueue, ^{
[self updateLog:@"串行队列任务1开始"];
[NSThread sleepForTimeInterval:1.0]; // 模拟任务执行
[self updateLog:@"串行队列任务1完成"];
});
dispatch_async(self.serialQueue, ^{
[self updateLog:@"串行队列任务2开始"];
[NSThread sleepForTimeInterval:1.0];
[self updateLog:@"串行队列任务2完成"];
});
// 并发队列演示 - 任务并行执行
for (int i = 0; i < 3; i++) {
dispatch_async(self.concurrentQueue, ^{
[self updateLog:[NSString stringWithFormat:@"并发队列任务%d开始", i+1]];
[NSThread sleepForTimeInterval:1.5];
[self updateLog:[NSString stringWithFormat:@"并发队列任务%d完成", i+1]];
});
}
// 主队列UI更新 - 确保UI操作在主线程
dispatch_async(dispatch_get_main_queue(), ^{
[self updateLog:@"主队列UI更新任务"];
self.statusLabel.textColor = [UIColor systemBlueColor];
});
// 任务组演示 - 等待多个任务完成
dispatch_group_t group = dispatch_group_create();
for (int i = 0; i < 2; i++) {
dispatch_group_async(group, self.concurrentQueue, ^{
[self updateLog:[NSString stringWithFormat:@"组任务%d执行中", i+1]];
[NSThread sleepForTimeInterval:1.0];
});
}
// 组任务完成通知
dispatch_group_notify(group, dispatch_get_main_queue(), ^{
[self updateLog:@"所有组任务已完成"];
self.statusLabel.textColor = [UIColor systemGreenColor];
});
}
功能:演示GCD的各种使用场景,包括串行队列、并发队列、主队列和任务组。
5. 工具方法
updateLog: 方法
objective-c
- (void)updateLog:(NSString *)message {
// 确保在主线程执行UI更新
if (![NSThread isMainThread]) {
[self performSelectorOnMainThread:@selector(updateLog:) withObject:message waitUntilDone:NO];
return;
}
// 添加时间戳并格式化日志消息
NSString *timestamp = [self currentTimestamp];
NSString *logMessage = [NSString stringWithFormat:@"[%@] %@\n", timestamp, message];
// 更新日志内容
[self.logContent appendString:logMessage];
self.logTextView.text = self.logContent;
// 自动滚动到底部
if (self.logContent.length > 0) {
NSRange bottom = NSMakeRange(self.logContent.length - 1, 1);
[self.logTextView scrollRangeToVisible:bottom];
}
}
功能:线程安全的日志更新,确保UI操作在主线程执行。
currentTimestamp 方法
objective-c
- (NSString *)currentTimestamp {
NSDateFormatter *formatter = [[NSDateFormatter alloc] init];
[formatter setDateFormat:@"HH:mm:ss.SSS"]; // 格式化时间戳
return [formatter stringFromDate:[NSDate date]];
}
功能:生成带毫秒的当前时间戳,用于日志记录。
6. 内存管理
dealloc 方法
objective-c
- (void)dealloc {
self.shouldKeepRunning = NO; // 确保线程停止
}
功能:对象销毁时确保后台线程停止,防止内存泄漏。


 877
877

 被折叠的 条评论
为什么被折叠?
被折叠的 条评论
为什么被折叠?
 到【灌水乐园】发言


