


本文是对CLIPIQA技术的代码讲解,原文解读请看CLIPIQA文章讲解。
1、原文概要
论文整体结构如下所示:
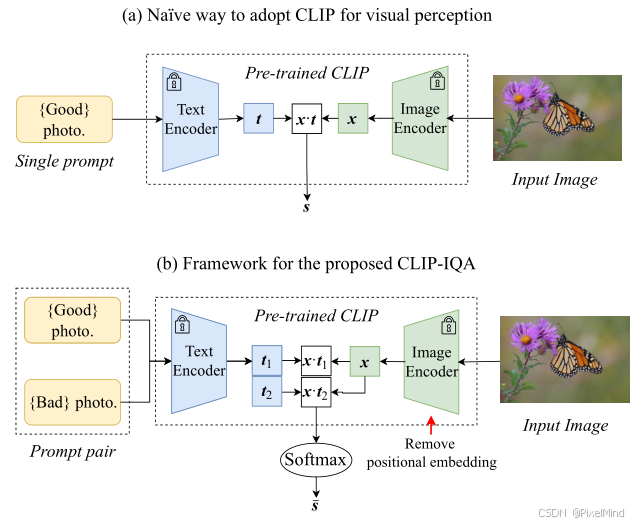
原有的CLIP做视觉感知的方法是直接评估与Good photo语句的相关性,如下式所示:
s
=
x
⊙
t
∥
x
∥
⋅
∥
t
∥
s=\frac{x \odot t}{\| x\| \cdot\| t\| }
s=∥x∥⋅∥t∥x⊙t其中
x
∈
R
C
x \in \mathbb{R}^{C}
x∈RC 代表输入图像经CLIP图像编码器提取的特征向量(
C
C
C 为特征通道数);
t
∈
R
C
t \in \mathbb{R}^{C}
t∈RC 代表文本提示词经CLIP文本编码器提取的特征向量;
⊙
\odot
⊙ 代表向量点积运算;
∥
⋅
∥
\|\cdot\|
∥⋅∥ 代表
ℓ
2
\ell_2
ℓ2 范数(欧几里得范数);
s
∈
[
0
,
1
]
s \in [0,1]
s∈[0,1] 代表图像与提示词的语义匹配得分。
作者认为这种方式不合理,容易有歧义,做了以下两点改进:
-
修改为图(b)的两个prompt对,计算一个softmax的方式,如下式所示: s i = x ⊙ t i ∥ x ∥ ⋅ ∥ t i ∥ , i ∈ { 1 , 2 } s_{i}=\frac {x\odot t_{i}}{\| x\| \cdot\| t_{i}\| }, \quad i\in \{ 1,2\} si=∥x∥⋅∥ti∥x⊙ti,i∈{1,2}其中 x x x、 ⊙ \odot ⊙、 ∥ ⋅ ∥ \|\cdot\| ∥⋅∥ 含义同公式(1); t 1 t_1 t1、 t 2 t_2 t2 代表一对语义相反的文本提示词特征向量; s i s_i si 代表图像与第 i i i 个提示词的余弦相似度得分; i ∈ { 1 , 2 } i \in \{1,2\} i∈{1,2} 代表提示词对的索引(1为正向、2为反向)。
最终的得分可用下式所示来计算: s ‾ = e s 1 e s 1 + e s 2 \overline{s}=\frac{e^{s_{1}}}{e^{s_{1}}+e^{s_{2}}} s=es1+es2es1其中 s 1 s_1 s1、 s 2 s_2 s2 代表公式(2)中两个反义词提示词对应的余弦相似度得分; e ⋅ e^{\cdot} e⋅ 代表自然指数函数; s ‾ ∈ [ 0 , 1 ] \overline{s} \in [0,1] s∈[0,1] 代表最终的图像感知评估得分(值越大越符合正向提示词属性)。 -
选用 ResNet 骨干并移除位置嵌入:基于transformer的VIT架构来提取特征,必须将图像进行resize,IQA任务引入resize会对于分辨率不敏感,如果强行去除position embedding,则基于vit的结构效果大大降低,因此作者选用了Resnet的clip网络并移除了位置嵌入,打破 CLIP 固定输入尺寸限制,避免图像缩放 / 裁剪引入的失真。
以上,作者做了CLIPIQA的两个版本:
- CLIP-IQA:基础版本,无任何任务特定训练,直接基于 CLIP 预训练权重和改进策略实现评估。
- CLIP-IQA⁺:基于 Coop方法微调提示词(网络权重固定,训练prompt,此时good和bad是学习的),在 KonIQ-10k 上训练 10 万轮(SGD 优化器、学习率 0.002、批次 64、MSE 损失),提升评估性能。
2、代码结构
IQA-pytorch项目中集成了MANIQA算法。
代码整体结构如下:

关注两个clip开头的文件。
3 、核心代码模块
clipiqa_arch.py 文件
整体网络结构如下所示:
class CLIPIQA(nn.Module):
    """
    CLIPIQA metric class.

    Args:
        model_type (str): The type of the model. Default is 'clipiqa'.
        backbone (str): The backbone model. Default is 'RN50'.
        pretrained (bool): Whether to load pretrained weights. Default is True.
        pos_embedding (bool): Whether to use positional embedding. Default is False.
    """

    def __init__(
        self,
        model_type='clipiqa',
        backbone='RN50',
        pretrained=True,
        pos_embedding=False,
    ) -> None:
        super().__init__()

        self.clip_model = [load(backbone, 'cpu')]  # avoid saving clip weights
        # Different from original paper, we assemble multiple prompts to improve performance
        self.prompt_pairs = clip.tokenize(
            [
                'Good image',
                'bad image',
                'Sharp image',
                'blurry image',
                'sharp edges',
                'blurry edges',
                'High resolution image',
                'low resolution image',
                'Noise-free image',
                'noisy image',
            ]
        )

        self.model_type = model_type
        self.pos_embedding = pos_embedding
        if 'clipiqa+' in model_type:
            self.prompt_learner = PromptLearner(self.clip_model[0])

        self.default_mean = torch.Tensor(OPENAI_CLIP_MEAN).view(1, 3, 1, 1)
        self.default_std = torch.Tensor(OPENAI_CLIP_STD).view(1, 3, 1, 1)

        for p in self.clip_model[0].parameters():
            p.requires_grad = False

        if pretrained and 'clipiqa+' in model_type:
            if model_type == 'clipiqa+' and backbone == 'RN50':
                self.prompt_learner.ctx.data = torch.load(
                    load_file_from_url(default_model_urls['clipiqa+']),
                    weights_only=False,
                )
            elif model_type in default_model_urls.keys():
                load_pretrained_network(
                    self, default_model_urls[model_type], True, 'params'
                )
            else:
                raise ValueError(f'No pretrained model for {model_type}')

    def forward(self, x):
        """
        Forward pass for the CLIPIQA model.

        Args:
            x (torch.Tensor): Input tensor with shape (N, C, H, W).

        Returns:
            torch.Tensor: The output probabilities.
        """
        # preprocess image
        x = (x - self.default_mean.to(x)) / self.default_std.to(x)
        clip_model = self.clip_model[0].to(x)

        if self.model_type == 'clipiqa':
            prompts = self.prompt_pairs.to(x.device)
            logits_per_image, logits_per_text = clip_model(
                x, prompts, pos_embedding=self.pos_embedding
            )
        elif 'clipiqa+' in self.model_type:
            learned_prompt_feature = self.prompt_learner(clip_model)
            logits_per_image, logits_per_text = clip_model(
                x,
                None,
                text_features=learned_prompt_feature,
                pos_embedding=self.pos_embedding,
            )

        probs = logits_per_image.reshape(logits_per_image.shape[0], -1, 2).softmax(
            dim=-1
        )

        return probs[..., 0].mean(dim=1, keepdim=True)
查看模型前向可知,当我们使用clipiqa时,会使用到预先设计好的prompt。
 if self.model_type == 'clipiqa':
     prompts = self.prompt_pairs.to(x.device)
     logits_per_image, logits_per_text = clip_model(
         x, prompts, pos_embedding=self.pos_embedding
     )
# 对应的prompt
self.prompt_pairs = clip.tokenize(
    [
        'Good image',
        'bad image',
        'Sharp image',
        'blurry image',
        'sharp edges',
        'blurry edges',
        'High resolution image',
        'low resolution image',
        'Noise-free image',
        'noisy image',
    ]
)
如果是clipiqa+,则是学习的prompt,如下所示。
 elif 'clipiqa+' in self.model_type:
     learned_prompt_feature = self.prompt_learner(clip_model)
     logits_per_image, logits_per_text = clip_model(
         x,
         None,
         text_features=learned_prompt_feature,
         pos_embedding=self.pos_embedding,
     )
而prompt_learner结构如下所示:
class PromptLearner(nn.Module):
    """
    PromptLearner class for learning prompts for CLIP-IQA.

    Disclaimer:
        This implementation follows exactly the official codes in: https://github.com/IceClear/CLIP-IQA.
        We have no idea why some tricks are implemented like this, which include:
            1. Using n_ctx prefix characters "X"
            2. Appending extra "." at the end
            3. Insert the original text embedding at the middle
    """

    def __init__(self, clip_model, n_ctx=16) -> None:
        """
        Initialize the PromptLearner.

        Args:
            clip_model (nn.Module): The CLIP model.
            n_ctx (int): Number of context tokens. Default is 16.
        """
        super().__init__()

        # For the following codes about prompts, we follow the official codes to get the same results
        prompt_prefix = ' '.join(['X'] * n_ctx) + ' '
        init_prompts = [prompt_prefix + 'Good photo..', prompt_prefix + 'Bad photo..']
        with torch.no_grad():
            txt_token = clip.tokenize(init_prompts)
            self.tokenized_prompts = txt_token
            init_embedding = clip_model.token_embedding(txt_token)

        init_ctx = init_embedding[:, 1 : 1 + n_ctx]
        self.ctx = nn.Parameter(init_ctx)

        self.n_ctx = n_ctx
        self.n_cls = len(init_prompts)
        self.name_lens = [
            3,
            3,
        ]  # hard coded length, which does not include the extra "." at the end

        self.register_buffer('token_prefix', init_embedding[:, :1, :])  # SOS
        self.register_buffer(
            'token_suffix', init_embedding[:, 1 + n_ctx :, :]
        )  # CLS, EOS

    def get_prompts_with_middle_class(self):
        """
        Get prompts with the original text embedding inserted in the middle.

        Returns:
            torch.Tensor: The generated prompts.
        """
        ctx = self.ctx.to(self.token_prefix)
        if ctx.dim() == 2:
            ctx = ctx.unsqueeze(0).expand(self.n_cls, -1, -1)

        half_n_ctx = self.n_ctx // 2
        prompts = []
        for i in range(self.n_cls):
            name_len = self.name_lens[i]
            prefix_i = self.token_prefix[i : i + 1, :, :]
            class_i = self.token_suffix[i : i + 1, :name_len, :]
            suffix_i = self.token_suffix[i : i + 1, name_len:, :]
            ctx_i_half1 = ctx[i : i + 1, :half_n_ctx, :]
            ctx_i_half2 = ctx[i : i + 1, half_n_ctx:, :]
            prompt = torch.cat(
                [
                    prefix_i,  # (1, 1, dim)
                    ctx_i_half1,  # (1, n_ctx//2, dim)
                    class_i,  # (1, name_len, dim)
                    ctx_i_half2,  # (1, n_ctx//2, dim)
                    suffix_i,  # (1, *, dim)
                ],
                dim=1,
            )
            prompts.append(prompt)
        prompts = torch.cat(prompts, dim=0)
        return prompts

    def forward(self, clip_model):
        """
        Forward pass for the PromptLearner.

        Args:
            clip_model (nn.Module): The CLIP model.

        Returns:
            torch.Tensor: The output features.
        """
        prompts = self.get_prompts_with_middle_class()
        x = prompts + clip_model.positional_embedding.type(clip_model.dtype)
        x = x.permute(1, 0, 2)  # NLD -> LND
        x = clip_model.transformer(x)
        x = x.permute(1, 0, 2)  # LND -> NLD
        x = clip_model.ln_final(x).type(clip_model.dtype)

        # x.shape = [batch_size, n_ctx, transformer.width]
        # take features from the eot embedding (eot_token is the highest number in each sequence)
        x = (
            x[torch.arange(x.shape[0]), self.tokenized_prompts.argmax(dim=-1)]
            @ clip_model.text_projection
        )

        return x
包含2个流程:
- 提示词构造(get_prompts_with_middle_class):将原始文本嵌入插入上下文 token 的中间。将ctx(16 个可学习 token)拆分为前 8 个(ctx_i_half1)和后 8 个(ctx_i_half2);提取原始文本嵌入class_i(对应 “Good photo”/“Bad photo”);按 “前缀→前半 ctx→文本→后半 ctx→后缀” 拼接,生成最终提示词嵌入;拼接两类提示词(好 / 差照片),输出形状[2, seq_len, dim](2 为提示词数量,seq_len 为拼接后长度)。总结就是3点,使用n_ctx个前缀字符X,在最后加额外的字符.,将text插入到中间,这个作为初始化的内容。
- 前向计算:拼接位置嵌入:prompts + CLIP.positional_embedding(CLIP 文本编码器必需);维度转换:NLD → LND(适配 CLIP Transformer 的输入格式,N=2,L = 序列长度,D = 嵌入维度);送入 CLIP 文本 Transformer:clip_model.transformer(x);归一化:clip_model.ln_final(CLIP 文本编码器的最终层归一化);提取 EOT 特征:定位每个提示词的结束符(argmax(dim=-1)),取对应位置的嵌入;投影到图像特征空间:@ clip_model.text_projection(CLIP 的文本特征投影层);输出:形状[2, dim]的文本特征(对应 “好 / 差照片” 的特征)。
clip_model.py 文件
该文件中放着clipiqa使用到的backbone,给出resnet的结构。
class ModifiedResNet(nn.Module):
    """
    A ResNet class that is similar to torchvision's but contains the following changes:
    - There are now 3 "stem" convolutions as opposed to 1, with an average pool instead of a max pool.
    - Performs anti-aliasing strided convolutions, where an avgpool is prepended to convolutions with stride > 1
    - The final pooling layer is a QKV attention instead of an average pool
    """

    def __init__(self, layers, output_dim, heads, input_resolution=224, width=64):
        super().__init__()
        self.output_dim = output_dim
        self.input_resolution = input_resolution

        # the 3-layer stem
        self.conv1 = nn.Conv2d(
            3, width // 2, kernel_size=3, stride=2, padding=1, bias=False
        )
        self.bn1 = nn.BatchNorm2d(width // 2)
        self.conv2 = nn.Conv2d(
            width // 2, width // 2, kernel_size=3, padding=1, bias=False
        )
        self.bn2 = nn.BatchNorm2d(width // 2)
        self.conv3 = nn.Conv2d(width // 2, width, kernel_size=3, padding=1, bias=False)
        self.bn3 = nn.BatchNorm2d(width)
        self.avgpool = nn.AvgPool2d(2)
        self.relu = nn.ReLU(inplace=True)

        # residual layers
        self._inplanes = width  # this is a *mutable* variable used during construction
        self.layer1 = self._make_layer(width, layers[0])
        self.layer2 = self._make_layer(width * 2, layers[1], stride=2)
        self.layer3 = self._make_layer(width * 4, layers[2], stride=2)
        self.layer4 = self._make_layer(width * 8, layers[3], stride=2)

        self.feature_dim_list = [width, width * 4, width * 8, width * 16, width * 32]

        embed_dim = width * 32  # the ResNet feature dimension
        self.attnpool = AttentionPool2d(
            input_resolution // 32, embed_dim, heads, output_dim
        )

    def _make_layer(self, planes, blocks, stride=1):
        layers = [Bottleneck(self._inplanes, planes, stride)]

        self._inplanes = planes * Bottleneck.expansion
        for _ in range(1, blocks):
            layers.append(Bottleneck(self._inplanes, planes))

        return nn.Sequential(*layers)

    def forward_features(self, x, return_token=False, pos_embedding=False):
        def stem(x):
            for conv, bn in [
                (self.conv1, self.bn1),
                (self.conv2, self.bn2),
                (self.conv3, self.bn3),
            ]:
                x = self.relu(bn(conv(x)))
            x = self.avgpool(x)
            return x

        x = x.type(self.conv1.weight.dtype)
        x = stem(x)
        feat_list = [x]
        x = self.layer1(x)
        feat_list += [x]
        x = self.layer2(x)
        feat_list += [x]
        x = self.layer3(x)
        feat_list += [x]
        x = self.layer4(x)
        feat_list += [x]
        return feat_list

    def forward(self, x, return_token=False, pos_embedding=False):
        def stem(x):
            for conv, bn in [
                (self.conv1, self.bn1),
                (self.conv2, self.bn2),
                (self.conv3, self.bn3),
            ]:
                x = self.relu(bn(conv(x)))
            x = self.avgpool(x)
            return x

        x = x.type(self.conv1.weight.dtype)
        x = stem(x)
        x = self.layer1(x)
        x = self.layer2(x)
        x = self.layer3(x)
        x = self.layer4(x)

        if return_token:
            x, tokens = self.attnpool(x, return_token, pos_embedding)
            return x, tokens
        else:
            x = self.attnpool(x, return_token, pos_embedding)
            return x
前向中其他结构是常规的卷积网络结构,下采样使用avgpool,最后使用到了一个attnpool结构,attnpool结构如下所示:
class AttentionPool2d(nn.Module):
    def __init__(
        self, spacial_dim: int, embed_dim: int, num_heads: int, output_dim: int = None
    ):
        super().__init__()
        self.positional_embedding = nn.Parameter(
            torch.randn(spacial_dim**2 + 1, embed_dim) / embed_dim**0.5
        )
        self.k_proj = nn.Linear(embed_dim, embed_dim)
        self.q_proj = nn.Linear(embed_dim, embed_dim)
        self.v_proj = nn.Linear(embed_dim, embed_dim)
        self.c_proj = nn.Linear(embed_dim, output_dim or embed_dim)
        self.num_heads = num_heads
        self.spacial_dim = spacial_dim
        self.embed_dim = embed_dim

    def forward(self, x, return_token=False, pos_embedding=False):
        n, c, h, w = x.shape
        x = x.reshape(x.shape[0], x.shape[1], x.shape[2] * x.shape[3]).permute(
            2, 0, 1
        )  # NCHW -> (HW)NC
        x = torch.cat([x.mean(dim=0, keepdim=True), x], dim=0)  # (HW+1)NC
        if pos_embedding:
            positional_embedding_resize = (
                F.interpolate(
                    self.positional_embedding.unsqueeze(0).unsqueeze(0),
                    size=(x.size(0), x.size(2)),
                    mode='bicubic',
                )
                .squeeze(0)
                .squeeze(0)
            )
            x = x + positional_embedding_resize[:, None, :].to(x.dtype)  # (HW+1)NC

        x, _ = F.multi_head_attention_forward(
            query=x,
            key=x,
            value=x,
            embed_dim_to_check=x.shape[-1],
            num_heads=self.num_heads,
            q_proj_weight=self.q_proj.weight,
            k_proj_weight=self.k_proj.weight,
            v_proj_weight=self.v_proj.weight,
            in_proj_weight=None,
            in_proj_bias=torch.cat(
                [self.q_proj.bias, self.k_proj.bias, self.v_proj.bias]
            ),
            bias_k=None,
            bias_v=None,
            add_zero_attn=False,
            dropout_p=0,
            out_proj_weight=self.c_proj.weight,
            out_proj_bias=self.c_proj.bias,
            use_separate_proj_weight=True,
            training=self.training,
            need_weights=False,
        )

        if return_token:
            return x[0], x[1:]
        else:
            return x[0]
分为几步:
- 特征图重塑与全局均值 token 拼接:引入全局先验信息,避免仅依赖局部空间 token 的信息偏差。对应于代码:
n, c, h, w = x.shape  # 输入:[批次N, 通道C, 高度H, 宽度W]
# 重塑:NCHW → (HW)NC(将空间维度展平为序列,长度=H×W)
x = x.reshape(n, c, h*w).permute(2, 0, 1)
# 拼接全局均值token:在序列开头添加所有空间token的均值(shape=[1, N, C])
# 最终序列长度=H×W + 1,对应“全局均值token + 所有空间位置token”
x = torch.cat([x.mean(dim=0, keepdim=True), x], dim=0)
- 位置嵌入插值与叠加(可选):适配任意尺寸输入(如 CLIP-IQA 移除固定位置嵌入后,通过插值动态生成对应尺寸的位置嵌入)。
if pos_embedding:
    # 插值适配位置嵌入:将原始位置嵌入插值到当前特征序列长度(HW+1)和嵌入维度
    positional_embedding_resize = F.interpolate(
        self.positional_embedding.unsqueeze(0).unsqueeze(0),
        size=(x.size(0), x.size(2)),  # 目标尺寸:[新序列长度, 嵌入维度]
        mode='bicubic'  # 双三次插值,保证平滑缩放
    ).squeeze(0).squeeze(0)
    # 叠加位置嵌入:(HW+1)NC + (HW+1)1C → (HW+1)NC
    x = x + positional_embedding_resize[:, None, :].to(x.dtype)
- 多头自注意力计算:调用 PyTorch 原生的F.multi_head_attention_forward实现自注意力。
3、总结
文章第一次成功尝试使用CLIP来进行IQA的评估,取得了一些进展。后续作者将会从3个方面优化提示词设计策略;用专业术语图文对预训练 CLIP;融合任务专用架构与 CLIP 的视觉 - 语言先验。
感谢阅读,欢迎留言或私信,一起探讨和交流。
如果对你有帮助的话,也希望可以给博主点一个关注,感谢。


 781
781

 被折叠的 条评论
为什么被折叠?
被折叠的 条评论
为什么被折叠?
 到【灌水乐园】发言


