


 本文详细解析ROS_Python中的自主巡逻案例,基于multi_point_patrol.py代码,重点介绍了如何使用ROS的StateMachine、Containers和States进行路径规划。通过示例展示了如何创建和配置StateMachine、Concurrence容器,以及不同状态的交互和结果判断策略。
ROS_Python编程 之 案例代码核心解析(第三版)
时隔有一段时间咯,忙着学习课内知识还有ros重要框架、接口,代码方面稍有懈怠,请大家见谅哈。通过Handsfree mini机器人平台配套的中级教程,我对ros_python 自主巡逻案例 的知识做以下归纳:
4. 自主巡逻案例
handsfree mini 机器人工控机自带的ros系统有一份代码,是 multi_point_patrol.py,代码如下:
#!/usr/bin/env python
import tf
import math
import smach
import rospy
import actionlib
import geometry_msgs
import move_base_msgs.msg
import tf.transformations


def gen_new_movebase_goal(frame_id,
                          target_x,
                          target_y,
                          next_target_x,
                          next_target_y):
    goal = move_base_msgs.msg.MoveBaseGoal()
    goal.target_pose.header.frame_id = frame_id
    goal.target_pose.header.stamp = rospy.Time.now()
    goal.target_pose.pose.position.x = target_x
    goal.target_pose.pose.position.y = target_y

    # to make our robot face the next target point,
    # when we arrive the target point

    target_yaw = (math.atan2(next_target_y - target_y, next_target_x - target_x) % (math.pi*2))
    # 二维平面中的欧拉角只有偏航角yaw,翻滚角、俯仰角均为0
    target_quaternion = tf.transformations.quaternion_from_euler(0, 0, target_yaw)
    goal.target_pose.pose.orientation.x = target_quaternion[0]
    goal.target_pose.pose.orientation.y = target_quaternion[1]
    goal.target_pose.pose.orientation.z = target_quaternion[2]
    goal.target_pose.pose.orientation.w = target_quaternion[3]
    return goal


class MoveToPoint(smach.State):
    def __init__(self, target_x, target_y, next_target_x, next_target_y):
        smach.State.__init__(self, outcomes=['next_point'])
        self.__target_x = target_x
        self.__target_y = target_y
        self.__next_target_x = next_target_x
        self.__next_target_y = next_target_y

    def execute(self, ud):
        goal = gen_new_movebase_goal('map',
                                     self.__target_x,
                                     self.__target_y,
                                     self.__next_target_x,
                                     self.__next_target_y)
        server_movebase.send_goal(goal)
        # todo: what should robot do when failed to finish the target point?
        is_server_availabel = server_movebase.wait_for_result()
        if is_server_availabel is False:
            return 'error_exit'
        else:
            return 'next_point'


if __name__ == '__main__':
    rospy.init_node('smach_serial_demo2',log_level=rospy.DEBUG)
    server_movebase = actionlib.SimpleActionClient('/move_base', move_base_msgs.msg.MoveBaseAction)
    connect_state = server_movebase.wait_for_server()
    points = [[10.58,35.83],  # target point 1  only need x and y
              [8.88,12.18],  # target point 2
              [18.04,21.29],  # target point 3
              [18.75,36.58]]  # target point 4
    if connect_state is not True:
        # please to ensure weather your move_base server is opened?
        rospy.logerr('can not connect to move_base server')
        exit(-1)
    rospy.logdebug('move base connect successfully!')
    size_points = len(points)
    name_target_point = ""
    name_next_target_point = ""
    smach_serial_demo2 = smach.StateMachine(outcomes=['successful'])
    with smach_serial_demo2:
        # to point in points list into state machine
        for target_point in range(0, size_points, 1):
            next_target_point = (target_point+1) % size_points
            name_target_point = 'POINT%d' % target_point
            name_next_target_point = 'POINT%d' % next_target_point
            smach.StateMachine.add(name_target_point,
              MoveToPoint(target_x=points[target_point][0],
                          target_y=points[target_point][1],
                          next_target_x=points[next_target_point][0],
                          next_target_y=points[next_target_point][1]),
                          transitions={'next_point': name_next_target_point})
    smach_serial_demo2.execute()
    rospy.loginfo("HandsFree smach_serial_demo 2 finish!")
其中,精髓如下:
# 精髓1
smach_serial_demo2 = smach.StateMachine(outcomes=['successful'])

# 解析1 因地制宜地应用了smach状态机
# 在收到一个任务时,第一步也是最重要的一步,即进行准确完整的需求分析:在自主巡逻案例中,需求即让机器人在四个固定目标点之间按照固定顺序进行循环运动:1->2->3->0->1->2->……,在做完需求分析之后,不可避免要进行方案分析:在自主巡逻案例中,机器人需要执行复杂的计划,其中包含多种可以被明确描述的状态和状态转换,这不禁让人联想到 smach状态机

# 解析2 smach状态机知识提点及较复杂的smach状态机案例剖析
【 以下部分内容出自 ROS 重要框架、接口学习资源小汇总 中的 ROS进阶——SMACH状态机 (注:若侵权,请告知删除) 】
smach的使用:
Containers(容器):包含状态
- StateMachine容器
- Concurrence容器
- Sequence容器
- Iterator容器
- 用actionlib封装容器
states(状态):基本操作单元
- state通用状态
- CBState
- SimpleActionState(ROS)
- ServiceState(ROS)
- MonitorState(ROS)
容器:
StateMachine:
from smach import State,StateMachine

# define state Foo
# 继承通用状态,构建Foo状态
class Foo(State):
 def __init__(self):
     State.__init__(self,
                    outcomes=['outcome1','outcome2'],
                    input_keys=['foo_counter_in'],
                    output_keys=['foo_counter_out'])
     self.counter = 0

 # 响应调用的函数
 def execute(self, userdata):
     rospy.loginfo('Executing state FOO')
     if self.counter < 3:
         self.counter += 1
         return 'outcome1'
     else:
         return 'outcome2'

# define state Bar
class Bar(State):
 def __init__(self):
     State.__init__(self, outcomes=['outcome1'])

 def execute(self, userdata):
     rospy.loginfo('Executing state BAR')
     return 'outcome1'

class main():
     rospy.init_node('smach_example_state_machine')

 # Create a SMACH state machine
 sm = StateMachine(outcomes=[])

 # Open the container
 with sm:
     # Add states to the container
     StateMachine.add('FOO',
                       Foo(),
                       transitions={'outcome1':'BAR',
                                    'outcome2':'outcome4'},
                       remapping={'foo_counter_in':'sm_counter',
                                  'foo_counter_out':'sm_counter'})
     StateMachine.add('BAR',
                      Bar(),
                      transitions={'outcome1':'FOO'})

     # 内部监视器
     intro_server = IntrospectionServer('sm_IntrospectionServer', sm, '/SM_ROOT')
     intro_server.start()

     # Execute the state machine
     sm_outcome = sm_vison_work.execute()

     rospy.spin()

     intro_server.stop()
说明:
- 初始化:
__init__(self, outcomes, input_keys=[], output_keys=[])
outcomes,转移input_keys,输入值output_keys,输出值
- 添加状态:
add(label, state, transitions=None, remapping=None)
label,状态名字state,状态transitions,状态机状态跳转remapping,状态机的输入输出映射到整体空间中,用于数据传递,input_keys为输入,output_keys为输出Concurrence:并行状态机
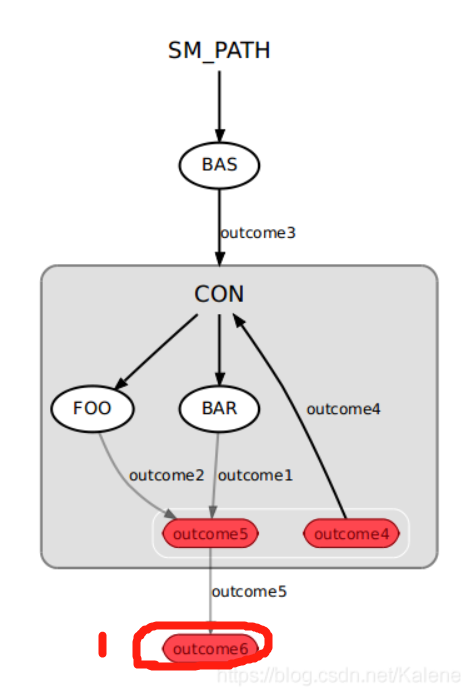
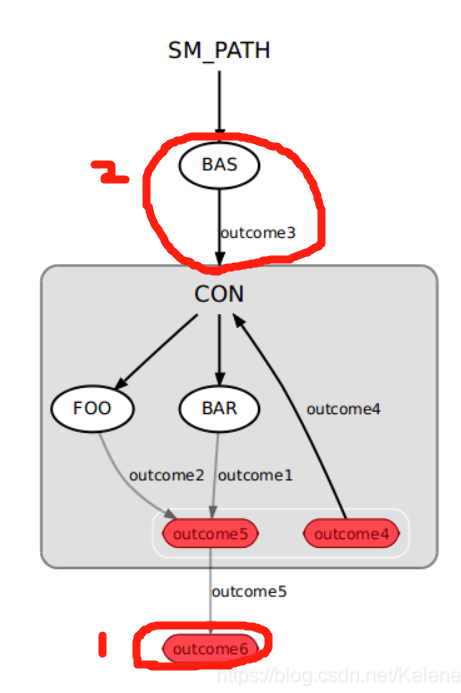
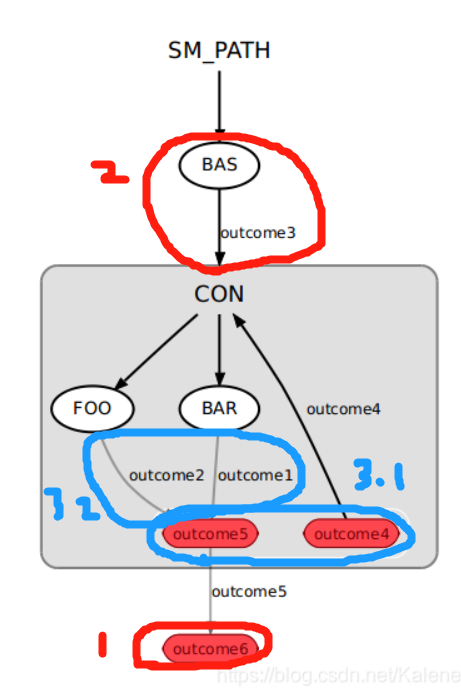
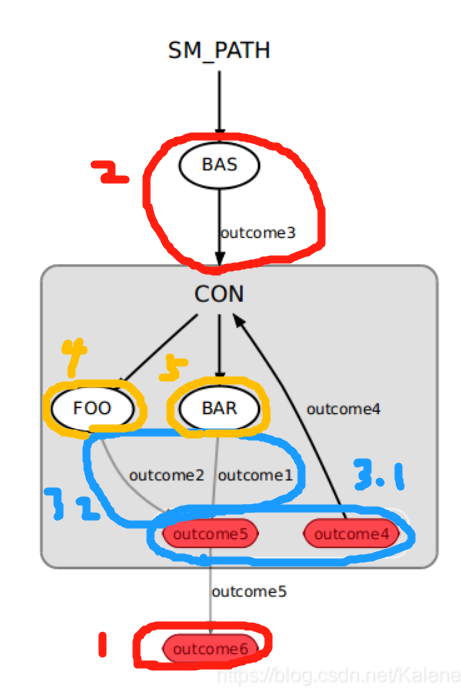
import roslib; roslib.load_manifest('smach_tutorials')
import rospy
import smach
import smach_ros

# define state Foo
class Foo(smach.State):
    def __init__(self):
        smach.State.__init__(self, outcomes=['outcome1','outcome2'])
        self.counter = 0

    def execute(self, userdata):
        rospy.loginfo('Executing state FOO')
        if self.counter < 3:
            self.counter += 1
            return 'outcome1'
        else:
            return 'outcome2'

# define state Bar
class Bar(smach.State):
    def __init__(self):
        smach.State.__init__(self, outcomes=['outcome1'])

    def execute(self, userdata):
        rospy.loginfo('Executing state BAR')
        return 'outcome1'

# define state Bas
class Bas(smach.State):
    def __init__(self):
        smach.State.__init__(self, outcomes=['outcome3'])

    def execute(self, userdata):
        rospy.loginfo('Executing state BAS')
        return 'outcome3'

def main():
    rospy.init_node('smach_example_state_machine')

    # Create the top level SMACH state machine
    sm_top = smach.StateMachine(outcomes=['outcome6'])

    # Open the container
    with sm_top:
        smach.StateMachine.add('BAS', Bas(),
                               transitions={'outcome3':'CON'})

        # Create the sub SMACH state machine
        sm_con = smach.Concurrence(outcomes=['outcome4','outcome5'],
                                   default_outcome='outcome4',
                                   outcome_map={'outcome5':
                                       { 'FOO':'outcome2',
                                         'BAR':'outcome1'}})

        # Open the container
        with sm_con:
            # Add states to the container
            smach.Concurrence.add('FOO', Foo())
            smach.Concurrence.add('BAR', Bar())

        smach.StateMachine.add('CON', sm_con,
                               transitions={'outcome4':'CON',
                                            'outcome5':'outcome6'})

    # Execute SMACH plan
    outcome = sm_top.execute()

if __name__ == '__main__':
    main()
函数说明:
- 初始化
__init__(self, outcomes, default_outcome, input_keys=[], output_keys=[], outcome_map={}, outcome_cb=None, child_termination_cb=None)
outcome_map,指定基于其子结果确定并发结果的策略,即可根据多个子结果的组合输出指定输出,若映射没有满足,则返回default_outcome
outcome_cb,called once when the last child state terminates. This callback returns the outcome of the concurrence state machine
child_termination_cb,called every time one of the child states terminates. In the callback function you can decide if the state machine should keep running (return False), or if it should preempt all remaining running states (return True)
- 添加状态
add(label, state, remapping={})
- 和StateMachine类似,但少了transitions,这部分通过outcome_map实现
具体流程说明:
(注意:区分状态和状态机;状态的outcomes是转移,状态机的outcomes是输出!!!)
- sm_top = smach.StateMachine(outcomes=[‘outcome6’])
- smach.StateMachine.add(‘BAS’, Bas(),transitions={‘outcome3’:‘CON’})
- sm_con = smach.Concurrence( outcomes=[‘outcome4’,‘outcome5’],
default_outcome=‘outcome4’,
outcome_map={‘outcome5’:
{ ‘FOO’:‘outcome2’, ‘BAR’:‘outcome1’}} )
smach.Concurrence.add(‘FOO’, Foo())
smach.Concurrence.add(‘BAR’, Bar())
- smach.StateMachine.add( ‘CON’, sm_con,
transitions={‘outcome4’:‘CON’,
‘outcome5’:‘outcome6’} )

# 解析3 自主巡逻案例中的状态机
    with smach_serial_demo2:
        # to point in points list into state machine
        for target_point in range(0, size_points, 1):
            next_target_point = (target_point+1) % size_points
            name_target_point = 'POINT%d' % target_point
            name_next_target_point = 'POINT%d' % next_target_point
            smach.StateMachine.add(name_target_point,
                   MoveToPoint(target_x=points[target_point][0],
                               target_y=points[target_point][1],
                               next_target_x=points[next_target_point][0],
                               next_target_y=points[next_target_point][1]),
                               transitions={'next_point': name_next_target_point})

class MoveToPoint(smach.State):
    def __init__(self, target_x, target_y, next_target_x, next_target_y):
        smach.State.__init__(self, outcomes=['next_point'])
        self.__target_x = target_x
        self.__target_y = target_y
        self.__next_target_x = next_target_x
        self.__next_target_y = next_target_y

# 解析3.1
smach.State.__init__(self, outcomes=['next_point'])
# 在 for target_point in range(0, size_points, 1): 循环中,每调用一次MoveToPoint(),都会为 状态机smach_serial_demo2 的新状态定义 转移next_point

# 解析3.2
for target_point in range(0, size_points, 1):
    next_target_point = (target_point+1) % size_points
    name_target_point = 'POINT%d' % target_point
    name_next_target_point = 'POINT%d' % next_target_point
# target_point: 			0 -> 1 -> 2 -> 3
# next_target_point: 		1 -> 2 -> 3 -> 0
# name_target_point: 		'POINT0' -> 'POINT1' -> 'POINT2' -> 'POINT3'
# name_next_target_point:   'POINT1' -> 'POINT2' -> 'POINT3' -> 'POINT0'
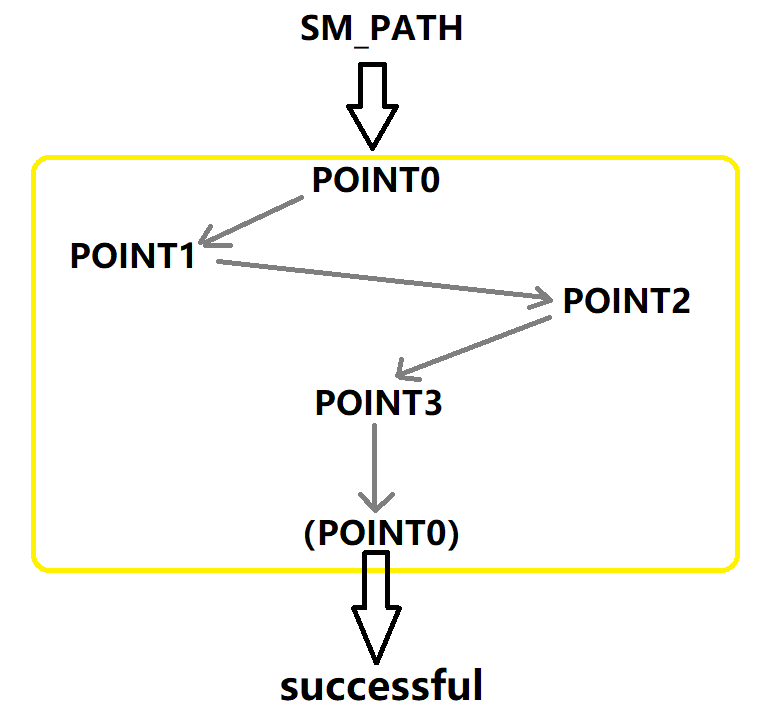
因此,此案例中的自主巡逻路径如下:

# 解析3.3
smach.StateMachine.add(name_target_point,
                       MoveToPoint(target_x=points[target_point][0],
                                   target_y=points[target_point][1],
                                   next_target_x=points[next_target_point][0],
                                   next_target_y=points[next_target_point][1]),
                      transitions={'next_point': name_next_target_point})
因此,此案例中构成的状态机如下:


 1万+
1万+

 被折叠的 条评论
为什么被折叠?
被折叠的 条评论
为什么被折叠?
 到【灌水乐园】发言


