


 本文介绍如何在MacBook Pro上安装Caffe框架,并通过LeNet模型进行Mnist手写数字训练集的训练过程。
Caffe是一个清晰而高效的深度学习框架,是纯粹的C++、CUDA架构,支持命令行,Python和MATLAB接口,可以在CPU和GPU直接无缝切换,Caffe的优势:
- 上手快,模型和相应优化都是以文本形式而非代码形式给出,
Caffe给出了模型的定义,最优化设置以及预训练的权重,方便立即上手。 - 速度快,Caffe与cuDNN结合使用,能够运行最棒的模型和海量的数据。
- 模块化,方便拓展新的认知和设置.
- 开源,开放
本文主要用于记录在MacBookPro笔记本电脑中安装Caffe(CPU-Only)框架。并使用最简单的LeNet识别的Mnist手写数字训练集:http://caffe.berkeleyvision.org/gathered/examples/mnist.html
1.安装Homebrew
打开你的terminal~输入
/usr/bin/ruby -e "$(curl -fsSL https://raw.githubusercontent.com/Homebrew/install/master/install)"2.安装CMake
brew install cmake3.安装依赖
terminal输入
brew install git openblas python
brew install --fresh -vd snappy leveldb gflags glog szip hdf5 lmdb homebrew/science/opencv
brew install --fresh -vd --with-python  protobuf
brew install --fresh -vd boost boost-python
我这里安装的是python3版本:
brew install python34.安装Caffe
下载 Caffe 并修改配置
首先进入安装目录
cd /usr/local/Cellargit clone https://github.com/BVLC/caffe.git
cd caffe
cp Makefile.config.example Makefile.config其实我们用的CMake不用改Makefile.config可是心理作用还是改一下吧,找到Makefile.config(刚copy出来的)搜索CPU_ONLY := 1 ,取消注释
修改后的 Makefile.config
## Refer to http://caffe.berkeleyvision.org/installation.html
# Contributions simplifying and improving our build system are welcome!

# cuDNN acceleration switch (uncomment to build with cuDNN).
# USE_CUDNN := 1

# CPU-only switch (uncomment to build without GPU support).
CPU_ONLY := 1

# uncomment to disable IO dependencies and corresponding data layers
# USE_OPENCV := 0
# USE_LEVELDB := 0
# USE_LMDB := 0

# uncomment to allow MDB_NOLOCK when reading LMDB files (only if necessary)
#	You should not set this flag if you will be reading LMDBs with any
#	possibility of simultaneous read and write
# ALLOW_LMDB_NOLOCK := 1

# Uncomment if you're using OpenCV 3
OPENCV_VERSION := 3

# To customize your choice of compiler, uncomment and set the following.
# N.B. the default for Linux is g++ and the default for OSX is clang++
# CUSTOM_CXX := g++

# CUDA directory contains bin/ and lib/ directories that we need.
# CUDA_DIR := /usr/local/cuda
# On Ubuntu 14.04, if cuda tools are installed via
# "sudo apt-get install nvidia-cuda-toolkit" then use this instead:
# CUDA_DIR := /usr

# CUDA architecture setting: going with all of them.
# For CUDA < 6.0, comment the *_50 through *_61 lines for compatibility.
# For CUDA < 8.0, comment the *_60 and *_61 lines for compatibility.
# For CUDA >= 9.0, comment the *_20 and *_21 lines for compatibility.
# CUDA_ARCH := -gencode arch=compute_30,code=sm_30 \
#		-gencode arch=compute_35,code=sm_35 \
#		-gencode arch=compute_50,code=sm_50 \
#		-gencode arch=compute_52,code=sm_52 \
#		-gencode arch=compute_60,code=sm_60 \
#		-gencode arch=compute_61,code=sm_61 \
#		-gencode arch=compute_61,code=compute_61

# BLAS choice:
# atlas for ATLAS (default)
# mkl for MKL
# open for OpenBlas
BLAS := atlas
# Custom (MKL/ATLAS/OpenBLAS) include and lib directories.
# Leave commented to accept the defaults for your choice of BLAS
# (which should work)!
# BLAS_INCLUDE := /path/to/your/blas
# BLAS_LIB := /path/to/your/blas

# Homebrew puts openblas in a directory that is not on the standard search path
# BLAS_INCLUDE := $(shell brew --prefix openblas)/include
# BLAS_LIB := $(shell brew --prefix openblas)/lib

# This is required only if you will compile the matlab interface.
# MATLAB directory should contain the mex binary in /bin.
# MATLAB_DIR := /usr/local
# MATLAB_DIR := /Applications/MATLAB_R2012b.app

# NOTE: this is required only if you will compile the python interface.
# We need to be able to find Python.h and numpy/arrayobject.h.
# PYTHON_INCLUDE := /usr/include/python2.7 \
#		/usr/lib/python2.7/dist-packages/numpy/core/include
PYTHON_INCLUDE := /usr/local/Cellar/python/3.6.5/Frameworks/Python.framework/Versions/3.6/include  \
                  /usr/local/Cellar/numpy/1.14.2/lib/python3.6/site-packages/numpy/core/include

# Anaconda Python distribution is quite popular. Include path:
# Verify anaconda location, sometimes it's in root.
# ANACONDA_HOME := $(HOME)/anaconda
# PYTHON_INCLUDE := $(ANACONDA_HOME)/include \
		# $(ANACONDA_HOME)/include/python2.7 \
		# $(ANACONDA_HOME)/lib/python2.7/site-packages/numpy/core/include

# Uncomment to use Python 3 (default is Python 2)
# PYTHON_LIBRARIES := boost_python3 python3.5m
# PYTHON_INCLUDE := /usr/include/python3.5m \
#                 /usr/lib/python3.5/dist-packages/numpy/core/include

# We need to be able to find libpythonX.X.so or .dylib.
PYTHON_LIB := /usr/local/Cellar/python/3.6.5/Frameworks/Python.framework/Versions/3.6/lib
# PYTHON_LIB := $(ANACONDA_HOME)/lib

# Homebrew installs numpy in a non standard path (keg only)
# PYTHON_INCLUDE += $(dir $(shell python -c 'import numpy.core; print(numpy.core.__file__)'))/include
# PYTHON_LIB += $(shell brew --prefix numpy)/lib

# Uncomment to support layers written in Python (will link against Python libs)
WITH_PYTHON_LAYER := 1

# Whatever else you find you need goes here.
INCLUDE_DIRS := $(PYTHON_INCLUDE) /usr/local/include  /usr/local/Cellar/opencv/3.4.1_2/include

LIBRARY_DIRS := $(PYTHON_LIB) /usr/local/lib /usr/lib  /usr/local/Cellar/opencv/3.4.1_2/lib

# If Homebrew is installed at a non standard location (for example your home directory) and you use it for general dependencies
# INCLUDE_DIRS += $(shell brew --prefix)/include
# LIBRARY_DIRS += $(shell brew --prefix)/lib

# NCCL acceleration switch (uncomment to build with NCCL)
# https://github.com/NVIDIA/nccl (last tested version: v1.2.3-1+cuda8.0)
# USE_NCCL := 1

# Uncomment to use `pkg-config` to specify OpenCV library paths.
# (Usually not necessary -- OpenCV libraries are normally installed in one of the above $LIBRARY_DIRS.)
# USE_PKG_CONFIG := 1

# N.B. both build and distribute dirs are cleared on `make clean`
BUILD_DIR := build
DISTRIBUTE_DIR := distribute

# Uncomment for debugging. Does not work on OSX due to https://github.com/BVLC/caffe/issues/171
# DEBUG := 1

# The ID of the GPU that 'make runtest' will use to run unit tests.
TEST_GPUID := 0

# enable pretty build (comment to see full commands)
Q ?= @
安装caffe的python接口
cd /usr/local/Cellar/caffe设置python环境变量
vi ~/.bash_profile
# Setting PATH for Python 3.6
# The original version is saved in .bash_profile.pysave
PATH="/Library/Frameworks/Python.framework/Versions/3.6/bin:${PATH}"

# PATH="/usr/local/bin/python3${PATH}"
export PATH
export PYTHONPATH=/usr/local/Cellar/caffe/python:$PYTHONPATH$ source ~/.bash_profile5.安装
mkdir build

cd build

cmake ..

打开CMakeCache.txt,将 CPU_ONLY:BOOL= 赋值ON。

打开CaffeConfig.cmake, 找到set(CPU_ONLY, OFF),同样改成ON。

注意:不要在caffe目录下去执行make;会一直报错;
6.编译
make all
make install
make runtest7.测试mnist
$ cd caffe
$ ./data/mnist/get_mnist.sh        #下载MNIST数据库并解压缩
$ ./examples/mnist/create_mnist.sh #将其转换成Lmdb数据库格式
$ vi examples/mnist/lenet_solver.prototxt # 设置solver_mode: CPU
$ ./examples/mnist/train_lenet.sh  # 训练网络</code>
在正式开始训练和测试我们的模型之前,先对LeNet有一个大致了解,如下图所示,它由一个卷积层、后面跟一个下采样层、再跟另外一个卷积层和另一个下采样层,再之后是两个全连接层组成。这里caffe中用的示例和original LeNet的区别是使用ReLU(Rectified Linear Unit)取代了sigmoid激活函数。

LeNet各层的属性在$CAFFE_ROOT/examples/mnist/lenet_train_test.prototxt中进行了定义。
vi ./examples/mnist/lenet_train_test.prototxt命令即可查看网络各层的定义。name: "LeNet" //网络名称是LeNet
layer {
name: "mnist" //数据层名称是mnist
type: "Data" //类型是数据
top: "data" //输出数据到两个Blob,data和label
top: "label"
include {
phase: TRAIN
}
transform_param {
scale: 0.00390625 //确保输出数据在[0,1)之间,所以乘以1/256
}
data_param {
source: "examples/mnist/mnist_train_lmdb" //从这里获得数据
batch_size: 64 //每批大小是64
backend: LMDB
}
}
layer {
name: "mnist"
type: "Data"
top: "data"
top: "label"
include {
phase: TEST
}
transform_param {
scale: 0.00390625
}
data_param {
source: "examples/mnist/mnist_test_lmdb"
batch_size: 100 //每批大小是100
backend: LMDB
}
}
然后是第一个卷积层和下采样层:
layer {
name: "conv1"
type: "Convolution"
bottom: "data" //以下层传输过来的data Blob作为输入
top: "conv1" //这层数据输出到Blob conv1
param {
lr_mult: 1 //lr为learning rate,学习率
}
param {
lr_mult: 2 //bias的学习率是weight的两倍
}
convolution_param {
num_output: 20 //输出有20个channel
kernel_size: 5 //卷积核大小为5
stride: 1 //卷积步长为1
weight_filler {
type: "xavier" //使用xavier algorithm,根据输入和输出神经元的数目,自动确定初始化权重的范围
}
bias_filler {
type: "constant" //将偏置初始化为常数,且为0
}
}
}
layer {
name: "pool1"
type: "Pooling" //层的类型是Pooling
bottom: "conv1" //输入是conv1 Blob
top: "pool1" //输出是pool1 Blob
pooling_param {
pool: MAX //下采样方式是最大值采样
kernel_size: 2 //在2*2的区域内选择最大值
stride: 2 //步长为2,防止区域有重叠
}
}
第二个卷积层和下采样层也都是类似的,就不再赘述了,下面是两个全连接层:
layer {
name: "ip1"
type: "InnerProduct" //Fully Connection Layer在caffe中也叫Inner Product
bottom: "pool2" //输入是pool2 Blob
top: "ip1" //输出是ip1 Blob
param {
lr_mult: 1
}
param {
lr_mult: 2
}
inner_product_param {
num_output: 500 //输出的神经元个数为500
weight_filler {
type: "xavier"
}
bias_filler {
type: "constant"
}
}
}
layer {
name: "relu1"
type: "ReLU"
bottom: "ip1" //把输入和输出的Blob设为同一个名字,可以是对单个元素操作的relu节省存储空间
top: "ip1"
}
然后是另一个全连接层,不过只有10个输出,对应10个数字。接下来就是Loss层(和Accuracy层,只在test阶段使用):
layer {
name: "loss"
type: "SoftmaxWithLoss"
bottom: "ip2" //将全连接层的prediction和data层输出的label作为输入
bottom: "label"
top: "loss"
}
这一层没有进一步的输出,只计算损失函数值,当BP开始时将loss 报告出来。这个网络的定义就到此结束了。
此外,还有一点需要注意的是,当如下的格式出现时,
layer {
// ...layer definition...
include: { phase: TRAIN }
}
说明这一层只在TRAIN阶段出现在网络中,当处在TEST阶段时,这一层不出现在网络中。没有这个标志的层始终出现在网络当中。所以在以上的定义中,DATA层以不同的BATCH出现了两次,分别是TRAIN和TEST阶段。另外在测试阶段还有一个Accuracy层,每100次迭代就计算一下准确率。
再输入命令行:~/caffe-master$ vi ./examples/mnist/lenet_solver.prototxt,可以看到MNIST solver的配置情况:
The train/test net protocol buffer definition
net: "examples/mnist/lenet_train_test.prototxt"
# test_iter specifies how many forward passes the test should carry out.
# In the case of MNIST, we have test batch size 100 and 100 test iterations,
# covering the full 10,000 testing images.
test_iter: 100
# Carry out testing every 500 training iterations.
test_interval: 500
# The base learning rate, momentum and the weight decay of the network.
base_lr: 0.01
momentum: 0.9
weight_decay: 0.0005
# The learning rate policy
lr_policy: "inv"
gamma: 0.0001
power: 0.75
# Display every 100 iterations
display: 100
# The maximum number of iterations
max_iter: 10000
# snapshot intermediate results
snapshot: 5000
snapshot_prefix: "examples/mnist/lenet"
# solver mode: CPU or GPU
solver_mode: GPU
$ vi examples/mnist/lenet_solver.prototxt # 设置solver_mode: CPU
这里可以看到网络训练的配置,每批次训练100张图片,共100批次10000张图片,基础的学习率是0.1,使用GPU计算。因为这里的训练量较小,所以GPU的速度优势还看不太出来,如果在大一些的网络和训练集中,GPU的速度优势会更加明显
最后输入训练:
./examples/mnist/train_lenet.sh就正式开始了训练和测试,正常情况下像MNIST这个级别的数据量应该几分钟就可以训练完。截取最后几行:
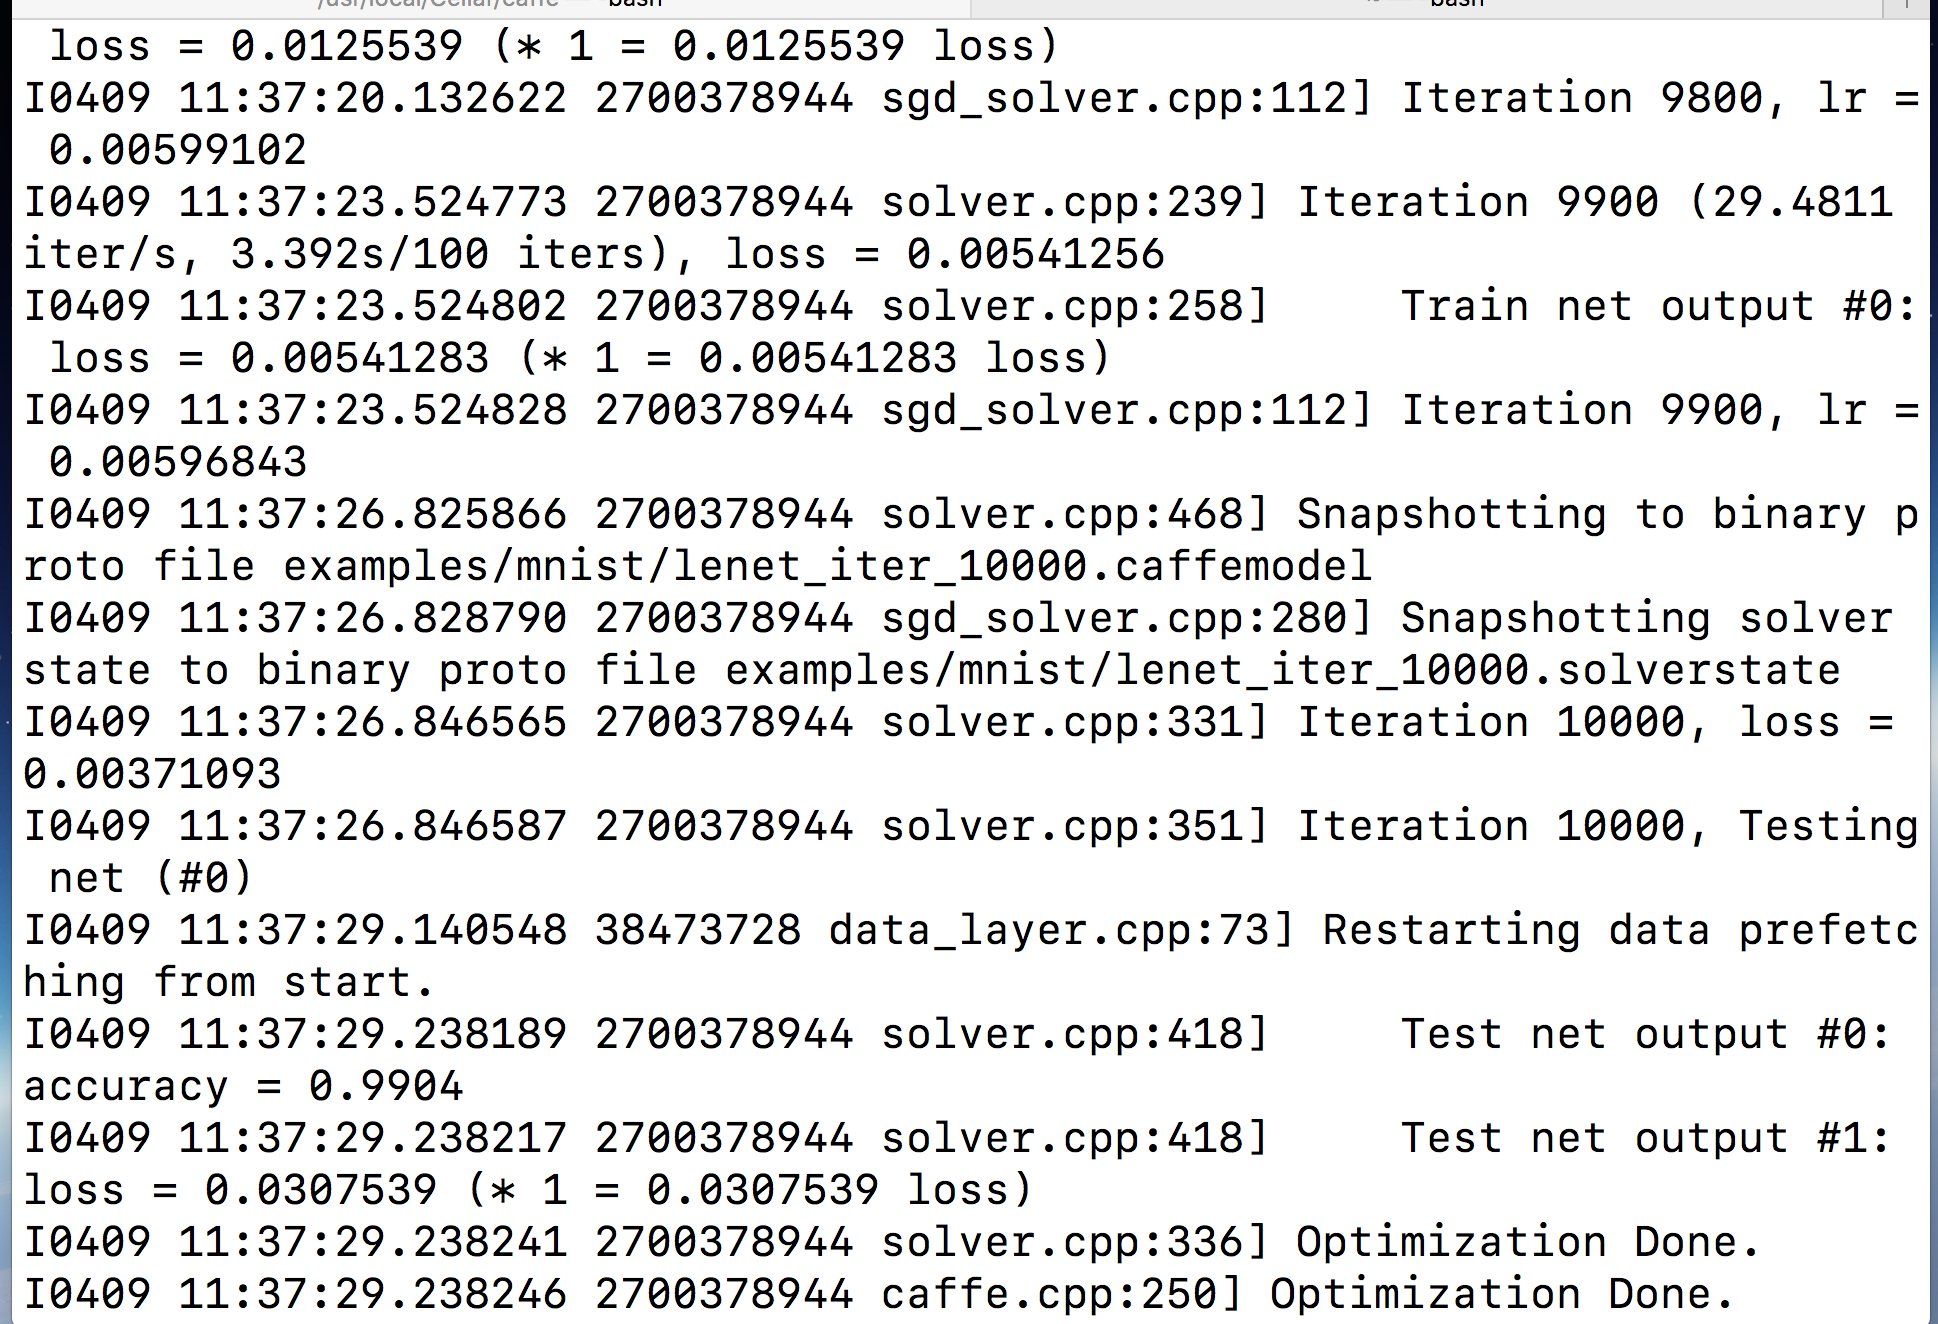
运行结果保存在了lenet_iter_10000.solverstate文件中。


 1496
1496

 被折叠的 条评论
为什么被折叠?
被折叠的 条评论
为什么被折叠?
 到【灌水乐园】发言


