


 这篇博客介绍了如何利用YOLACT模型进行实时实例分割。作者提供了模型的高速性能和训练过程,包括数据集的准备、转换为COCO格式、安装步骤以及评估模型的方法。还分享了自定义数据集的制作流程,使用labelme工具进行标注,并给出了训练指令。
注:2019年04月05日刚出炉的paper
Abstract:我们提出了一个用于实时实例分割的简单全卷积模型,在单个Titan Xp上以33 fps在MS COCO上实现了29.8 mAP,这比以前的任何算法都要快得多。此外,我们只在一个GPU上训练后获得此结果。我们通过将实例分割分成两个并行子任务:(1)生成一组原型掩膜(prototype mask);(2)预测每个实例的掩膜系数(mask coefficients)。然后我们通过将原型与掩模系数线性组合来生成实例掩膜(instance masks)。我们发现因为这个过程不依赖于 repooling,所以这种方法可以产生非常高质量的掩模。此外,我们分析了 the emergent behavior of our prototypes,并表明他们学会以 translation variant manner 定位实例,尽管是完全卷积的。最后,我们还提出了快速NMS(Fast NMS),比标准NMS快12 ms,只有一点点性能损失。
paper:yolact
github:yolact
效果还可以。


下面是实现过程:
Installation
- Set up a Python3 environment.
- Install Pytorch 1.0.1 (or higher) and TorchVision.
- Install some other packages:
# Cython needs to be installed before pycocotools pip install cython pip install opencv-python pillow pycocotools matplotlib - Clone this repository and enter it:
git clone https://github.com/dbolya/yolact.git cd yolact - If you'd like to train YOLACT, download the COCO dataset and the 2014/2017 annotations. Note that this script will take a while and dump 21gb of files into
./data/coco.sh data/scripts/COCO.sh - If you'd like to evaluate YOLACT on
test-dev, downloadtest-devwith this script.sh data/scripts/COCO_test.sh
安装参考源码给的步骤没问题。数据集下载按照coco.sh里下载,我是自行抠出下载地址然后使用wget下载的。
这里放一个百度网盘下载链接供大家使用, 提取码: 2tw3
Evaluation
As of April 5th, 2019 here are our latest models along with their FPS on a Titan Xp and mAP on test-dev:
| Image Size | Backbone | FPS | mAP | Weights | |
|---|---|---|---|---|---|
| 550 | Resnet50-FPN | 42.5 | 28.2 | yolact_resnet50_54_800000.pth | Mirror |
| 550 | Darknet53-FPN | 40.0 | 28.7 | yolact_darknet53_54_800000.pth | Mirror |
| 550 | Resnet101-FPN | 33.0 | 29.8 | yolact_base_54_800000.pth | Mirror |
| 700 | Resnet101-FPN | 23.6 | 31.2 | yolact_im700_54_800000.pth | Mirror |
To evalute the model, put the corresponding weights file in the ./weights directory and run one of the following commands.
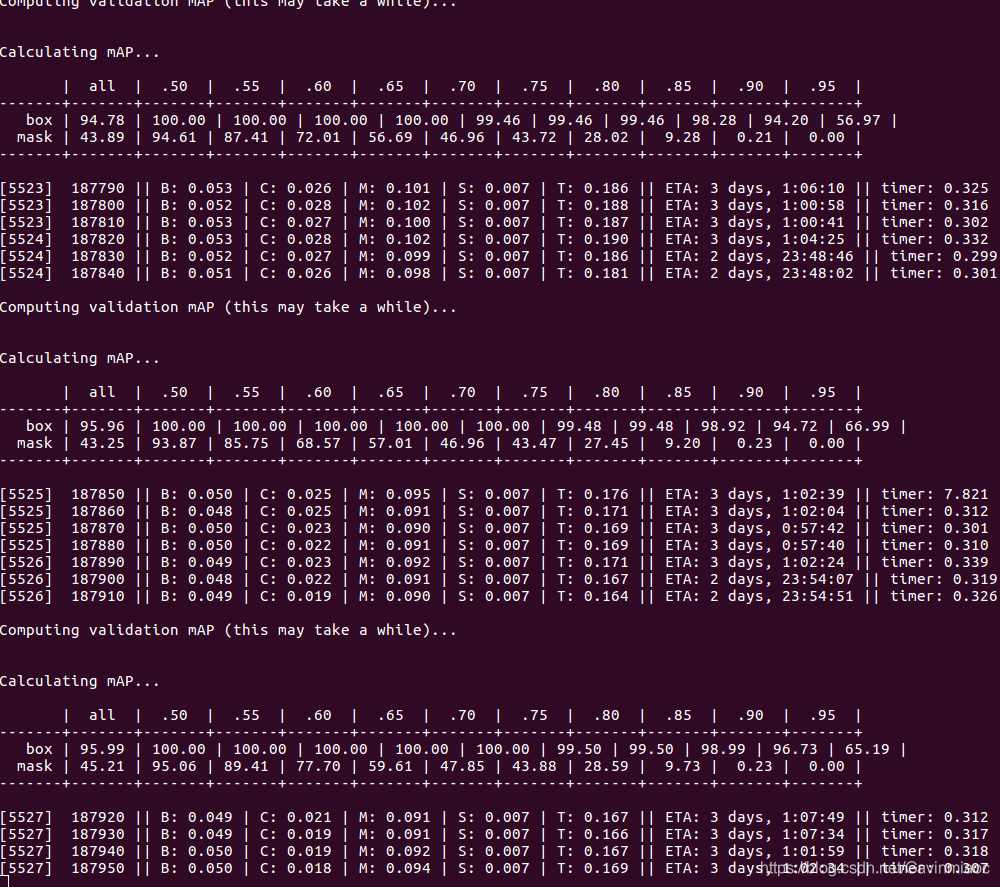
在整个数据集做评估:
python3 eval.py --trained_model=weights/yolact_base_54_800000.pth --dataset=coco2017_dataset单张图片进行测试:
python3 eval.py --trained_model=weights/yolact_base_54_800000.pth --score_threshold=0.3 --top_k=100 --image=my_image.png其他用法汇总如下:
Quantitative Results on COCO
# Quantitatively evaluate a trained model on the entire validation set. Make sure you have COCO downloaded as above.
# This should get 29.92 validation mask mAP last time I checked.
python3 eval.py --trained_model=weights/yolact_base_54_800000.pth  --dataset=coco2017_dataset

# Output a COCOEval json to submit to the website or to use the run_coco_eval.py script.
# This command will create './results/bbox_detections.json' and './results/mask_detections.json' for detection and instance segmentation respectively.
python3 eval.py --trained_model=weights/yolact_base_54_800000.pth --output_coco_json

# You can run COCOEval on the files created in the previous command. The performance should match my implementation in eval.py.
python run_coco_eval.py

# To output a coco json file for test-dev, make sure you have test-dev downloaded from above and go
python3 eval.py --trained_model=weights/yolact_base_54_800000.pth --output_coco_json --dataset=coco2017_testdev_dataset


# Display qualitative results on COCO. From here on I'll use a confidence threshold of 0.3.
python3 eval.py --trained_model=weights/yolact_base_54_800000.pth --dataset=coco2017_dataset --score_threshold=0.3 --top_k=100 --display


Benchmarking on COCO
# Run just the raw model on the first 1k images of the validation set
python eval.py --trained_model=weights/yolact_base_54_800000.pth --benchmark --max_images=1000


Images
# Display qualitative results on the specified image.
python3 eval.py --trained_model=weights/yolact_base_54_800000.pth --score_threshold=0.3 --top_k=100 --image=my_image.png

# Process an image and save it to another file.
python3 eval.py --trained_model=weights/yolact_base_54_800000.pth --score_threshold=0.3 --top_k=100 --image=input_image.png:output_image.png

# Process a whole folder of images.
python3 eval.py --trained_model=weights/yolact_base_54_800000.pth --score_threshold=0.3 --top_k=100 --images=path/to/input/folder:path/to/output/folder

eg:python3 eval.py --trained_model=weights/yolact_base_54_800000.pth --score_threshold=0.3 --top_k=100 --images=data/test:data/results


# Display a video in real-time. "--video_multiframe" will process that many frames at once for improved performance.
python eval.py --trained_model=weights/yolact_base_54_800000.pth --score_threshold=0.3 --top_k=100 --video_multiframe=2 --video=my_video.mp4

# Display a webcam feed in real-time. If you have multiple webcams pass the index of the webcam you want instead of 0.
python eval.py --trained_model=weights/yolact_base_54_800000.pth --score_threshold=0.3 --top_k=100 --video_multiframe=2 --video=0

# Process a video and save it to another file. This is unoptimized.
python eval.py --trained_model=weights/yolact_base_54_800000.pth --score_threshold=0.3 --top_k=100 --video=input_video.mp4:output_video.mp4


## training
# Trains using the base config with a batch size of 8 (the default).
python train.py --config=yolact_base_config

# Trains yolact_base_config with a batch_size of 5. For the 550px models, 1 batch takes up around 1.5 gigs of VRAM, so specify accordingly.
python3 train.py --config=yolact_base_config --batch_size=5

# Resume training yolact_base with a specific weight file and start from the iteration specified in the weight file's name.
python3 train.py --config=yolact_base_config --resume=weights/yolact_base_10_32100.pth --start_iter=-1

# Use the help option to see a description of all available command line arguments
python train.py --help
下面是重点,如何训练自己的数据集?
最重要的当然是数据集制作,我们借用labeme工具进行自定义数据集制作。
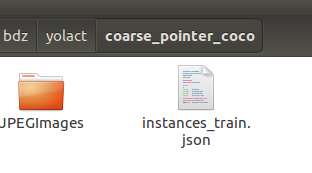
最终训练的数据集文件夹如下:
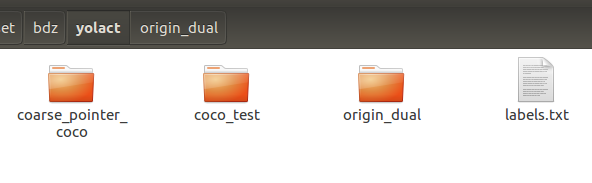
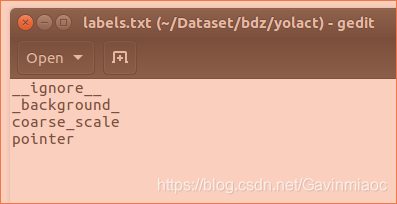
coarse_pointer_coco是自动生成的coco格式数据集,源数据在origin_dual,labels.txt是实例类别。
下面讲下制作过程:
labelme进行实例分割可以参考这里:https://github.com/wkentaro/labelme/tree/master/examples/instance_segmentation
安装好后直接终端运行labelme指令,然后标注自己关心的实例对象,并分配类别ID
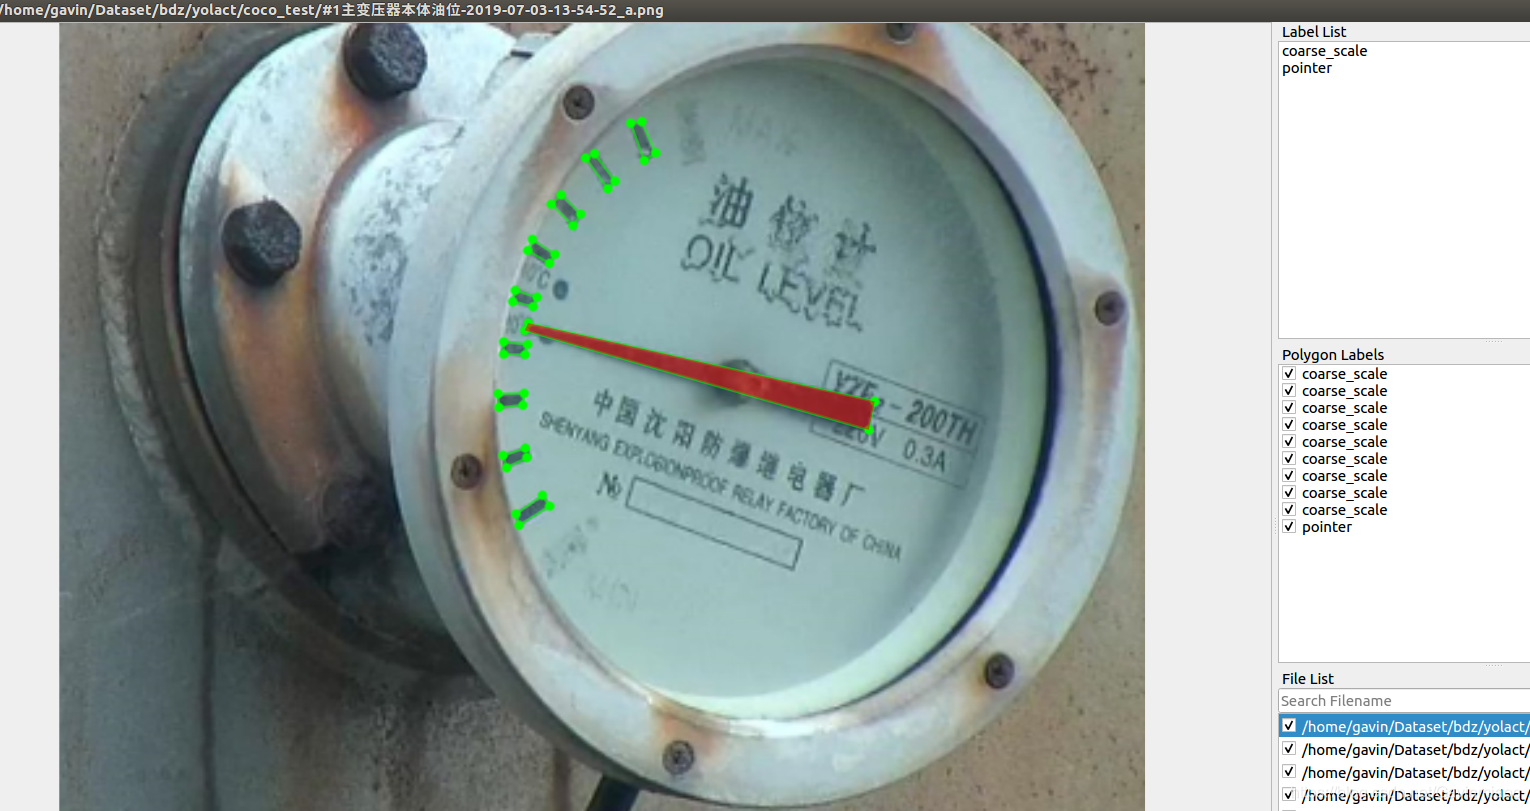
以上只是举例,仅供参考。
标注完后每个图片对应一个json文件。
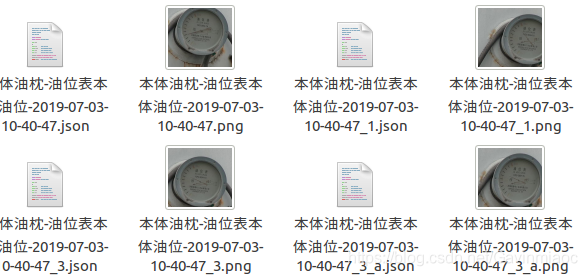
全部标注完毕后,进行格式生成。
Convert to COCO-format Dataset
# It generates:
#   - data_dataset_coco/JPEGImages
#   - data_dataset_coco/annotations.json
./labelme2coco.py data_annotated data_dataset_coco --labels labels.txt
生成的内容如下:
训练指令如下:
python3 train.py --config=yolact_im400_custom_cfg --batch_size=6其中完整配置文件:
from backbone import ResNetBackbone, VGGBackbone, ResNetBackboneGN, DarkNetBackbone
from math import sqrt
import torch

# for making bounding boxes pretty
COLORS = ((244,  67,  54),
          (233,  30,  99),
          (156,  39, 176),
          (103,  58, 183),
          ( 63,  81, 181),
          ( 33, 150, 243),
          (  3, 169, 244),
          (  0, 188, 212),
          (  0, 150, 136),
          ( 76, 175,  80),
          (139, 195,  74),
          (205, 220,  57),
          (255, 235,  59),
          (255, 193,   7),
          (255, 152,   0),
          (255,  87,  34),
          (121,  85,  72),
          (158, 158, 158),
          ( 96, 125, 139))


# These are in BGR and are for ImageNet
MEANS = (103.94, 116.78, 123.68)
STD   = (57.38, 57.12, 58.40)

COCO_CLASSES = ('person', 'bicycle', 'car', 'motorcycle', 'airplane', 'bus',
                'train', 'truck', 'boat', 'traffic light', 'fire hydrant',
                'stop sign', 'parking meter', 'bench', 'bird', 'cat', 'dog',
                'horse', 'sheep', 'cow', 'elephant', 'bear', 'zebra', 'giraffe',
                'backpack', 'umbrella', 'handbag', 'tie', 'suitcase', 'frisbee',
                'skis', 'snowboard', 'sports ball', 'kite', 'baseball bat',
                'baseball glove', 'skateboard', 'surfboard', 'tennis racket',
                'bottle', 'wine glass', 'cup', 'fork', 'knife', 'spoon', 'bowl',
                'banana', 'apple', 'sandwich', 'orange', 'broccoli', 'carrot',
                'hot dog', 'pizza', 'donut', 'cake', 'chair', 'couch',
                'potted plant', 'bed', 'dining table', 'toilet', 'tv', 'laptop',
                'mouse', 'remote', 'keyboard', 'cell phone', 'microwave', 'oven',
                'toaster', 'sink', 'refrigerator', 'book', 'clock', 'vase',
                'scissors', 'teddy bear', 'hair drier', 'toothbrush')

COCO_LABEL_MAP = { 1:  1,  2:  2,  3:  3,  4:  4,  5:  5,  6:  6,  7:  7,  8:  8,
                   9:  9, 10: 10, 11: 11, 13: 12, 14: 13, 15: 14, 16: 15, 17: 16,
                  18: 17, 19: 18, 20: 19, 21: 20, 22: 21, 23: 22, 24: 23, 25: 24,
                  27: 25, 28: 26, 31: 27, 32: 28, 33: 29, 34: 30, 35: 31, 36: 32,
                  37: 33, 38: 34, 39: 35, 40: 36, 41: 37, 42: 38, 43: 39, 44: 40,
                  46: 41, 47: 42, 48: 43, 49: 44, 50: 45, 51: 46, 52: 47, 53: 48,
                  54: 49, 55: 50, 56: 51, 57: 52, 58: 53, 59: 54, 60: 55, 61: 56,
                  62: 57, 63: 58, 64: 59, 65: 60, 67: 61, 70: 62, 72: 63, 73: 64,
                  74: 65, 75: 66, 76: 67, 77: 68, 78: 69, 79: 70, 80: 71, 81: 72,
                  82: 73, 84: 74, 85: 75, 86: 76, 87: 77, 88: 78, 89: 79, 90: 80}


# ----------------------- CONFIG CLASS ----------------------- #

class Config(object):
    """
    Holds the configuration for anything you want it to.
    To get the currently active config, call get_cfg().

    To use, just do cfg.x instead of cfg['x'].
    I made this because doing cfg['x'] all the time is dumb.
    """

    def __init__(self, config_dict):
        for key, val in config_dict.items():
            self.__setattr__(key, val)

    def copy(self, new_config_dict={}):
        """
        Copies this config into a new config object, making
        the changes given by new_config_dict.
        """

        ret = Config(vars(self))

        for key, val in new_config_dict.items():
            ret.__setattr__(key, val)

        return ret

    def replace(self, new_config_dict):
        """
        Copies new_config_dict into this config object.
        Note: new_config_dict can also be a config object.
        """
        if isinstance(new_config_dict, Config):
            new_config_dict = vars(new_config_dict)

        for key, val in new_config_dict.items():
            self.__setattr__(key, val)

    def print(self):
        for k, v in vars(self).items():
            print(k, ' = ', v)


# ----------------------- DATASETS ----------------------- #

dataset_base = Config({
    'name': 'Base Dataset',

    # Training images and annotations
    'train_images': '/media/gavin/home/gavin/DataSet/pose_esm/coco/images/train2017/',
    'train_info':   'path_to_annotation_file',

    # Validation images and annotations.
    'valid_images': '/media/gavin/home/gavin/DataSet/pose_esm/coco/images/val2017/',
    'valid_info':   'path_to_annotation_file',

    # Whether or not to load GT. If this is False, eval.py quantitative evaluation won't work.
    'has_gt': True,

    # A list of names for each of you classes.
    'class_names': COCO_CLASSES,

    # COCO class ids aren't sequential, so this is a bandage fix. If your ids aren't sequential,
    # provide a map from category_id -> index in class_names + 1 (the +1 is there because it's 1-indexed).
    # If not specified, this just assumes category ids start at 1 and increase sequentially.
    'label_map': None
})

coco2014_dataset = dataset_base.copy({
    'name': 'COCO 2014',

    'train_info': './data/coco/annotations/instances_train2014.json',
    'valid_info': './data/coco/annotations/instances_val2014.json',

    'label_map': COCO_LABEL_MAP
})

coco2017_dataset = dataset_base.copy({
    'name': 'COCO 2017',

    'train_info': '/media/gavin/home/gavin/DataSet/pose_esm/coco/annotations/instances_train2017.json',
    'valid_info': '/media/gavin/home/gavin/DataSet/pose_esm/coco/annotations/instances_val2017.json',

    'label_map': COCO_LABEL_MAP
})

coco2017_testdev_dataset = dataset_base.copy({
    'name': 'COCO 2017 Test-Dev',

    'valid_info': '/media/gavin/home/gavin/DataSet/pose_esm/coco/annotations/image_info_test-dev2017.json',
    'has_gt': False,

    'label_map': COCO_LABEL_MAP
})


my_custom_dataset = dataset_base.copy({
    'name': 'my_custom_dataset',

    'train_images': '/home/gavin/Dataset/bdz/yolact/coarse_pointer_coco/',
    'train_info':   '/home/gavin/Dataset/bdz/yolact/coarse_pointer_coco/instances_train.json',

    'valid_images': '/home/gavin/Dataset/bdz/yolact/coarse_pointer_coco/',
    'valid_info':   '/home/gavin/Dataset/bdz/yolact/coarse_pointer_coco/instances_train.json',

    'has_gt': True,
    'class_names': ('coarse_scale', 'pointer', )
})


# ----------------------- TRANSFORMS ----------------------- #

resnet_transform = Config({
    'channel_order': 'RGB',
    'normalize': True,
    'subtract_means': False,
    'to_float': False,
})

vgg_transform = Config({
    # Note that though vgg is traditionally BGR,
    # the channel order of vgg_reducedfc.pth is RGB.
    'channel_order': 'RGB',
    'normalize': False,
    'subtract_means': True,
    'to_float': False,
})

darknet_transform = Config({
    'channel_order': 'RGB',
    'normalize': False,
    'subtract_means': False,
    'to_float': True,
})


# ----------------------- BACKBONES ----------------------- #

backbone_base = Config({
    'name': 'Base Backbone',
    'path': 'path/to/pretrained/weights',
    'type': object,
    'args': tuple(),
    'transform': resnet_transform,

    'selected_layers': list(),
    'pred_scales': list(),
    'pred_aspect_ratios': list(),

    'use_pixel_scales': False,
    'preapply_sqrt': True,
    'use_square_anchors': False,
})

resnet101_backbone = backbone_base.copy({
    'name': 'ResNet101',
    'path': 'resnet101_reducedfc.pth',
    'type': ResNetBackbone,
    'args': ([3, 4, 23, 3],),
    'transform': resnet_transform,

    'selected_layers': list(range(2, 8)),
    'pred_scales': [[1]]*6,
    'pred_aspect_ratios': [ [[0.66685089, 1.7073535, 0.87508774, 1.16524493, 0.49059086]] ] * 6,
})

resnet101_gn_backbone = backbone_base.copy({
    'name': 'ResNet101_GN',
    'path': 'R-101-GN.pkl',
    'type': ResNetBackboneGN,
    'args': ([3, 4, 23, 3],),
    'transform': resnet_transform,

    'selected_layers': list(range(2, 8)),
    'pred_scales': [[1]]*6,
    'pred_aspect_ratios': [ [[0.66685089, 1.7073535, 0.87508774, 1.16524493, 0.49059086]] ] * 6,
})

resnet50_backbone = resnet101_backbone.copy({
    'name': 'ResNet50',
    'path': 'resnet50-19c8e357.pth',
    'type': ResNetBackbone,
    'args': ([3, 4, 6, 3],),
    'transform': resnet_transform,
})

darknet53_backbone = backbone_base.copy({
    'name': 'DarkNet53',
    'path': 'darknet53.pth',
    'type': DarkNetBackbone,
    'args': ([1, 2, 8, 8, 4],),
    'transform': darknet_transform,

    'selected_layers': list(range(3, 9)),
    'pred_scales': [[3.5, 4.95], [3.6, 4.90], [3.3, 4.02], [2.7, 3.10], [2.1, 2.37], [1.8, 1.92]],
    'pred_aspect_ratios': [ [[1, sqrt(2), 1/sqrt(2), sqrt(3), 1/sqrt(3)][:n], [1]] for n in [3, 5, 5, 5, 3, 3] ],
})

vgg16_arch = [[64, 64],
              [ 'M', 128, 128],
              [ 'M', 256, 256, 256],
              [('M', {'kernel_size': 2, 'stride': 2, 'ceil_mode': True}), 512, 512, 512],
              [ 'M', 512, 512, 512],
              [('M',  {'kernel_size': 3, 'stride':  1, 'padding':  1}),
               (1024, {'kernel_size': 3, 'padding': 6, 'dilation': 6}),
               (1024, {'kernel_size': 1})]]

vgg16_backbone = backbone_base.copy({
    'name': 'VGG16',
    'path': 'vgg16_reducedfc.pth',
    'type': VGGBackbone,
    'args': (vgg16_arch, [(256, 2), (128, 2), (128, 1), (128, 1)], [3]),
    'transform': vgg_transform,

    'selected_layers': [3] + list(range(5, 10)),
    'pred_scales': [[5, 4]]*6,
    'pred_aspect_ratios': [ [[1], [1, sqrt(2), 1/sqrt(2), sqrt(3), 1/sqrt(3)][:n]] for n in [3, 5, 5, 5, 3, 3] ],
})


# ----------------------- MASK BRANCH TYPES ----------------------- #

mask_type = Config({
    # Direct produces masks directly as the output of each pred module.
    # This is denoted as fc-mask in the paper.
    # Parameters: mask_size, use_gt_bboxes
    'direct': 0,

    # Lincomb produces coefficients as the output of each pred module then uses those coefficients
    # to linearly combine features from a prototype network to create image-sized masks.
    # Parameters:
    #   - masks_to_train (int): Since we're producing (near) full image masks, it'd take too much
    #                           vram to backprop on every single mask. Thus we select only a subset.
    #   - mask_proto_src (int): The input layer to the mask prototype generation network. This is an
    #                           index in backbone.layers. Use to use the image itself instead.
    #   - mask_proto_net (list<tuple>): A list of layers in the mask proto network with the last one
    #                                   being where the masks are taken from. Each conv layer is in
    #                                   the form (num_features, kernel_size, **kwdargs). An empty
    #                                   list means to use the source for prototype masks. If the
    #                                   kernel_size is negative, this creates a deconv layer instead.
    #                                   If the kernel_size is negative and the num_features is None,
    #                                   this creates a simple bilinear interpolation layer instead.
    #   - mask_proto_bias (bool): Whether to include an extra coefficient that corresponds to a proto
    #                             mask of all ones.
    #   - mask_proto_prototype_activation (func): The activation to apply to each prototype mask.
    #   - mask_proto_mask_activation (func): After summing the prototype masks with the predicted
    #                                        coeffs, what activation to apply to the final mask.
    #   - mask_proto_coeff_activation (func): The activation to apply to the mask coefficients.
    #   - mask_proto_crop (bool): If True, crop the mask with the predicted bbox during training.
    #   - mask_proto_crop_expand (float): If cropping, the percent to expand the cropping bbox by
    #                                     in each direction. This is to make the model less reliant
    #                                     on perfect bbox predictions.
    #   - mask_proto_loss (str [l1|disj]): If not None, apply an l1 or disjunctive regularization
    #                                      loss directly to the prototype masks.
    #   - mask_proto_binarize_downsampled_gt (bool): Binarize GT after dowsnampling during training?
    #   - mask_proto_normalize_mask_loss_by_sqrt_area (bool): Whether to normalize mask loss by sqrt(sum(gt))
    #   - mask_proto_reweight_mask_loss (bool): Reweight mask loss such that background is divided by
    #                                           #background and foreground is divided by #foreground.
    #   - mask_proto_grid_file (str): The path to the grid file to use with the next option.
    #                                 This should be a numpy.dump file with shape [numgrids, h, w]
    #                                 where h and w are w.r.t. the mask_proto_src convout.
    #   - mask_proto_use_grid (bool): Whether to add extra grid features to the proto_net input.
    #   - mask_proto_coeff_gate (bool): Add an extra set of sigmoided coefficients that is multiplied
    #                                   into the predicted coefficients in order to "gate" them.
    #   - mask_proto_prototypes_as_features (bool): For each prediction module, downsample the prototypes
    #                                 to the convout size of that module and supply the prototypes as input
    #                                 in addition to the already supplied backbone features.
    #   - mask_proto_prototypes_as_features_no_grad (bool): If the above is set, don't backprop gradients to
    #                                 to the prototypes from the network head.
    #   - mask_proto_remove_empty_masks (bool): Remove masks that are downsampled to 0 during loss calculations.
    #   - mask_proto_reweight_coeff (float): The coefficient to multiple the forground pixels with if reweighting.
    #   - mask_proto_coeff_diversity_loss (bool): Apply coefficient diversity loss on the coefficients so that the same
    #                                             instance has similar coefficients.
    #   - mask_proto_coeff_diversity_alpha (float): The weight to use for the coefficient diversity loss.
    #   - mask_proto_normalize_emulate_roi_pooling (bool): Normalize the mask loss to emulate roi pooling's affect on loss.
    #   - mask_proto_double_loss (bool): Whether to use the old loss in addition to any special new losses.
    #   - mask_proto_double_loss_alpha (float): The alpha to weight the above loss.
    'lincomb': 1,
})


# ----------------------- ACTIVATION FUNCTIONS ----------------------- #

activation_func = Config({
    'tanh':    torch.tanh,
    'sigmoid': torch.sigmoid,
    'softmax': lambda x: torch.nn.functional.softmax(x, dim=-1),
    'relu':    lambda x: torch.nn.functional.relu(x, inplace=True),
    'none':    lambda x: x,
})


# ----------------------- FPN DEFAULTS ----------------------- #

fpn_base = Config({
    # The number of features to have in each FPN layer
    'num_features': 256,

    # The upsampling mode used
    'interpolation_mode': 'bilinear',

    # The number of extra layers to be produced by downsampling starting at P5
    'num_downsample': 1,

    # Whether to down sample with a 3x3 stride 2 conv layer instead of just a stride 2 selection
    'use_conv_downsample': False,

    # Whether to pad the pred layers with 1 on each side (I forgot to add this at the start)
    # This is just here for backwards compatibility
    'pad': True,
})


# ----------------------- CONFIG DEFAULTS ----------------------- #

coco_base_config = Config({
    'dataset': coco2014_dataset,
    'num_classes': 81, # This should include the background class

    'max_iter': 400000,

    # The maximum number of detections for evaluation
    'max_num_detections': 100,

    # dw' = momentum * dw - lr * (grad + decay * w)
    'lr': 1e-3,
    'momentum': 0.9,
    'decay': 5e-4,

    # For each lr step, what to multiply the lr with
    'gamma': 0.1,
    'lr_steps': (280000, 360000, 400000),

    # Initial learning rate to linearly warmup from (if until > 0)
    'lr_warmup_init': 1e-4,

    # If > 0 then increase the lr linearly from warmup_init to lr each iter for until iters
    'lr_warmup_until': 500,

    # The terms to scale the respective loss by
    'conf_alpha': 1,
    'bbox_alpha': 1.5,
    'mask_alpha': 0.4 / 256 * 140 * 140, # Some funky equation. Don't worry about it.

    # Eval.py sets this if you just want to run YOLACT as a detector
    'eval_mask_branch': True,

    # See mask_type for details.
    'mask_type': mask_type.direct,
    'mask_size': 16,
    'masks_to_train': 100,
    'mask_proto_src': None,
    'mask_proto_net': [(256, 3, {}), (256, 3, {})],
    'mask_proto_bias': False,
    'mask_proto_prototype_activation': activation_func.relu,
    'mask_proto_mask_activation': activation_func.sigmoid,
    'mask_proto_coeff_activation': activation_func.tanh,
    'mask_proto_crop': True,
    'mask_proto_crop_expand': 0,
    'mask_proto_loss': None,
    'mask_proto_binarize_downsampled_gt': True,
    'mask_proto_normalize_mask_loss_by_sqrt_area': False,
    'mask_proto_reweight_mask_loss': False,
    'mask_proto_grid_file': 'data/grid.npy',
    'mask_proto_use_grid':  False,
    'mask_proto_coeff_gate': False,
    'mask_proto_prototypes_as_features': False,
    'mask_proto_prototypes_as_features_no_grad': False,
    'mask_proto_remove_empty_masks': False,
    'mask_proto_reweight_coeff': 1,
    'mask_proto_coeff_diversity_loss': False,
    'mask_proto_coeff_diversity_alpha': 1,
    'mask_proto_normalize_emulate_roi_pooling': False,
    'mask_proto_double_loss': False,
    'mask_proto_double_loss_alpha': 1,

    # SSD data augmentation parameters
    # Randomize hue, vibrance, etc.
    'augment_photometric_distort': True,
    # Have a chance to scale down the image and pad (to emulate smaller detections)
    'augment_expand': True,
    # Potentialy sample a random crop from the image and put it in a random place
    'augment_random_sample_crop': True,
    # Mirror the image with a probability of 1/2
    'augment_random_mirror': True,
    # Flip the image vertically with a probability of 1/2
    'augment_random_flip': False,
    # With uniform probability, rotate the image [0,90,180,270] degrees
    'augment_random_rot90': False,

    # If using batchnorm anywhere in the backbone, freeze the batchnorm layer during training.
    # Note: any additional batch norm layers after the backbone will not be frozen.
    'freeze_bn': False,

    # Set this to a config object if you want an FPN (inherit from fpn_base). See fpn_base for details.
    'fpn': None,

    # Use the same weights for each network head
    'share_prediction_module': False,

    # For hard negative mining, instead of using the negatives that are leastl confidently background,
    # use negatives that are most confidently not background.
    'ohem_use_most_confident': False,

    # Use focal loss as described in https://arxiv.org/pdf/1708.02002.pdf instead of OHEM
    'use_focal_loss': False,
    'focal_loss_alpha': 0.25,
    'focal_loss_gamma': 2,

    # The initial bias toward forground objects, as specified in the focal loss paper
    'focal_loss_init_pi': 0.01,

    # Whether to use sigmoid focal loss instead of softmax, all else being the same.
    'use_sigmoid_focal_loss': False,

    # Use class[0] to be the objectness score and class[1:] to be the softmax predicted class.
    # Note: at the moment this is only implemented if use_focal_loss is on.
    'use_objectness_score': False,

    # Adds a global pool + fc layer to the smallest selected layer that predicts the existence of each of the 80 classes.
    # This branch is only evaluated during training time and is just there for multitask learning.
    'use_class_existence_loss': False,
    'class_existence_alpha': 1,

    # Adds a 1x1 convolution directly to the biggest selected layer that predicts a semantic segmentations for each of the 80 classes.
    # This branch is only evaluated during training time and is just there for multitask learning.
    'use_semantic_segmentation_loss': False,
    'semantic_segmentation_alpha': 1,

    # Match gt boxes using the Box2Pix change metric instead of the standard IoU metric.
    # Note that the threshold you set for iou_threshold should be negative with this setting on.
    'use_change_matching': False,

    # Uses the same network format as mask_proto_net, except this time it's for adding extra head layers before the final
    # prediction in prediction modules. If this is none, no extra layers will be added.
    'extra_head_net': None,

    # What params should the final head layers have (the ones that predict box, confidence, and mask coeffs)
    'head_layer_params': {'kernel_size': 3, 'padding': 1},

    # Add extra layers between the backbone and the network heads
    # The order is (bbox, conf, mask)
    'extra_layers': (0, 0, 0),

    # During training, to match detections with gt, first compute the maximum gt IoU for each prior.
    # Then, any of those priors whose maximum overlap is over the positive threshold, mark as positive.
    # For any priors whose maximum is less than the negative iou threshold, mark them as negative.
    # The rest are neutral and not used in calculating the loss.
    'positive_iou_threshold': 0.5,
    'negative_iou_threshold': 0.5,

    # If less than 1, anchors treated as a negative that have a crowd iou over this threshold with
    # the crowd boxes will be treated as a neutral.
    'crowd_iou_threshold': 1,

    # This is filled in at runtime by Yolact's __init__, so don't touch it
    'mask_dim': None,

    # Input image size. If preserve_aspect_ratio is False, min_size is ignored.
    'min_size': 200,
    'max_size': 300,

    # Whether or not to do post processing on the cpu at test time
    'force_cpu_nms': True,

    # Whether to use mask coefficient cosine similarity nms instead of bbox iou nms
    'use_coeff_nms': False,

    # Whether or not to have a separate branch whose sole purpose is to act as the coefficients for coeff_diversity_loss
    # Remember to turn on coeff_diversity_loss, or these extra coefficients won't do anything!
    # To see their effect, also remember to turn on use_coeff_nms.
    'use_instance_coeff': False,
    'num_instance_coeffs': 64,

    # Whether or not to tie the mask loss / box loss to 0
    'train_masks': True,
    'train_boxes': True,
    # If enabled, the gt masks will be cropped using the gt bboxes instead of the predicted ones.
    # This speeds up training time considerably but results in much worse mAP at test time.
    'use_gt_bboxes': False,

    # Whether or not to preserve aspect ratio when resizing the image.
    # If True, uses the faster r-cnn resizing scheme.
    # If False, all images are resized to max_size x max_size
    'preserve_aspect_ratio': False,

    # Whether or not to use the prediction module (c) from DSSD
    'use_prediction_module': False,

    # Whether or not to use the predicted coordinate scheme from Yolo v2
    'use_yolo_regressors': False,

    # For training, bboxes are considered "positive" if their anchors have a 0.5 IoU overlap
    # or greater with a ground truth box. If this is true, instead of using the anchor boxes
    # for this IoU computation, the matching function will use the predicted bbox coordinates.
    # Don't turn this on if you're not using yolo regressors!
    'use_prediction_matching': False,

    # A list of settings to apply after the specified iteration. Each element of the list should look like
    # (iteration, config_dict) where config_dict is a dictionary you'd pass into a config object's init.
    'delayed_settings': [],

    # Use command-line arguments to set this.
    'no_jit': False,

    'backbone': None,
    'name': 'base_config',
})


# ----------------------- YOLACT v1.0 CONFIGS ----------------------- #

yolact_base_config = coco_base_config.copy({
    'name': 'yolact_base',

    # Dataset stuff
    'dataset': coco2017_dataset,
    'num_classes': len(coco2017_dataset.class_names) + 1,

    # Image Size
    'max_size': 550,

    # Training params
    'lr_steps': (280000, 600000, 700000, 750000),
    'max_iter': 800000,

    # Backbone Settings
    'backbone': resnet101_backbone.copy({
        'selected_layers': list(range(1, 4)),
        'use_pixel_scales': True,
        'preapply_sqrt': False,
        'use_square_anchors': True, # This is for backward compatability with a bug

        'pred_aspect_ratios': [ [[1, 1/2, 2]] ]*5,
        'pred_scales': [[24], [48], [96], [192], [384]],
    }),

    # FPN Settings
    'fpn': fpn_base.copy({
        'use_conv_downsample': True,
        'num_downsample': 2,
    }),

    # Mask Settings
    'mask_type': mask_type.lincomb,
    'mask_alpha': 6.125,
    'mask_proto_src': 0,
    'mask_proto_net': [(256, 3, {'padding': 1})] * 3 + [(None, -2, {}), (256, 3, {'padding': 1})] + [(32, 1, {})],
    'mask_proto_normalize_emulate_roi_pooling': True,

    # Other stuff
    'share_prediction_module': True,
    'extra_head_net': [(256, 3, {'padding': 1})],

    'positive_iou_threshold': 0.5,
    'negative_iou_threshold': 0.4,

    'crowd_iou_threshold': 0.7,

    'use_semantic_segmentation_loss': True,
})

yolact_im400_config = yolact_base_config.copy({
    'name': 'yolact_im400',

    'max_size': 400,
    'backbone': yolact_base_config.backbone.copy({
        'pred_scales': [[int(x[0] / yolact_base_config.max_size * 400)] for x in yolact_base_config.backbone.pred_scales],
    }),
})

yolact_im700_config = yolact_base_config.copy({
    'name': 'yolact_im700',

    'masks_to_train': 300,
    'max_size': 700,
    'backbone': yolact_base_config.backbone.copy({
        'pred_scales': [[int(x[0] / yolact_base_config.max_size * 700)] for x in yolact_base_config.backbone.pred_scales],
    }),
})

yolact_darknet53_config = yolact_base_config.copy({
    'name': 'yolact_darknet53',

    'backbone': darknet53_backbone.copy({
        'selected_layers': list(range(2, 5)),

        'pred_scales': yolact_base_config.backbone.pred_scales,
        'pred_aspect_ratios': yolact_base_config.backbone.pred_aspect_ratios,
        'use_pixel_scales': True,
        'preapply_sqrt': False,
        'use_square_anchors': True, # This is for backward compatability with a bug
    }),
})

yolact_resnet50_config = yolact_base_config.copy({
    'name': 'yolact_resnet50',

    'backbone': resnet50_backbone.copy({
        'selected_layers': list(range(1, 4)),

        'pred_scales': yolact_base_config.backbone.pred_scales,
        'pred_aspect_ratios': yolact_base_config.backbone.pred_aspect_ratios,
        'use_pixel_scales': True,
        'preapply_sqrt': False,
        'use_square_anchors': True, # This is for backward compatability with a bug
    }),
})


yolact_im400_custom_cfg = yolact_base_config.copy({
    'name': 'yolact_im400',
    # Dataset stuff
    'dataset': my_custom_dataset,
    'num_classes': len(my_custom_dataset.class_names) + 1,

    'max_size': 416,
    'backbone': yolact_base_config.backbone.copy({
        'pred_scales': [[int(x[0] / yolact_base_config.max_size * 400)] for x in yolact_base_config.backbone.pred_scales],
    }),
})


# Default config
cfg = yolact_base_config.copy()

def set_cfg(config_name:str):
    """ Sets the active config. Works even if cfg is already imported! """
    global cfg

    # Note this is not just an eval because I'm lazy, but also because it can
    # be used like ssd300_config.copy({'max_size': 400}) for extreme fine-tuning
    cfg.replace(eval(config_name))

def set_dataset(dataset_name:str):
    """ Sets the dataset of the current config. """
    cfg.dataset = eval(dataset_name)
参考文献:
1.https://zhuanlan.zhihu.com/p/62652145


 6705
6705

 被折叠的 条评论
为什么被折叠?
被折叠的 条评论
为什么被折叠?
 到【灌水乐园】发言


