


学了这么久也该实践应用一下,在我们勤勤恳恳的工作之余(bushi)来画一个经常用到的粒子动画吧
今天是周五,糟糕快下班了让我们抓点紧学完下班咯 🕔 ❗❗❗
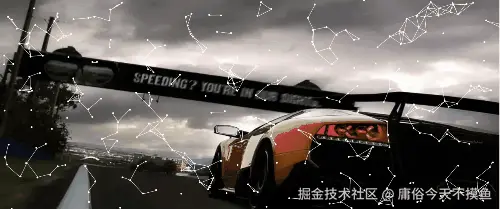
这就是本期我们要实现的效果啦,粒子动画,鼠标跟随及点击增加
话不多说上代码我们细细分析:
1.起手一个平A 先来个<canvas>
<template>
  <div ref="body" style="width: 100%;height: 100vh;">
    <canvas id="myCanvas"></canvas>
  </div>
</template>
2.初始化我们的canvas
获取当前区域宽高,初始化canvas,并保存宽高为下一步做准备
      const body = this.$refs.body
      const canvas = document.getElementById('myCanvas')

      canvas.width = body.clientWidth
      canvas.height = body.clientHeight

      let aw = canvas.width
      let ah = canvas.height

      const ctx = canvas.getContext('2d')
      // 自适应宽高
      window.addEventListener('resize', () => {
        canvas.width = body.clientWidth
        canvas.height = body.clientHeight
        aw = canvas.width
        ah = canvas.height
        const ctx = canvas.getContext('2d')
      })
3.定义个类我们叫做star⭐
- 首先是他的宽高及半径,不要问为啥star是个球,因为简单着急下班🙄
- 第二绘制我们的⭐
arc()嘿嘿画圆 - 第三设置边界,顺便前期复习,也可选择超界消失根据个人喜好
   class Star {
        constructor(x, y, radius) {
          // x,y是坐标,r是半径
          this.x = x
          this.y = y
          this.r = radius
          // speed参数,在  -3 ~ 3 之间取值 随机速度初始化:
          this.speedX = Math.random() * 3 * Math.pow(-1, Math.round(Math.random()))
          this.speedY = Math.random() * 3 * Math.pow(-1, Math.round(Math.random()))
        }
        // 绘制圆球
        draw() {
          ctx.beginPath()
          ctx.arc(this.x, this.y, this.r, 0, Math.PI * 2)
          ctx.fill()
          ctx.closePath()
        }
        // 设置边界反弹
        move() {
          this.x -= this.speedX
          this.y -= this.speedY
          // 碰到边界时,反弹,只需要把speed取反就行
          if (this.x < 0 || this.x > aw) this.speedX *= -1
          if (this.y < 0 || this.y > ah) this.speedY *= -1
        }
        // 绘制连线
        drawLine(startX, startY, endX, endY) {
          ctx.beginPath()
          ctx.moveTo(startX, startY)
          ctx.lineTo(endX, endY)
          ctx.stroke()
          ctx.closePath()
        }
      }
4.所需事件,移动及点击
//前期有讲解,绑定鼠标移动事件
 const getMouse = element => {
        let mouse = { x: 0, y: 0 }
        element.addEventListener('mousemove', e => {
          mouse.x = e.clientX - element.getBoundingClientRect().left // 使用clientX和getBoundingClientRect计算鼠标位置
          mouse.y = e.clientY - element.getBoundingClientRect().top
        })

        return mouse
      }
//绑定canvas的点击事件,注意保持数组数量始终一致
canvas.addEventListener('click', e => {
        // 使用clientX和getBoundingClientRect计算鼠标位置
        let x = e.clientX - canvas.getBoundingClientRect().left
        let y = e.clientY - canvas.getBoundingClientRect().top

        for (let i = 0; i < 10; i++) {
          let newStar = new Star(x, y, 3)
          stars.push(newStar)
        }
        stars.splice(0, 10)
      })
5. ⭐⭐⭐终点绘制动画来了!!!
      // 定义颜色,色调都是白色
      ctx.fillStyle = 'white'
      ctx.strokeStyle = 'white'
      // 获取鼠标创造鼠标点球
      let mouse = getMouse(canvas)
      let mouseStar = new Star(0, 0, 3)
      let stars = []
      for (let index = 0; index < 300; index++) {
        stars.push(new Star(Math.random() * aw, Math.random() * ah, 3))
      }
      //立即执行
      ;(function frame() {
        window.requestAnimationFrame(frame)
        ctx.clearRect(0, 0, canvas.width, canvas.height)
        //鼠标点绘制
        mouseStar.x = mouse.x
        mouseStar.y = mouse.y
        mouseStar.draw()
        // 散点球绘制
        stars.forEach(star => {
          star.draw()
          star.move()
        })
        //这里重点理解
        // 对比每一个圆球,如果当前x,y与另一个圆球x,y间距小于50,就绘制连线
        // Math.abs 是一个数学函数,用于计算一个数的绝对值永远是正数
        stars.forEach((star, i) => {
          stars.forEach((otherStar, j) => {
            if (i !== j && Math.abs(star.x - otherStar.x) < 50 && Math.abs(star.y - otherStar.y) < 50) {
              star.drawLine(star.x, star.y, otherStar.x, otherStar.y)
            }
            // 判断鼠标星星连线
            if (Math.abs(mouseStar.x - star.x) < 50 && Math.abs(mouseStar.y - star.y) < 50) {
              mouseStar.drawLine(mouseStar.x, mouseStar.y, star.x, star.y)
            }
          })
        })
      })()
这里就结束咯,!!!!要认真看注释,哪里不理解可以提问我!
贴完整代码:
<template>
  <div ref="body" style="width: 100%;height: 80vh;background: #000;">
    <canvas id="myCanvas"></canvas>
  </div>
</template>

<script>
export default {
  data() {
    return {}
  },
  mounted() {
    this.init()
  },

  methods: {
    init() {
      // 定义球形及初速度
      class Star {
        constructor(x, y, radius) {
          // x,y是坐标,r是半径
          this.x = x
          this.y = y
          this.r = radius
          // speed参数,在  -3 ~ 3 之间取值 随机速度初始化:
          this.speedX = Math.random() * 3 * Math.pow(-1, Math.round(Math.random()))
          this.speedY = Math.random() * 3 * Math.pow(-1, Math.round(Math.random()))
        }
        // 绘制圆球
        draw() {
          ctx.beginPath()
          ctx.arc(this.x, this.y, this.r, 0, Math.PI * 2)
          ctx.fill()
          ctx.closePath()
        }
        // 设置边界反弹
        move() {
          this.x -= this.speedX
          this.y -= this.speedY
          // 碰到边界时,反弹,只需要把speed取反就行
          if (this.x < 0 || this.x > aw) this.speedX *= -1
          if (this.y < 0 || this.y > ah) this.speedY *= -1
        }
        // 绘制连线
        drawLine(startX, startY, endX, endY) {
          ctx.beginPath()
          ctx.moveTo(startX, startY)
          ctx.lineTo(endX, endY)
          ctx.stroke()
          ctx.closePath()
        }
      }

      const body = this.$refs.body
      const canvas = document.getElementById('myCanvas')

      canvas.width = body.clientWidth
      canvas.height = body.clientHeight

      let aw = canvas.width
      let ah = canvas.height

      const ctx = canvas.getContext('2d')
      // 自适应宽高
      window.addEventListener('resize', () => {
        canvas.width = body.clientWidth
        canvas.height = body.clientHeight
        aw = canvas.width
        ah = canvas.height
        const ctx = canvas.getContext('2d')
      })

      const getMouse = element => {
        let mouse = { x: 0, y: 0 }
        element.addEventListener('mousemove', e => {
          mouse.x = e.clientX - element.getBoundingClientRect().left // 使用clientX和getBoundingClientRect计算鼠标位置
          mouse.y = e.clientY - element.getBoundingClientRect().top
        })

        return mouse
      }

      canvas.addEventListener('click', e => {
        let x = e.clientX - canvas.getBoundingClientRect().left // 使用clientX和getBoundingClientRect计算鼠标位置
        let y = e.clientY - canvas.getBoundingClientRect().top

        for (let i = 0; i < 10; i++) {
          let newStar = new Star(x, y, 3)
          stars.push(newStar)
        }
        stars.splice(0, 10)
      })

      // 定义颜色,色调都是白色
      ctx.fillStyle = 'white'
      ctx.strokeStyle = 'white'
      // 获取鼠标创造鼠标点球
      let mouse = getMouse(canvas)
      let mouseStar = new Star(0, 0, 3)
      let stars = []
      for (let index = 0; index < 300; index++) {
        stars.push(new Star(Math.random() * aw, Math.random() * ah, 3))
      }
      ;(function frame() {
        window.requestAnimationFrame(frame)
        ctx.clearRect(0, 0, canvas.width, canvas.height)
        //鼠标点绘制
        mouseStar.x = mouse.x
        mouseStar.y = mouse.y
        mouseStar.draw()
        // 散点球绘制
        stars.forEach(star => {
          star.draw()
          star.move()
        })
        stars.forEach((star, i) => {
          stars.forEach((otherStar, j) => {
            // 对比每一个圆球,如果当前x,y与另一个圆球x,y间距小于50,就绘制连线
            // Math.abs 是一个数学函数,用于计算一个数的绝对值永远是正数
            if (i !== j && Math.abs(star.x - otherStar.x) < 50 && Math.abs(star.y - otherStar.y) < 50) {
              star.drawLine(star.x, star.y, otherStar.x, otherStar.y)
            }
            // 判断鼠标星星连线
            if (Math.abs(mouseStar.x - star.x) < 50 && Math.abs(mouseStar.y - star.y) < 50) {
              mouseStar.drawLine(mouseStar.x, mouseStar.y, star.x, star.y)
            }
          })
        })
      })()
    }
  }
}
</script>
<style lang="scss" scoped>
canvas {
  border: 1px solid black;
  background-color: #f0f0f0;
  margin-right: 10px;
  background: url('https://img2.baidu.com/it/u=2966362877,3794426626&fm=253&fmt=auto&app=138&f=JPEG?w=1920&h=2080')
    no-repeat;
  background-size: 100% 100%;
}
</style>
到此canvas动画实战学习结束,道阻且长,行则将至。与诸君共勉。 zuo


 2632
2632

 被折叠的 条评论
为什么被折叠?
被折叠的 条评论
为什么被折叠?
 到【灌水乐园】发言


