


相信大家平时在学习canvas 或 项目开发中使用canvas的时候应该都遇到过这样的需求:实现一个可以书写的 画板小工具 。
<template>
  <div>
    <div>
      <button @click="clear">清空</button>
      <canvas id="myCanvas" width="500px" height="400px"></canvas>
    </div>
  </div>
</template>
  clear() {
      var canvas = document.getElementById('myCanvas')
      var ctx = canvas.getContext('2d')
      ctx.clearRect(0, 0, canvas.width, canvas.height)
    },
    init() {
      var canvas = document.getElementById('myCanvas')
      var ctx = canvas.getContext('2d')
      let isDown = false
      let beginPoint = null
      let points = []
      // 设置线条颜色
      ctx.strokeStyle = 'red'
      ctx.lineWidth = 1
      ctx.lineJoin = 'round'
      ctx.lineCap = 'round'
      canvas.addEventListener('mousedown', down, false) //按下鼠标按键时触发
      canvas.addEventListener('mousemove', move, false) //移动鼠标时触发
      canvas.addEventListener('mouseup', up, false) //释放鼠标按键时触发
      canvas.addEventListener('mouseout', up, false) //鼠标离开元素时触发
      // 鼠标按下
      function down(evt) {
        isDown = true
        beginPoint = getPos(evt)
      }

      // 鼠标移动
      function move(evt) {
        if (!isDown) return
        const endPoint = getPos(evt)
        drawLine(beginPoint, endPoint)
        beginPoint = endPoint
      }

      // 抬起鼠标
      function up(evt) {
        if (!isDown) return
        const endPoint = getPos(evt)
        drawLine(beginPoint, endPoint)
        beginPoint = null
        isDown = false
      }

      // 定位赋值
      function getPos(evt) {
        const rect = canvas.getBoundingClientRect()
        return {
          x: evt.clientX - rect.left,
          y: evt.clientY - rect.top
        }
      }
      // 绘制
      function drawLine(beginPoint, endPoint) {
        ctx.beginPath()
        ctx.moveTo(beginPoint.x, beginPoint.y)
        ctx.lineTo(endPoint.x, endPoint.y)
        ctx.stroke()
        ctx.closePath()
      }

    }
但是这样是有缺陷的 通过这种方式画出来的线条存在锯齿,不够平滑,而且你画得越快,折线感越强。
问题分析
出现该现象的原因主要是:
- 我们是以canvas的
lineTo方法连接点的,连接相邻两点的是条直线,非曲线,因此通过这种方式绘制出来的是条折线; - 受限于浏览器对
mousemove事件的采集频率,大家都知道在mousemove时,浏览器是每隔一小段时间去采集当前鼠标的坐标的,因此鼠标移动的越快,采集的两个临近点的距离就越远,故“折线感越明显“;
如何才能画出平滑的曲线?
要画出平滑的曲线,其实也是有方法的,lineTo靠不住那我们可以采用canvas的另一个绘图API——quadraticCurveTo,它用于绘制二次贝塞尔曲线。
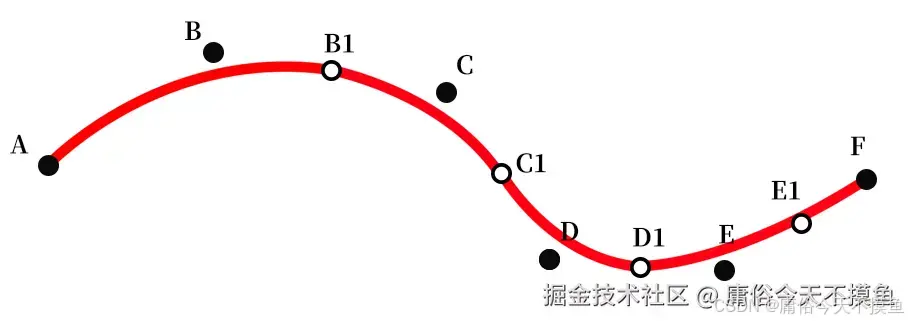
二次贝塞尔曲线
quadraticCurveTo(cp1x, cp1y, x, y)
调用quadraticCurveTo方法需要四个参数,cp1x、cp1y描述的是控制点,而x、y则是曲线的终点
优化代码 纵享丝滑
 init() {
      var canvas = document.getElementById('myCanvas')
      var ctx = canvas.getContext('2d')
      let isDown = false
      let beginPoint = null
      let points = []
      // 设置线条颜色
      ctx.strokeStyle = 'red'
      ctx.lineWidth = 1
      ctx.lineJoin = 'round'
      ctx.lineCap = 'round'
      canvas.addEventListener('mousedown', down, false) //按下鼠标按键时触发
      canvas.addEventListener('mousemove', move, false) //移动鼠标时触发
      canvas.addEventListener('mouseup', up, false) //释放鼠标按键时触发
      canvas.addEventListener('mouseout', up, false) //鼠标离开元素时触发
      // 鼠标按下
      function down(evt) {
        isDown = true
        const { x, y } = getPos(evt)
        points.push({ x, y })
        beginPoint = { x, y }
      }
      // 鼠标移动
      function move(evt) {
        if (!isDown) return

        const { x, y } = getPos(evt)
        points.push({ x, y })

        if (points.length > 3) {
          const lastTwoPoints = points.slice(-2)
          const controlPoint = lastTwoPoints[0]
          const endPoint = {
            x: (lastTwoPoints[0].x + lastTwoPoints[1].x) / 2,
            y: (lastTwoPoints[0].y + lastTwoPoints[1].y) / 2
          }
          drawLine(beginPoint, controlPoint, endPoint)
          beginPoint = endPoint
        }
      }
      // 抬起鼠标
      function up(evt) {
        if (!isDown) return
        const { x, y } = getPos(evt)
        points.push({ x, y })

        if (points.length > 3) {
          const lastTwoPoints = points.slice(-2)
          const controlPoint = lastTwoPoints[0]
          const endPoint = lastTwoPoints[1]
          drawLine(beginPoint, controlPoint, endPoint)
        }
        beginPoint = null
        isDown = false
        points = []
      }
      // 定位赋值
      function getPos(evt) {
        const rect = canvas.getBoundingClientRect()
        return {
          x: evt.clientX - rect.left,
          y: evt.clientY - rect.top
        }
      }
      // 绘制
      function drawLine(beginPoint, controlPoint, endPoint) {
        ctx.beginPath()
        ctx.moveTo(beginPoint.x, beginPoint.y)
        ctx.quadraticCurveTo(controlPoint.x, controlPoint.y, endPoint.x, endPoint.y)
        ctx.stroke()
        ctx.closePath()
      }
    }
到此canvas进阶平滑曲线学习结束,道阻且长,行则将至。与诸君共勉。 ⭐️


 5797
5797

 被折叠的 条评论
为什么被折叠?
被折叠的 条评论
为什么被折叠?
 到【灌水乐园】发言


