


前言
由于NXP官方提供的BSP里已经包含了其片上I2C控制器的驱动并接入到了Linux的I2C子系统,所以我们可以直接去写与I2C有关的应用程序了。
在本篇博文中我们用两种方式对I2C设备AP3216C进行读写操作。
第一种:直接利用Linux的I2C子系统对I2C设备AP3216C进行读写操作。
第二种:利用i2c-tools工具集对I2C设备AP3216C进行读写操作,当然i2c-tools也是运行于Linux的I2C子系统基础上的用户空间工具集,之前已经介绍过它了,并且之前已经用它的命令行对I2C设备AP3216C进行过读写操作了,详情见: https://blog.youkuaiyun.com/wenhao_ir/article/details/146319007
在阅读本文前建议还是先将博文 https://blog.youkuaiyun.com/wenhao_ir/article/details/146319007 阅读一遍。
直接利用Linux的I2C子系统对I2C设备AP3216C进行读写操作
完整代码(I2C_direct_control_ATP2126C.c)
#include <stdio.h>
#include <stdlib.h>
#include <unistd.h>
#include <fcntl.h>
#include <linux/i2c-dev.h>
#include <sys/ioctl.h>
#include <errno.h>
#define I2C_BUS "/dev/i2c-0" // I2C 设备文件
#define I2C_ADDR 0x1E // AP3216C 设备地址
// 写入 I2C 设备寄存器
void i2c_write(int fd, unsigned char reg, unsigned char value) {
unsigned char buf[2] = {reg, value};
if (write(fd, buf, 2) != 2) {
perror("Failed to write to I2C device");
exit(EXIT_FAILURE);
}
}
// 读取 I2C 设备寄存器(16位数据)
int i2c_read_word(int fd, unsigned char reg) {
unsigned char buf[2];
if (write(fd, ®, 1) != 1) {
perror("Failed to set register address");
exit(EXIT_FAILURE);
}
if (read(fd, buf, 2) != 2) {
perror("Failed to read from I2C device");
exit(EXIT_FAILURE);
}
return buf[0] | (buf[1] << 8); // 低字节在前,高字节在后
}
int main() {
int fd = open(I2C_BUS, O_RDWR);
if (fd < 0) {
perror("Failed to open I2C bus");
return EXIT_FAILURE;
}
if (ioctl(fd, I2C_SLAVE, I2C_ADDR) < 0) {
perror("Failed to select I2C device");
return EXIT_FAILURE;
}
// 1. 软复位 AP3216C
i2c_write(fd, 0x00, 0x04);
sleep(1); // 等待复位完成
// 2. 启用光感和距离检测
i2c_write(fd, 0x00, 0x03);
sleep(1); // 等待设备启动
while (1) {
// 3. 读取光照强度数据
int als_data = i2c_read_word(fd, 0x0C);
printf("Ambient Light: %d\n", als_data);
// 4. 读取距离数据
int ps_data = i2c_read_word(fd, 0x0E);
int distance = ((ps_data >> 8) & 0x3F) << 4 | (ps_data & 0x0F);
printf("Proximity Distance: %d\n", distance);
sleep(3); // 每 3 秒读取一次
}
close(fd);
return EXIT_SUCCESS;
}
代码ioctl(fd, I2C_SLAVE, I2C_ADDR)的作用
I2C_SLAVE 是一个 ioctl 命令,用于设置当前通信的 I2C 从设备地址,在同一条 I2C 总线上可以有多个设备,这个 ioctl 调用用于选择当前要操作的I2C设备,它告诉 Linux的I2C 驱动,后续所有 read() 和 write() 操作都针对 0x1E 这个 I2C 设备。
代码int distance = ((ps_data >> 8) & 0x3F) << 4 | (ps_data & 0x0F);
通过博文 https://blog.youkuaiyun.com/wenhao_ir/article/details/146319007 【搜索“读取距离值”】中我们知道需要取一个字的高8位的低6位和低8位的低4位组成一个10位的数值,所以有了这个distance的计算公式。
注意:0x3F = 0b0011 1111,作与操作后就可以得到ps_data高8位的低6位。
交叉编译代码
将文件I2C_direct_control_ATP2126C.c复制到Ubuntu中:
运行下面的命令编译它得到ELF可执行程序:
arm-buildroot-linux-gnueabihf-gcc -o I2C_direct_control_ATP2126C I2C_direct_control_ATP2126C.c

测试生成的可执行程序
将刚才交叉编译生成的ELF可执行程序复制到NFS网络文件目录中:
打开串口终端→打开开发板→挂载网络文件系统:
mount -t nfs -o nolock,vers=3 192.168.5.11:/home/book/nfs_rootfs /mnt
然后运行下面的命令执行程序:
cd /mnt/IC2_app1
./I2C_direct_control_ATP2126C
运行结果如下:

然后我用手电筒照向芯片AP3216C,运行结果如下:

可见光照强度的数值变大了很多。
接下来我再用我的手指靠近芯片AP3216C,运行结果如下:
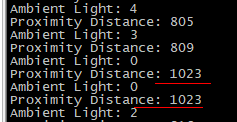
可见距离接近值也变大了很多,说明程序没有问题,测试成功。
附代码文件和编译好的ELF可执行程序
https://pan.baidu.com/s/1URp5fmx5iBuusK2GZXCKaA?pwd=3yuq
利用i2c-tools工具集对I2C设备AP3216C进行读写操作
完整代码(I2C_tools_control_ATP2126C.c)
#include <stdio.h>
#include <stdlib.h>
#include <unistd.h>
#include <fcntl.h>
#include <linux/i2c-dev.h>
#include <sys/ioctl.h>
#include <errno.h>
#include <smbus.h>

#define I2C_BUS "/dev/i2c-0"  // I2C 设备文件
#define I2C_ADDR 0x1E  // AP3216C 设备地址

// 写入 I2C 设备寄存器
void i2c_write(int fd, unsigned char reg, unsigned char value) {
    if (i2c_smbus_write_byte_data(fd, reg, value) < 0) {
        perror("Failed to write to I2C device");
        exit(EXIT_FAILURE);
    }
}

// 读取 I2C 设备寄存器(16位数据)
int i2c_read_word(int fd, unsigned char reg) {
    int res = i2c_smbus_read_word_data(fd, reg);
    if (res < 0) {
        perror("Failed to read from I2C device");
        exit(EXIT_FAILURE);
    }
    return res; // 低字节在前,高字节在后
}

int main() {
    int fd = open(I2C_BUS, O_RDWR);
    if (fd < 0) {
        perror("Failed to open I2C bus");
        return EXIT_FAILURE;
    }
    if (ioctl(fd, I2C_SLAVE, I2C_ADDR) < 0) {
        perror("Failed to select I2C device");
        return EXIT_FAILURE;
    }

    // 1. 软复位 AP3216C
    i2c_write(fd, 0x00, 0x04);
    sleep(1);  // 等待复位完成

    // 2. 启用光感和距离检测
    i2c_write(fd, 0x00, 0x03);
    sleep(1);  // 等待设备启动

    while (1) {
        // 3. 读取光照强度数据
        int als_data = i2c_read_word(fd, 0x0C);
        printf("Ambient Light: %d\n", als_data);

        // 4. 读取距离数据
        int ps_data = i2c_read_word(fd, 0x0E);
        int distance = ((ps_data >> 8) & 0x3F) << 4 | (ps_data & 0x0F);
        printf("Proximity Distance: %d\n", distance);

        sleep(3);  // 每 3 秒读取一次
    }

    close(fd);
    return EXIT_SUCCESS;
}
代码分析说明
代码没啥好分析与详解的,与上一个代码差不多,差别就是把对设备的读写函数read、write换成了i2c-tools工具集的函数i2c_smbus_read_word_data、i2c_smbus_write_byte_data,其实i2c-tools工具集的函数也是在基本的读写函数read、write上套壳开发的嘛。
交叉编译代码
首先请参考博文 https://blog.youkuaiyun.com/wenhao_ir/article/details/146364042 把i2c-tools编译并安装配置好。
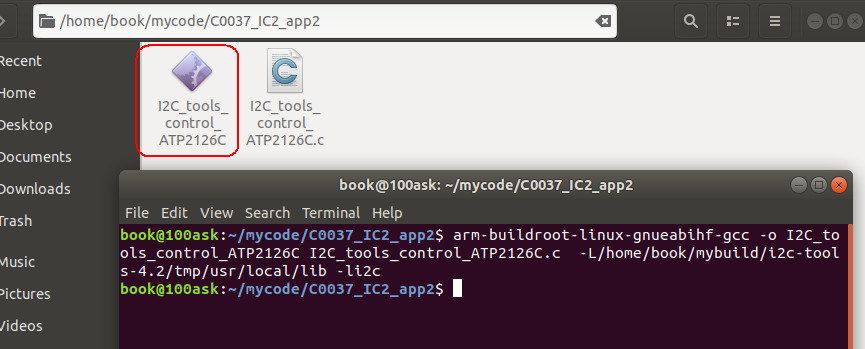
然后把源代码文件I2C_tools_control_ATP2126C.c复制到Ubuntu中:
运行下面的命令编译它得到ELF可执行程序:
arm-buildroot-linux-gnueabihf-gcc -o I2C_tools_control_ATP2126C I2C_tools_control_ATP2126C.c -L/home/book/mybuild/i2c-tools-4.2/tmp/usr/local/lib -li2c
测试生成的可执行程序
将刚才交叉编译生成的ELF可执行程序复制到NFS网络文件目录中:

打开串口终端→打开开发板→挂载网络文件系统:
mount -t nfs -o nolock,vers=3 192.168.5.11:/home/book/nfs_rootfs /mnt
然后运行下面的命令执行程序:
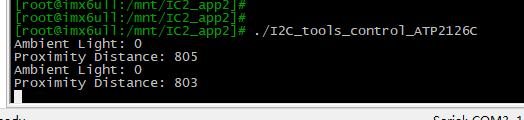
cd /mnt/IC2_app2
./I2C_tools_control_ATP2126C
运行结果如下:
然后我用手电筒照向芯片AP3216C,运行结果如下:
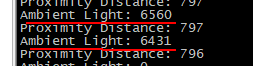
可见光照强度的数值变大了很多。
接下来我再用我的手指靠近芯片AP3216C,运行结果如下:
可见距离接近值也变大了很多,说明程序没有问题,测试成功。


 1155
1155

 被折叠的 条评论
为什么被折叠?
被折叠的 条评论
为什么被折叠?
 到【灌水乐园】发言


