val3_learning

这篇博客记录了使用Val3编程系统进行机器人操作的学习过程,包括准备工作、简单Move操作、码垛实验、参数传递及Socket通讯。内容涵盖点的示教、坐标系理解、速度设置以及通信实例。

摘要生成于 C知道 ,由 DeepSeek-R1 满血版支持, 前往体验 >

实验室有史陶比尔软件srs7.31的电子狗,学习笔记如下:
在这里插入图片描述
在这里插入图片描述
1.准备工作
配置工作单元,新建一个即可,这里能变成true的尽量变成true
在这里插入图片描述
打开val3,在star函数下进行编程,代码如下:

begin
  cls()
  userPage()
  gotoxy(2,2)
  put("hello_val3")
  
end

在这里插入图片描述
打开模拟器,如果是模拟器上srs ip是127.0.0.1,实际机器人是192.168.0.254
在这里插入图片描述
打开三维显示界面,因为这是很早以前的版本了,貌似不能导cad图进去!!
在这里插入图片描述
用虚拟示教器示教如下
在这里插入图片描述
运行val3程序如图:
在这里插入图片描述
EX1:简单move
在这里插入图片描述
在这里插入图片描述
先定义4个点,一个home点(0,0,90,0,45,0),tool工具坐标系是以法兰盘坐标系定义的(0,0,0,0,0,0)jjoint ppoint等通过示教得到 这些都是全局数据,可以改变的!!
在这里插入图片描述
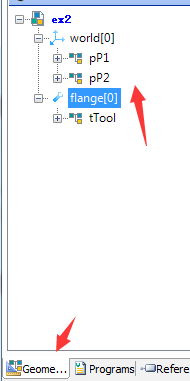
P点是在世界坐标系下的,ttool是在法兰盘系下的
运行前示教

2005-26 Teaching Interface JEC Page 1 11/4/2005 Teaching interface VAL3 version 5.2.1 The purpose of this document is to explain the use of the teaching / jogging interface on the Staubli SP1 pendant. It uses VAL3 version 5.2.1, but other versions are similar. The illustrations shown are from the PC emulator. The actual pendant has a different keyboard layout. See the diagram below comparing the two. 3 4 5 6 7 2005-26 Teaching Interface JEC Page 2 11/4/2005 Loading an Application To enter the teaching interface, you must have an application already loaded. Most customers have applications set to auto start so it will already be loaded. While teaching can be done with an application running, it is better to stop the application. If an application is not loaded, please load it at this time as shown below. Press menu until the main menu is displayed. Use the up and down arrow to highlight the Application Manager. Press the right arrow or enter key. Press the F7 open key. Press Right arrow to expand the disk entry. Arrow down to highlight your application and press the F8 OK key. 2005-26 Teaching Interface JEC Page 3 11/4/2005 Manual Mode and Arm Power Teaching locations is done in manual mode. Switch to manual mode by pressing the mode select button until the manual LED is light up. The manual symbol is a picture of a hand. Remove the pendant from its holding cradle. Release and reapply the robot enabling device (deadman switch) and press the arm power button. On the emulator click on the "System" menu. Uncheck Parking and check deadman, then press the arm power button. Arm power should come on in 2 to 3 seconds. If it does not there will be a pop up message, for example an open e-stop, stating why arm power did not come. 2005-26 Teaching Interface JEC Page 4 11/4/2005 Jogging Mode Press one of the four jogging mode buttons on the pendant. They are joint, frame, tool and point. The LED beside the chosen mode will illuminate. Tool Selection The first time you go in to t
评论 7
添加红包

请填写红包祝福语或标题

红包个数最小为10个

红包金额最低5元

当前余额3.43前往充值 >
需支付:10.00
成就一亿技术人!
领取后你会自动成为博主和红包主的粉丝 规则
hope_wisdom
发出的红包
实付
使用余额支付
点击重新获取
扫码支付
钱包余额 0

抵扣说明:

1.余额是钱包充值的虚拟货币,按照1:1的比例进行支付金额的抵扣。
2.余额无法直接购买下载,可以购买VIP、付费专栏及课程。

余额充值