


一 记录下这个需求
最近摸鱼 有时间准备整理下之前做过的一些东西 项目当中可能偶尔会遇到类似的需求 需要处理大量物体的渲染
二 方案尝试
1 最常规的方法
    public int instanceCount = 100000;

    public GameObject InstanceGameObject;

    private const int MAXSpace = 100;
    // Start is called before the first frame update
    void Start()
    {
        for (int i = 0; i < instanceCount; i++)
        {
            GameObject go = GameObject.Instantiate(InstanceGameObject);
            go.transform.position = Random.insideUnitSphere * MAXSpace;
        }
    }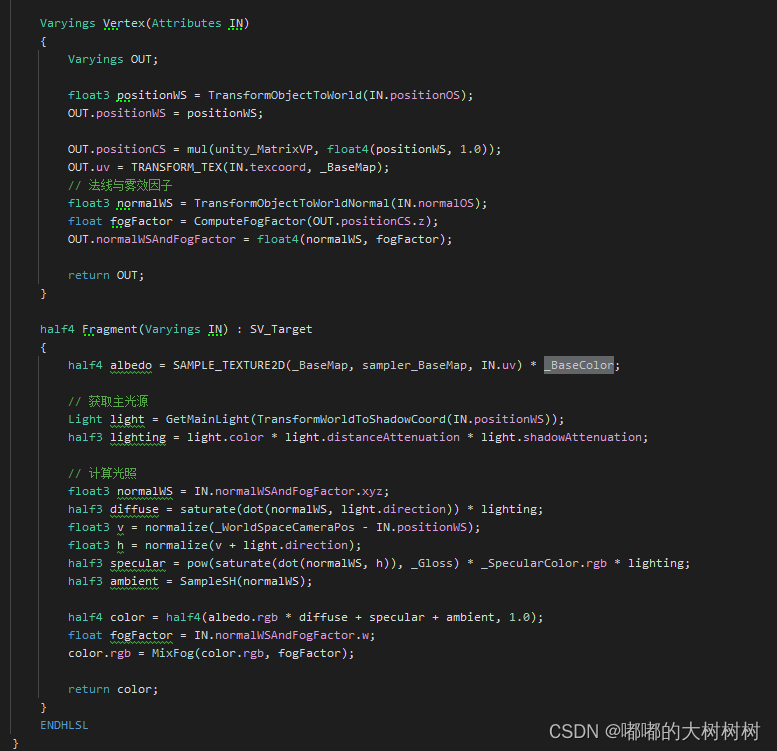
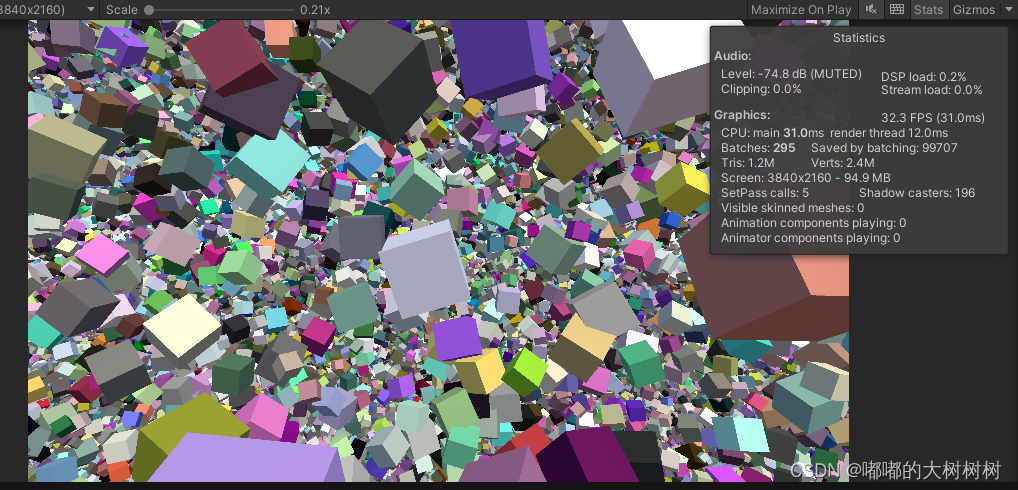
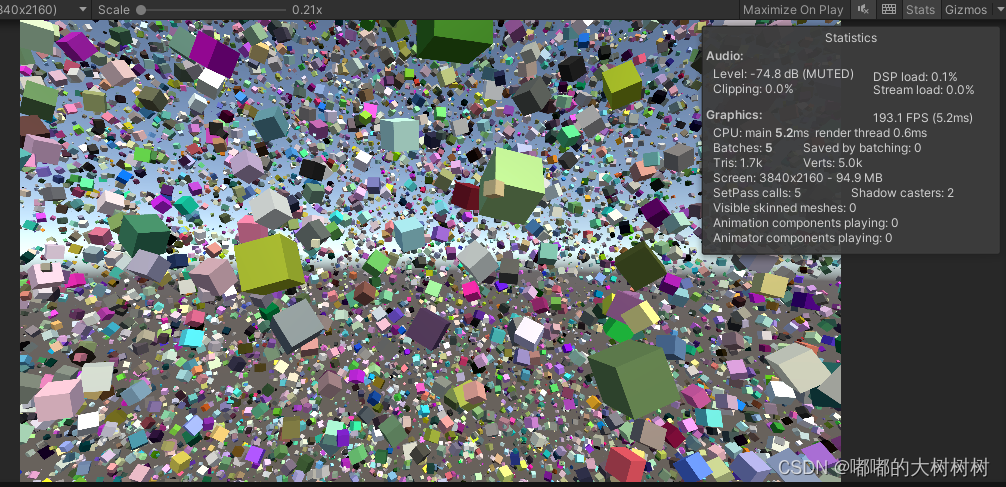
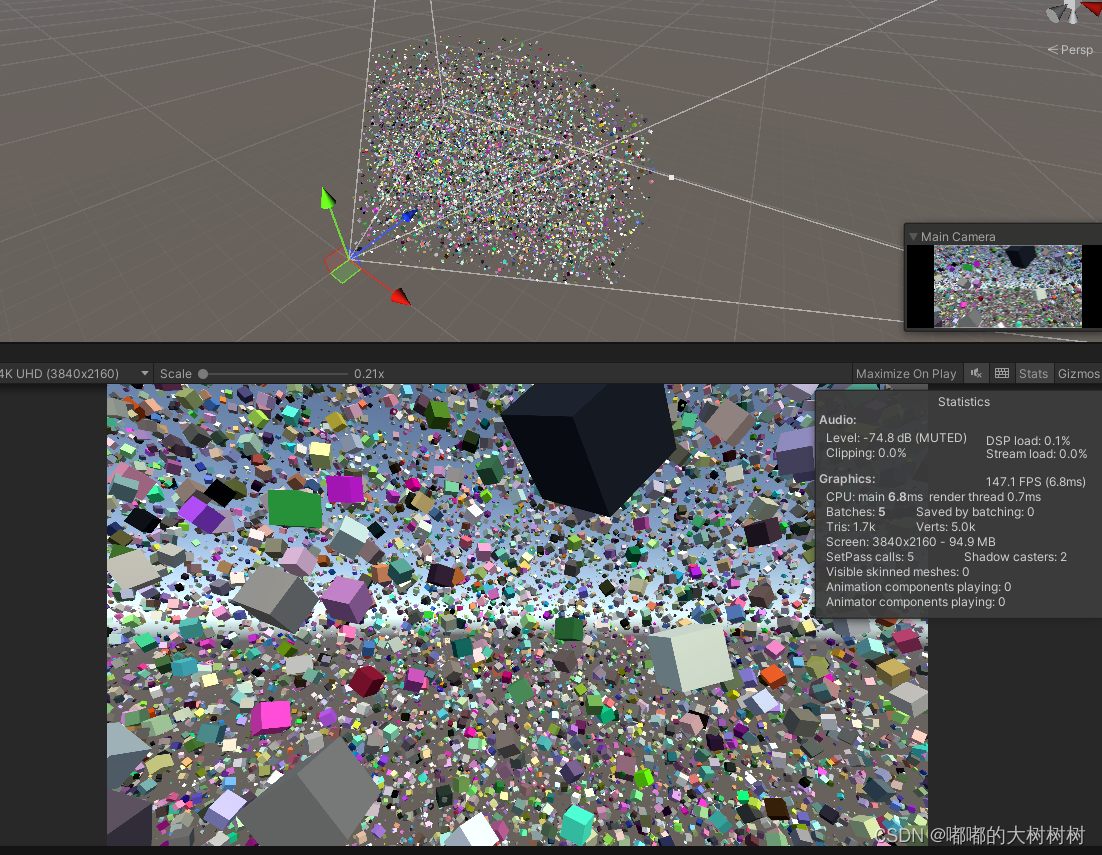
简单写了点代码 做了个简单的着色器

符合预期 这种消耗放哪里估计都吃不消
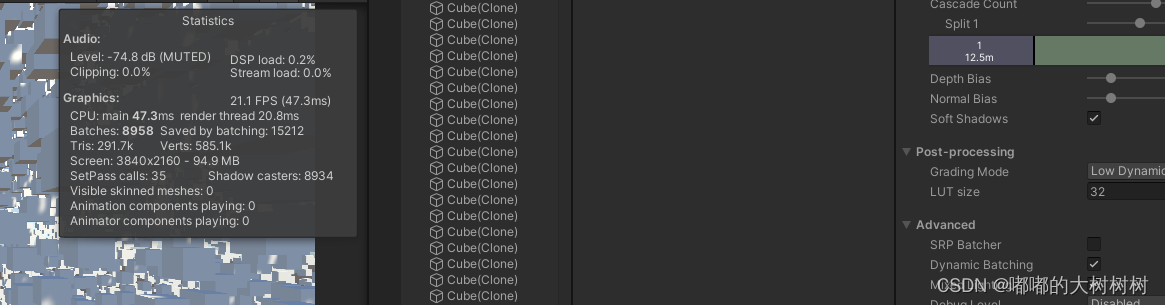
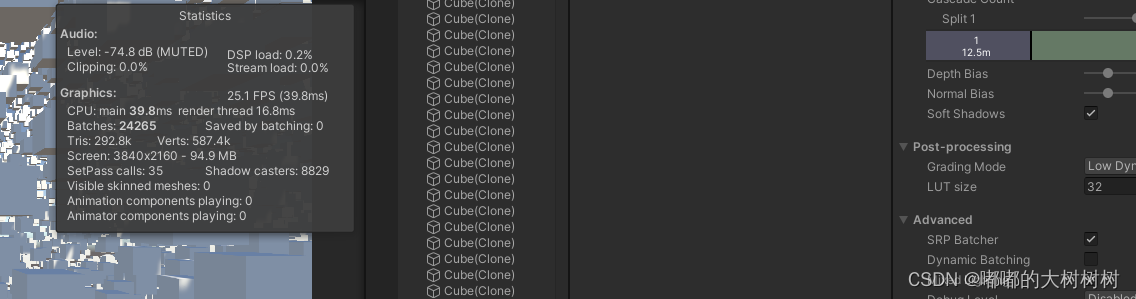 然后简单看了下在这种极端情况下srpbatch和dynamicbatching的对比
编辑器下的数据来说srpbatch略好于dynamicbatching
2 着色器支持GPUInstancing
一般大批量物体渲染 首先会想到 GPUInstancing
但上面的着色器明显不支持 简单修改下
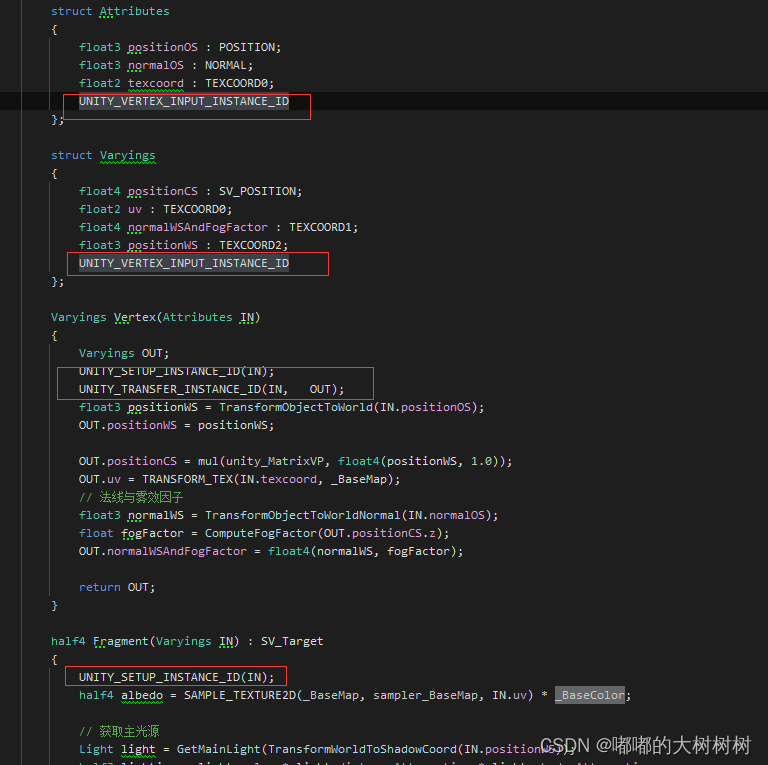
按照官方案例添加在自己的自定义着色器里面
同时关闭着色器内srpbatch的设置
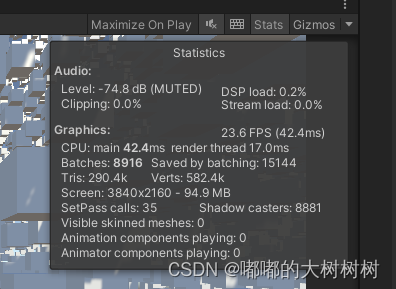
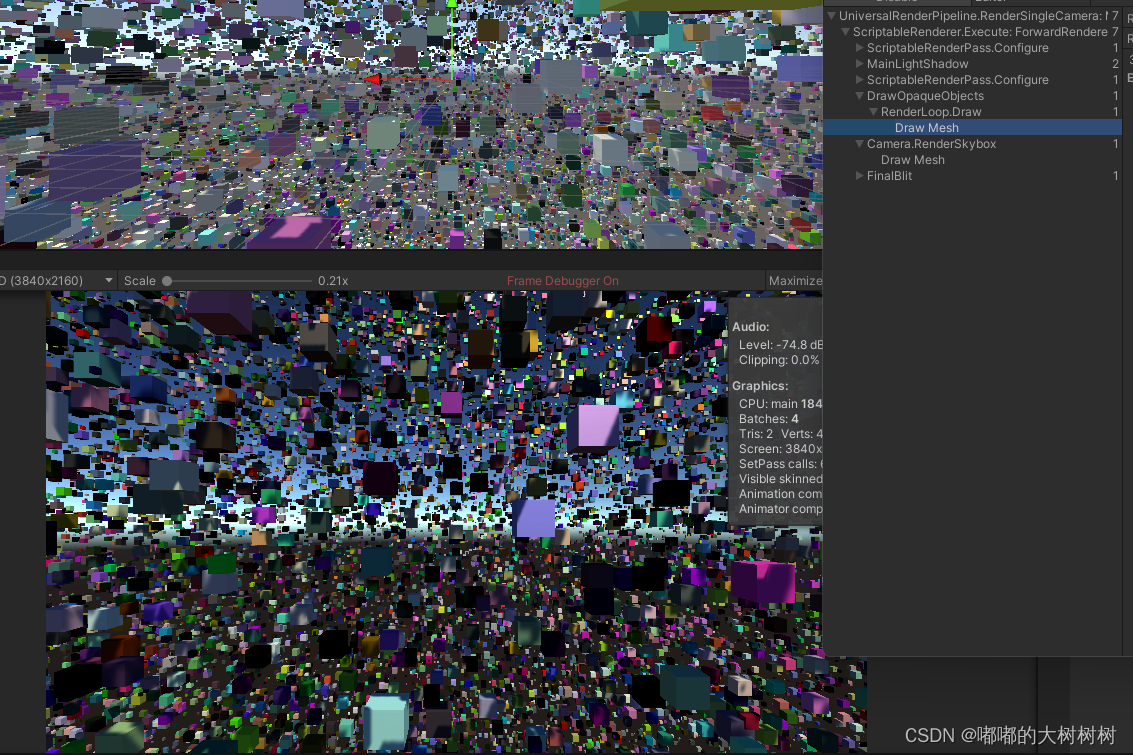
修改完之后的数据 比默认的dynamicbatching好一点
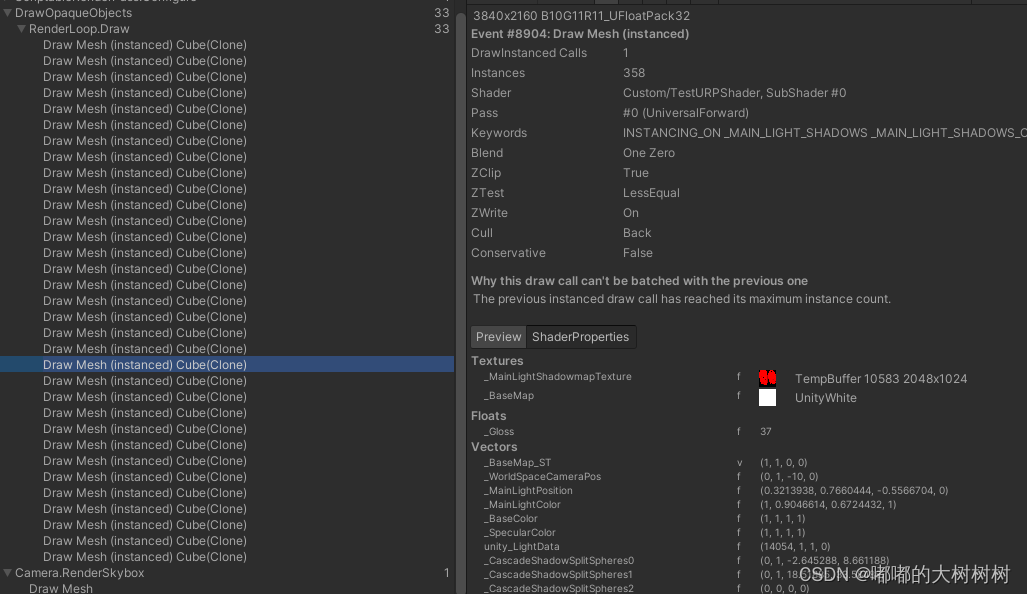
framedebug里面也可以看到绘制的过程
结果上来说 提升了些许 但是消耗还是太大
对手机来说 实例化如此多的物体 消耗还是巨大 如果说大量的这些物体并没有实际的逻辑 考虑不进行实例化 而直接进行绘制

官方也给开放出了两个接口
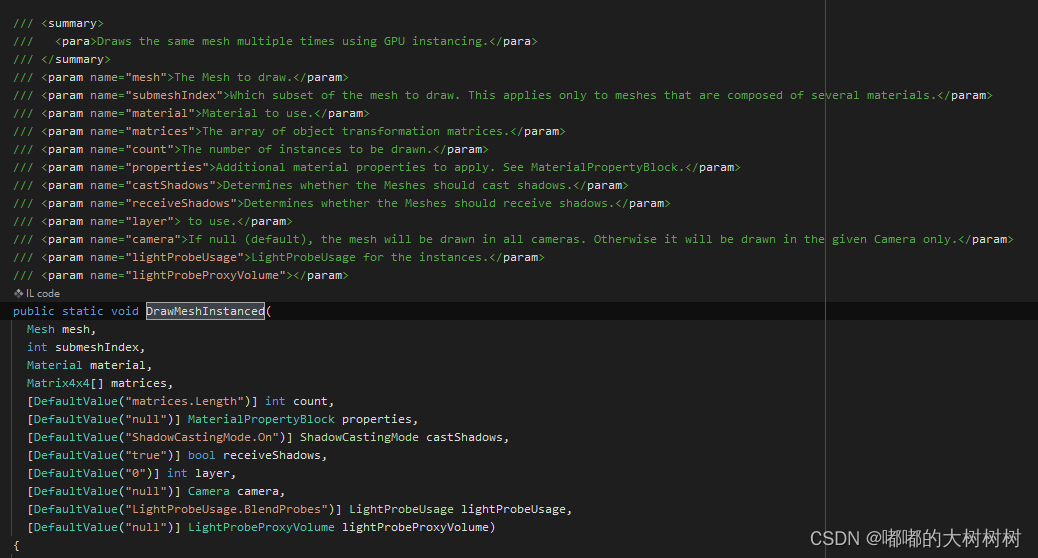
3 Graphics.DrawMeshInstanced
Note: You can only draw a maximum of 1023 instances at once.
注意这个接口的一些限制 绘制数量上有一定的限制
Similar to Graphics.DrawMesh, this function draws meshes for one frame without the overhead of creating unnecessary game objects.
调用这个接口可以避免创造一些非必须得游戏实例
简单试下
因为鉴于有数量上的限制 所以
    public Mesh mesh;
    public Material material;
    public int instanceCount = 100000;
    private const int MAXOneTimeInstanceCount = 1023;

    private List<DrawInstanced> _drawInstancedList = new List<DrawInstanced>();
    void Start()
    {
        int count = instanceCount / MAXOneTimeInstanceCount;
        int remainder = instanceCount % MAXOneTimeInstanceCount;

        for (int i = 0; i < count; i++)
        {
            DrawInstanced drawInstanced = new DrawInstanced();
            drawInstanced.Init(MAXOneTimeInstanceCount, mesh, material);
            _drawInstancedList.Add(drawInstanced);
        }

        DrawInstanced remainderDrawInstanced = new DrawInstanced();
        remainderDrawInstanced.Init(remainder, mesh, material);
        _drawInstancedList.Add(remainderDrawInstanced);
    }

    void Update()
    {
        for (int i = 0; i < _drawInstancedList.Count; i++)
        {
            _drawInstancedList[i].Draw();
        }
    }
简单包了一下
 private Mesh _mesh;
    private Material _material;
    private int _instanceCount = 100;

    private Matrix4x4[] _matrices;
    private Vector4[] _colors;
    private MaterialPropertyBlock _properties;

    public void Init(int instancedCount, Mesh mesh, Material material)
    {
        this._mesh = mesh;
        this._material = material;
        this._instanceCount = instancedCount;

        _matrices = new Matrix4x4[_instanceCount];
        _colors = new Vector4[_instanceCount];
        _properties = new MaterialPropertyBlock();

        for (int i = 0; i < _instanceCount; i++)
        {
            Vector3 pos = Random.insideUnitSphere * 100f;
            Quaternion rot = Random.rotation;
            Vector3 scale = Vector3.one * Random.Range(0.5f, 1.5f);
            _matrices[i] = Matrix4x4.TRS(pos, rot, scale);
            _colors[i] = Random.ColorHSV();
        }

        _properties.SetVectorArray("_BaseColor", _colors);
    }

    public void Draw()
    {
        Graphics.DrawMeshInstanced(_mesh, 0, _material, _matrices, _instanceCount, _properties, UnityEngine.Rendering.ShadowCastingMode.On, true, 0, null, UnityEngine.Rendering.LightProbeUsage.Off, null);
    }
随机设置了一些位置 旋转和缩放
由于Graphics.DrawMeshInstanced里面可以传递MaterialPropertyBlock
所以我们可以通过MaterialPropertyBlock 对材质参数进行调整
Note that this is not compatible with SRP Batcher. Using this in the Universal Render Pipeline (URP), High Definition Render Pipeline (HDRP) or a custom render pipeline based on the Scriptable Render Pipeline (SRP) will likely result in a drop in performance.
不过需要注意MaterialPropertyBlock和srpbatcher并不兼容 在做别的功能的时候需要注意下 这里就不赘述了 同时MaterialPropertyBlock也不在这里赘述了
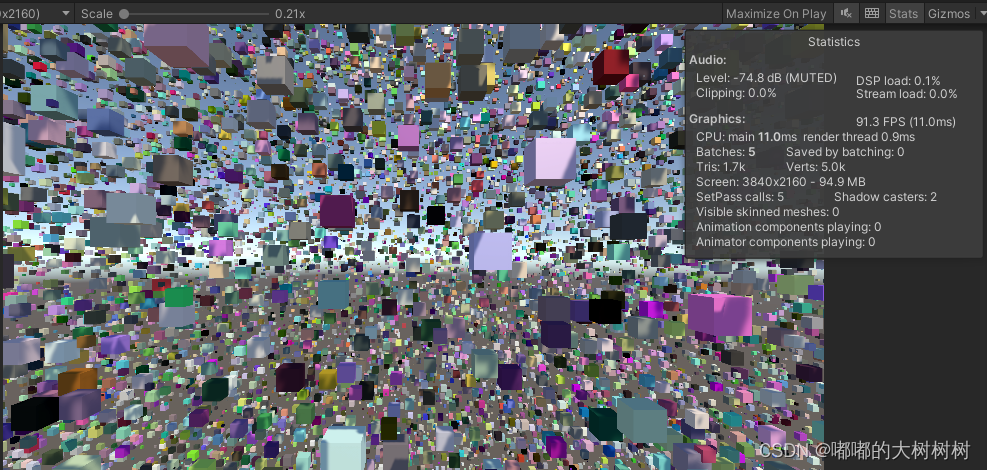
测试下
效果还行 batches数量 cpu和render的耗时相比之前都有所降低
不过还是有些问题 首先绘制数量上有1023的限制 同时也需要每一帧将数据从CPU提交至GPU
4 Graphics.DrawMeshInstancedIndirect
其实drawmeshinstance()其实是对drawmeshinstanceindirect()的一种包装。您可以在后者中实现与前者相同的一切(反之亦然,不过相对复杂一些)。drawmeshinstance()相对来说是更友好的绘制网格的方式,因为它不需要我们跟GPU打交道。
但是相对的,一些非常美妙的用法在也在抽象包装中丢失了。首先,DrawMeshInstancedIndirect()允许你绕过1023网格的限制,并在单个批次中绘制尽可能多的网格(1023网格限制似乎是因为MaterialPropertyBlock的原因)。但最主要的好处是你可以把所有的工作都转移到GPU上。使用drawmeshinstance(), Unity必须在每一帧将网格矩阵数组上传到GPU,而drawmeshinstanceindirect()则在GPU上无限创建并存储数据(怎么总感觉有点危险)。这也意味着使用基于gpu的结构来存储数据,主要是ComputeBuffers,这听起来有点不靠谱,但结果是非常棒的,它就像给我们打开了一扇新的门,一些简单的大规模的并行计算我们可以使用Compute shader来完成。
Unity - Scripting API: Graphics.DrawMeshInstancedIndirect
直接抄下官方案例 在修改一些
    public int instanceCount = 100000;
    public Mesh instanceMesh;
    public Material instanceMaterial;
    public int subMeshIndex = 0;

    private ComputeBuffer _positionBuffer;
    private ComputeBuffer _colorBuffer;
    private ComputeBuffer _argsBuffer;
    private uint[] _args = new uint[5] { 0, 0, 0, 0, 0 };

    private const int MAXSpace = 100;

    private int _cachedInstanceCount = -1;
    private int _cachedSubMeshIndex = -1;

    void Update()
    {
        // 更新Buffer
        UpdateBuffers();

        // 设置渲染包围盒 影响culling
        Bounds renderBounds = new Bounds(Vector3.zero, new Vector3(MAXSpace, MAXSpace, MAXSpace));
        Graphics.DrawMeshInstancedIndirect(instanceMesh, subMeshIndex, instanceMaterial, renderBounds, _argsBuffer);
    }
有些注意的点是 包围盒的设置 会影响到culling 最好是根据整体的大小 参考来设置
 void UpdateBuffers()
    {
        // 不需要更新时返回
        if ((_cachedInstanceCount == instanceCount || _cachedSubMeshIndex != subMeshIndex)
            && _argsBuffer != null)
            return;
        // 规范subMeshIndex
        if (instanceMesh != null)
            subMeshIndex = Mathf.Clamp(subMeshIndex, 0, instanceMesh.subMeshCount - 1);
        //初始化位置Buffer
        _positionBuffer?.Release();
        _positionBuffer = new ComputeBuffer(instanceCount, sizeof(float) * 4); // float4 ==这东西也不知道有没有上线
        //初始化颜色buffer
        _colorBuffer?.Release();
        _colorBuffer = new ComputeBuffer(instanceCount, sizeof(float) * 4); // float4

        Vector4[] positions = new Vector4[instanceCount];
        Vector4[] colors = new Vector4[instanceCount];
        for (int i = 0; i < instanceCount; i++)
        {
            float size = Random.Range(0.05f, 1f);
            Vector3 pos = Random.insideUnitSphere * MAXSpace;
            positions[i] = new Vector4(pos.x, pos.y, pos.z, size);
            colors[i] = Random.ColorHSV();
        }

        _positionBuffer.SetData(positions);
        instanceMaterial.SetBuffer("positionBuffer", _positionBuffer);

        _colorBuffer.SetData(colors);
        instanceMaterial.SetBuffer("colorsBuffer", _colorBuffer);

        // Indirect args 直接复制官方案例
        _argsBuffer?.Release();
        _argsBuffer = new ComputeBuffer(1, _args.Length * sizeof(uint), ComputeBufferType.IndirectArguments);
        if (instanceMesh != null)
        {
            _args[0] = (uint) instanceMesh.GetIndexCount(subMeshIndex);
            _args[1] = (uint) instanceCount;
            _args[2] = (uint) instanceMesh.GetIndexStart(subMeshIndex);
            _args[3] = (uint) instanceMesh.GetBaseVertex(subMeshIndex);
        }
        else
        {
            _args[0] = _args[1] = _args[2] = _args[3] = 0;
        }

        _argsBuffer.SetData(_args);

        _cachedInstanceCount = instanceCount;
        _cachedSubMeshIndex = subMeshIndex;
    }
这里定义了三个ComputeBuffer,利用它们可以将数据传至GPU侧,positionBuffer用来存放所有物体的位置,argsBuffer则是DrawMeshInstancedIndirect绘制需要用到的参数,各项参数通过args变量存放。colorBuffer存放颜色
Update中的逻辑很简单,必要时更新ComputeBuffer,然后渲染:
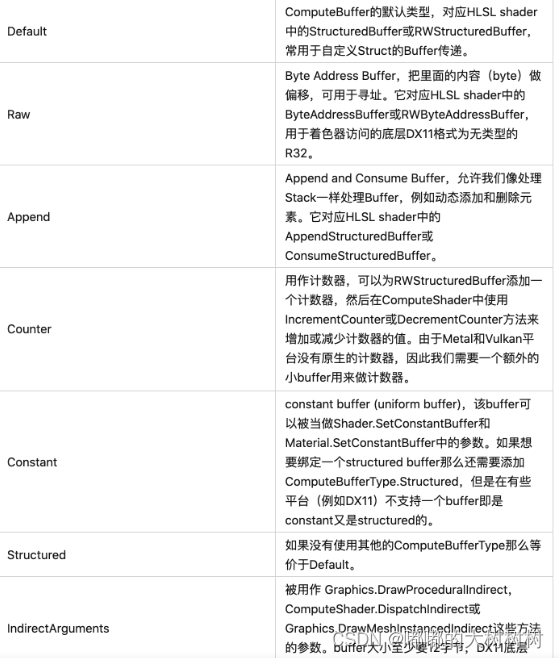
在这里需要注意的是不同类型的ComputeBuffer的使用
还需要注意的是ComputerBuffer的构造方法中需要指定数量与单个数据占用空间大小,这里物体的位置为Vector4类型,在Shader中对应float4,xyz分量存放坐标,w分量存放大小。之后为每个物体随机设置位置与大小,然后通过ComputerBuffer的SetData方法设置数据,最后设置到材质中,那么大致可以这样认为,经过这一步,每个物体的位置数据已经向GPU侧提交了。
    void OnDisable()
    {
        _argsBuffer?.Release();
        _argsBuffer = null;

        _colorBuffer?.Release();
        _colorBuffer = null;
    }
}
然后是着色器的修改 因为使用了computeBuffer
着色的也需要有对应的修改
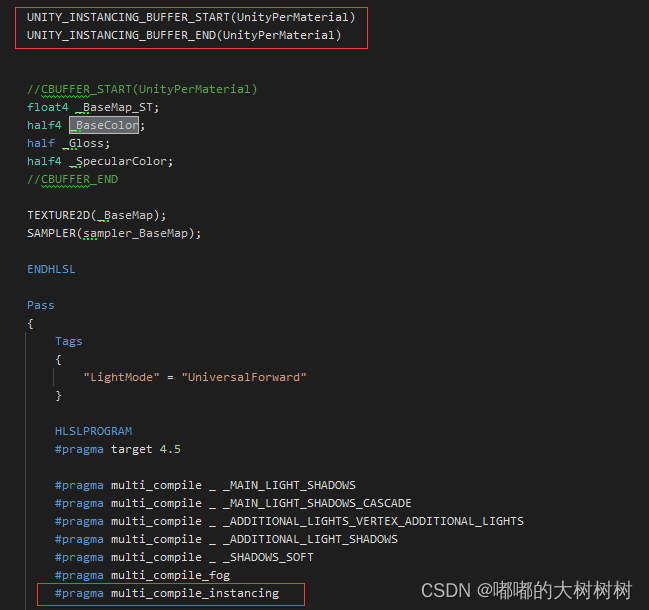
着色器可以不用设置multi_compile_instancing 之前使用UNITY_INSTANCING_BUFFER_START的这部分也可以省略
材质内直接设置了buffer 我们可以直接在着色器内拿到对应的数据
#if SHADER_TARGET >= 45
        StructuredBuffer<float4> positionBuffer;
        StructuredBuffer<float4> colorsBuffer;
#endifStructuredBuffer在Shader中是只读的,它将接收从C#传递过来的位置数据,需要注意这里的
同时需要再顶点着色器内 添加instanceID以便从buffer内拿到对应的数据
            Varyings Vertex(Attributes IN, uint instanceID : SV_InstanceID)
            {
            #if SHADER_TARGET >= 45
                float4 data = positionBuffer[instanceID];
                float4 color = colorsBuffer[instanceID];
            #else
                float4 data = 0;
                float4 color = 1
            #endif
                Varyings OUT;
                float3 positionWS = data.xyz + IN.positionOS.xyz * data.w;
                OUT.positionWS = positionWS;
看下效果
相较之前 这个不论是耗时还是batches 提升都不错
5 添加旋转
上面的例子里面没有设置旋转 在这里添加下
我们对positionBuffer进行一个修改 改为matricesBuffer 由物体的位置信息修改为物体复合变换矩阵
类型由vector3 变为Matrix4x4
        //初始化物体复合变换矩阵Buffer
        _matricesBuffer?.Release();
        _matricesBuffer = new ComputeBuffer(instanceCount, sizeof(float) * 16);   // float4x4;
        Matrix4x4[] trs = new Matrix4x4[instanceCount];
ComputeBuffer的初始化需要进行修改
       for (int i = 0; i < instanceCount; i++)
        {
            float size = Random.Range(0.05f, 1f);
            Vector3 pos = Random.insideUnitSphere * MAXSpace;
            colors[i] = Random.ColorHSV();
            trs[i] = Matrix4x4.TRS(pos, Random.rotationUniform, new Vector3(size, size, size));
        }

        _matricesBuffer.SetData(trs);
        instanceMaterial.SetBuffer("matricesBuffer", _matricesBuffer);
随机给个旋转
着色器 修改 传递的buffer数据类型和格式都进行了调整
6 compute shader 做视锥剔除(View Frustum Culling)
使用Graphics.DrawMeshInstancedIndirect实现了基本的物体渲染,但还没有做剔除,相机视野外的物体也会被渲染,造成性能上的浪费。这里做剔除方案中常见的视锥剔除
简单来说,视锥剔除就是判断物体是否在当前相机的视锥体内,排除掉完全在视锥体外的物体,仅渲染视锥体内的物体,减少不必要的消耗。需要强调的是,只有在使用类似DrawMeshInstancedIndirect这样的API做渲染时,才需要自己做剔除工作,用自带的Renderer组件渲染物体时Unity会帮我们做这些处理。
关于视锥剔除如何实现以及为什么要用ComputeShader做视锥剔除,推荐一篇文章:
Unity中使用ComputeShader做视锥剔除(View Frustum Culling) - 知乎
在这里顺带对视椎剔除 做下笔记
整体思路并不复杂,每一帧我们需要做这些事:
- 获取当前相机视锥的六个面的定义,即平面方程Ax+By+Cz+D=0,可以自己计算,也可以通过API获取。
- 获取每个物体的包围盒,通常包围盒的大小可以是一个定值,判断时再根据物体当前变换(平移、旋转、缩放)计算包围盒八个点的实际坐标。
- 把上面的东西扔到CoumputeShader里计算,判断哪些物体在视锥体内,返回这些物体的instanceID。
- 根据返回的instanceID渲染,而不是渲染全部物体,这样渲染出来的就是剔除后的结果了。
Unity的GPU instancing技术可以帮助我们使用少量的draw call绘制大量相同材质的物体,例如场景中的植被,因此我们才能够绘制很多小树从而保持着不错的帧率。
而我们要用cs来进行culling判断的话,必然要将这成千上万个物体的包围盒信息传入到cs中,然后再由cs把不被剔除的物体传回到CPU,最终绘制出来。其中大量数据在CPU与GPU的传递就会造成很大的性能问题,特别在手机端传输带宽受限的情况下肯定是无法承受的。
而DrawMeshInstancedIndirect方法可以为我们很好的解决这样的问题,官方有一段说明如下:
This is useful if you want to populate all of the instance data from the GPU, and the CPU does not know the number of instances to draw (for example, when performing GPU culling).
也就是说使用该方法,我们可以把在显存里面的数据直接Draw到渲染管线中,而不是传统的从CPU发送数据。也就是说可以把cs处理后的结果直接放到渲染管线当中,而不用再传递到CPU端。
视锥体六个面的定义
视锥剔除的核心就是如何判断包围盒与视锥体的关系,前面我们说了判断的方法为:若包围盒的所有顶点都在视锥体的某个面外,那么我们认为这个物体是要被剔除的。那么我们首先要定义出视锥体的六个面。
我们知道平面方程为:
Ax+By+Cz+D=0
其中xyz代表平面上的一点,ABC为平面法线,D的值后面介绍。这样我们即可以使用一个四维向量 Vector4=(A,B,C,D)来表示一个平面。
例如假设有个平面平行于xz平面且正面向上,那么其法线即为(0,1,0),因此A=0,B=1,C=0。若该平面过点(0,5,0),那么x=0,y=5,z=0,可解得D=-5。因此过点(0,5,0)法线为(0,1,0)的平面方程为0x+1y+0z-5=0,用向量表示即为(0,1,0,-5)。
我们可以发现其中D=-(Ax+By+Cz),而Ax+By+Cz的值正是(A,B,C)与(x,y,z)的点乘结果,因此D的值即为平面法线和平面内任意一点的点乘结果取负。
这样我们可以得到第一个函数:
//一个点和一个法向量确定一个平面
public static Vector4 GetPlane(Vector3 normal, Vector3 point)
{
    return new Vector4(normal.x, normal.y, normal.z, -Vector3.Dot(normal, point));
}视锥体的六个面我们简单的用左右上下远近来称呼,其中远近两个面的法线我们可以通过Camera.transform.forward来获得,其他四个面的法线怎么求呢?因为透视相机的左右上下四个面肯定都过相机本身,因此Camera.transform.position就是四个面上的一点,而三点可以确定一个平面,我们只需要再求出远平面(或近平面)的四个端点,这样对于上下左右四个面中的任何一个面的法线我们都可以利用远平面的某两个点和相机本身(一共三个点)通过向量的叉乘来获取。
//三点确定一个平面
public static Vector4 GetPlane(Vector3 a, Vector3 b, Vector3 c)
{
    Vector3 normal = Vector3.Normalize(Vector3.Cross(b - a, c - a));
    return GetPlane(normal, a);
}
不过我们其实有更好的选择
GeometryUtility.CalculateFrustumPlanes
Description
Calculates frustum planes.
This function takes the given camera's view frustum and returns six planes that form it.
Ordering: [0] = Left, [1] = Right, [2] = Down, [3] = Up, [4] = Near, [5] = Far
See Also: Plane, GeometryUtility.TestPlanesAABB.
我们可以声明一个
    // 相机的视锥平面
    Plane[] cameraFrustumPlanes = new Plane[6];
    // 传入ComputeShader的视锥平面
    Vector4[] frustumPlanes = new Vector4[6];
然后通过
        GeometryUtility.CalculateFrustumPlanes(Camera.main, cameraFrustumPlanes);
        for (int i = 0; i < cameraFrustumPlanes.Length; i++)
        {
            var normal = -cameraFrustumPlanes[i].normal;
            frustumPlanes[i] = new Vector4(normal.x, normal.y, normal.z, -cameraFrustumPlanes[i].distance);
        }
同时 unity内 plane的Distance正是即为平面法线和平面内任意一点的点乘结果取负。
    public Plane(Vector3 a, Vector3 b, Vector3 c)
    {
      this.m_Normal = Vector3.Normalize(Vector3.Cross(b - a, c - a));
      this.m_Distance = -Vector3.Dot(this.m_Normal, a);
    }
获取到上面说的 一个法向量Vector4=(A,B,C,D)
同时根据
ax+by+cz+d>0 则点在平面外
ax+by+cz+d=0 则点在平面上
ax+by+cz+d<0 则点在平面内
bool IsOutsideThePlane(float4 plane, float3 position)
{
    return dot(plane.xyz, position) + plane.w > 0;
}
然后给物体设置下包围盒
float3 _BoundMin;   // 物体包围盒最小点
float3 _BoundMax;   // 物体包围盒最大点
包围盒的八个顶点为
float4(_BoundMin, 1)
float4(_BoundMax, 1)
float4(_BoundMax.x, _BoundMax.y, _BoundMin.z, 1)
float4(_BoundMax.x, _BoundMin.y, _BoundMax.z, 1)
float4(_BoundMax.x, _BoundMin.y, _BoundMin.z, 1)
float4(_BoundMin.x, _BoundMax.y, _BoundMax.z, 1)
float4(_BoundMin.x, _BoundMax.y, _BoundMin.z, 1)
float4(_BoundMin.x, _BoundMin.y, _BoundMax.z, 1)
然后再将包围盒的点由自身坐标转到世界坐标
boundPoints[0] = mul(m, float4(_BoundMin, 1));
boundPoints[1] = mul(m, float4(_BoundMax, 1));
boundPoints[2] = mul(m, float4(_BoundMax.x, _BoundMax.y, _BoundMin.z, 1));
boundPoints[3] = mul(m, float4(_BoundMax.x, _BoundMin.y, _BoundMax.z, 1));
boundPoints[4] = mul(m, float4(_BoundMax.x, _BoundMin.y, _BoundMin.z, 1));
boundPoints[5] = mul(m, float4(_BoundMin.x, _BoundMax.y, _BoundMax.z, 1));
boundPoints[6] = mul(m, float4(_BoundMin.x, _BoundMax.y, _BoundMin.z, 1));
boundPoints[7] = mul(m, float4(_BoundMin.x, _BoundMin.y, _BoundMax.z, 1));
而变换矩阵m可以由上一节的matricesBuffer里面的数据即可
这部分的计算可以都放到computeshader里面计算
完整cs代码
// Each #kernel tells which function to compile; you can have many kernels
#pragma kernel CSMain

float4 _FrustumPlanes[6];   // 视锥体的六个面
float3 _BoundMin;   // 物体包围盒最小点
float3 _BoundMax;   // 物体包围盒最大点
StructuredBuffer<float4x4> _MatricesBuffer;   // 所有物体的复合变换矩阵
AppendStructuredBuffer<uint> _VisibleIDsBuffer;  // 可见物体实例ID

bool IsOutsideThePlane(float4 plane, float3 position)
{
    return dot(plane.xyz, position) + plane.w > 0;
}

[numthreads(640, 1, 1)]
void CSMain(uint3 id : SV_DispatchThreadID)
{
    float4x4 m = _MatricesBuffer[id.x];
    float4 boundPoints[8];
    boundPoints[0] = mul(m, float4(_BoundMin, 1));
    boundPoints[1] = mul(m, float4(_BoundMax, 1));
    boundPoints[2] = mul(m, float4(_BoundMax.x, _BoundMax.y, _BoundMin.z, 1));
    boundPoints[3] = mul(m, float4(_BoundMax.x, _BoundMin.y, _BoundMax.z, 1));
    boundPoints[4] = mul(m, float4(_BoundMax.x, _BoundMin.y, _BoundMin.z, 1));
    boundPoints[5] = mul(m, float4(_BoundMin.x, _BoundMax.y, _BoundMax.z, 1));
    boundPoints[6] = mul(m, float4(_BoundMin.x, _BoundMax.y, _BoundMin.z, 1));
    boundPoints[7] = mul(m, float4(_BoundMin.x, _BoundMin.y, _BoundMax.z, 1));

    for (int i = 0; i < 6; i++)
    {
        for (int j = 0; j < 8; j++)
        {
            float3 p = boundPoints[j].xyz;
            if (!IsOutsideThePlane(_FrustumPlanes[i], p))
                break;
            if (j == 7)
                return;
        }
    }

    _VisibleIDsBuffer.Append(id.x);
}
然后在 c#端调用
    void Start()
    {
        _kernel = cullingComputeShader.FindKernel("CSMain");
    }
初始化computeshader
        // ComputeShader
        cullingComputeShader.SetVector("_BoundMin", objectBoundMin);
        cullingComputeShader.SetVector("_BoundMax", objectBoundMax);
        cullingComputeShader.SetBuffer(_kernel, "_MatricesBuffer", _matricesBuffer);
        cullingComputeShader.SetBuffer(_kernel, "_VisibleIDsBuffer", _visibleIDsBuffer);
设置computeshader需要的各项数据
        _visibleIDsBuffer.SetCounterValue(0);//初始化计数器数值
        cullingComputeShader.SetVectorArray("_FrustumPlanes", frustumPlanes);
        cullingComputeShader.Dispatch(_kernel, Mathf.CeilToInt(instanceCount / 640f), 1, 1);
运行处理数据
在这里新加了一个computeBuffer 类型为ComputeBufferType.Append
        // 新增: 可见实例 Buffer
        _visibleIDsBuffer?.Release();
        _visibleIDsBuffer = new ComputeBuffer(instanceCount, sizeof(uint), ComputeBufferType.Append);//	Appends a value to the end of the buffer.允许动态添加删除元素
        instanceMaterial.SetBuffer("visibleIDsBuffer", _visibleIDsBuffer);
允许动态添加删除元素
对应computeshader内为AppendStructuredBuffer
然后 将_visibleIDsBuffer内可见物体的数量 拷贝到_argsBuffer内
ComputeBuffer.CopyCount(_visibleIDsBuffer, _argsBuffer, sizeof(uint));//获取计数器的值 从src拷贝到dst中 dstOffectBytes为在dst当中的值 在dx11平台dst类型必须为raw或者indirectArguments 其他平台可任意修改实际的渲染数量
        // 新增:可见物体实例ID
        StructuredBuffer<uint> visibleIDsBuffer;
着色器内新增可见实例物体的buffer
float4x4 data = matricesBuffer[visibleIDsBuffer[instanceID]];然后拿到剔除后的id
不过实际使用起来 因为没有考虑物体在视椎体外 阴影在视椎体内的情况 所以阴影会有些问题
Unity引擎里面做阴影剔除是在摄像机视锥的六个面之外多加了光锥的几个面,然后计算aabb是否完全在这几个面外部,用float4点乘做的,因为有simd所以一次可以判断四个面
最后 兼容性
ComputeShader手机兼容性报告 ComputeShader手机兼容性报告 - 知乎
GPU Instancing手机兼容性报告 GPU Instancing手机兼容性报告 - 知乎
DrawMeshInstancedIndirect 实验 【躬行】-围绕DrawMeshInstancedIndirect的一些实验 - 知乎
在官方文档的GPU instancing中提到:
You can also use the calls Graphics.DrawMeshInstanced and Graphics.DrawMeshInstancedIndirect to perform GPU Instancing from your scripts.
所以,Graphics.DrawMeshInstancedIndirect()对平台和图形API的要求,与GPU instancing的要求是一致的。在上面的文档中,提到了GPU instancing对平台和图形API的要求:
1.GPU Insancing技术在Android上运行要求:OpenGL ES 3.1开始完全支持GPU Instancing(OpenGL ES 3.0高通芯片的手机不支持)。
2.GPU Insancing技术在iOS上运行要求:iOS的Metal均支持GPU Instancing。Metal从Apple A7(iPhone 5s)开始支持。
3.ComputeShader技术在Android上运行要求:GLSL Version 1.50的设备(OpenGL ES 3.1及以上设备大部分满足此条件,少数3.1的设备不满足)。
4.ComputeShader技术在iOS上运行要求:系统软件最低为iOS 9(iPhone6之前的因缺乏设备未能测试,有需要的看官请自行测试)。
官方给出的测试接口 SystemInfo.supportsComputeShaders和SystemInfo.supportsInstancing 可以检测设备是否支持
项目地址https://github.com/jdxjdx/ProjectEssay/tree/master/GPU_Instancing_Record/GPUInstancingRecord


 895
895

 被折叠的 条评论
为什么被折叠?
被折叠的 条评论
为什么被折叠?
 到【灌水乐园】发言


