


 YOLOV3模型有3个输出tensor,对应输入图像的32倍、16倍和8倍下采样。每个tensor表示不同尺度的检测,用于检测不同大小的物体。每个小方格有3个anchor box,总共可检测10647个物体。输出tensor维度为(batchsize, 10647, 85),其中85包含位置、置信度和类别概率信息。"
107527744,8035154,MySQL基础操作详解,"['数据库管理', 'SQL查询', '表连接', '数据操作', '存储过程']
YOLOV3模型有3个输出tensor,对应输入图像的32倍、16倍和8倍下采样。每个tensor表示不同尺度的检测,用于检测不同大小的物体。每个小方格有3个anchor box,总共可检测10647个物体。输出tensor维度为(batchsize, 10647, 85),其中85包含位置、置信度和类别概率信息。"
107527744,8035154,MySQL基础操作详解,"['数据库管理', 'SQL查询', '表连接', '数据操作', '存储过程']
用过YOLOV3模型的人都知道,YOLOV3网络有3个输出tensor,他分别是对输入RGB三通道图像的32倍,16倍以及8倍的下采样,YOLOV3支持三种尺寸的图像输入,分别是320x320,416x416以及608x608,我们以416X416为例,输入和输出示意图如下:

Yolo v3 采用 FPN(Feature Pyramid Network,特征金字塔结构,就是多种尺寸的特征图构成金字塔结构) 网络的思路输出多尺度特征,效果很好,对于如上的tensor输出,它的维度顺序是怎样的呢?在百思不得其解的情况下,就需要看代码来解惑了。我们找到darknet的代码后处理实现部分,关键流程在函数forward_yolo_layer中:

我们关注entry_index的实现:
![]()
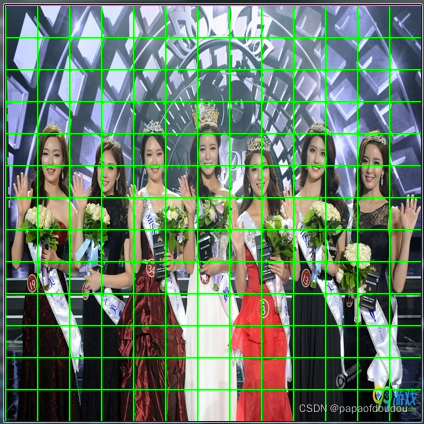
我们知道,根据YOLOV3论文中的说法,以416X416尺寸的输入图像为例,YOLOV3是将其按照 13x13,26x16,52x52分割成小块,如下图的样子,用示意图表示如下,原图尺寸是1200x741.


先用FFMPG将其转换为416X416NV12格式:
ffmpeg -i beauty.jpeg -pix_fmt nv12 -s 416x416 beauty.nv12.yuv
之后,用命令查看:
ffplay -pix_fmt nv12 -f rawvideo -video_size 416x416 ./beauty.nv12.yuv
可以看到,图像scale的目的已经达到了:

开发程序,分别对图像进行32倍,16倍和8倍下采样,画出网格:
#include <stdio.h>
#include <stdlib.h>
#include <string.h>
#include <math.h>
#include <stddef.h>
#include <stdint.h>
#include <fcntl.h>
#include <unistd.h>
#include <sys/ioctl.h>

#define DOWN_SAMPLE1 32
#define DOWN_SAMPLE2 16
#define DOWN_SAMPLE3 8

#define DBG(fmt, ...)   do { printf("%s line %d, "fmt"\n", __func__, __LINE__, ##__VA_ARGS__); } while (0)
static int yuv_width, yuv_height;
static unsigned char *yuvbuf = NULL;

void setpixel(int x,int y)
{
	if(x < 0 || x >= yuv_width)
	{
        DBG("x is not valied %d.", x);
        return;
	}

	if(y < 0 || y >= yuv_height)
	{
        DBG("y is not valied %d.", y);
        return;
	}

	// green yuv 0x96, 0x2c, 0x15
	// red   yuv 0x4c, 0x55, 0xff
	yuvbuf[y * yuv_width + x] = 0x96;
	yuvbuf[yuv_height*yuv_width + (y/2) * yuv_width + x/2 * 2]  = 0x2c;
	yuvbuf[yuv_height*yuv_width + (y/2) * yuv_width + x/2 * 2 + 1]  = 0x15;

    return;
}

void draw_line(int x0, int y0, int x1, int y1)
{
   int dx =  abs(x1-x0), sx = x0<x1 ? 1 : -1;
   int dy = -abs(y1-y0), sy = y0<y1 ? 1 : -1;

   // error value e_xy
   int err = dx + dy, e2;

   for( ; ; )
   {
        setpixel(x0,y0);

        if (x0 == x1 && y0 == y1)
	    {
            break;
	    }

        e2 = 2 * err;

        // e_xy+e_x > 0
        // e_xy+e_y < 0
        if (e2 >= dy)
        {
            err += dy;
            x0 += sx;
        }

        if (e2 <= dx)
        {
            err += dx;
            y0 += sy;
        }
   }

   return;
}

int main(int argc, char **argv)
{
	FILE *file, *filewrite1, *filewrite2, *filewrite3;
    int width  = atoi(argv[1]);
    int height = atoi(argv[2]);

	yuv_width = width;
	yuv_height = height;

	int size = width * height * 3 / 2;

	yuvbuf = malloc(size);

	if(yuvbuf == NULL)
	{
		DBG("malloc yuvbuf failure.");
		return -1;
	}

	memset(yuvbuf, 0x00, size);

	file = fopen(argv[3], "rb");
	if(file == NULL)
	{
		DBG("fatal error, open file %s failure, please check the file status.", argv[3]);
		return -1;
	}

	filewrite1 = fopen("lined1.yuv", "wb+");
	filewrite2 = fopen("lined2.yuv", "wb+");
	filewrite3 = fopen("lined3.yuv", "wb+");
	if(filewrite1 == NULL || filewrite2 == NULL || filewrite3 == NULL)
	{
		DBG("fatal error, open file lined.yuv failure, please check the file status.");
		return -1;
	}

	fseek(file, 0, SEEK_END);
	int filelen = ftell(file);

	DBG("file %s len %d byets.", argv[3], filelen);
	if(filelen != size)
	{
        DBG("yuvdata has been corrupted.size %d", size);
        /*return -1;*/
	}

    fseek(file, 0, SEEK_SET);
	if(fread(yuvbuf, 1, filelen, file) != filelen)
	{
		DBG("read file failure, size wrong.");
		return -1;
	}

	int row = 0, col = 0;
	for(row = 0; row <= width; row += DOWN_SAMPLE1)
	{
	    draw_line(row, 0, row, height);
	}

	for(col = 0; col <= height; col += DOWN_SAMPLE1)
	{
	    draw_line(0, col, width, col);
    }

    fseek(filewrite1, 0, SEEK_SET);

	if(fwrite(yuvbuf, 1, filelen, filewrite1) != filelen)
	{
		DBG("write file failure.");
		return -1;
	}

	fflush(filewrite1);
	fsync(fileno(filewrite1));

    fseek(file, 0, SEEK_SET);
	if(fread(yuvbuf, 1, filelen, file) != filelen)
	{
		DBG("read file failure, size wrong.");
		return -1;
	}

	for(row = 0; row <= width; row += DOWN_SAMPLE2)
	{
	    draw_line(row, 0, row, height);
	}

	for(col = 0; col <= height; col += DOWN_SAMPLE2)
	{
	    draw_line(0, col, width, col);
    }

    fseek(filewrite2, 0, SEEK_SET);

	if(fwrite(yuvbuf, 1, filelen, filewrite2) != filelen)
	{
		DBG("write file failure.");
		return -1;
	}

	fflush(filewrite2);
	fsync(fileno(filewrite2));

    fseek(file, 0, SEEK_SET);

	if(fread(yuvbuf, 1, filelen, file) != filelen)
	{
		DBG("read file failure, size wrong.");
		return -1;
	}

	for(row = 0; row <= width; row += DOWN_SAMPLE3)
	{
	    draw_line(row, 0, row, height);
	}

	for(col = 0; col <= height; col += DOWN_SAMPLE3)
	{
	    draw_line(0, col, width, col);
    }

    fseek(filewrite3, 0, SEEK_SET);

	if(fwrite(yuvbuf, 1, filelen, filewrite3) != filelen)
	{
		DBG("write file failure.");
		return -1;
	}

	fflush(filewrite3);
	fsync(fileno(filewrite3));

	fclose(file);
	fclose(filewrite1);
	fclose(filewrite2);
	fclose(filewrite3);

	return 0;
}
编译,输入命令执行上述程序:
./a.out 416 416 ./beauty.nv12.yuv

得到带有下采样推理网格的图像如下:
13X13tensor对应的推理图:
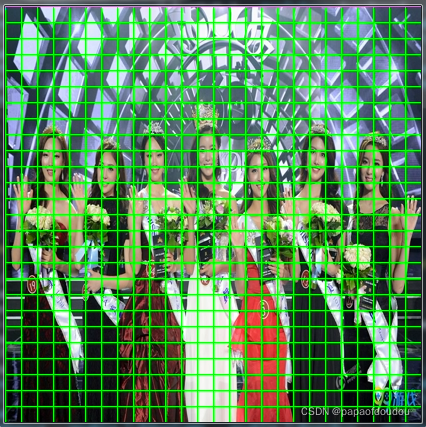
26x26对应的推理图:
52x52对应的推理图:
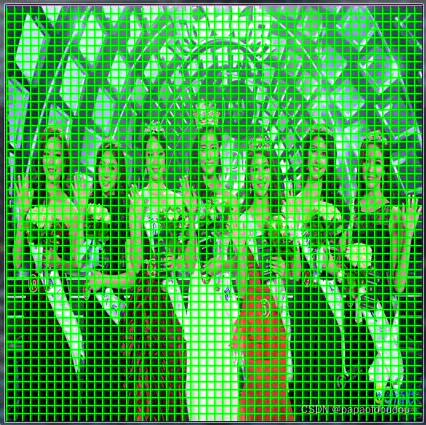
图中,从左到右分别是13*13,26*26,以及52*52的网格图。
格局YOLOV3的检测原理,上面图中每张图像对应一个输出tensor,所以yolov3网络一共三个输出层,输出三个tensor用于后处理。
根据yolov3 论文的描述,每个小方格负责检测以此小方格为中心的物体,每个小方格有3个anchor box用于回归分析,所以,YOLOV3总共可以检测的物体种类有理论上限值,就是:
Max objects(boxes) = 13*13*3 + 26*26*3+52*52*3=10647
目标,也叫做预测框, 更多的预测框表示召回率更高,小物体检测效果好。
现在回到YOLOV3输出tensor维度的讨论,根据函数entry_index的实现,不难分析出,输出tensor的维度为(batchsize,10647,85),针对具体的输出tensor来说,就是(batch, 3*13*13, 255),针对单个batch,就是3*13*13*85,由于我们空间是三维的,对于后面的13*13*85,其实我们怎么理解都可以,但是由于在内存中只能以1维线性数组的存在,所以应该是3*85*13*13这样的形状顺序.
其中前面的13*13*3为entry_index函数中的location,它表示的”预测框”的位置,而并非tensor某个”字节”的位置,对location来说,85这个维度可以看成一个整体,它是对一个location对应的box的描述,比如描述box的位置,置信度,以及这个box属于某类物体的概率,加载一起有85个长度。画成层级结构如下:
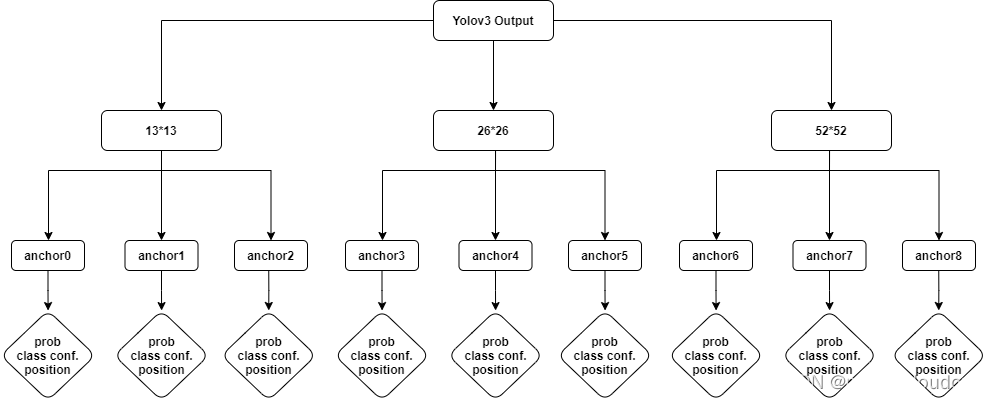
以上理解先记录在这里,未来有新的理解持续更新。
总结:
YOLOV3有三路输出:
第一路:从 36 到 61到79层,再到 82 层,属于正常的卷积网络;
这一路输出相对于原始图像是 32 倍下采样,对于 416x416 图像来说,就是 13x13;这一路适合检测尺寸较大的对象;
第二路:从 79 层开始做 上采样,反卷积或者插值,然后 和 61 层融合,然后做正常卷积,到 91 到 94 层;这一路输出相对于原始图像是 16 倍下采样,对于 416x416 图像来说,就是 26x26;这一路适合检测中等尺寸的对象;
第三路:从 91 层开始做上采样,反卷积或者插值,然后 和 36 层融合,然后做正常卷积,到 106 层;这一路输出相对于原始图像是 8倍下采样,对于 416x416 图像来说,就是 52x52;这一路适合检测尺寸较小的对象;
不同尺度的输出用于检测不同尺寸的物体,需要不同的 anchor box。以 COCO 数据集为例,9 种 box 尺寸如下 9个先验框是:(10x13),(16x30),(33x23),(30x61),(62x45),(59x119),(116x90),(156x198),(373x326)

特征图越小,anchor box 尺寸越大,检测目标也越大;
参考资料:
目标检测(8)-Yolo v3-布布扣-bubuko.com
从YoLov3到Scaled-YoLov4_sasig@y的博客-优快云博客_scaled yolov4
https://antkillerfarm.github.io/deep%20object%20detection/2018/12/01/Deep_Object_Detection_5.html


 2801
2801


 到【灌水乐园】发言


