


有许多可以直接使用的预训练BERT模型。然而,有时训练或微调一个新的语言模型以适配后续NLP任务是有优势的。例如,医学论文使用特定于医学领域的词汇,因此用医学论文训练的语言模型将比在通用文本上训练的模型更适合处理医学文本项目。
在这篇文章中,你将学习如何使用特定领域数据预训练BERT语言模型。
1 数据准备
掩蔽神经语言模型(如BERT)是在文本上训练的。然而,文本必须首先被转换成数值表示,这一过程称为分词。网络随后通过在输入句子中掩盖随机单词并预测缺失单词来进行训练。训练后的语言模型可以用于下游NLP任务,此时被称为预训练语言模型。
这里我们使用的NVIDIA NeMo,可以选择在训练过程中实时进行分词,或在训练前离线分词。
-
实时数据预处理:训练和验证的文本文件中,单词应以空格分隔:
[WORD] [SPACE] [WORD] [SPACE] [WORD] [SPACE] [WORD] -
离线数据预处理:数据提前以
HD5F格式准备好。对于大型文本语料库,推荐这种预处理方式。- 参考BERT快速入门指南获取离线数据预处理脚本。
在本例中,我们将使用实时数据预处理流程。我们将在NCBI-disease corpus上训练BERT。
NCBI Disease Corpus是一个在疾病提及和疾病概念级别上进行了完整标注的数据集,旨在为生物医学 NLP 社区提供研究资源。
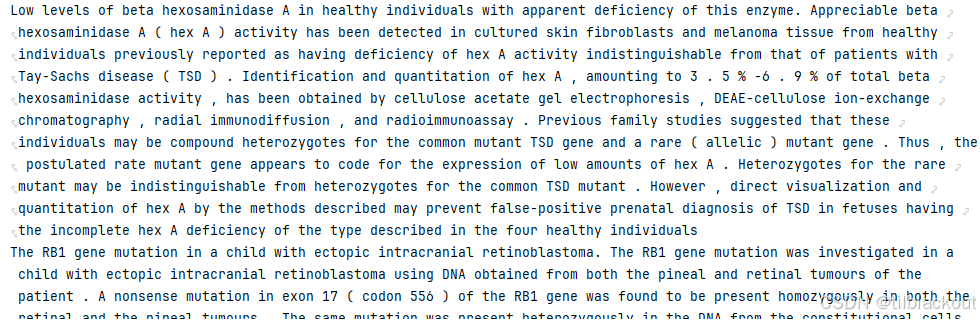
NCBI语料库包含793篇PubMed(免费的生物医学文献数据库)摘要。我们的目标是为医学领域创建一个预训练模型。下面是一些摘要示例:
with open('./data/train.txt', 'r', encoding='utf-8') as f:
    lines = f.readlines()
    last_5_lines = lines[-5:]
    for line in last_5_lines:
        print(line.strip())
输出:
2 训练BERT分词器
上一篇文章有提到,BERT分词器根据预定义的词汇表将文本分割为tokens。分词器算法从文本语料库中选取Top-K频繁单词来生成词汇表。
由于训练成本随词汇表大小增加,因此词汇表大小受到限制。如果将所有唯一单词纳入词汇表,会导致训练复杂度爆炸,超出分词器的承受能力。例如,2018年发布的BERT模型采用WordPiece子词分词器,词汇表限制在30000。
那么,分词器如何处理不在词汇表中的术语,即词汇外(OOV) 单词呢?
- 一种方法是将OOV单词替换为特殊标记
UNKUNK。但这样所有OOV词对神经网络来说具有相同表示,丧失了语义。 - 另一种方法是按字符级拆分OOV单词。这增加了输入的长度,模型需学习字符之间的关系以保留语义。
- 子词分词器(如BERT WordPiece)提供了折中方案,将OOV单词切分为子词。
2.1 测试分词器
我们来看看bert-base-uncased分词器:
# ! pip install nemo_toolkit['nlp']
# !pip install megatron-core

from nemo.collections import nlp as nemo_nlp

tokenizer_uncased = nemo_nlp.modules.get_tokenizer(tokenizer_name="bert-base-uncased")
print("词汇表大小: ", tokenizer_uncased.vocab_size)  # 输出30522
例如,使用BERT分词器分词年份。2021年之前的年份在语料库中出现频率较高,因此包含在词汇表中;而未来年份则属于OOV,会被切分为子词。
下面使用tokenizer_uncased.text_to_tokens()函数试试:
# Bert 分词器分词年份
print("Tokenized year: ", tokenizer_uncased.text_to_tokens('2019'))
print("Tokenized year: ", tokenizer_uncased.text_to_tokens('2020'))
print("Tokenized year: ", tokenizer_uncased.text_to_tokens('2021'))
print("Tokenized year: ", tokenizer_uncased.text_to_tokens('2022'))
print("Tokenized year: ", tokenizer_uncased.text_to_tokens('2023'))
print("Tokenized year: ", tokenizer_uncased.text_to_tokens('2030'))
输出:
Tokenized year:  ['2019']
Tokenized year:  ['2020']
Tokenized year:  ['2021']
Tokenized year:  ['202', '##2']
Tokenized year:  ['202', '##3']
Tokenized year:  ['203', '##0']
1.为什么使用BERT分词器时,2019、2020、2021这些年份能直接分词,而2022、2023、2030会被拆分成子词?
因为bert-base-uncased模型是在2018-2019年训练的,那时2019、2020、2021出现在语料中频率很高,被完整收录进词表;而2022之后的年份在当时数据中很少或根本没有,所以没有纳入词表,只能被拆成子词。2.如果要处理很多未来的新词,比如新的年份、新药品名或新公司名,应该怎么办?
可以选择重新用自己的领域数据训练一个新的分词器(如BertWordPieceTokenizer),或者在原分词器上动态扩展词表(用add_tokens()),但扩展效果有限,不如重新训练分词器更彻底。
通过年份的例子我们可以直观理解分词过程。那医学术语呢?下面的示例句中包含了诸如dilutions、C5D、C5、hemolytic、assay等医学术语。
# Bert 分词器分词医学术语示例
SAMPLES = "Further studies suggested that low dilutions of C5D serum contain a factor or factors interfering at some step in the hemolytic assay of C5 rather than a true C5 inhibitor."
print("Tokenized sentence: ", tokenizer_uncased.text_to_tokens(SAMPLES))
输出如下:
Tokenized sentence: ['further', 'studies', 'suggested', 'that', 'low', 'dil', '##ution', '##s', 'of', 'c', '##5', '##d', 'serum', 'contain', 'a', 'factor', 'or', 'factors', 'interfering', 'at', 'some', 'step', 'in', 'the', 'hem', '##ol', '##ytic', 'ass', '##ay', 'of', 'c', '##5', 'rather', 'than', 'a', 'true', 'c', '##5', 'inhibitor', '.']
可以看到医学术语被分词成子词,如dilutions -> 'dil', '##ution', '##s'和hemolytic -> 'hem', '##ol', '##ytic'。
这些医学术语不在标准BERT词汇表中,因此被拆成子词。
2.2 更新BERT词汇表
可以使用tokenizer_uncased.tokenizer.add_tokens()方法将特定领域的新词加入词汇表。每个新token的嵌入向量将随机初始化。
# 将医学术语添加到 Bert 分词器的词汇表中
additional_tokens = tokenizer_uncased.tokenizer.add_tokens(["dilutions", "hemolytic"])
print("添加前词汇表大小: ", tokenizer_uncased.vocab_size)
print("添加后词汇表大小: ", tokenizer_uncased.vocab_size)
# 使用新词汇表分词
print("Tokenized sentence: ", tokenizer_uncased.text_to_tokens(SAMPLES))
输出如下:
添加前词汇表大小:  30524
添加后词汇表大小:  30524
Tokenized sentence:  ['further', 'studies', 'suggested', 'that', 'low', 'dilutions', 'of', 'c', '##5', '##d', 'serum', 'contain', 'a', 'factor', 'or', 'factors', 'interfering', 'at', 'some', 'step', 'in', 'the', 'hemolytic', 'ass', '##ay', 'of', 'c', '##5', 'rather', 'than', 'a', 'true', 'c', '##5', 'inhibitor', '.']
当要添加大量领域特有单词时,最好从特定领域语料库重新训练分词器。
我们将使用 [NCBI-disease corpus] 训练一个新的 WordPiece 分词器,限制词汇表大小为10000。相关的函数类为BertWordPieceTokenizer,它的train的参数如下。
| 参数名 | 含义 | 说明 |
|---|---|---|
files | 输入文本文件路径列表 | 分词器要读取这些文件内容来学习 token 频率 |
vocab_size | 词表大小上限 | 最多保留这么多 token,决定最终分词器大小 |
min_frequency | 词频下限 | 词出现的次数至少要达到这个数,才能被收录到词表 |
special_tokens | 特殊 token 列表 | 人工指定必须保留的特殊 token,比如 [CLS], [SEP], [MASK] |
show_progress | 是否显示训练进度条 | 帮助观察训练过程 |
wordpieces_prefix | 子词的前缀 | BERT 使用 ## 标记子词,比如 “##ing” 表示不是单独词而是子词 |
下面来训练新的WordPiece分词:
# 设置参数
vocab_size= 10000
text_corpus=["./data/train.txt"]

# 添加 BERT 预训练所需的特殊 tokens,即必须加到词表的特定字符串
special_tokens = ["<PAD>","<UNK>","<CLS>","<SEP>","<MASK>"]

# 训练新的 WordPiece 分词器
from tokenizers import BertWordPieceTokenizer

my_bert_tokenizer = BertWordPieceTokenizer()
my_bert_tokenizer.train(files=text_corpus, vocab_size=vocab_size,
                        min_frequency=1, special_tokens=special_tokens,
                        show_progress=True, wordpieces_prefix="##")
# 查看新词汇表大小
print("新词汇表大小: ", len(my_bert_tokenizer.get_vocab()))
# 保存新词汇表
my_bert_tokenizer.save_model(directory="./data/")
# 查看新词汇表最后 20 行
!tail -20 /dli/task/data/vocab.txt  # 需在linux运行才行
输出如下:
新词汇表大小:  10000
d17s857
delayed
maintaining
contributions
arg170
362arg
362ser
grandmother
grandmatrilineal
cytoskeleton
tyr231
tyr180
israelis
d14s291
angioedema
angiokeratoma
d13s314
d13s316
portugal
ophthalmologic
一旦定义了词汇表,可以使用nemo_nlp.modules.get_tokenizer()方法加载新分词器,并对之前的样本文本进行分词,比对基础版BERT的效果。
# 加载自定义词汇表分词器
special_tokens_dict = {
    "unk_token": "<UNK>",
    "sep_token": "<SEP>",
    "pad_token": "<PAD>",
    "bos_token": "<CLS>",
    "mask_token": "<MASK>",
    "eos_token": "<SEP>",
    "cls_token": "<CLS>"
}

tokenizer_custom = nemo_nlp.modules.get_tokenizer(tokenizer_name="bert-base-uncased", vocab_file='./data/vocab.txt', special_tokens=special_tokens_dict)

print("使用自定义词汇表的BERT分词结果: ", tokenizer_custom.text_to_tokens(SAMPLES))
- 这里传入的
special_tokens不会影响text_to_tokens的输出,它会被保存在分词器内部,形成:tokenizer_custom.mask_token、tokenizer_custom.cls_token等属性供后续任务(如训练、推理、数据构造等)使用
输出如下:
使用自定义词汇表的BERT分词结果: ['further', 'studies', 'suggested', 'that', 'low', 'dil', '##ution', '##s', 'of', 'c5d', 'serum', 'contain', 'a', 'factor', 'or', 'factors', 'interfer', '##ing', 'at', 'some', 'step', 'in', 'the', 'hemolytic', 'assay', 'of', 'c5', 'rather', 'than', 'a', 'true', 'c5', 'inhibitor', '.']
2.3 特殊tokens区分
先来看看刚刚分词定义的special_tokens:
special_tokens = ["<PAD>","<UNK>","<CLS>","<SEP>","<MASK>"]
为什么要有
special_tokens变量呢?因为输入的文本中不一定有它们,但是词表里一定要有这些符号,以支持后续模型正常训练和推理。在
my_bert_tokenizer.train(...)中只是训练一个分词器,学习文本中哪些词/子词出现得多,生成一个词表。它会把special_tokens当做普通的字符串,加到词表里,给它们分配一个token id。
对于刚刚special_tokens_dict字典中的参数名解释如下:
| 参数名 | 意思 | 默认对应符号 | 用途 |
|---|---|---|---|
unk_token | Unknown token | <UNK> | 不在词表里的词,替换成这个符号 |
sep_token | Segment separator token | <SEP> | 两句话之间的分隔符 |
pad_token | Padding token | <PAD> | 补齐句子长度用 |
bos_token | Beginning of sequence token | <CLS> | 序列起始符号,通常也拿来做分类任务的特征 |
mask_token | Masking token | <MASK> | 预训练时掩盖单词的专用符号 |
eos_token | End of sequence token | <SEP> | 句子结束符,BERT里和<SEP>复用 |
cls_token | Classification token | <CLS> | 特别用于分类任务的特殊位置的 token |
- 上面表格中的参数名是
Hugging Face transformers库、NVIDIA NeMo库等大框架内部硬性规定的关键词,代表模型或分词器内部特定用途的token类型,不能改变。 - 而对于刚刚训练过程中的变量
special_tokens来说,里面的特殊字符串可以自己定义,只要你能在special_tokens_dict中对应上就行,但建议还是按含义来定义。 special_tokens_dict的参数比我们设置的special_tokens多了两个,但是实际上有两个对应的符号是重复的,所以不会出错。special_tokens_dict是为了告诉分词器哪些token在vocab里具有特殊用途,为了赋予它们角色和意义
在分词完成之后,特殊tokens会在模型训练或推理前的数据准备阶段被真正使用:这时会根据任务需要,将 <CLS>插入到句首表示整体语义、<SEP>用于分隔多段文本、<MASK>用于构建掩蔽语言建模任务、<PAD>用于对齐不同长度的输入句子,而<UNK>用于替代词表中不存在的词,使得模型输入格式符合预训练或微调要求。
3 使用NeMo启动BERT预训练
这里我们使用一个.yaml文件来统一管理BERT预训练过程中的超参数和路径设置,只需修改文件就能灵活调整训练策略。我们将使用实时数据预处理的模型配置文件 bert_pretraining_from_text_config.yaml:
- 注意,本教材以
NeMo1.0为例,下面的yaml的方法为1.0版本的方法。这里使用的docker镜像:nvcr.io/nvidia/nemo:1.6.1 - 最新的
NeMo2.0中已经去除yaml文件,改为在类中声明,参考链接。
# BERT Pretraining from Text
name: &name PretrainingBERTFromText
trainer:
  devices: 1 # the number of gpus, 0 for CPU, or list with gpu indices
  num_nodes: 1
  max_epochs: 2 # the number of training epochs
  max_steps: -1 # precedence over max_epochs
  accumulate_grad_batches: 1 # accumulates grads every k batches
  precision: 16 # 16 to use AMP
  accelerator: gpu
  gradient_clip_val: 0.0
  log_every_n_steps: 1
  val_check_interval: 1.0 # check once per epoch .25 for 4 times per epoch
  enable_checkpointing: False # provided by exp_manager
  logger: false # provided by exp_manager

model:
  nemo_path: null # exported .nemo path
  only_mlm_loss: false # only use masked language model without next sentence prediction
  num_tok_classification_layers: 1 # number of token classification head output layers
  num_seq_classification_layers: 2 # number of sequence classification head output layers
  max_seq_length: 128
  # The maximum total input sequence length after tokenization. Sequences longer than this
  # will be truncated, and sequences shorter than this will be padded.
  mask_prob: 0.15
  # Probability of masking a token in the input text during data processing.
  short_seq_prob: 0.1
  # Probability of having a sequence shorter than the maximum sequence length `max_seq_length` in data processing.",

  language_model:
    pretrained_model_name: bert-base-uncased
    lm_checkpoint: null
    config:
      attention_probs_dropout_prob: 0.1
      hidden_act: gelu
      hidden_dropout_prob: 0.1
      hidden_size: 768
      initializer_range: 0.02
      intermediate_size: 3072
      max_position_embeddings: 512
      num_attention_heads: 12
      num_hidden_layers: 12
      type_vocab_size: 2
      vocab_size: 30522
    config_file: null # json file, precedence over config

  tokenizer:
    tokenizer_name: ${model.language_model.pretrained_model_name} # tokenizer that inherits from TokenizerSpec
    vocab_file: null # path to vocab file
    tokenizer_model: null # tokenizer model for sentencepiece
    special_tokens: # only necessary for adding transformer/bert-specific special tokens to tokenizer if the tokenizer does not already have these inherently.
        unk_token: '[UNK]'
        sep_token: '[SEP]'
        pad_token: '[PAD]'
        bos_token: '[CLS]'
        mask_token: '[MASK]'
        eos_token: '[SEP]'
        cls_token: '[CLS]'

  train_ds:
    data_file: ??? # path to data file
    max_seq_length: ${model.max_seq_length}
    mask_prob: ${model.mask_prob}
    short_seq_prob: ${model.short_seq_prob}
    batch_size: 16 # per GPU
    shuffle: true
    num_samples: -1
    num_workers: 2
    drop_last: false
    pin_memory: false

  validation_ds:
    data_file: ??? # path to data file
    max_seq_length: ${model.max_seq_length}
    mask_prob: ${model.mask_prob}
    short_seq_prob: ${model.short_seq_prob}
    batch_size: 16 # per GPU
    shuffle: false
    num_samples: -1
    num_workers: 2
    drop_last: false
    pin_memory: false

  optim:
    name: adamw
    lr: 3e-5
    weight_decay: 0.0

    sched:
      name: CosineAnnealing
      warmup_steps: null
      warmup_ratio: 0.1
      min_lr: 0.0
      last_epoch: -1


exp_manager:
  exp_dir: null # where to store logs and checkpoints
  name: *name # name of experiment
  create_tensorboard_logger: True
  create_checkpoint_callback: True

hydra:
  run:
    dir: .
  job_logging:
    root:
      handlers: null
稍后模块会深入讲解NeMo的配置文件和脚本。现在只需了解YAML文件中的几个重要参数键:
trainer:训练过程参数,如GPU 数量、混合精度训练、epoch数等model.only_mlm_loss:仅使用掩蔽语言模型损失,不做下一句预测model.mask_prob:掩盖输入文本token的概率model.train_ds/model.validation_ds:数据集参数model.tokenizer:分词器参数model.language_model:语言模型架构参数model.optim:优化器参数
还有训练脚本bert_pretraining.py,下面是基于NeMo1.6.1做了一些改动后的版本:
import pytorch_lightning as pl
from pytorch_lightning.plugins import DDPPlugin

from omegaconf import DictConfig, OmegaConf

from nemo.collections.nlp.models.language_modeling import BERTLMModel
from nemo.core.config import hydra_runner
from nemo.utils import logging
from nemo.utils.exp_manager import exp_manager


@hydra_runner(config_path="conf", config_name="bert_pretraining_from_text_config")
def main(cfg: DictConfig) -> None:
    logging.info(f'Config:\n {OmegaConf.to_yaml(cfg)}')
    trainer = pl.Trainer(plugins=DDPPlugin(find_unused_parameters=True), **cfg.trainer)
    exp_manager(trainer, cfg.get("exp_manager", None))
    bert_model = BERTLMModel(cfg.model, trainer=trainer)
    trainer.fit(bert_model)
    if cfg.model.nemo_path:
        bert_model.save_to(cfg.model.nemo_path)


if __name__ == '__main__':
    main()
这段训练脚本的作用是:基于配置文件bert_pretraining_from_text_config.yaml,使用PyTorch Lightning和NeMo框架,构建并训练一个BERT语言模型(BERTLMModel);其中,脚本会初始化训练器(Trainer),配置分布式训练(DDPStrategy),管理实验日志与保存(exp_manager),然后开始正式训练模型,并在训练结束后根据需要保存成.nemo格式文件。
详细了解 bert_pretraining 参数请参考 NeMo 官方文档。
如果是离线预处理的数据,请使用配置文件 bert_pretraining_from_preprocessed_config.yaml。
# !pip install pytorch-lightning
# 定义数据目录变量
DATA_DIR = '/content/drive/MyDrive/learning/data'

# 查看配置文件内容
! cat {DATA_DIR}/conf/bert_pretraining_from_text_config.yaml

%%time
! python $DATA_DIR/bert_pretraining.py \
    model.train_ds.data_file=$DATA_DIR/train.txt \
    model.validation_ds.data_file=$DATA_DIR/test.txt \
    model.tokenizer.vocab_file=$DATA_DIR/vocab.txt \
    model.train_ds.batch_size=16 \
    trainer.max_epochs=2
输出如下:
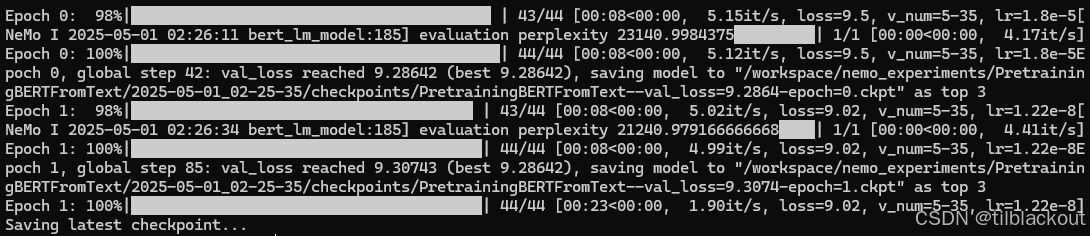
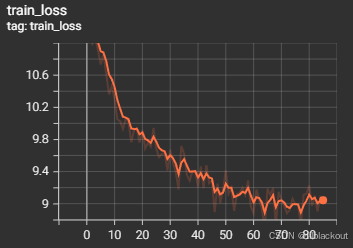
我们可以用TensorBoard查看保存在nemo_experiments文件夹下的实验指标,比如loss和accuracy。
tensorboard --logdir /workspace/nemo_experiments
部分输出如下:
4 总结
在这篇文章中,我们学习了如何训练一个BERT分词器,并利用NVIDIA NeMo框架在大规模无标签文本数据上预训练一个BERT语言模型。尽管预训练阶段不依赖带标签数据,但它需要大量的计算资源和时间,一般要一周甚至更多的时间。相比之下,微调BERT模型的计算开销较小,但需配合带标签的数据集。


 被折叠的 条评论
为什么被折叠?
被折叠的 条评论
为什么被折叠?
 到【灌水乐园】发言


