


本篇文章我们将构建一个NER(命名实体识别)应用程序,用于在医学疾病摘要中识别疾病名称。这个模型不是从一个列表中查找名称,而是通过上下文识别某些词是疾病名称。
对于NER任务,你将与文本分类任务类似的方式完成项目构建、训练与测试。BioMegatron是一种类似BERT的Megatron-LM模型,它在大型生物医学文本语料(如PubMed摘要与全文)上进行了预训练。由于我们处理的疾病数据也来自生物医学领域,因此我们可以预期它的表现优于通用语言模型。
1 使用命令行进行Token级分类
我们要回答的问题是:给定医学文摘中的句子,提到了哪些疾病?
我们将使用英伟达的token classification模型来进行NER任务,因为我们要在token级别进行分类,也就是识别与疾病相关的词。
1.1 数据输入
在之前的文章文本分类与命名实体识别的数据结构中,我们知道NER项目的数据集由带有IOB标签的句子组成,每个单词都被标记为命名实体的开头、中间或外部。
- 数据集下载地址:NCBI医学语料库
训练文本和标签文件分别是text_train.txt和labels_train.txt。验证和测试文件也采用类似的命名规则。下面验证数据文件的位置:
# 设置NER数据目录变量并列出文件
NER3_DATA_DIR = '/dli/task/data/NCBI_ner-3'
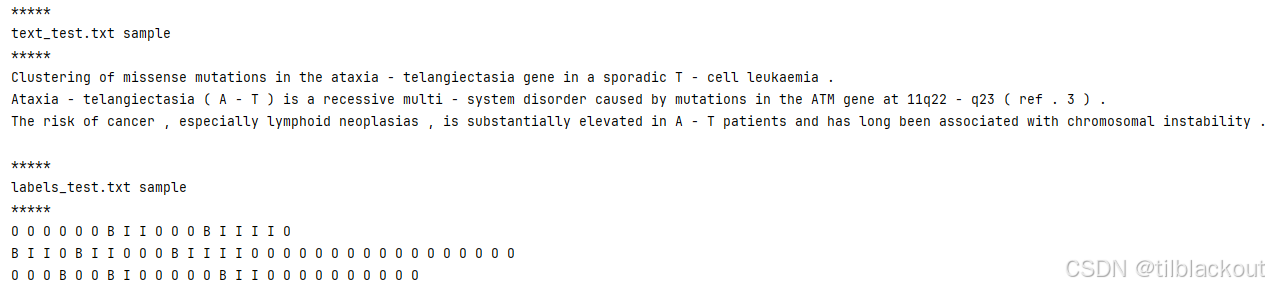
print("*****\ntext_test.txt sample\n*****")
!head -n 3 $NER3_DATA_DIR/text_test.txt
print("\n*****\nlabels_test.txt sample\n*****")
!head -n 3 $NER3_DATA_DIR/labels_test.txt
输出如下:
IOB标签说明
NER数据集中的句子与标签是通过IOB(Inside, Outside, Beginning)标注对应的,我们再来回顾一下。
这种机制可以广泛用于多个命名实体类别的标注:
B-{CHUNK_TYPE}:实体块的开头词I-{CHUNK_TYPE}:实体块中的词O:非任何实体的词
在我们的案例中,我们只关心disease这个实体类型。其中B是疾病名称的开头词,I是疾病名称中的词,O是所有疾病名称之外的词

这些类别在labels.csv文件中定义:
# 查看标签ID定义
!head $NER3_DATA_DIR/label_ids.csv

输出:
O
B
I
如果我们需要识别多种命名实体(例如词性分析中的名词和动词),可以使用五分类IOB标注方式:
B-N:名词短语的开头词I-N:名词短语中的词B-V:动词短语的开头词I-V:动词短语中的词O:所有名词和动词之外的词
我们的NCBI_ner-3疾病数据已经符合NeMo文档中对token classification的数据输入格式要求,因此可以开始查看配置文件。
1.2 配置文件
NER的配置文件 token_classification_config.yaml 指定了模型、训练与实验管理的细节,如数据路径、预训练模型、超参数等。该配置文件的结构与文本分类任务中的配置类似。我们继续使用OmegaConf工具查看每一部分的配置内容。
# 导入OmegaConf用于加载配置
from omegaconf import OmegaConf

CONFIG_DIR = "/dli/task/nemo/examples/nlp/token_classification/conf"
CONFIG_FILE = "token_classification_config.yaml"

config = OmegaConf.load(CONFIG_DIR + "/" + CONFIG_FILE)

# 打印模型部分配置
print(OmegaConf.to_yaml(config.model))
输出如下:
label_ids: null
class_labels:
  class_labels_file: label_ids.csv
dataset:
  data_dir: ???
  class_balancing: null
  max_seq_length: 128
  pad_label: O
  ignore_extra_tokens: false
  ignore_start_end: false
  use_cache: true
  num_workers: 2
  pin_memory: false
  drop_last: false
train_ds:
  text_file: text_train.txt
  labels_file: labels_train.txt
  shuffle: true
  num_samples: -1
  batch_size: 64
validation_ds:
  text_file: text_dev.txt
  labels_file: labels_dev.txt
  shuffle: false
  num_samples: -1
  batch_size: 64
test_ds:
  text_file: text_dev.txt
  labels_file: labels_dev.txt
  shuffle: false
  num_samples: -1
  batch_size: 64
tokenizer:
  tokenizer_name: ${model.language_model.pretrained_model_name}
  vocab_file: null
  tokenizer_model: null
  special_tokens: null
language_model:
  pretrained_model_name: bert-base-uncased
  lm_checkpoint: null
  config_file: null
  config: null
head:
  num_fc_layers: 2
  fc_dropout: 0.5
  activation: relu
  use_transformer_init: true
optim:
  name: adam
  lr: 5.0e-05
  weight_decay: 0.0
  sched:
    name: WarmupAnnealing
    warmup_steps: null
    warmup_ratio: 0.1
    last_epoch: -1
    monitor: val_loss
    reduce_on_plateau: false
另外,可以通过下面命令查看NeMo中支持的BERT类语言模型列表:
from nemo.collections import nlp as nemo_nlp
nemo_nlp.modules.get_pretrained_lm_models_list()
我们需要指定包含所有数据文件的dataset.data_dir路径。我们数据集的文件名已经yaml中的默认值。
对于语言模型来说,我们先将language_model.pretrained_model_name设为'bert-base-cased',之后再与特定领域的'biomegatron-bert-345m-cased'进行对比。为节省内存,我们也会设置较小的max_seq_length与batch_size。
# 打印训练器配置项
print(OmegaConf.to_yaml(config.trainer))
输出如下:
gpus: 1
num_nodes: 1
max_epochs: 5
max_steps: null
accumulate_grad_batches: 1
gradient_clip_val: 0.0
amp_level: O0
precision: 16
accelerator: ddp
checkpoint_callback: false
logger: false
log_every_n_steps: 1
val_check_interval: 1.0
resume_from_checkpoint: null
为提升效率,我们可以设置amp_level为'O1',并将max_epochs设置为较小值以减少训练时间。
# 打印实验管理器配置项
print(OmegaConf.to_yaml(config.exp_manager))
输出如下:
exp_dir: null
name: token_classification_model
create_tensorboard_logger: true
create_checkpoint_callback: true
暂时无需更改exp_manager的默认设置。
我们需要更改或覆盖的参数包括:
model.language_model.pretrained_model_name:设为'bert-base-cased'model.dataset.data_dir:设为/dli/task/data/NCBI_ner-3model.dataset.max_seq_length:设为64model.train_ds.batch_size:设为32model.val_ds.batch_size:设为32model.test_ds.batch_size:设为32trainer.amp_level:设为'O1'trainer.max_epochs:设为3
2 模型训练和评估
本次实验需要用到的训练与评估的脚本文件如下:token_classification_train.py和token_evaluate.py,训练与评估在此任务中需要分别运行。
2.1 训练
和之前文本分类任务一样,运行token_classification_train.py训练脚本即可。
%%time
# 训练大约耗时2分钟

TOKEN_DIR = "/dli/task/nemo/examples/nlp/token_classification"

# 设置需要覆盖的配置值
PRETRAINED_MODEL_NAME = 'bert-base-cased'
DATA_DIR = '/dli/task/data/NCBI_ner-3'
MAX_SEQ_LENGTH = 64
BATCH_SIZE = 32
AMP_LEVEL = 'O1'
MAX_EPOCHS = 3

# 运行训练脚本,覆盖默认配置
!python $TOKEN_DIR/token_classification_train.py \
        model.language_model.pretrained_model_name=$PRETRAINED_MODEL_NAME \
        model.dataset.data_dir=$DATA_DIR \
        model.dataset.max_seq_length=$MAX_SEQ_LENGTH \
        model.train_ds.batch_size=$BATCH_SIZE \
        model.validation_ds.batch_size=$BATCH_SIZE \
        model.test_ds.batch_size=$BATCH_SIZE \
        trainer.amp_level=$AMP_LEVEL \
        trainer.max_epochs=$MAX_EPOCHS
训练结果:

特定领域训练
这次将model.language_model.pretrained_model_name设置为'biomegatron-bert-345m-cased'。这是一个拥有3.45亿参数的大模型,因此运行时间会更长。
%%time
# 训练大约耗时 5~6 分钟

TOKEN_DIR = "/dli/task/nemo/examples/nlp/token_classification"

# 设置我们要覆盖的值
PRETRAINED_MODEL_NAME = 'biomegatron-bert-345m-cased'
DATA_DIR = '/dli/task/data/NCBI_ner-3'
MAX_SEQ_LENGTH = 64
BATCH_SIZE = 32
AMP_LEVEL = 'O1'
MAX_EPOCHS = 3

# 运行训练脚本,使用 BioMegatron 语言模型
!python $TOKEN_DIR/token_classification_train.py \
        model.language_model.pretrained_model_name=$PRETRAINED_MODEL_NAME \
        model.dataset.data_dir=$DATA_DIR \
        model.dataset.max_seq_length=$MAX_SEQ_LENGTH \
        model.train_ds.batch_size=$BATCH_SIZE \
        model.validation_ds.batch_size=$BATCH_SIZE \
        model.test_ds.batch_size=$BATCH_SIZE \
        trainer.amp_level=$AMP_LEVEL \
        trainer.max_epochs=$MAX_EPOCHS
我们使用TensorBoard可视化结果。要比较多个模型的性能,可以选择f1分数作为观察指标。下图中,橙色线表示bert-base-cased模型,蓝色线表示biomegatron-bert-345m-cased模型。
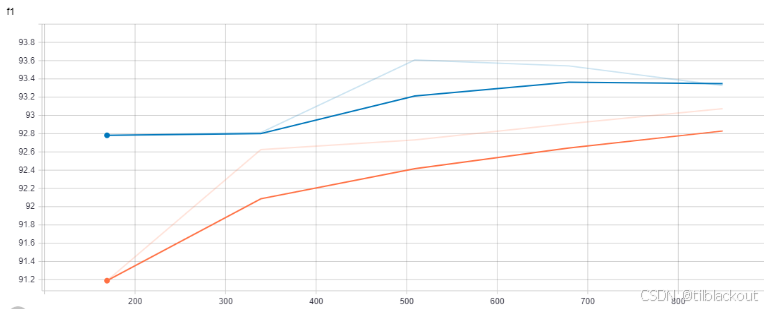
BioMegatron模型收敛速度快,效果也更好,因为它更适合生物医学语料。五轮训练后f1分数略高。但最终使用哪个模型,还需根据你的显存、训练时间、性能要求综合考虑。你的实际结果可能会因训练随机性略有不同。
2.2 评估
# 重启 Notebook 内核
import IPython
app = IPython.Application.instance()
app.kernel.do_shutdown(True)
要在测试集上评估模型,我们需要指定训练得到的.nemo模型路径。每次实验会生成一个时间戳目录,保存在nemo_experiments下。进入checkpoints文件夹即可找到最终模型文件。
下面这段Python代码将获取所有训练模型路径,并选取最新的一个:
# 获取最近一次训练生成的 .nemo 模型路径
import glob

nemo_model_paths = glob.glob('nemo_experiments/token_classification_model/*/checkpoints/*.nemo')

# 最新的模型排在前面
nemo_model_paths.sort(reverse=True)
print("最新的模型路径为:\n{}".format(nemo_model_paths[0]))
你可以用以下两种方式评估模型:
方法1:使用token_classification_evaluate.py脚本
运行脚本,并设置如下参数,注意额外添加.nemo模型路径。
!python $TOKEN_DIR/token_classification_evaluate.py \
        model.dataset.data_dir=$DATA_DIR \
        model.dataset.max_seq_length=$MAX_SEQ_LENGTH \
        model.train_ds.batch_size=$BATCH_SIZE \
        model.validation_ds.batch_size=$BATCH_SIZE \
        model.test_ds.batch_size=$BATCH_SIZE \
        model.language_model.pretrained_model_name=$PRETRAINED_MODEL_NAME \
        pretrained_model=$LATEST_MODEL
方法2:在代码中加载模型并调用NeMo方法评估
我们使用这种方式进行演示。
# 从 .nemo 文件中加载训练好的模型
from nemo.collections import nlp as nemo_nlp

LATEST_MODEL = nemo_model_paths[0]
model = nemo_nlp.models.TokenClassificationModel.restore_from(LATEST_MODEL)
调用evaluate_from_file方法,在测试集上进行评估。设置add_confusion_matrix=True可以显示混淆矩阵图。
# 使用测试集进行评估,输出混淆矩阵
import os.path

DATA_DIR = '/dli/task/data/NCBI_ner-3'
OUTPUT_DIR = '/dli/task/nemo_experiments/token_classification_model/logs'
model.evaluate_from_file(
    text_file=os.path.join(DATA_DIR, 'text_test.txt'),
    labels_file=os.path.join(DATA_DIR, 'labels_test.txt'),
    output_dir=OUTPUT_DIR,
    add_confusion_matrix=True,
    normalize_confusion_matrix=True,
    batch_size=1
)
输出结果应类似如下:
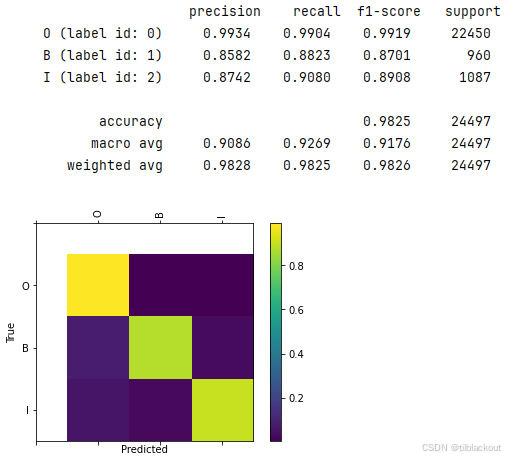
最终混淆矩阵显示了明亮的对角线,说明预测标签与真实标签高度一致,识别准确率很高。
2.3 推理
要对新输入进行推理,使用训练好的模型并调用add_predictions()方法即可。
# 推理文本样本列表
queries = [
    "Clustering of missense mutations in the ataxia - telangiectasia gene in a sporadic T - cell leukaemia . ",
    "Ataxia - telangiectasia ( A - T ) is a recessive multi - system disorder caused by mutations in the ATM gene at 11q22 - q23 ( ref . 3 ) . ",
    "The risk of cancer , especially lymphoid neoplasias , is substantially elevated in A - T patients and has long been associated with chromosomal instability . ",
    "By analysing tumour DNA from patients with sporadic T - cell prolymphocytic leukaemia ( T - PLL ) , a rare clonal malignancy with similarities to a mature T - cell leukaemia seen in A - T , we demonstrate a high frequency of ATM mutations in T - PLL . ",
    "In marked contrast to the ATM mutation pattern in A - T , the most frequent nucleotide changes in this leukaemia were missense mutations . ",
    "These clustered in the region corresponding to the kinase domain , which is highly conserved in ATM - related proteins in mouse , yeast and Drosophila . ",
    "The resulting amino - acid substitutions are predicted to interfere with ATP binding or substrate recognition . ",
    "Two of seventeen mutated T - PLL samples had a previously reported A - T allele . ",
    "In contrast , no mutations were detected in the p53 gene , suggesting that this tumour suppressor is not frequently altered in this leukaemia . ",
    "Occasional missense mutations in ATM were also found in tumour DNA from patients with B - cell non - Hodgkins lymphomas ( B - NHL ) and a B - NHL cell line . "
]

# 对输入文本进行NER预测,结果写入 predictions.txt
results = model.add_predictions(queries, output_file='predictions.txt')
3 总结
这篇文章我们基于NeMo框架实现了医学领域的命名实体识别系统,涵盖了从数据加载、模型训练到推理评估的完整流程,并对比了通用模型与医学领域模型在任务表现上的差异。实验显示,领域模型如BioMegatron在识别准确率上更具优势,特别适用于处理专业性强的医学文本。
此外,当前模型仅识别疾病实体,未来可以扩展到多类别实体识别(如药物、症状、基因等),并结合上下游任务如关系抽取,构建更完整的医学知识抽取系统。


 852
852

 被折叠的 条评论
为什么被折叠?
被折叠的 条评论
为什么被折叠?
 到【灌水乐园】发言


