 提升深度学习识别:SphereFace, CosFace与ArcFace算法详解


 本文介绍了SphereFace、CosFace和ArcFace三种基于softmax的深度学习模型,它们通过归一化权重和输入特征、引入惩罚margin,使类别间距离增大,类型内部紧凑,适用于人脸识别和紧凑型分类任务。
ArcFace简化版代码镇楼
import torch
import torch.nn as nn
import math
import torch.nn.functional as F

# ArcFace
class ArcMarginProduct(nn.Module):
    def __init__(self, in_features, out_features, s=30.0, m=0.50):
        super(ArcMarginProduct, self).__init__()
        self.s = s
        self.m = m
        self.weight = nn.Parameter(torch.FloatTensor(out_features, in_features))
        nn.init.xavier_uniform_(self.weight)

        self.cos_m = math.cos(m)
        self.sin_m = math.sin(m)

    def forward(self, input, label):
        # input: (bs, in_features) label: (bs)
        cosine = F.linear(F.normalize(input), F.normalize(self.weight))
        sine = torch.sqrt(1.0 - torch.pow(cosine, 2))
        # cos(a+b)=cos(a)*cos(b)-size(a)*sin(b)
        phi = cosine * self.cos_m - sine * self.sin_m
        # 对phi的修正参考easy margin
        one_hot = torch.zeros(cosine.size())
        # scatter_(dim, index, src)
        one_hot.scatter_(1, label.view(-1, 1).long(), 1)
        # 注意arcface的公式是分子上的加了margin,所以也就是one_hot*phi
        # 另外还有一个问题:CE中用-one_hot * logsoftmax就够了,为啥这里还多了((1.0 - one_hot) * cosine)?
        # 答案是因为这个函数本质上是normalized->转角度->把input的logits调整成为output的logits
        # 所以对于one_hot是1的位置,就使用phi,对于one_hot是0的位置,还是使用cos,所以就出现了 phi = cosine * self.cos_m - sine * self.sin_m
        # 最终这个函数得到的logits还要再去直接过一遍CE,代码 https://github.com/ronghuaiyang/arcface-pytorch/blob/47ace80b128042cd8d2efd408f55c5a3e156b032/train.py#L59 中过CE是这么写的
        '''
            metric_fc就是这里的ArcMarginProduct
            output = metric_fc(feature, label)
            loss = criterion(output, label)
        '''
        output = (one_hot * phi) + ((1.0 - one_hot) * cosine)
        output *= self.s

        # output: (bs, out_features)
        return output

if __name__ == '__main__':
    in_features,out_features,bs = 3,20,10
    arc = ArcMarginProduct(in_features=in_features, out_features=out_features)
    input = torch.randn(bs, in_features)
    label = torch.arange(bs)
    res = arc(input, label)
    print(res.shape)
TripletLoss简化版代码镇楼
目标:使 d ( a , p ) + m < d ( a , n )尽量成立,如果不成立的话,max(d ( a , p ) + m - d ( a , n ), 0)尽量小
import torch
import torch.nn as nn

class TripletLoss(nn.Module):
    def __init__(self, margin=1.0):
        super(TripletLoss, self).__init__()
        self.margin = margin

    def forward(self, anchor, positive, negative):
        # 计算 anchor 和 positive 之间的欧氏距离的平方
        positive_distance = (anchor - positive).pow(2).sum(1)

        # 计算 anchor 和 negative 之间的欧氏距离的平方
        negative_distance = (anchor - negative).pow(2).sum(1)

        # 计算损失
        losses = torch.relu(positive_distance - negative_distance + self.margin)

        # 返回平均损失
        return losses.mean()

# 创建一些示例数据
anchor = torch.randn(10, 128, requires_grad=True)
positive = torch.randn(10, 128, requires_grad=True)
negative = torch.randn(10, 128, requires_grad=True)

# 实例化 TripletLoss
triplet_loss = TripletLoss(margin=1.0)

# 计算损失
loss = triplet_loss(anchor, positive, negative)

# 打印损失
print("Triplet Loss:", loss.item())

# 反向传播
loss.backward()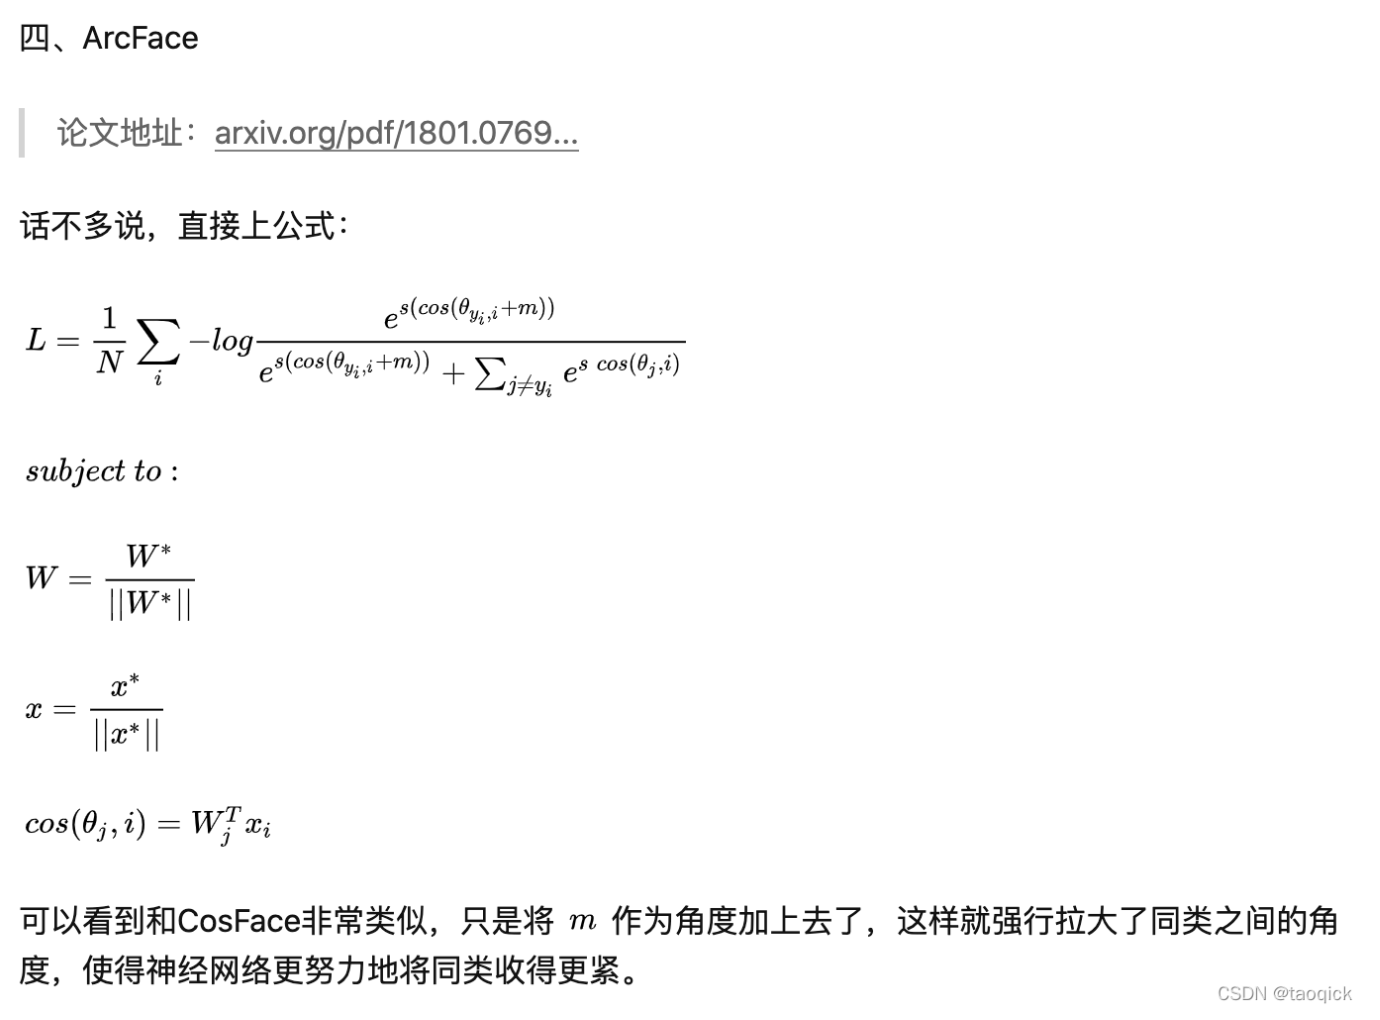
直观总结
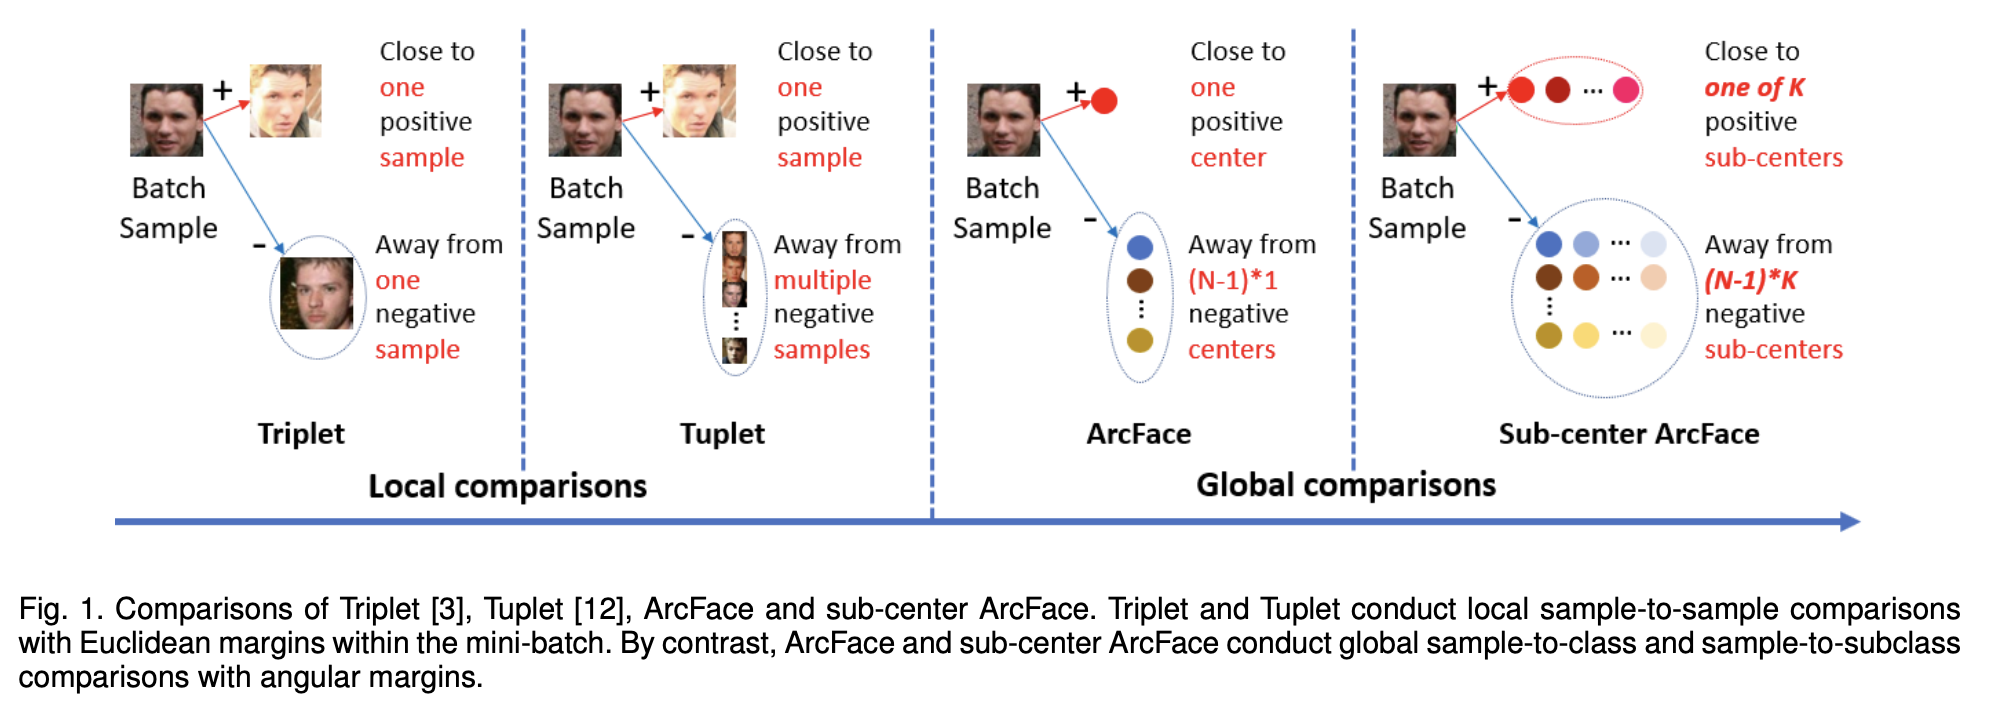
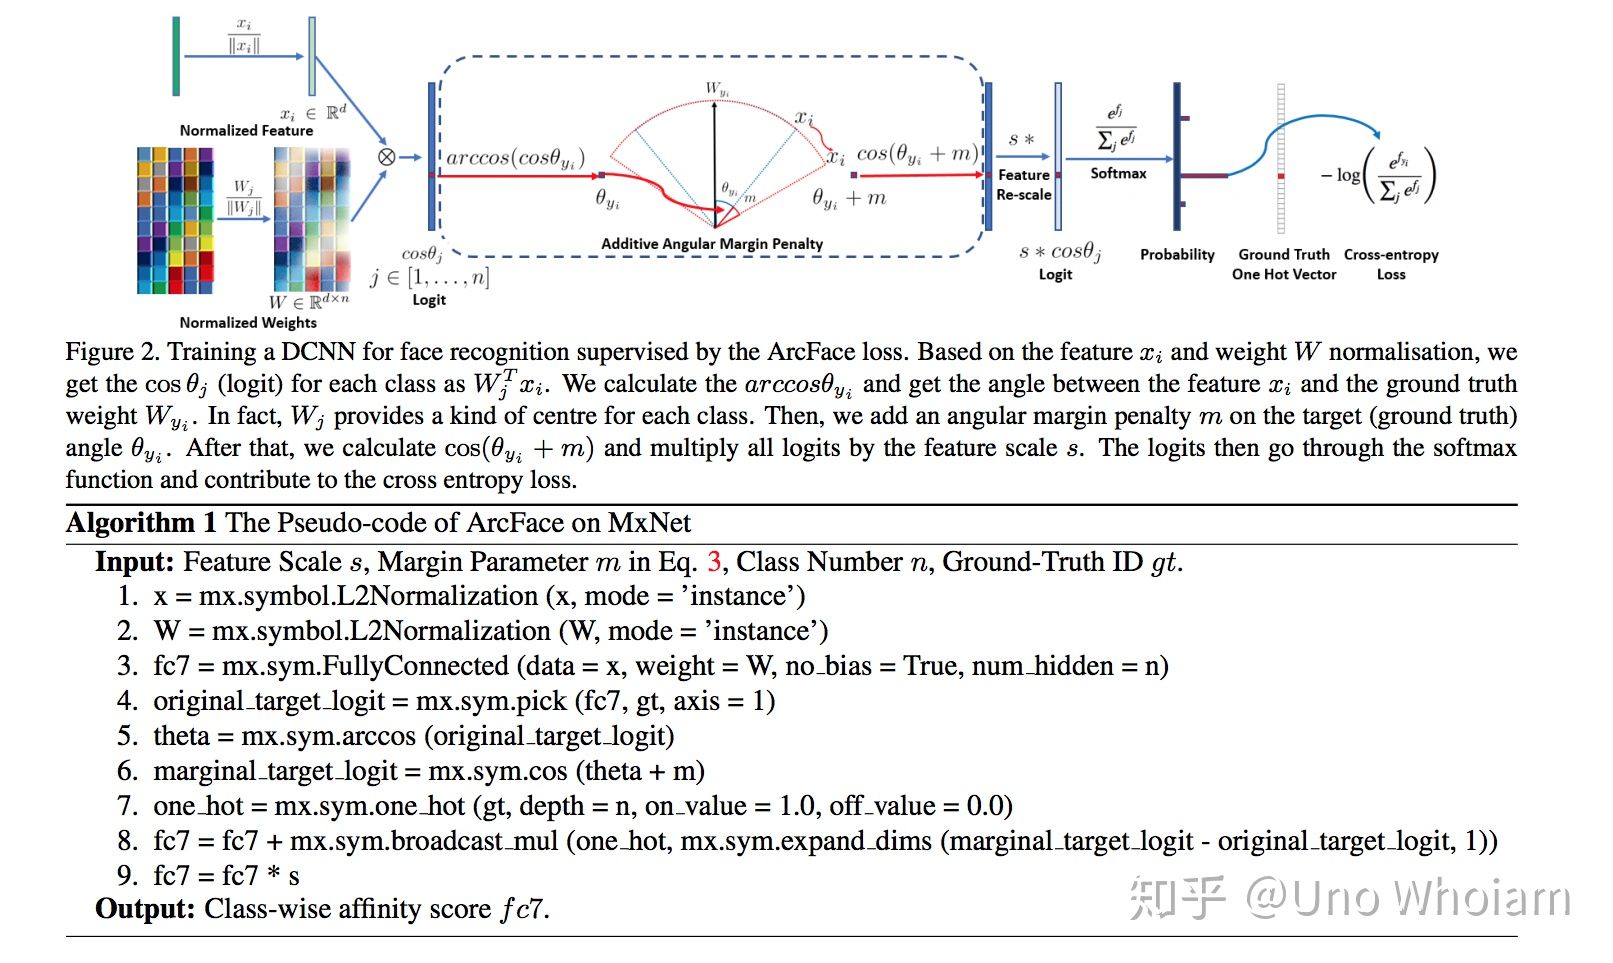
ArcFace中的Arc其实是弧度的意思,直观感觉如下图,Triplet之前找一个参照,ArcFace找n类参照,自然就到了CrossEntropy多分类里面的Softmax:
总结成一句话就是:在softmax基础上,对最后一层全连接的权重和输入特征进行归一化,重新放缩到半径为s的超平面,增加惩罚的margin训练,使得类型紧凑,类间变得远离
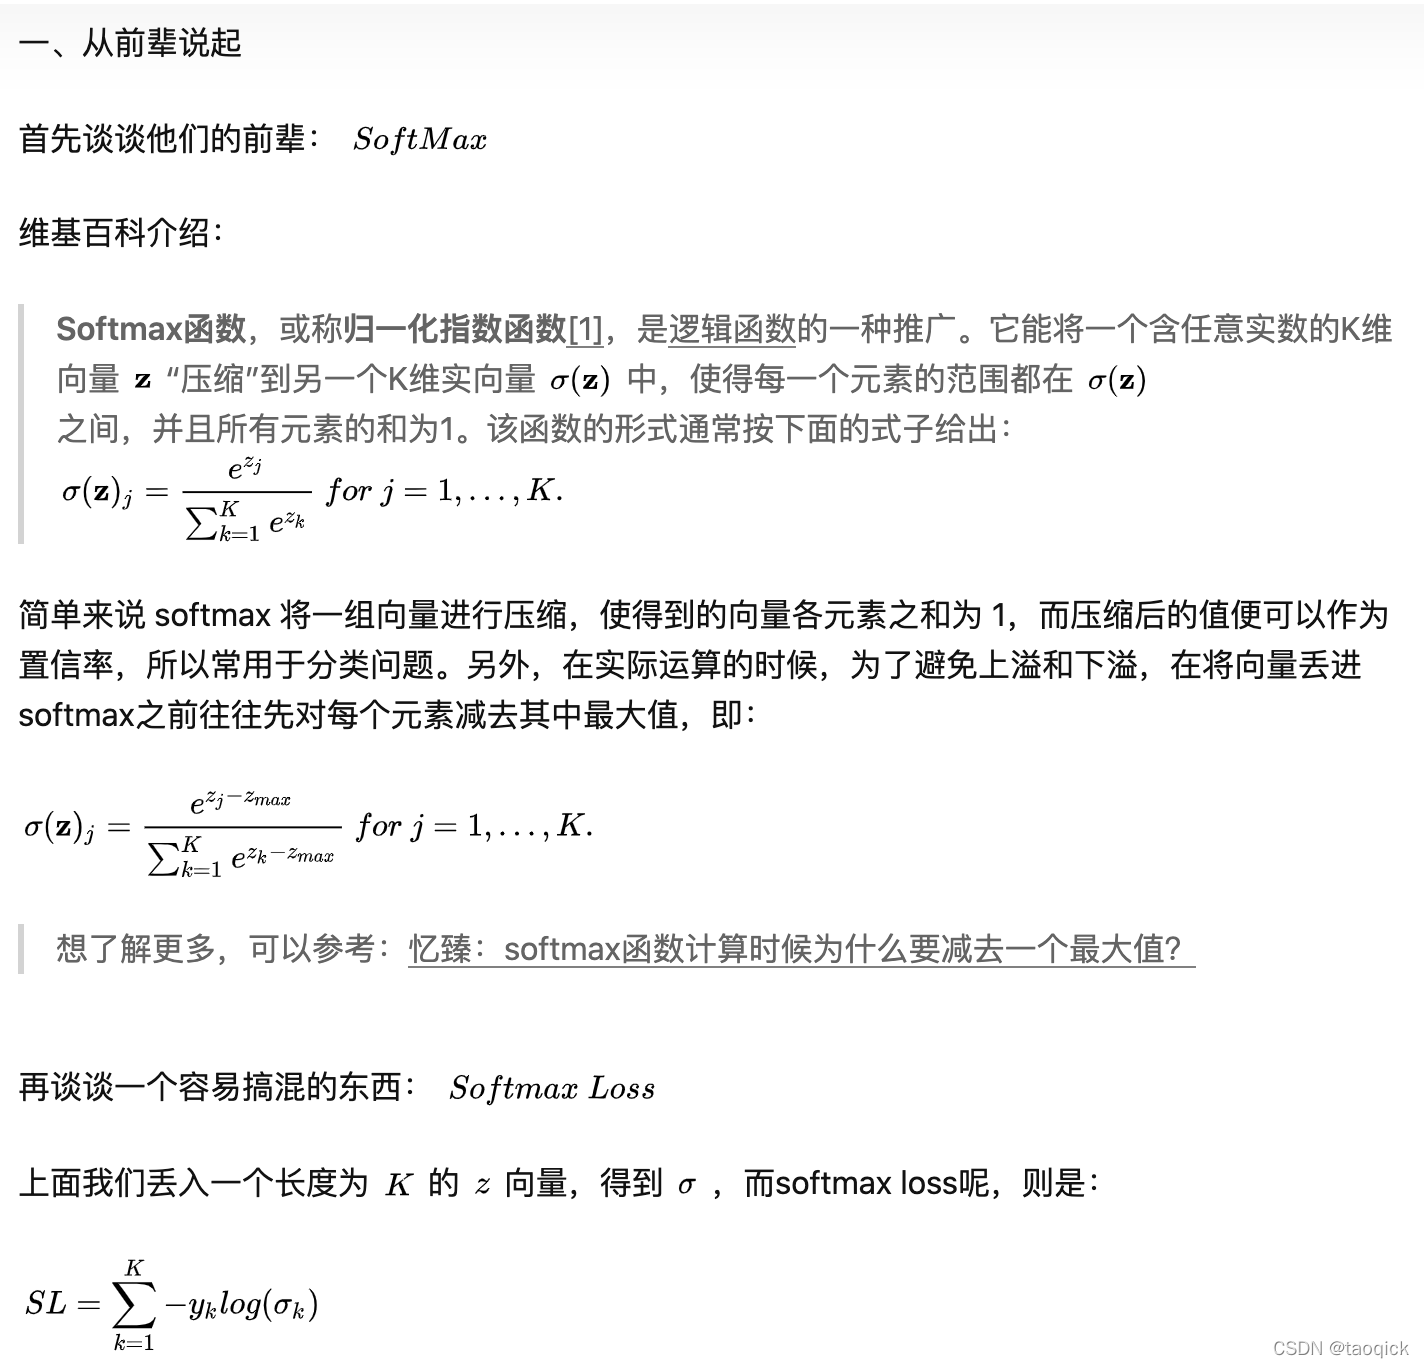
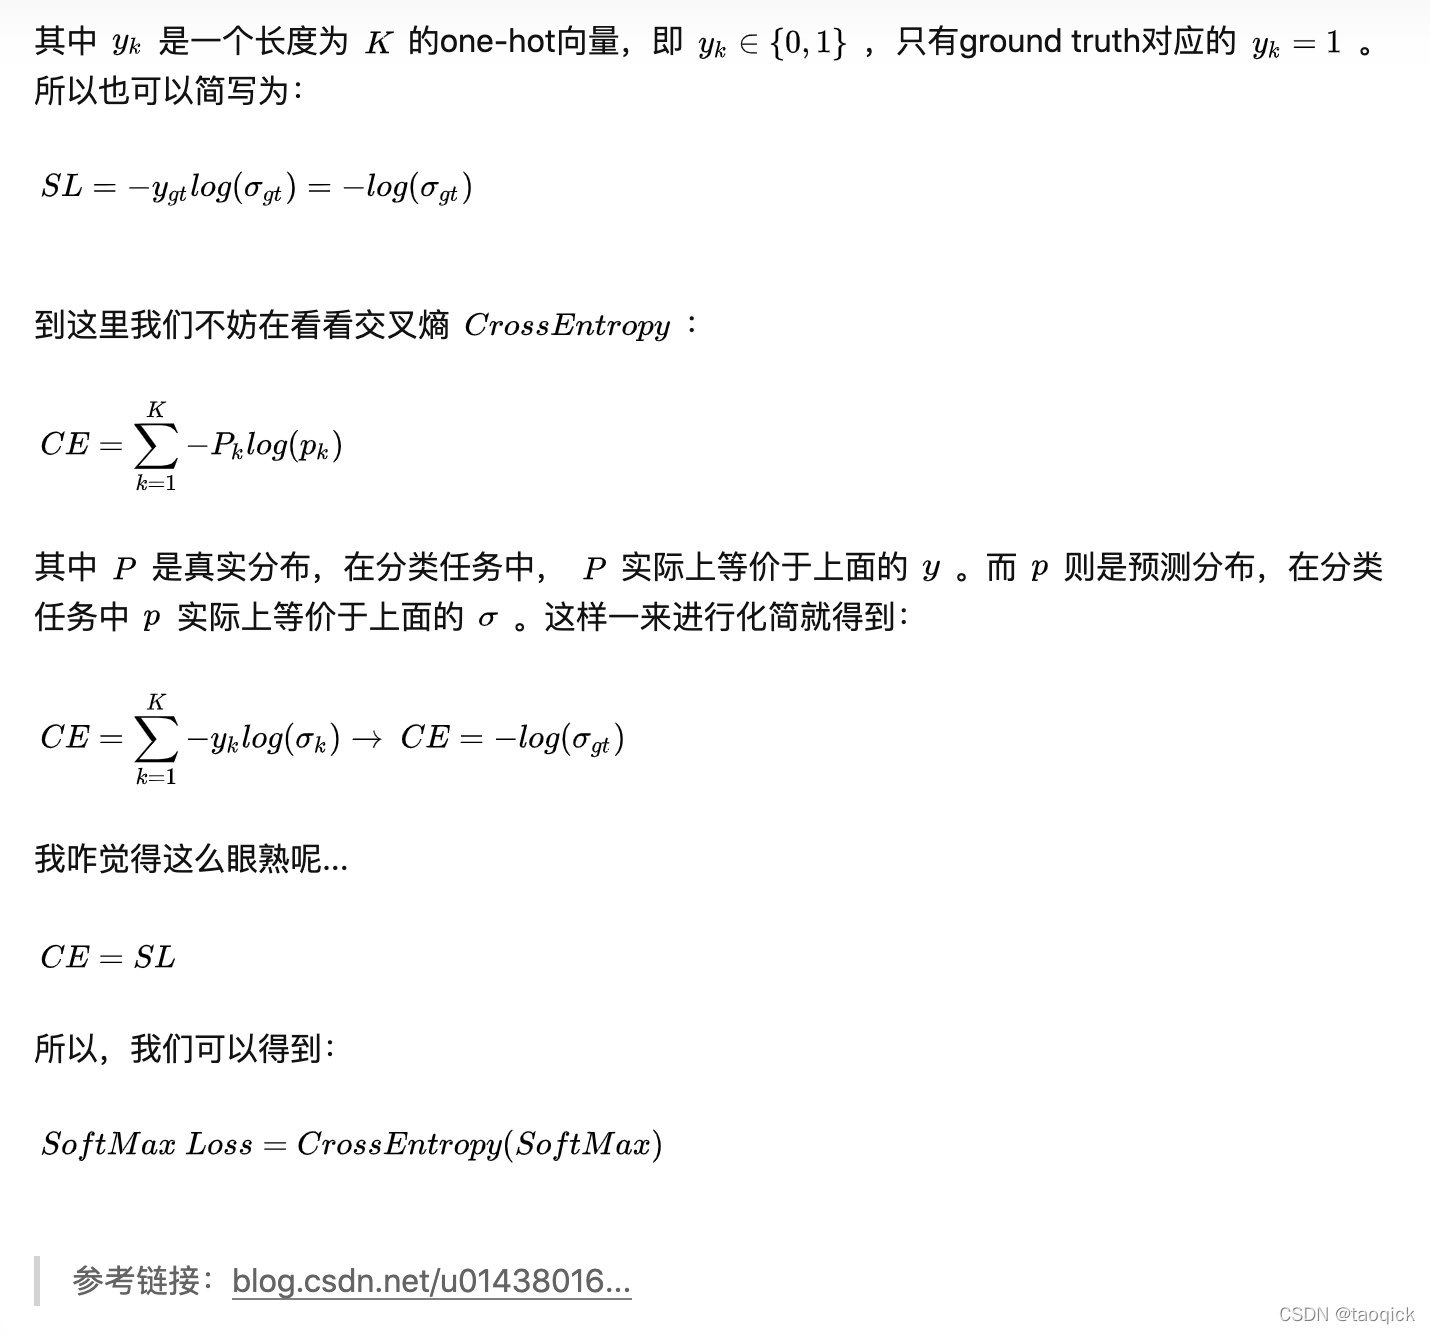
从Softmax说起
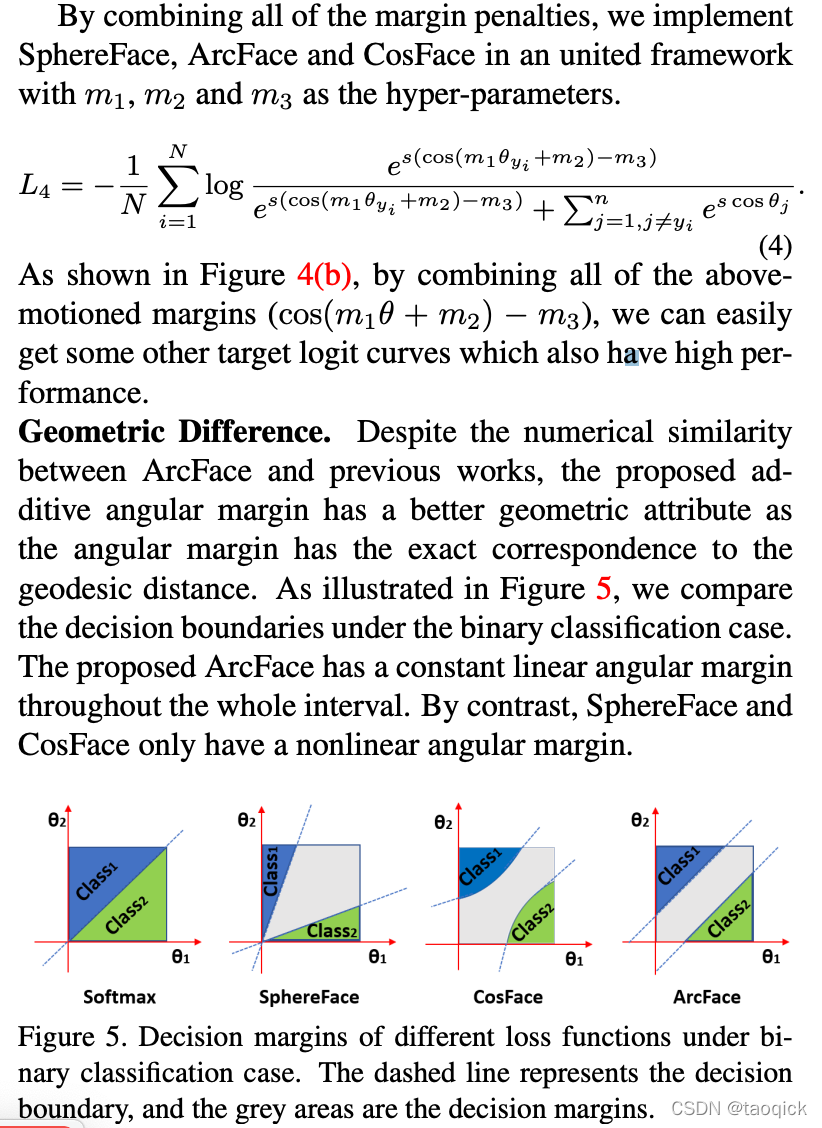
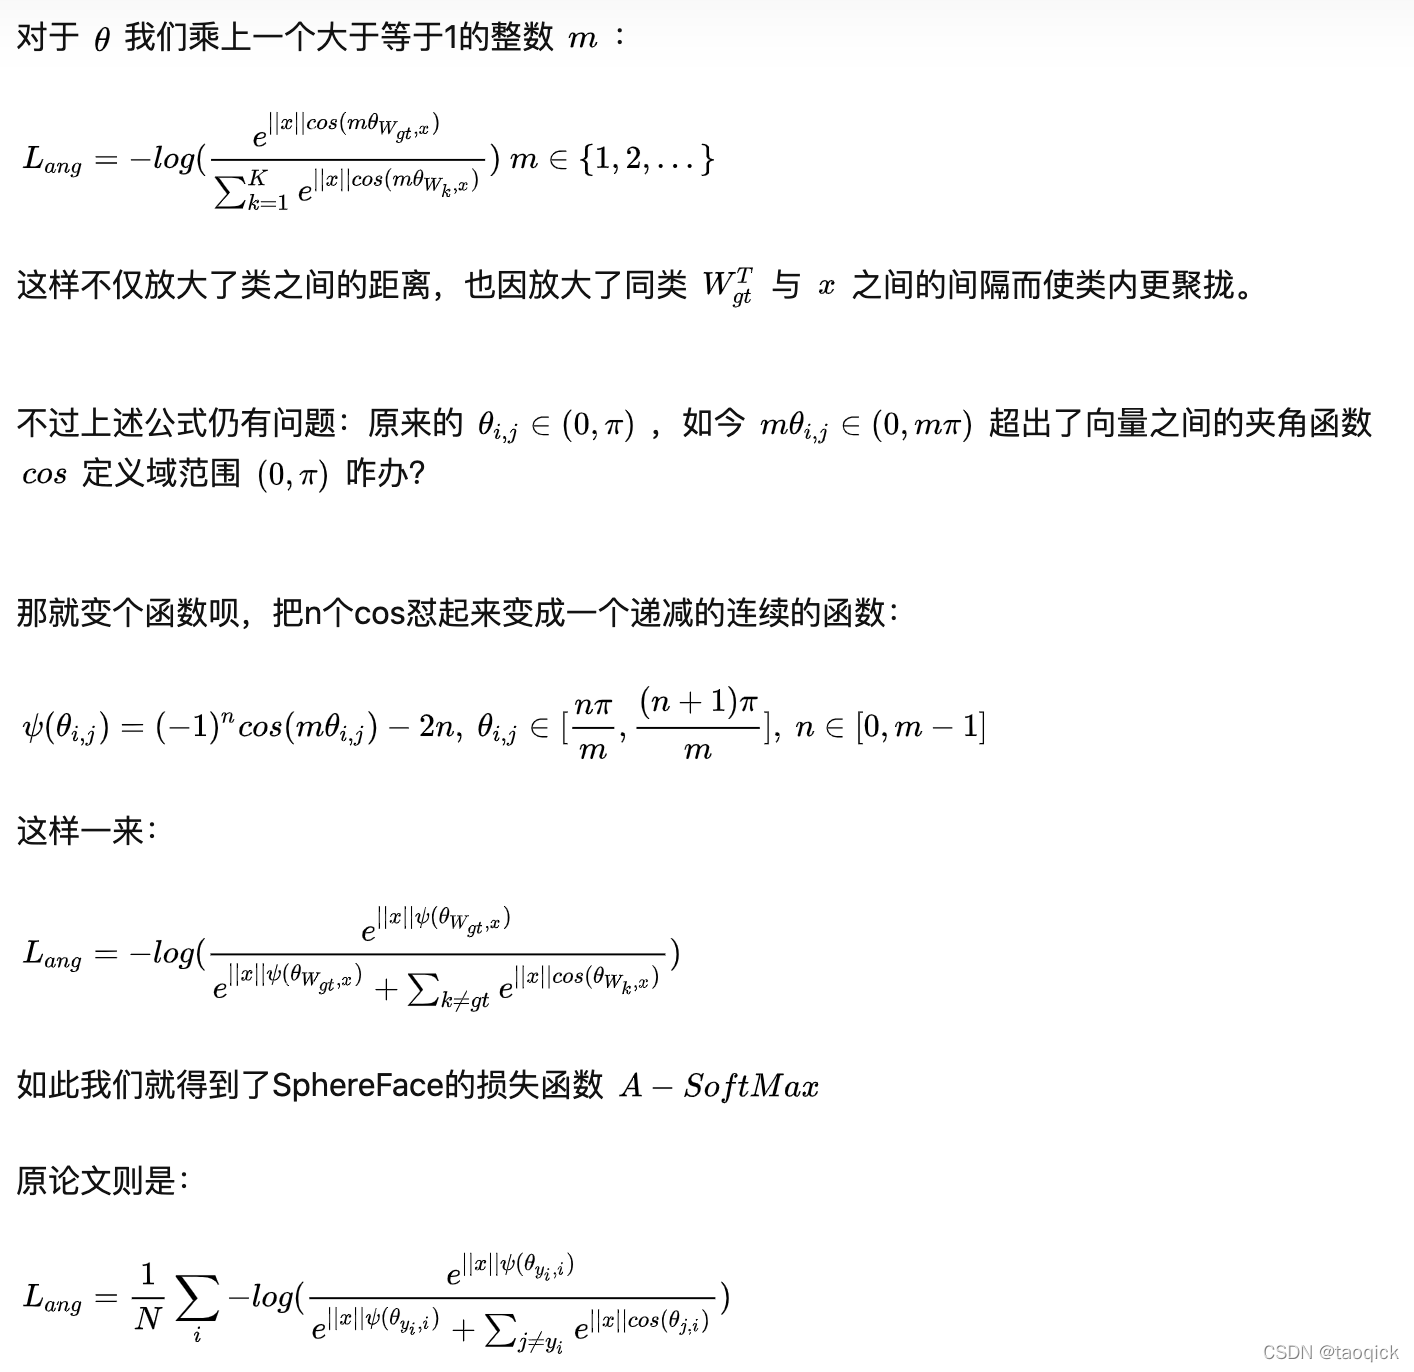
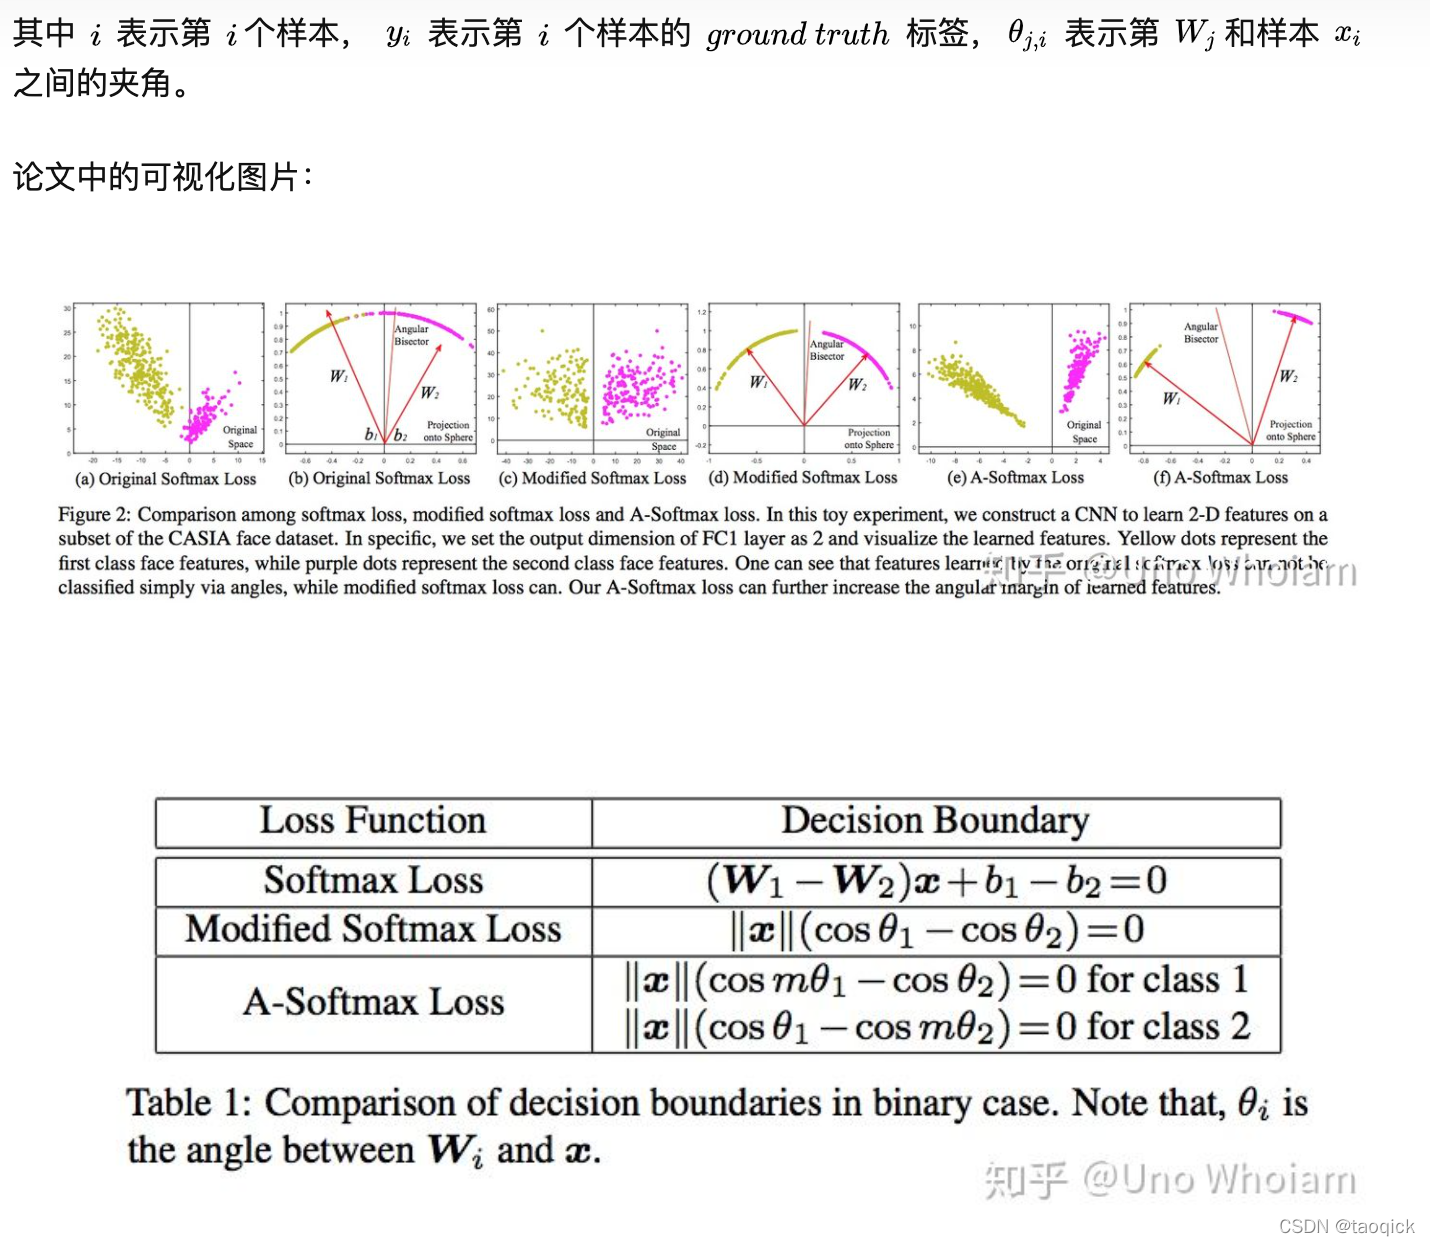
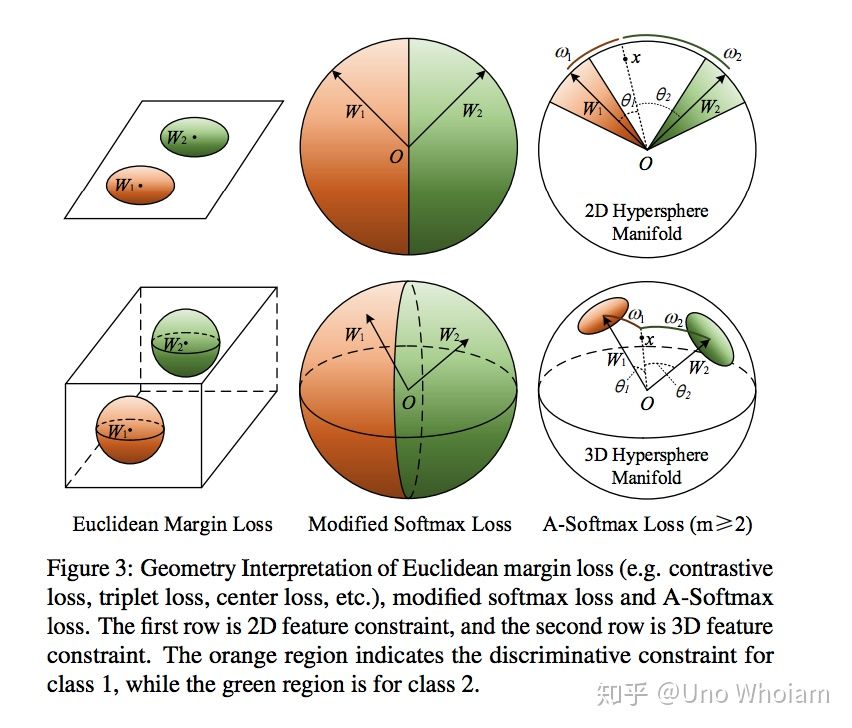
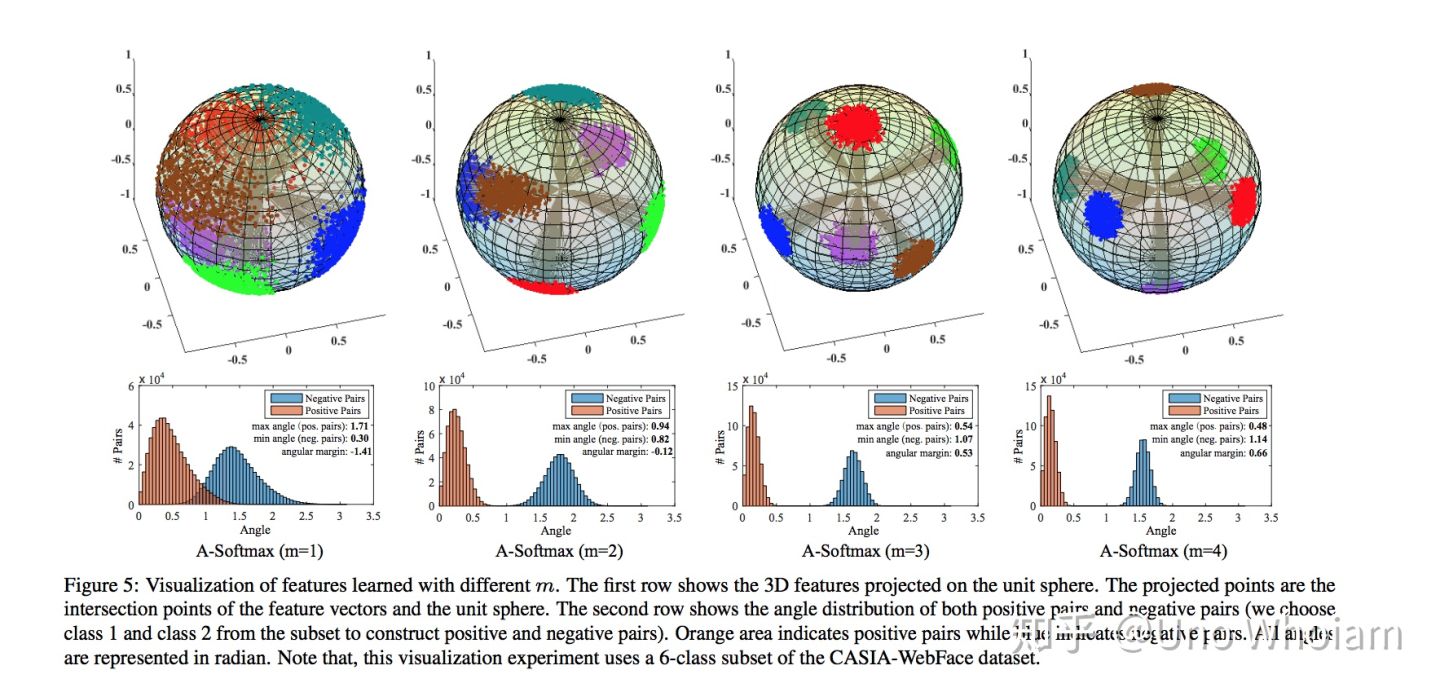
SphereFace(也叫A-Softmax),margin乘在θ前

# SphereFace
class SphereProduct(nn.Module):
    r"""Implement of large margin cosine distance: :
    Args:
        in_features: size of each input sample
        out_features: size of each output sample
        m: margin
        cos(m*theta)
    """

    def __init__(self, in_features, out_features, m=4):
        super(SphereProduct, self).__init__()
        self.in_features = in_features
        self.out_features = out_features
        self.m = m
        self.base = 1000.0
        self.gamma = 0.12
        self.power = 1
        self.LambdaMin = 5.0
        self.iter = 0
        self.weight = Parameter(torch.FloatTensor(out_features, in_features))
        nn.init.xavier_uniform(self.weight)

        # duplication formula
        # 将x\in[-1,1]范围的重复index次映射到y\[-1,1]上
        self.mlambda = [
            lambda x: x ** 0,
            lambda x: x ** 1,
            lambda x: 2 * x ** 2 - 1,
            lambda x: 4 * x ** 3 - 3 * x,
            lambda x: 8 * x ** 4 - 8 * x ** 2 + 1,
            lambda x: 16 * x ** 5 - 20 * x ** 3 + 5 * x
        ]
        """
        执行以下代码直观了解mlambda
        import matplotlib.pyplot as  plt

        mlambda = [
            lambda x: x ** 0,
            lambda x: x ** 1,
            lambda x: 2 * x ** 2 - 1,
            lambda x: 4 * x ** 3 - 3 * x,
            lambda x: 8 * x ** 4 - 8 * x ** 2 + 1,
            lambda x: 16 * x ** 5 - 20 * x ** 3 + 5 * x
        ]
        x = [0.01 * i for i in range(-100, 101)]
        print(x)
        for f in mlambda:
            plt.plot(x,[f(i) for i in x])
            plt.show()
        """

    def forward(self, input, label):
        # lambda = max(lambda_min,base*(1+gamma*iteration)^(-power))
        self.iter += 1
        self.lamb = max(self.LambdaMin, self.base * (1 + self.gamma * self.iter) ** (-1 * self.power))

        # --------------------------- cos(theta) & phi(theta) ---------------------------
        cos_theta = F.linear(F.normalize(input), F.normalize(self.weight))
        cos_theta = cos_theta.clamp(-1, 1)
        cos_m_theta = self.mlambda[self.m](cos_theta)
        theta = cos_theta.data.acos()
        k = (self.m * theta / 3.14159265).floor()
        phi_theta = ((-1.0) ** k) * cos_m_theta - 2 * k
        NormOfFeature = torch.norm(input, 2, 1)

        # --------------------------- convert label to one-hot ---------------------------
        one_hot = torch.zeros(cos_theta.size())
        one_hot = one_hot.cuda() if cos_theta.is_cuda else one_hot
        one_hot.scatter_(1, label.view(-1, 1), 1)

        # --------------------------- Calculate output ---------------------------
        output = (one_hot * (phi_theta - cos_theta) / (1 + self.lamb)) + cos_theta
        output *= NormOfFeature.view(-1, 1)

        return output

    def __repr__(self):
        return self.__class__.__name__ + '(' \
               + 'in_features=' + str(self.in_features) \
               + ', out_features=' + str(self.out_features) \
               + ', m=' + str(self.m) + ')'
CosFace,margin加在θ后
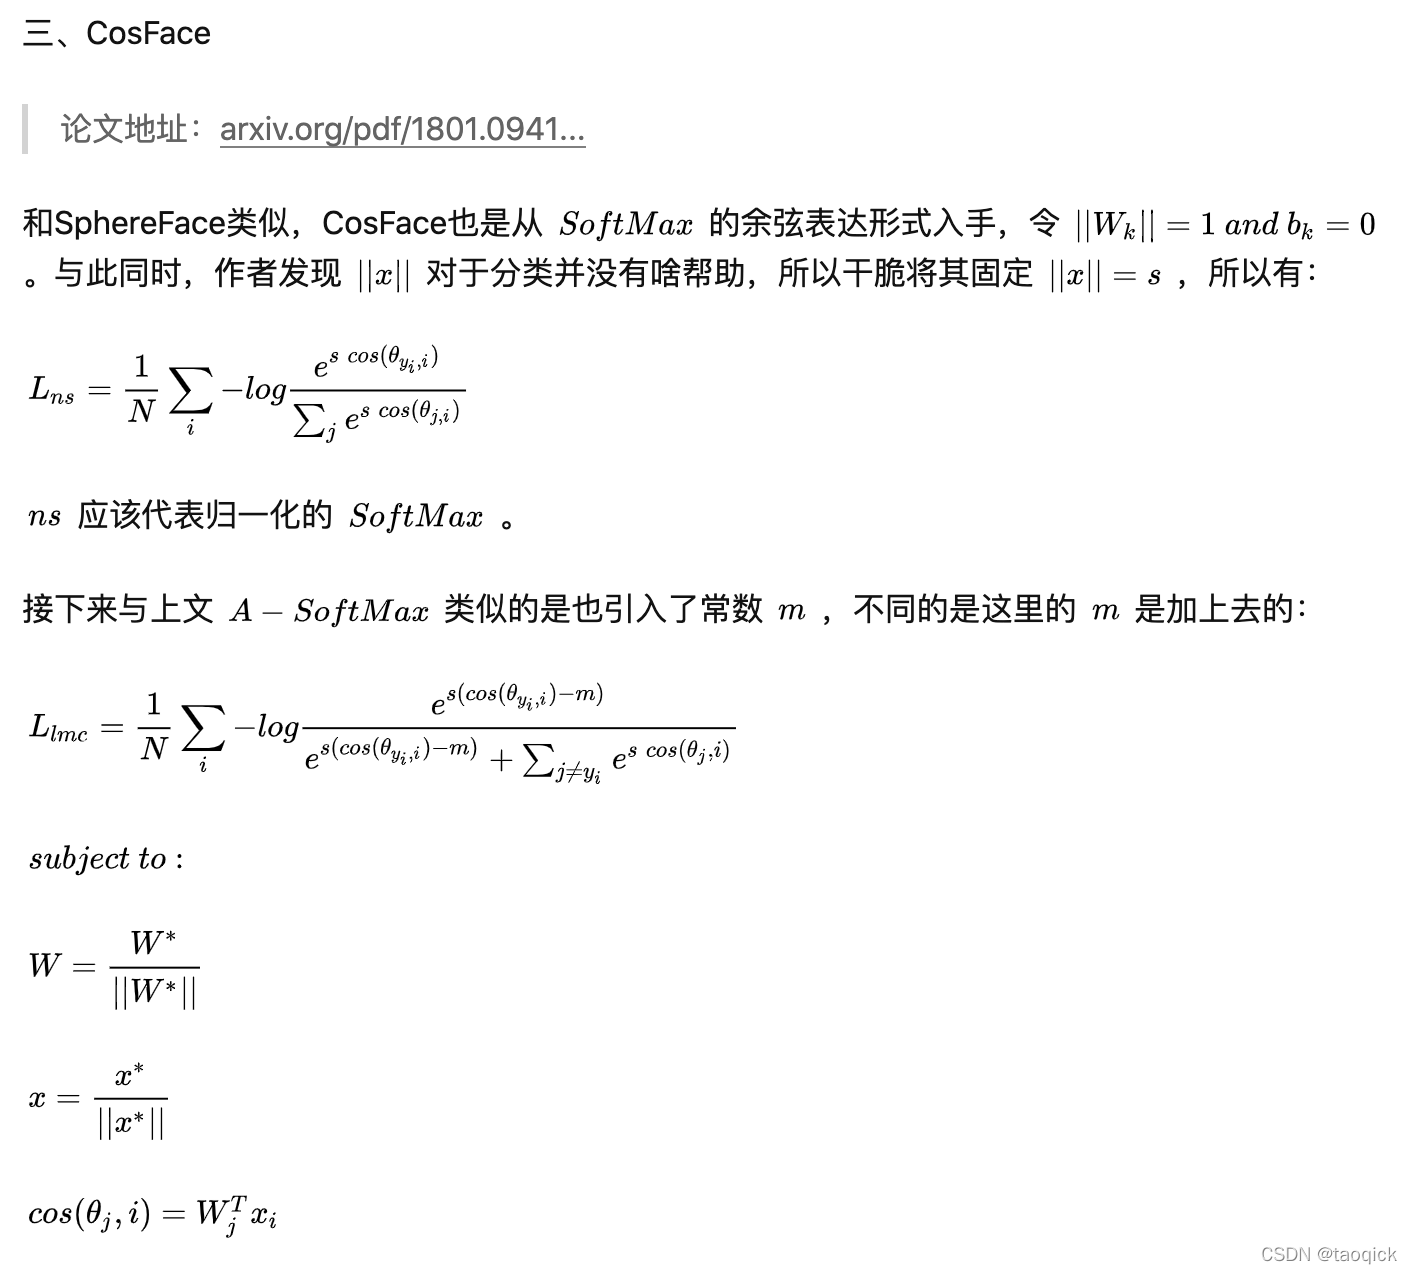
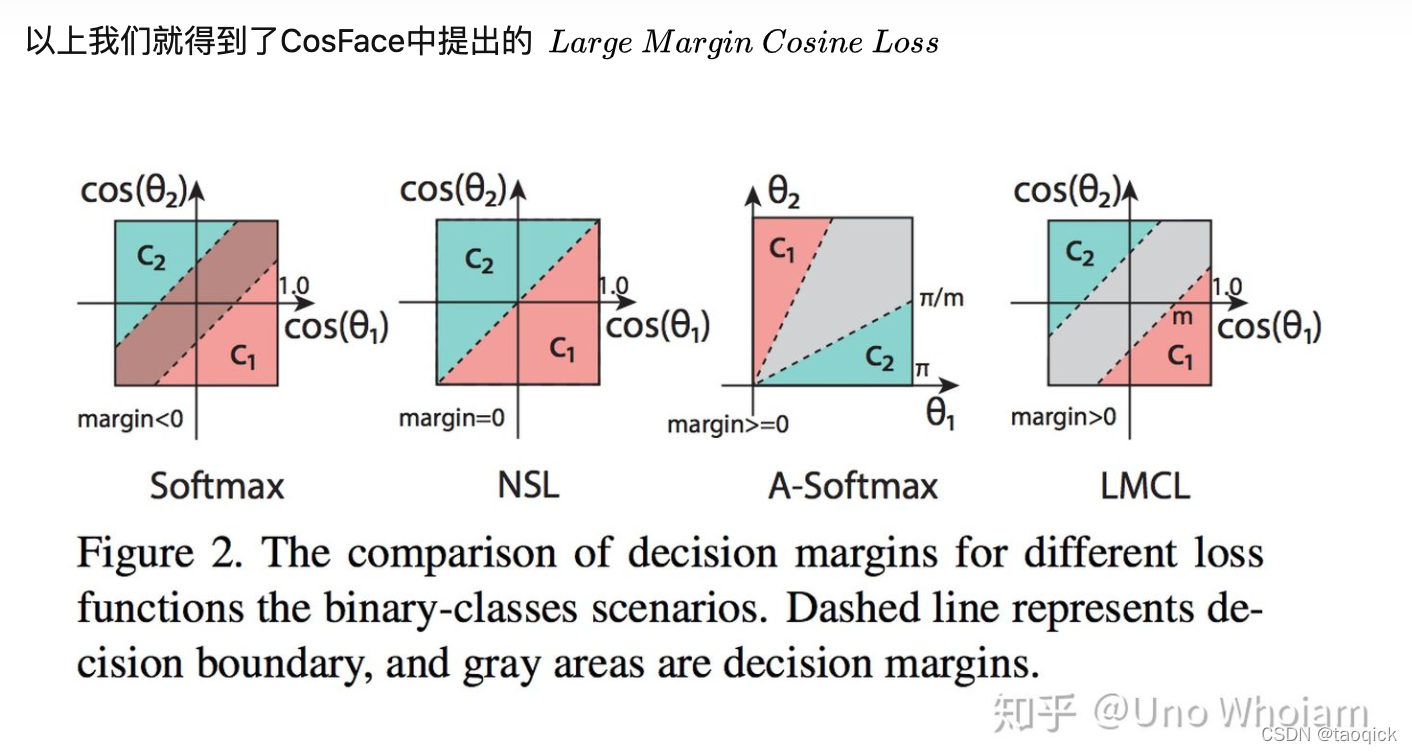
# CosFace
class AddMarginProduct(nn.Module):
    r"""Implement of large margin cosine distance: :
    Args:
        in_features: size of each input sample
        out_features: size of each output sample
        s: norm of input feature
        m: margin
        cos(theta) - m
    """

    def __init__(self, in_features, out_features, s=30.0, m=0.40):
        super(AddMarginProduct, self).__init__()
        self.in_features = in_features
        self.out_features = out_features
        self.s = s
        self.m = m
        self.weight = Parameter(torch.FloatTensor(out_features, in_features))
        nn.init.xavier_uniform_(self.weight)

    def forward(self, input, label):
        # --------------------------- cos(theta) & phi(theta) ---------------------------
        cosine = F.linear(F.normalize(input), F.normalize(self.weight))
        phi = cosine - self.m
        # --------------------------- convert label to one-hot ---------------------------
        one_hot = torch.zeros(cosine.size(), device='cuda')
        # one_hot = one_hot.cuda() if cosine.is_cuda else one_hot
        one_hot.scatter_(1, label.view(-1, 1).long(), 1)
        # -------------torch.where(out_i = {x_i if condition_i else y_i) -------------
        output = (one_hot * phi) + ((1.0 - one_hot) * cosine)
        # you can use torch.where if your torch.__version__ is 0.4
        output *= self.s
        # print(output)

        return output

    def __repr__(self):
        return self.__class__.__name__ + '(' \
               + 'in_features=' + str(self.in_features) \
               + ', out_features=' + str(self.out_features) \
               + ', s=' + str(self.s) \
               + ', m=' + str(self.m) + ')'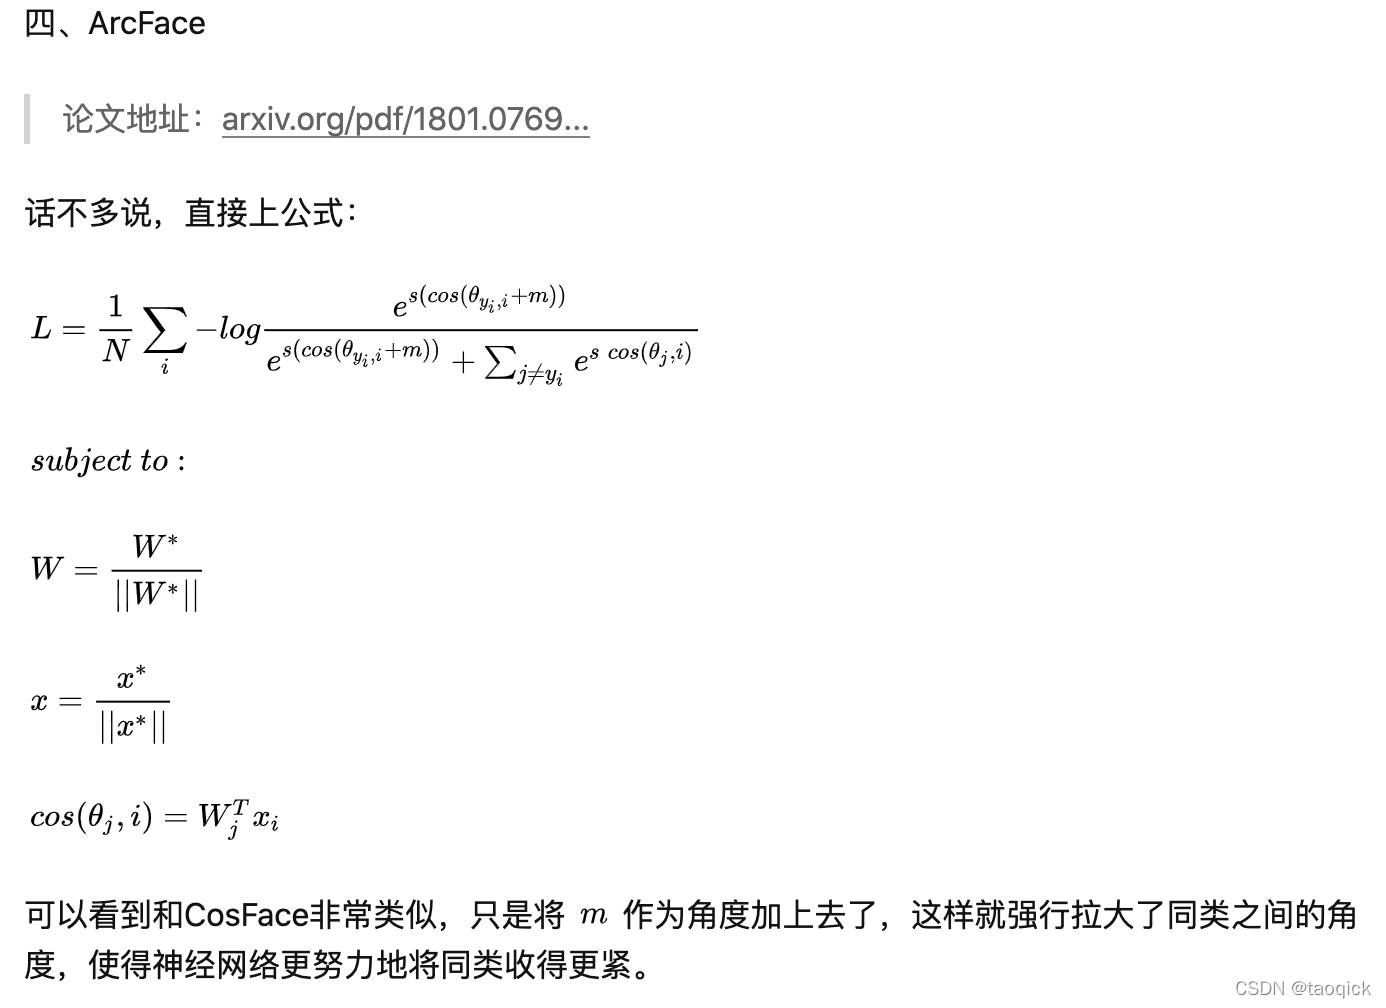
ArcFace,给正例转角度加margin
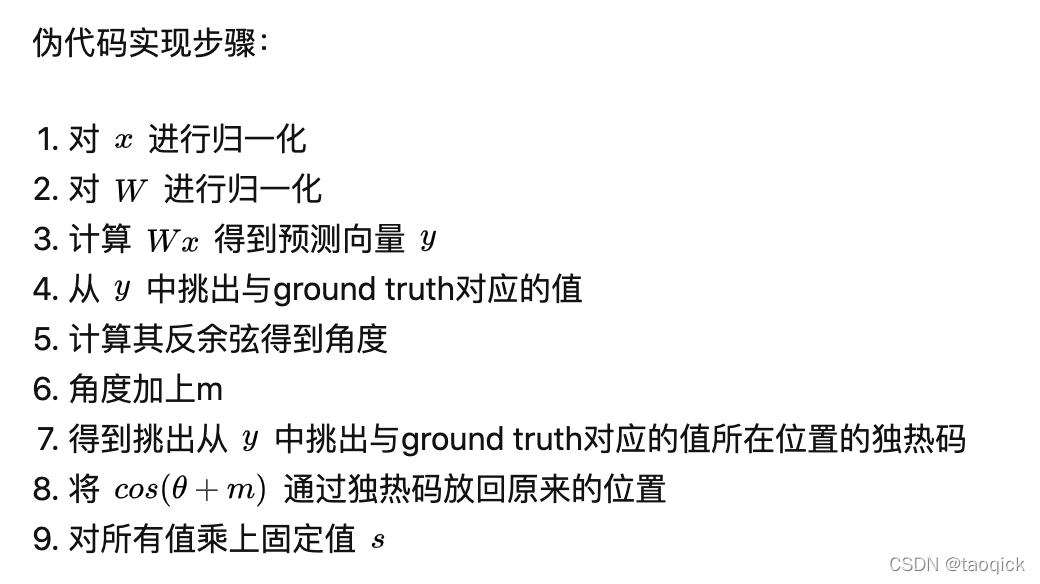
代码实现:
import torch
import torch.nn as nn
import math
import torch.nn.functional as F

# ArcFace
class ArcMarginProduct(nn.Module):
    def __init__(self, in_features, out_features, s=30.0, m=0.50):
        super(ArcMarginProduct, self).__init__()
        self.s = s
        self.m = m
        self.weight = nn.Parameter(torch.FloatTensor(out_features, in_features))
        nn.init.xavier_uniform_(self.weight)

        self.cos_m = math.cos(m)
        self.sin_m = math.sin(m)

    def forward(self, input, label):
        # input: (bs, in_features) label: (bs)
        cosine = F.linear(F.normalize(input), F.normalize(self.weight))
        sine = torch.sqrt(1.0 - torch.pow(cosine, 2))
        # cos(a+b)=cos(a)*cos(b)-size(a)*sin(b)
        phi = cosine * self.cos_m - sine * self.sin_m
        # 对phi的修正参考easy margin
        one_hot = torch.zeros(cosine.size())
        # scatter_(dim, index, src)
        one_hot.scatter_(1, label.view(-1, 1).long(), 1)
        # 注意arcface的公式是分子上的加了margin,所以也就是one_hot*phi
        output = (one_hot * phi) + ((1.0 - one_hot) * cosine)
        output *= self.s

        # output: (bs, out_features)
        return output

if __name__ == '__main__':
    in_features,out_features,bs = 3,20,10
    arc = ArcMarginProduct(in_features=in_features, out_features=out_features)
    input = torch.randn(bs, in_features)
    label = torch.arange(bs)
    res = arc(input, label)
    print(res.shape)
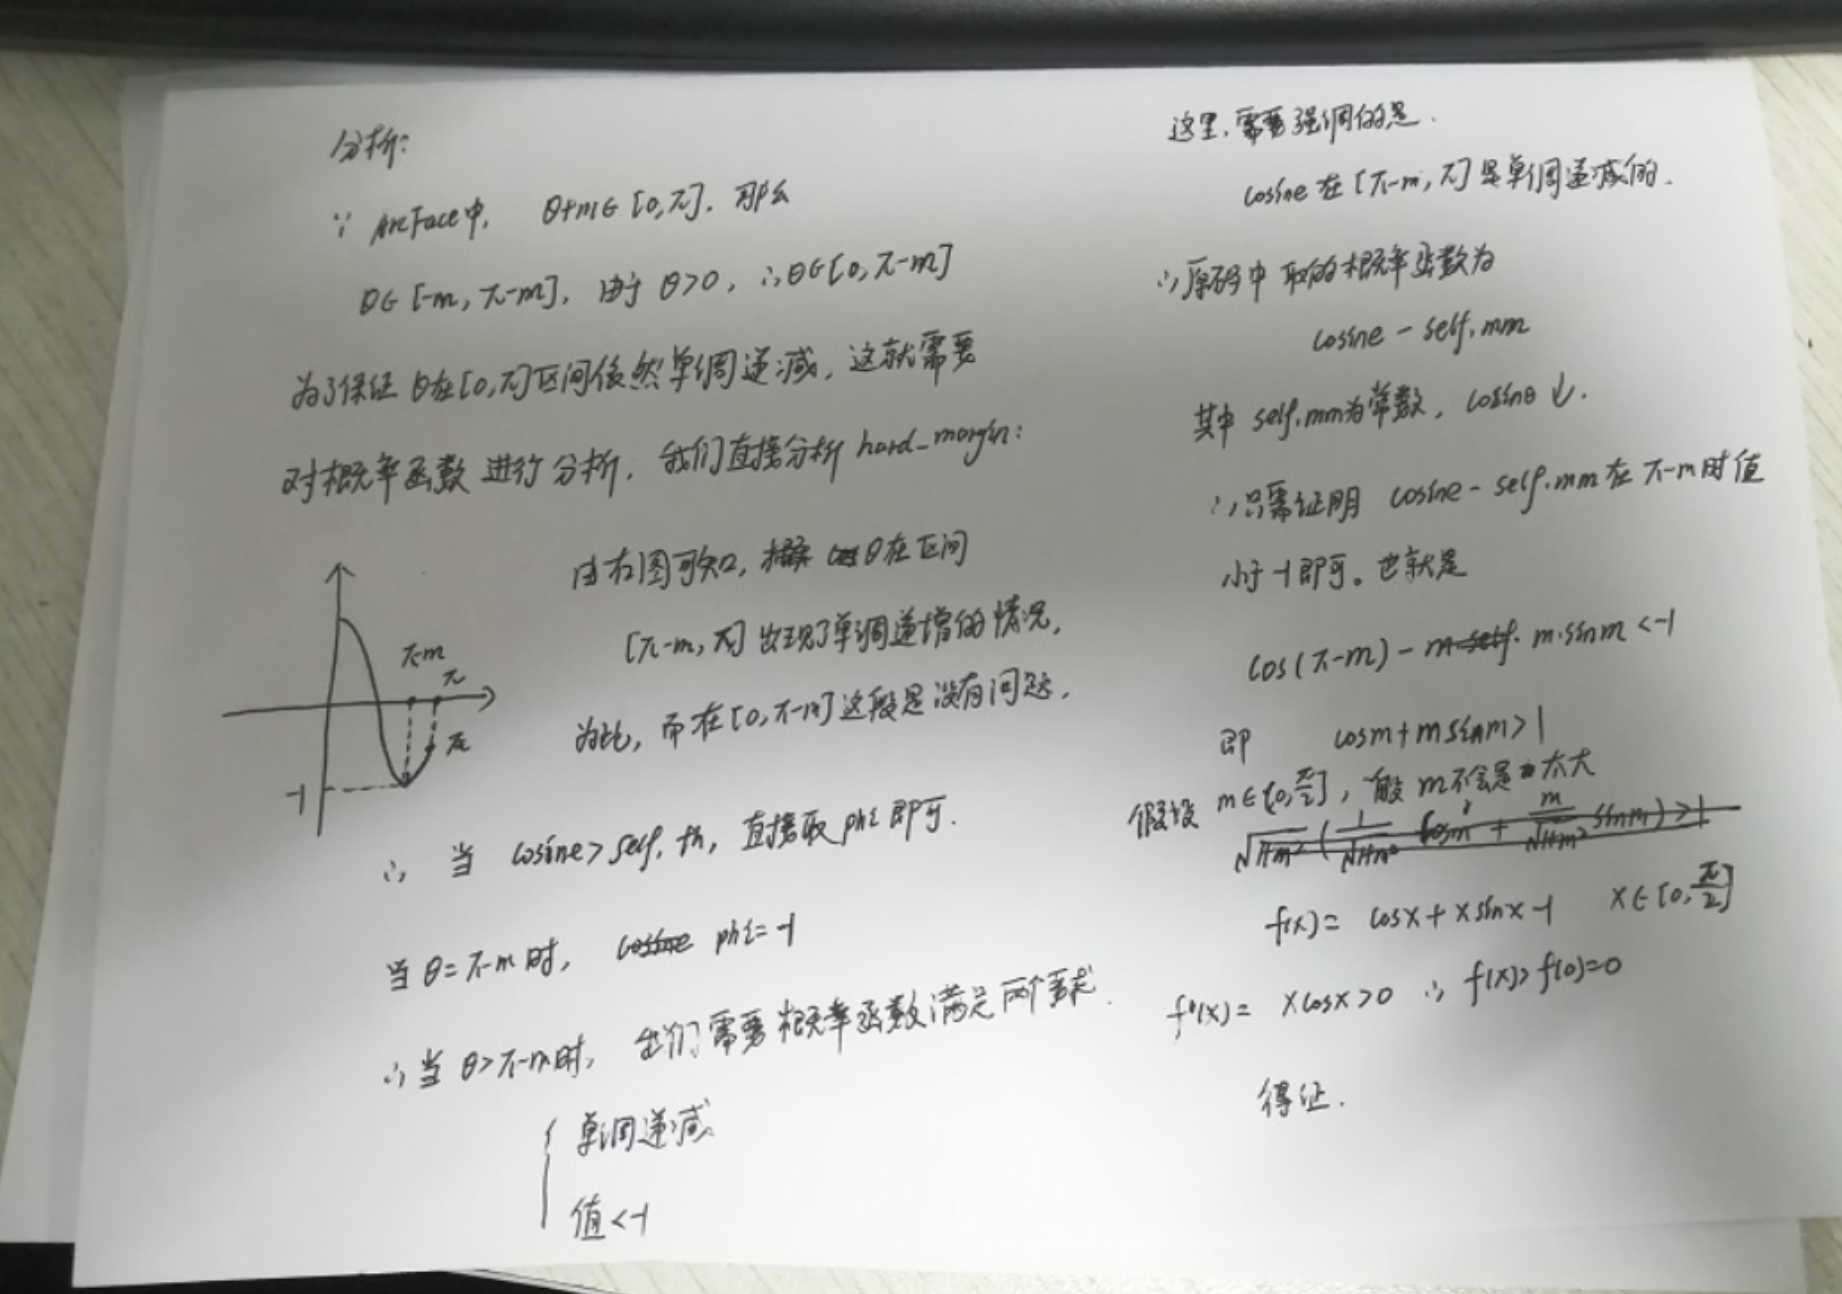
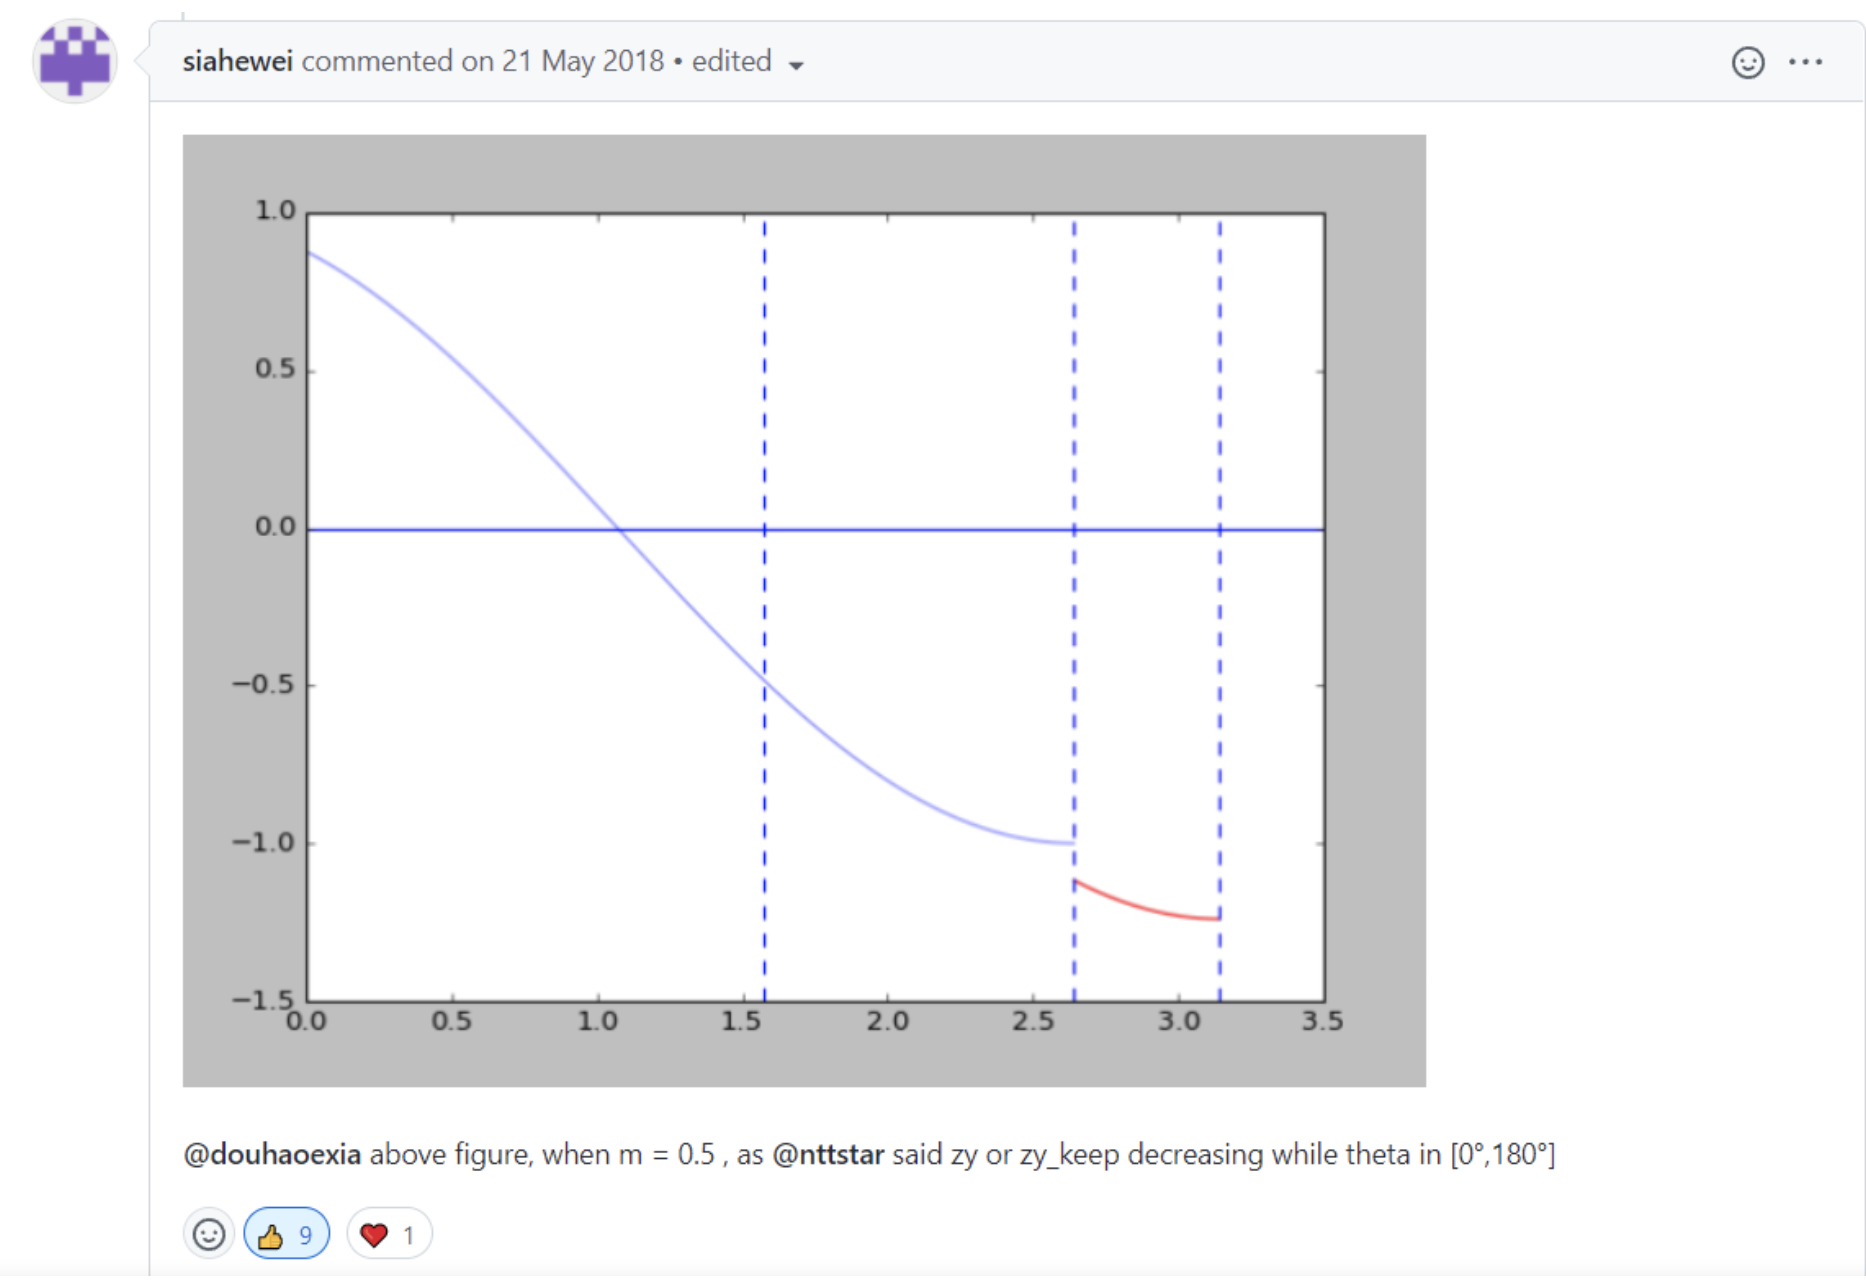
easy_margin的解释
只对cosine > 0的项添加margin惩罚,虽然函数整体不再满足单调递减的性质,但是总体上绝大部分样本与w的夹角小于pi/2,所以影响不会太大。

对代码中else部分的解释,整体满足单调递减的性质。


 444
444

 被折叠的 条评论
为什么被折叠?
被折叠的 条评论
为什么被折叠?
 到【灌水乐园】发言


