


📝 面试求职: 「面试试题小程序」 ,内容涵盖 测试基础、Linux操作系统、MySQL数据库、Web功能测试、接口测试、APPium移动端测试、Python知识、Selenium自动化测试相关、性能测试、性能测试、计算机网络知识、Jmeter、HR面试,命中率杠杠的。(大家刷起来…)
📝 职场经验干货:
有很多种自动化测试报告样式,接下来主要看下这些常用样式的效果是怎样的
每个样式各有特点,选择自己喜欢的使用就好了
自动化测试时你用的最多的是哪个呢?
1 框架设计(准备工作)
我们需要把HTMLTestRunner、BeautifulReport、HTMLReport、Allure这几个报告样式用在自动化测试框架中;
以下是我们设计了一个简易的WebUI自动化框架,便于后续的报告样式讲解使用。
1.1 简易框架图
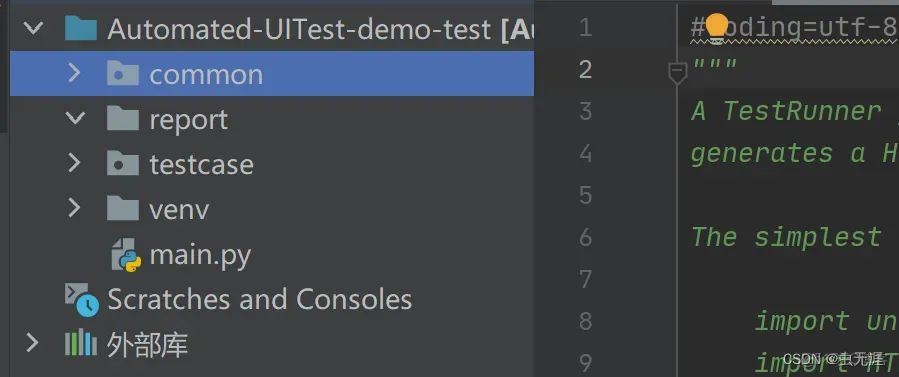
1.2 common/reportOut.py
报告的封装,详细的在后续的内容讲解;
1.3 report
存放报告的路径; 在common/reportOut.py中指定存放在此处。
1.4 testcase/test_baidu.py
写了一个简单的用例,用于后续报告数据的展示;
用例中3个成功,2个失败,故意这样设计是为了查看报告的样式显示;
脚本如下:
from selenium import webdriver
from selenium.webdriver.common.keys import Keys
import time
import unittest
class Test_Baidu(unittest.TestCase):
@classmethod
def setUpClass(cls) -> None:
cls.driver = webdriver.Chrome() # 打开Chrome浏览器
cls.driver.get("http://www.baidu.com") # 输入百度网址
print("============验证浏览器的基本控制==========")
@classmethod
def tearDownClass(cls) -> None:
cls.driver.quit() # 关闭浏览器
def test_01_search(self):
"""1、搜索helloworld.并回车......"""
time.sleep(2)
self.driver.find_element_by_id("kw").send_keys("helloworld") # 输入“helloworld”
time.sleep(2)
self.driver.find_element_by_id("kw").send_keys(Keys.ENTER) # 回车进行搜索
time.sleep(2)
self.driver.maximize_window() # 最大化当前窗口
time.sleep(0.5)
size = self.driver.get_window_size()
print(type(size))
get_size = {'height': 696, 'width': 1296} # 根据自己电脑的最大化尺寸赋值
self.assertEqual(size, get_size, "最大化窗口失败~")
def test_02_windows_size(self):
"""2、浏览器窗口大小缩小为640*480......"""
time.sleep(2)
self.driver.set_window_size(640, 480) # 控制浏览器显示尺寸为640*480
time.sleep(2)
get_size = {'height': 480, 'width': 640}
size = self.driver.get_window_size()
self.assertEqual(size, get_size, "设置窗口为640*480失败~")
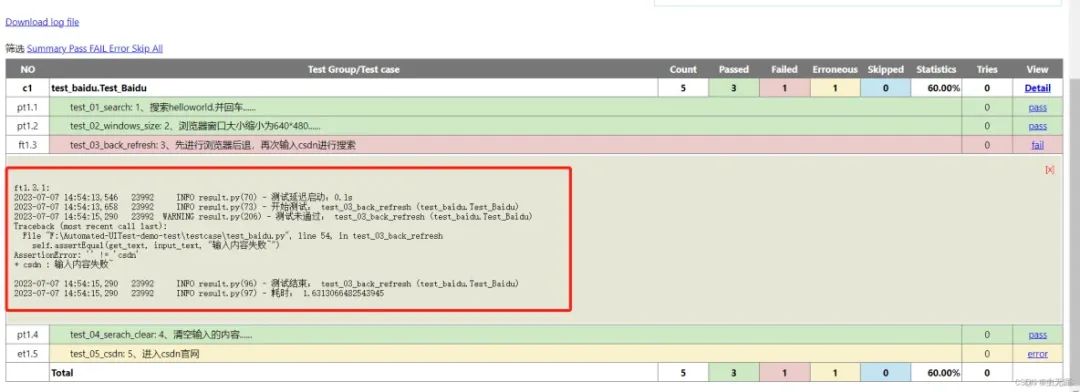
def test_03_back_refresh(self):
"""3、先进行浏览器后退,再次输入csdn进行搜索"""
self.driver.maximize_window() # 最大化当前窗口
self.driver.back()
input_text = "csdn"
self.driver.find_element_by_id("kw").send_keys(input_text) # 输入csdn
time.sleep(1)
get_text = self.driver.find_element_by_id("kw").text
self.assertEqual(get_text, input_text, "输入内容失败~")
def test_04_serach_clear(self):
"""4、清空输入的内容......"""
self.driver.refresh() # 刷新
self.driver.find_element_by_id("kw").send_keys("csdn") # 输入csdn
time.sleep(2)
self.driver.find_element_by_id("kw").clear()
time.sleep(0.5)
get_text = self.driver.find_element_by_id("kw").text
self.assertEqual(get_text, "", "清空内容失败~")
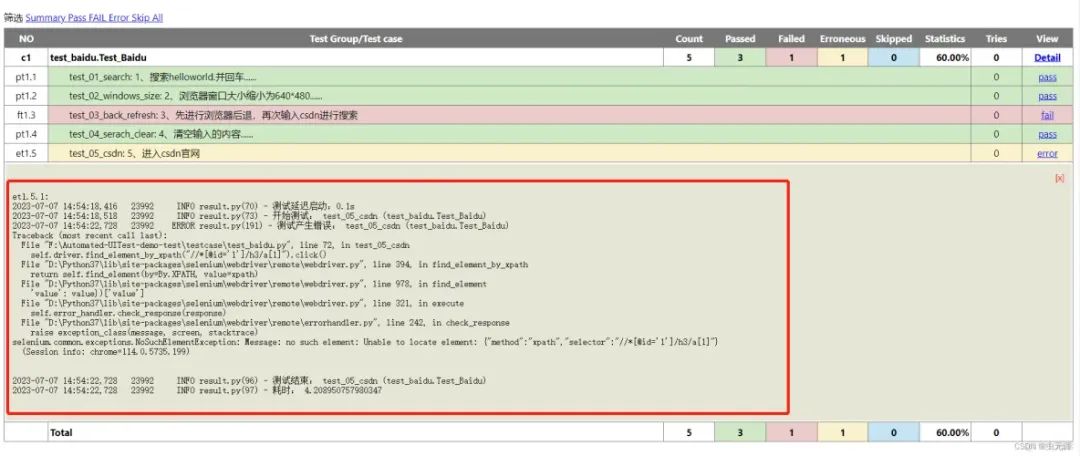
def test_05_csdn(self):
"""5、进入csdn官网"""
self.driver.find_element_by_id("kw").send_keys("csdn") # 输入csdn
time.sleep(2)
self.driver.find_element_by_id("kw").send_keys(Keys.ENTER) # 回车进行搜索
time.sleep(2)
self.driver.find_element_by_xpath("//*[@id='1']/h3/a[1]").click()
time.sleep(2)
windows = self.driver.window_handles
self.driver.switch_to.window(windows[-1])
now_url = self.driver.current_url
m_get_url = "https://www.youkuaiyun.com/"
self.assertEqual(now_url, m_get_url, "经过判断,没有进入csdn官网")
if __name__ == '__main__':
unittest.main()
1.5 mian.py
框架的主入口;
脚本如下:
import time
from common.reportOut import report_out
import os


def run_case():
    print("======开始执行!!!======")
    curpath = os.path.dirname(os.path.realpath(__file__))
    report_dir = os.path.join(curpath, "report/")        # 测试报告存放目录
    test_dir = os.path.join(curpath, "testcase/")        # 测试用例读取目录
    name_project = "BaiDu "
    report_out(test_dir, report_dir, name_project)
    time.sleep(5)
    print("======执行结束!!!======")

if __name__ == '__main__':
    run_case()
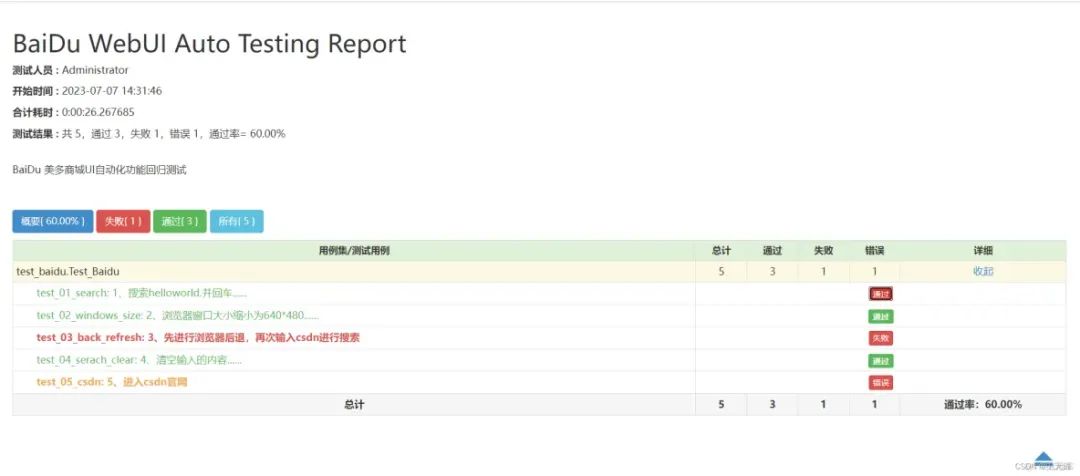
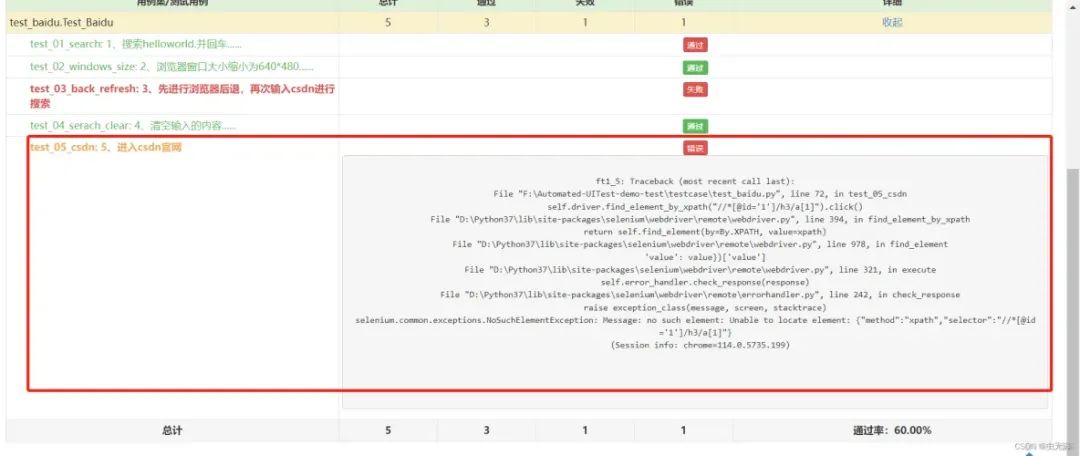
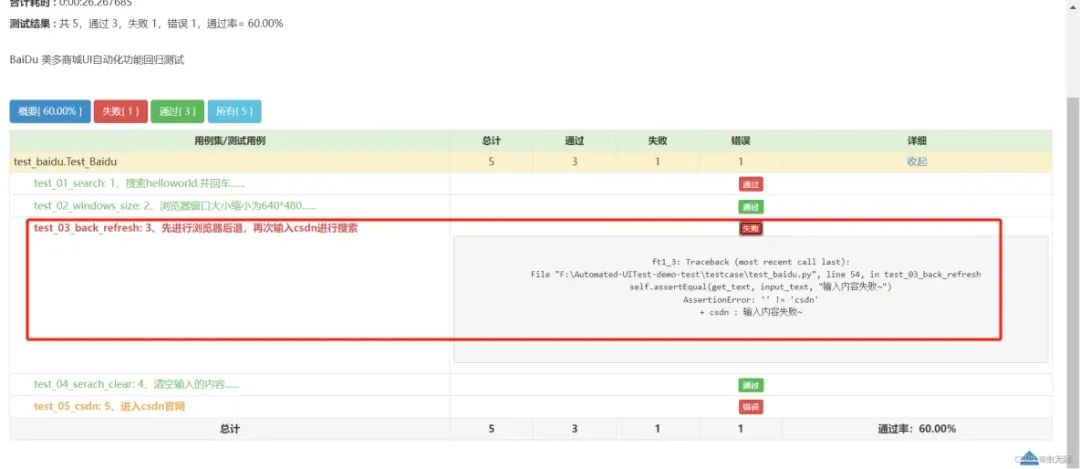
2 HTMLTestRunner
2.1 下载使用
直接下载对应的HTMLTestRunner.py版本,放到项目的common目录下,进行调用即可;
下载路径:
链接: https://pan.baidu.com/s/1xTc2enIMU2uOn1-IlgRBFQ?pwd=93ah 提取码: 93ah
2.2 reportOut.py设计
import time
import unittest
from common import HTMLTestRunner    # 引入导入的报告模板
# from BeautifulReport import BeautifulReport as bf


def report_out(test_dir, report_dir, name_project):
    '''
    :test_dir: 用例路径
    :report_dir : 报告路径
    :name_project : 项目名称=>用于报告命名及描述
    :return: 无
    '''

    now = time.strftime("%Y_%m_%d %H_%M_%S")
    discover = unittest.defaultTestLoader.discover(test_dir,pattern='test*.py')      # 加载测试用例
    report_name = report_dir + now + '-' + name_project+'_test_report.html'          # 报告名称
    with open(report_name,'wb') as f:                                                # 运行用例生成测试报告
        runner = HTMLTestRunner.HTMLTestRunner(stream=f,
                              title=name_project + 'WebUI Auto Testing Report',
                              description=(name_project + U"美多商城UI自动化功能回归测试"),
                              verbosity=2)
        runner.run(discover)
        f.close()

    """
    stream:要操作的文件;
    title:测试报告标题;
    description:报告描述;
    verbosity:报告级别。
    """
2.3 报告样式效果
直接运行main.py,即可;
样式如下:
错误的用例:
失败的用例:
3 BeautifulReport
3.1 下载安装
直接使用命令安装即可:
pip install BeautifulReport
3.2 使用方法
直接调用即可;
直接在reportOut.py设计调用方法。
3.3 reportOut.py设计
屏蔽掉调用HTMLTestRunner的方法;
重新设计调用BeautifulReport的方法;
脚本如下:
import time
import unittest
# from common import HTMLTestRunner    # 引入导入的报告模板
from BeautifulReport import BeautifulReport as bf

def report_out(test_dir, report_dir, name_project):
    '''
    :test_dir: 用例路径
    :report_dir : 报告路径
    :name_project : 项目名称=>用于报告命名及描述
    :return: 无
    '''

    now = time.strftime("%Y_%m_%d %H_%M_%S")
    discover = unittest.defaultTestLoader.discover(test_dir,pattern='test*.py')      # 加载测试用例
    report_name = now + '-' + name_project + '_test_report.html'          # 报告名称
    run = bf(discover)
    run.report(filename=report_name, report_dir=report_dir, description=U"美多商城UI自动化功能回归测试")

    """
    stream:要操作的文件;
    title:测试报告标题;
    description:报告描述;
    verbosity:报告级别。
    """
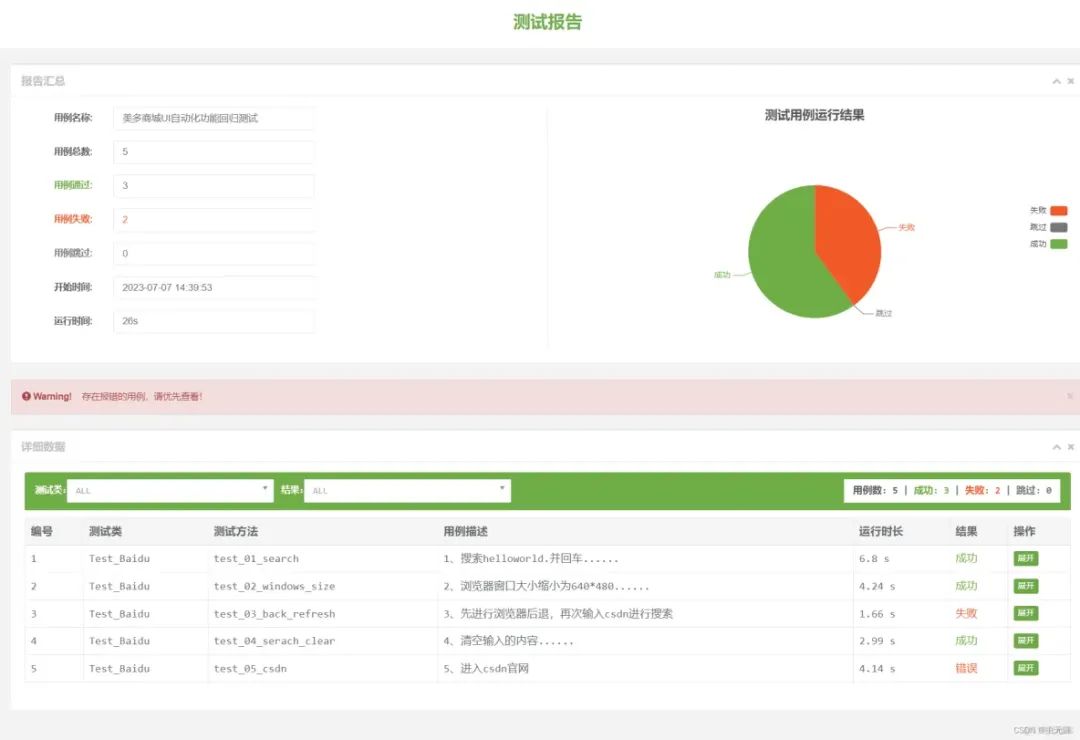
3.4 报告样式效果
全部样式效果:
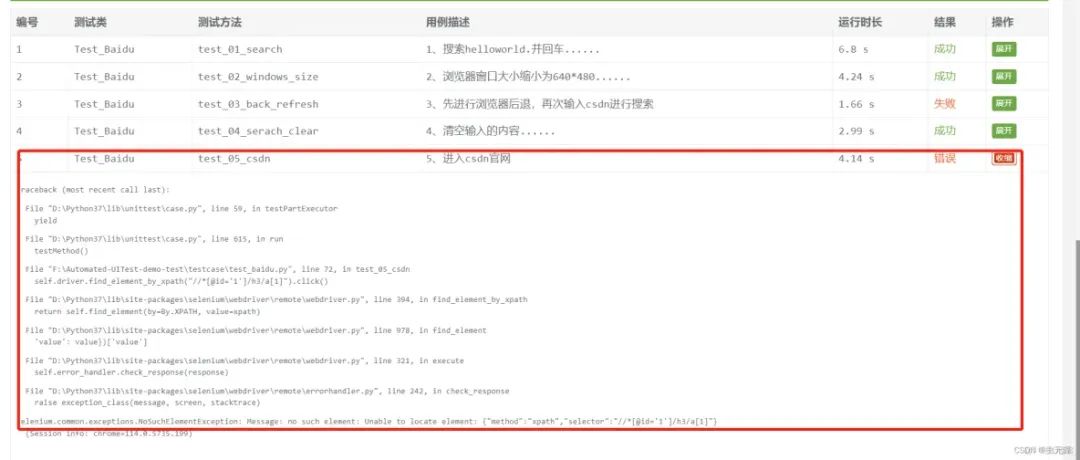
错误样式:
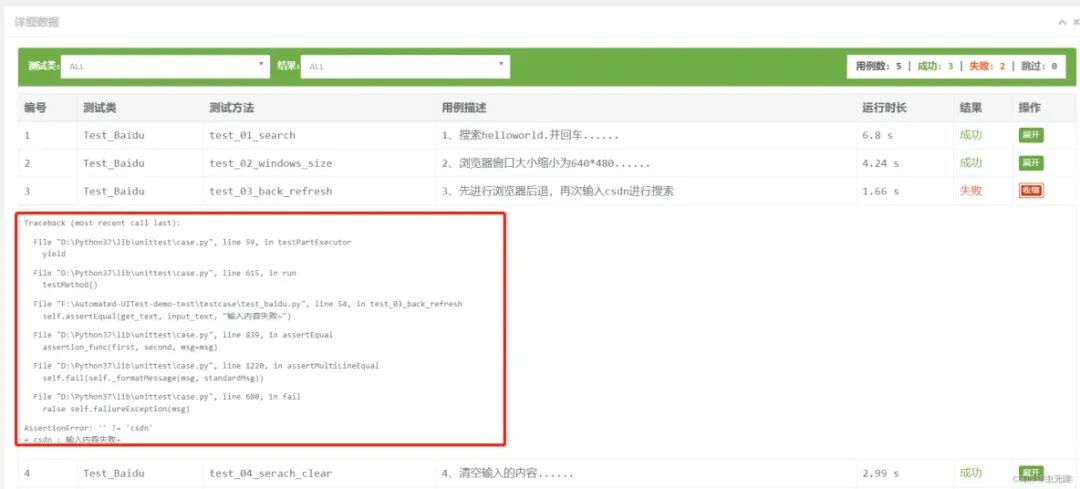
失败用例样式:
4 HTMLReport
4.1 下载安装
直接使用命令安装即可:
pip install HTMLReport

C:\Users\Administrator>pip install HTMLReport
Looking in indexes: https://pypi.tuna.tsinghua.edu.cn/simple
Collecting HTMLReport
  Using cached https://pypi.tuna.tsinghua.edu.cn/packages/ea/f5/b95ada8e79548e60b690207f41f18aedc9bdacafce7afaa91aefeb514b18/HTMLReport-2.3.1-py3-none-any.whl (33 kB)
Installing collected packages: HTMLReport
Successfully installed HTMLReport-2.3.1
4.2 使用方法
直接调用即可,屏蔽掉调用HTMLTestRunner、BeautifulReport;
重新设计调用HTMLReport的方法;
脚本如下:
import time
import unittest
# from common import HTMLTestRunner # 引入导入的报告模板
# from BeautifulReport import BeautifulReport as bf
from HTMLReport import ddt, TestRunner, add_image, no_retry, retry
def report_out(test_dir, report_dir, name_project):
'''
:test_dir: 用例路径
:report_dir : 报告路径
:name_project : 项目名称=>用于报告命名及描述
:return: 无
'''
now = time.strftime("%Y_%m_%d %H_%M_%S")
discover = unittest.defaultTestLoader.discover(test_dir, pattern='test*.py') # 加载测试用例
# report_name = now + '-' + name_project + '_test_report.html' # 报告名称
test_runner = TestRunner(
report_file_name=now,
output_path=report_dir,
title=name_project,
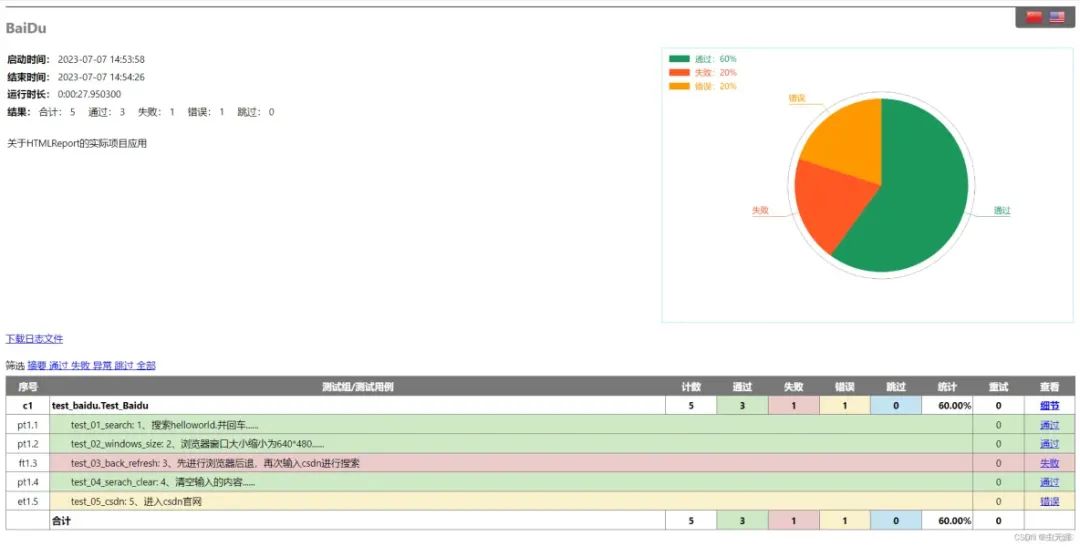
description="关于HTMLReport的实际项目应用",
thread_count=1,
thread_start_wait=0.1,
tries=0,
delay=0,
back_off=1,
retry=True,
sequential_execution=True,
lang="cn"
)
test_runner.run(discover)
4.3 参数说明
参数 说明
report_file_name 报告文件名,如果未赋值,将采用“test+时间戳”
log_file_name 日志文件名,如果未赋值,将采用报告文件名,如果报告文件名也没有,将采用“test+时间戳”
output_path 报告保存文件夹名,默认“report”
title 报告标题,默认“测试报告”
description 报告描述,默认“无测试描述”
tries 重试次数
delay 重试延迟间隔,单位为 秒
back_off 扩展每次重试等待时间的乘数
max_delay 最大重试等待时间长度,单位为 秒
retry 如果为 True 表示所有用例遵循重试规则,False 只针对添加了 @retry 用例有效
thread_count 并发线程数量(无序执行测试),默认数量 1
thread_start_wait 各线程启动延迟,默认 0 s
sequential_execution 是否按照套件添加(addTests)顺序执行, 会等待一个addTests执行完成,再执行下一个,默认 False。如果用例中存在 tearDownClass ,建议设置为True,否则 tearDownClass 将会在所有用例线程执行完后才会执行。
lang ("cn", "en") 支持中文与英文报告输出,默认采用中文
image 默认支持添加图片,False 放弃所有图片添加
failed_image true 只有失败才添加图片,成功用例添加的图片会被删除
4.4 报告样式效果
整体效果:
中英文切换

错误用例效果:
失败用例效果
5 Allure
5.1 allure-pytest插件安装
pip3 install allure-pytest

C:\Users\Administrator>pip3 install allure-pytest
Looking in indexes: https://pypi.tuna.tsinghua.edu.cn/simple
Requirement already satisfied: allure-pytest in d:\python37\lib\site-packages (2.8.12)
Requirement already satisfied: six>=1.9.0 in d:\python37\lib\site-packages (from allure-pytest) (1.15.0)
Requirement already satisfied: allure-python-commons==2.8.12 in d:\python37\lib\site-packages (from allure-pytest) (2.8.12)
Requirement already satisfied: pytest>=4.5.0 in d:\python37\lib\site-packages (from allure-pytest) (6.2.4)
Requirement already satisfied: attrs>=16.0.0 in d:\python37\lib\site-packages (from allure-python-commons==2.8.12->allure-pytest) (20.3.0)
Requirement already satisfied: pluggy>=0.4.0 in d:\python37\lib\site-packages (from allure-python-commons==2.8.12->allure-pytest) (0.13.1)
Requirement already satisfied: importlib-metadata>=0.12 in d:\python37\lib\site-packages (from pytest>=4.5.0->allure-pytest) (2.1.1)
Requirement already satisfied: iniconfig in d:\python37\lib\site-packages (from pytest>=4.5.0->allure-pytest) (1.1.1)
Requirement already satisfied: py>=1.8.2 in d:\python37\lib\site-packages (from pytest>=4.5.0->allure-pytest) (1.10.0)
Requirement already satisfied: packaging in d:\python37\lib\site-packages (from pytest>=4.5.0->allure-pytest) (20.8)
Requirement already satisfied: colorama in d:\python37\lib\site-packages (from pytest>=4.5.0->allure-pytest) (0.4.4)
Requirement already satisfied: atomicwrites>=1.0 in d:\python37\lib\site-packages (from pytest>=4.5.0->allure-pytest) (1.4.0)
Requirement already satisfied: toml in d:\python37\lib\site-packages (from pytest>=4.5.0->allure-pytest) (0.10.2)
Requirement already satisfied: zipp>=0.5 in d:\python37\lib\site-packages (from importlib-metadata>=0.12->pytest>=4.5.0->allure-pytest) (1.2.0)
Requirement already satisfied: pyparsing>=2.0.2 in d:\python37\lib\site-packages (from packaging->pytest>=4.5.0->allure-pytest) (2.4.7)
5.2 pytest安装
pip3 install pytest
5.3 allure文件下载
下载地址: https:///allure-framework/allure2/releases
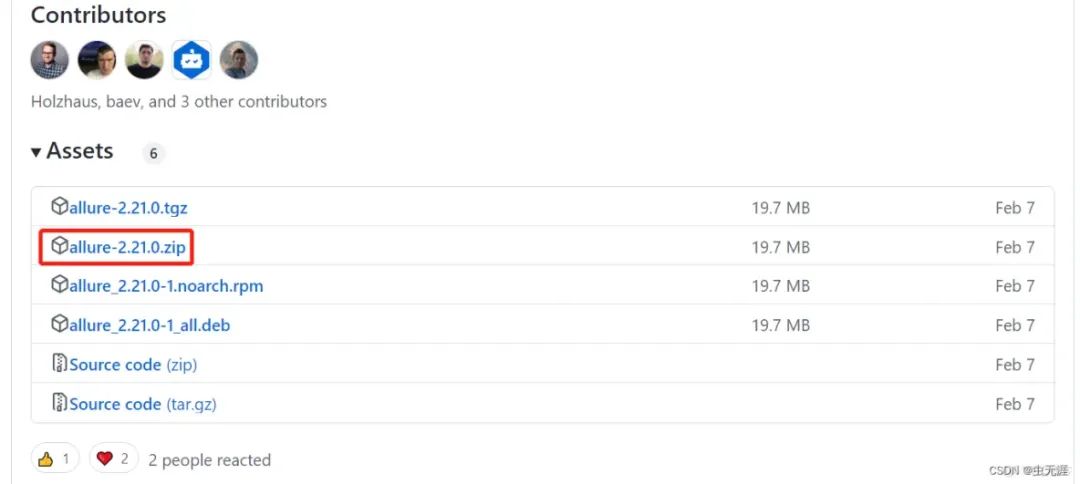
往下找,找到下载链接,这里使用的Windows操作系统,所以下载zip文件:
如果以上下载比较慢,可以使用以下地址: https://repo.maven.apache.org/maven2/io/qameta/allure/allure-commandline/
5.4 allure环境变量配置
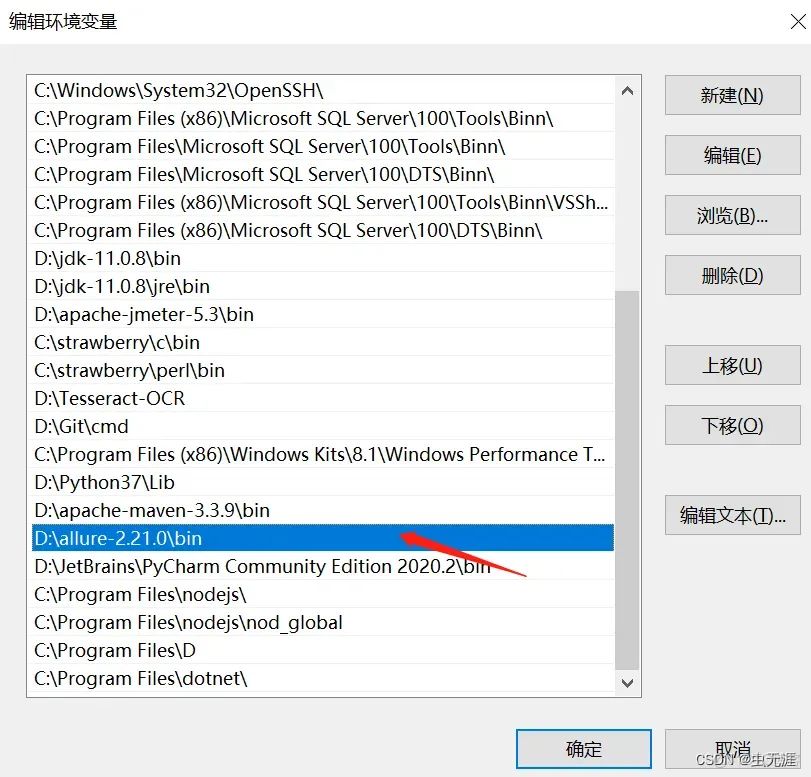
下载后解压到本地即可,比如:

D:\allure-2.21.0\bin
然后把以上路径添加到系统环境变量中:
5.5 配置java环境
因为allure是依赖java环境的,所以还需要配置java变量;
详细java环境配置可以直接网上搜索即可
5.6 查看allure版本
C:\Users\Administrator>allure --version
2.13.2
5.7 设计用例
这里我们重新写一个脚本,不在以上代码框架中运行,因为Allure用的是pytest框架,以上时unittest框架;
脚本为:
import pytest
import time

class TestCase01():
    def test_case_01(self):
        time.sleep(1)
        print("case01$$$$$$$$$$$$$$$$$$$$$")

    def test_case_02(self):
        time.sleep(1)
        print("case02$$$$$$$$$$$$$$$$$$$$$")

    def test_case_03(self):
        time.sleep(1)
        print("case03$$$$$$$$$$$$$$$$$$$$$")

    def test_case_04(self):
        time.sleep(1)
        print("case04$$$$$$$$$$$$$$$$$$$$$")

    def test_case_05(self):
        time.sleep(1)
        print("case05$$$$$$$$$$$$$$$$$$$$$")

    def test_case_06(self):
        time.sleep(1)
        print("case06$$$$$$$$$$$$$$$$$$$$$")

class TestCase02():
    def test_case_07(self):
        time.sleep(1)
        print("case07$$$$$$$$$$$$$$$$$$$$$")

    def test_case_08(self):
        time.sleep(1)
        print("case08$$$$$$$$$$$$$$$$$$$$$")

    def test_case_09(self):
        time.sleep(1)
        print("case08$$$$$$$$$$$$$$$$$$$$$")


if __name__ == '__main__':
    pytest.main(["-s", "test_xxx.py"])
5.8 执行方法
执行pytest -n auto --alluredir=xxx/xxx/xxx来运行查看测试结果,其中--alluredir是指定报告存放的路径,比如:
pytest -n auto --alluredir=allure
我只运行以上代码,所以我指定了要运行的脚本为:test_xxx.py,报告存放路径在当前脚本的路径:
pytest -n auto --alluredir=allure test_xxx.py
运行:
gw0 [9] / gw1 [9] / gw2 [9] / gw3 [9] / gw4 [9] / gw5 [9] / gw6 [9] / gw7 [9]
.........                                                                                               [100%]
============================================= 9 passed in 4.66s ==============================================
5.9 查看报告方法
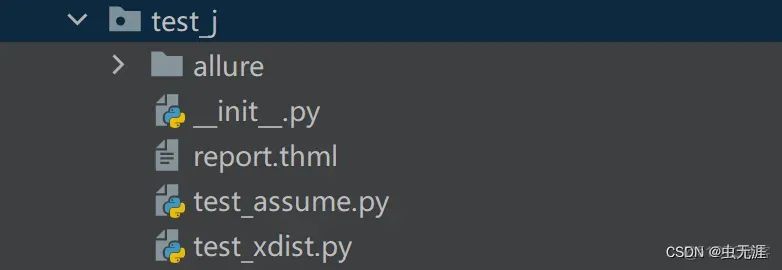
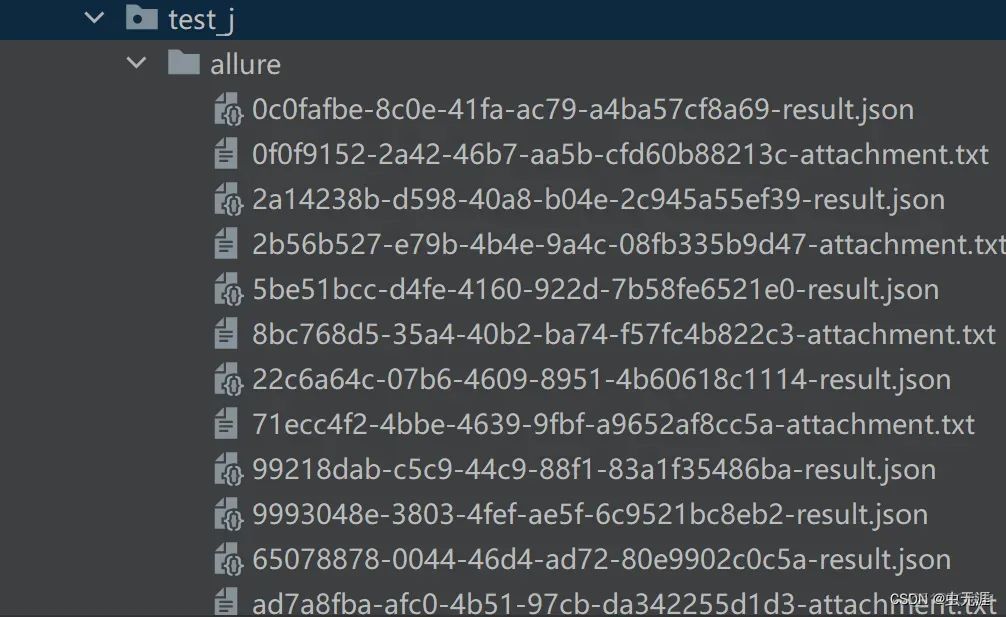
运行完成后在test_xxx.py的相同路径下,生成一个allure的文件夹;
可以看到有很多文件,我们需要使用allure命令来显示测试报告:
allure serve allure

(venv) F:\pytest_study\test_case\test_j>allure serve allure
Generating report to temp directory...
Report successfully generated to C:\Users\ADMINI~1\AppData\Local\Temp\743714976960418009\allure-report
Starting web server...
2023-07-07 11:16:28.270:INFO::main: Logging initialized @4392ms to org.eclipse.jetty.util.log.StdErrLog
Server started at <http://172.16.1.33:13959/>. Press <Ctrl+C> to exit
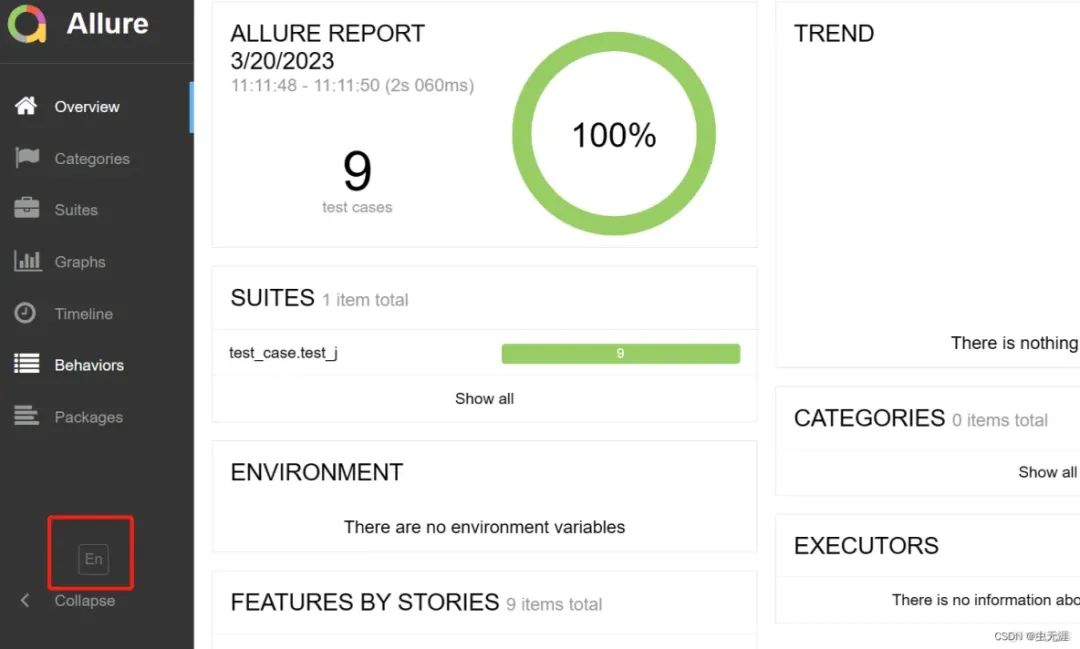
使用以上命令会自动打开报告,如下:

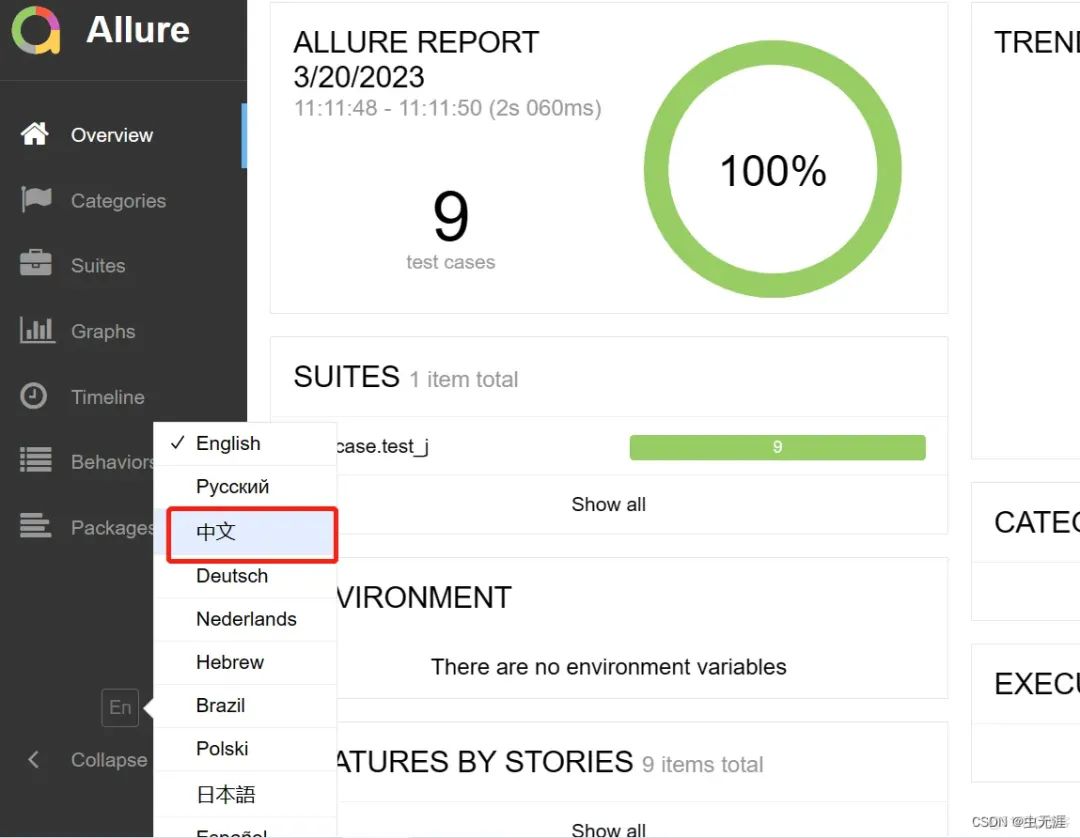
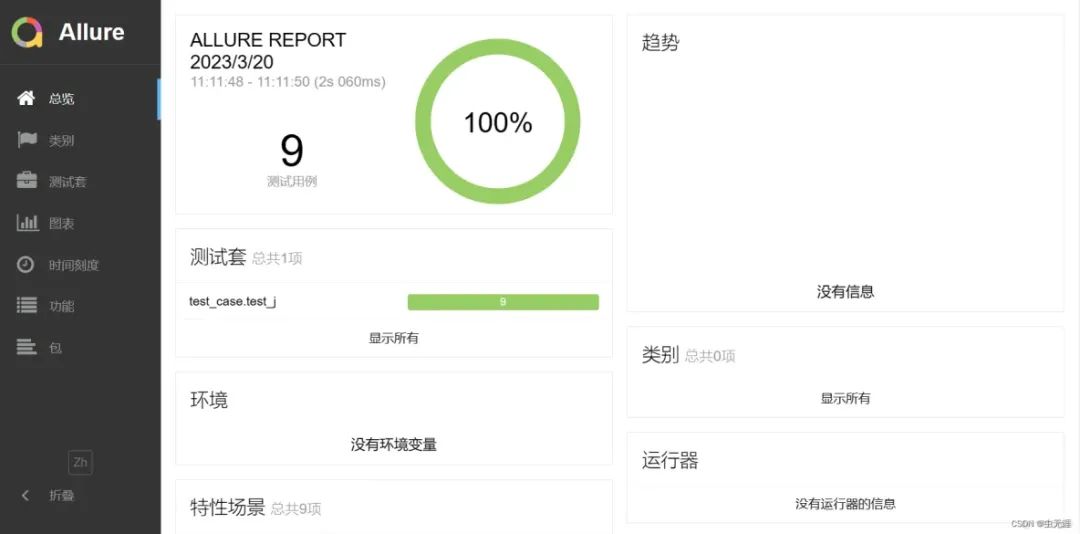
5.10 切换语言
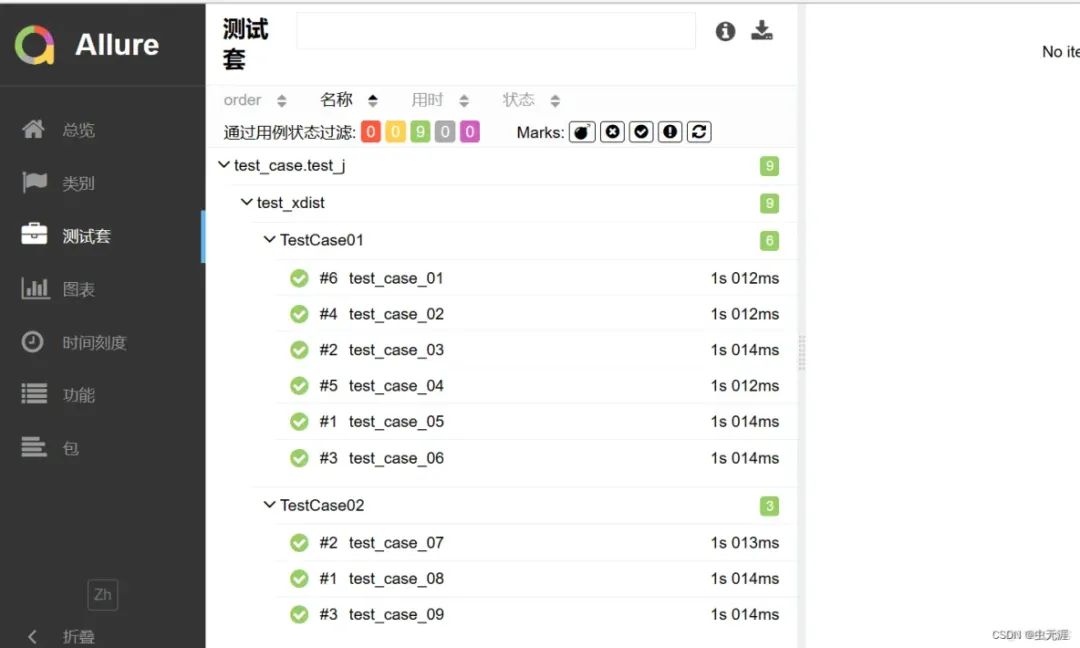
5.11 查看测试套件
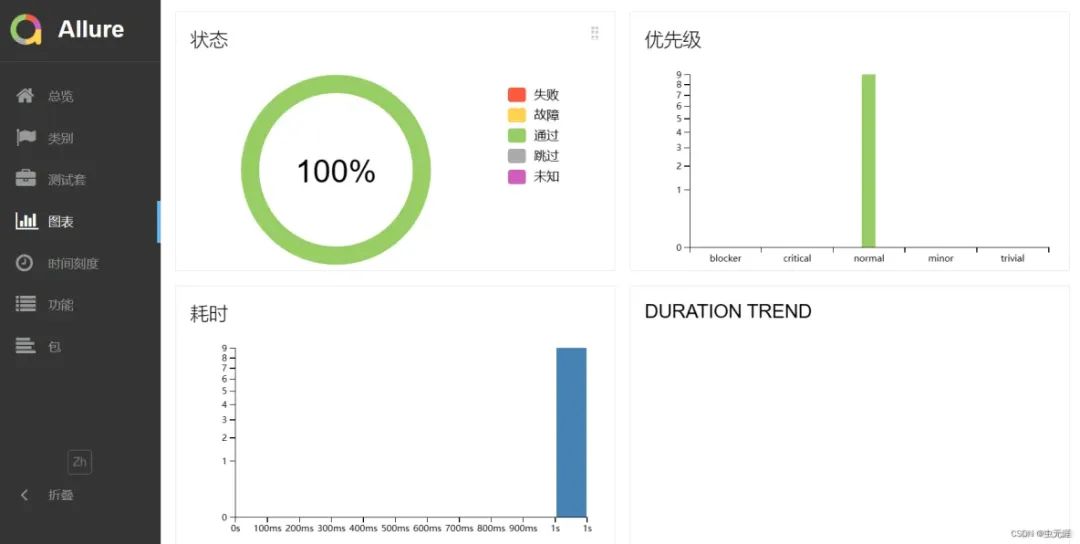
5.12 查看运行图表数据
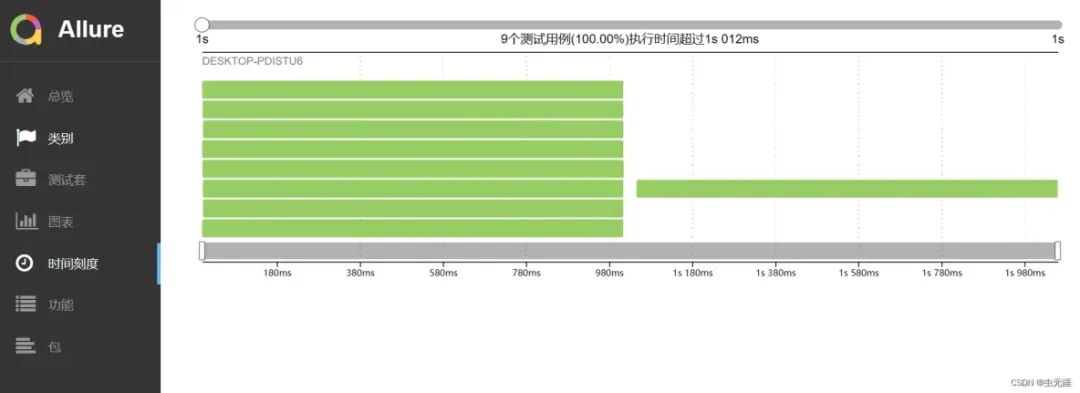
5.13 查看用例执行时间
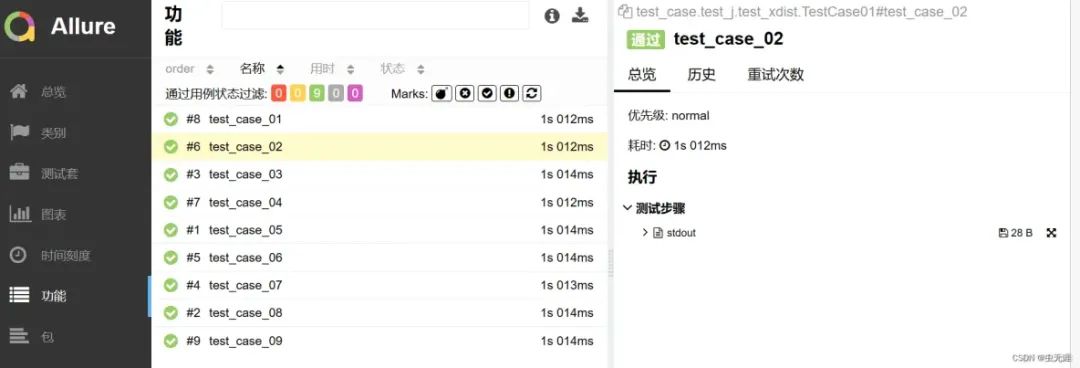
5.14 查看用例数据
最后: 下方这份完整的软件测试视频教程已经整理上传完成,需要的朋友们可以自行领取【保证100%免费】


 563
563

 被折叠的 条评论
为什么被折叠?
被折叠的 条评论
为什么被折叠?
 到【灌水乐园】发言


