


有关使用这些函数的示例,请参见 cuda-examples.py 作为对下面伪代码的补充。在进入这里之前,建议您先阅读上一页关于摄像头流媒体和多媒体的内容,了解有关视频捕获和输出、加载/保存图像等方面的信息。
1. 图像管理
1.1 图像格式
尽管视频流API和DNN对象(如imageNet、detectNet和segNet)期望图像为RGB/RGBA格式,但为传感器采集和低级别I/O定义了多种其他格式:
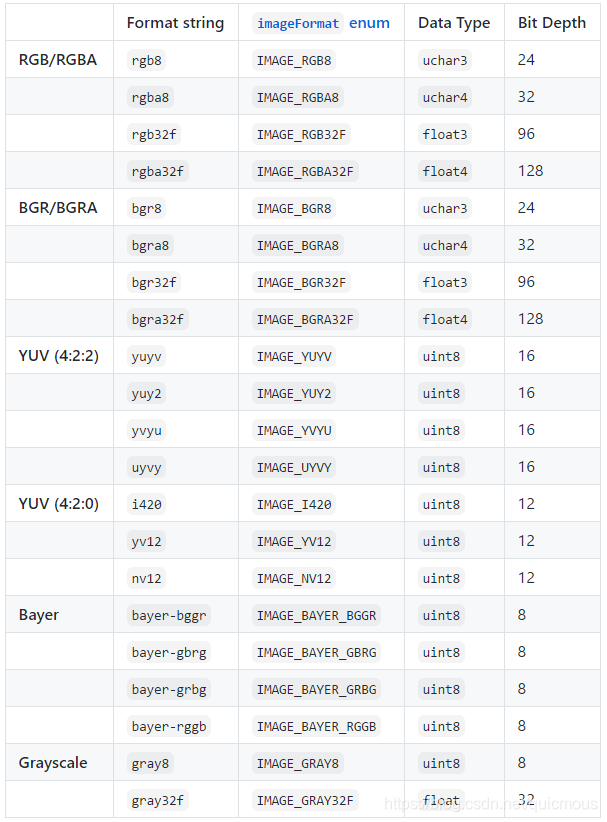
- 位深度表示每像素的有效位数
- 有关YUV格式的详细规范,请参阅fourcc.org网站
注意:在C++中,RGB/RGBA格式是唯一应该用于 uchar3/uchar4/float3/float4 向量类型的格式。假设使用这些类型时,图像为RGB/RGBA格式。
要在数据格式和/或颜色空间之间转换图像,请参见下面的颜色转换部分。
1.2 图像分配
为了分配空的GPU内存,用于存储中间/输出图像(即处理过程中的工作内存),使用C++或Python中的一个 cudaAllocMapped() 函数。请注意,videoSource输入流会自动分配自己的GPU内存,并将最新图像返回给您,因此您无需为这些图像分配自己的内存。
cudaAllocMapped() 分配的内存驻留在共享的CPU/GPU内存空间中,因此可以从CPU和GPU访问它,而无需在它们之间执行内存复制(因此也称为零拷贝内存)。
但是,同步是必需的-因此,如果要在GPU处理完成后从CPU访问映像,请先调用cudaDeviceSynchronize()。若要释放C++中的内存,请使用 cudaFreeHost() 函数。在Python中,内存将由垃圾收集器自动释放,但是您可以使用del操作符显式地释放它。
下面是Python和C++的伪代码,用于分配/同步/释放零拷贝内存:
Python
import jetson.utils

# allocate a 1920x1080 image in rgb8 format
img = jetson.utils.cudaAllocMapped(width=1920, height=1080, format='rgb8')

# do some processing on the GPU here
...

# wait for the GPU to finish processing
jetson.utils.cudaDeviceSynchronize()

# Python will automatically free the memory, but you can explicitly do it with 'del'
del img
C++
#include <jetson-utils/cudaMappedMemory.h>

void* img = NULL;

// allocate a 1920x1080 image in rgb8 format
if( !cudaAllocMapped(&img, 1920, 1080, IMAGE_RGB8) )
	return false;	// memory error

// do some processing on the GPU here
...

// wait for the GPU to finish processing
CUDA(cudaDeviceSynchronize());

// release the memory
CUDA(cudaFreeHost(img));
在C++中,如果指针指向类型 uchar3/uchar4/float3/float4,则经常可以省略显式IMAGE格式枚举。以下功能等同于上述分配:
uchar3* img = NULL;	// can be uchar3 (rgb8), uchar4 (rgba8), float3 (rgb32f), float4 (rgba32f)

if( !cudaAllocMapped(&img, 1920, 1080) )
	return false;
注意:使用这些向量类型时,将假定这些图像位于各自的RGB/RGBA颜色空间中。因此,如果使用uchar3/uchar4/float3/float4表示包含BGR/BGRA数据的图像,则某些处理函数可能会将其解释为RGB/RGBA,除非明确指定正确的图像格式。
1.3 Python中的图像封装
在Python中分配图像时,或使用 videoSource.Capture(),它将返回一个独立的内存封装对象(类型为<jetson.utils.cudaImage>)。无需复制底层内存就可以进行传递。cudaImage对象具有以下成员:
<jetson.utils.cudaImage>
  .ptr      # memory address (not typically used)
  .size     # size in bytes
  .shape    # (height,width,channels) tuple
  .width    # width in pixels
  .height   # height in pixels
  .channels # number of color channels
  .format   # format string
  .mapped   # true if ZeroCopy
因此,你可以采用 img.width、imgh.height 这样的方式访问图像的属性。
1.3.1 在Python中访问图像数据
CUDA图像也是可订阅的,这意味着您可以对它们进行索引,以便直接从CPU访问像素数据:
for y in range(img.height):
	for x in range(img.width):
		pixel = img[y,x]    # returns a tuple, i.e. (r,g,b) for RGB formats or (r,g,b,a) for RGBA formats
		img[y,x] = pixel    # set a pixel from a tuple (tuple length must match the number of channels)
注意:Python 的下标索引仅在图像时通过 ZeroCopy 内存中分配时可用(即通过cudaAllocMapped())。否则,无法从CPU访问数据,将引发异常。
用于访问图像的索引元组可以采用以下形式:
- img[y,x] - 注意元组 (y,x) 的顺序,与 numpy 一样
- img[y,x,channel] - 仅返回一个特殊的通道 (即 0 为红色通道, 1 为绿色通道, 2 为蓝色为通道, 3 为 alpha 通道)
- img[y*img.width+x] - 平坦的一维索引,返回对应像素的全部通道
虽然支持图像订阅,但是不建议从Python单独访问大图像的每个像素,因为这样会大大降低应用程序的速度。假设GPU实现不可用,更好的选择是使用Numpy。
1.3.2 转换为Numpy数组
首先,您可以通过调用 jetson.utils.cudaToNumpy() 从 Numpy 获得一幅 cudaImage 得内存封装。底层内存没有被复制,Numpy将直接访问它—因此请注意,如果您通过Numpy就地更改数据,cudaImage 封装中的数据也会更改。
有关使用 cudaToNumpy() 的示例,请参见 jetson utils 中的例子 cuda-to-numpy.py。
请注意,OpenCV需要BGR 色彩空间中的图像,因此如果计划将图像与OpenCV一起使用,则在OpenCV中使用之前,应使用 cv2.COLOR_RGB2BGR 调用 cv2.cvtColor()。
1.3.3 从Numpy数组转换
假设您中有一个 Numpy ndarray 格式的图像,可能是由OpenCV提供的。作为Numpy数组,它只能从CPU访问。你可以用 jetson.utils.cudaFromNumpy() 将其复制到 GPU(到共享CPU/GPU ZeroCopy内存中)。
有关使用 cudaFromNumpy() 的示例,请参见来自 jetson utils的例子 cuda-from-numpy.py 。
请注意,OpenCV图像位于BGR colorspace中,因此如果图像来自OpenCV,则应首先使用cv2.COLOR_BGR2RGB 调用cv2.cvtColor()。
2. CUDA 程序
2.1 颜色转换
cudaConvertColor() 函数的作用是:使用GPU在图像格式和颜色空间之间进行转换。例如,可以从RGB转换为BGR(反之亦然)、从YUV转换为RGB、从RGB转换为灰度等。您还可以更改通道的数据类型和数量(例如,RGB8到RGBA32F)。有关可在不同格式之间进行转换的更多信息,请参阅上面的“图像格式”部分。
cudaConvertColor()具有以下限制和不支持的转换:
- YUV格式不支持BGR/BGRA或灰度(仅RGB/RGBA)
- YUV NV12, YUYV, YVYU, 和UYVY只能转换为RGB/RGBA(注意:转换为,不是转换自)
- Bayer 格式只能转换为RGB8(uchar3)和RGBA8(uchar4)
下面的Python/C++ +代码在RGB8中加载一个图像,并将其转换成RGBA32 f(注意这是纯粹的说明性的,因为图像可以直接加载为RGBA32)。有关更全面的示例,请参见 cuda-examples.py。
Python
import jetson.utils

# load the input image (default format is rgb8)
imgInput = jetson.utils.loadImage('my_image.jpg', format='rgb8') # default format is 'rgb8', but can also be 'rgba8', 'rgb32f', 'rgba32f'

# allocate the output as rgba32f, with the same width/height as the input
imgOutput = jetson.utils.cudaAllocMapped(width=imgInput.width, height=imgInput.height, format='rgba32f')

# convert from rgb8 to rgba32f (the formats used for the conversion are taken from the image capsules)
jetson.utils.cudaConvertColor(imgInput, imgOutput)
C++
#include <jetson-utils/cudaColorspace.h>
#include <jetson-utils/cudaMappedMemory.h>
#include <jetson-utils/imageIO.h>

uchar3* imgInput = NULL;   // input is rgb8 (uchar3)
float4* imgOutput = NULL;  // output is rgba32f (float4)

int width = 0;
int height = 0;

// load the image as rgb8 (uchar3)
if( !loadImage("my_image.jpg", &imgInput, &width, &height) )
	return false;

// allocate the output as rgba32f (float4), with the same width/height
if( !cudaAllocMapped(&imgOutput, width, height) )
	return false;

// convert from rgb8 to rgba32f
if( CUDA_FAILED(cudaConvertColor(imgInput, IMAGE_RGB8, imgOutput, IMAGE_RGBA32F, width, height)) )
	return false;	// an error or unsupported conversion occurred
2.2 调整大小
cudaResize() 函数的作用是:使用GPU将图像重新缩放到不同的大小(下采样或上采样)。下面的Python /C++伪代码加载一个图像,并通过特定的因素调整它的大小(在示例中被下采样了一半)。有关更全面的示例,请参见cuda-examples.py.
Python
import jetson.utils

# load the input image
imgInput = jetson.utils.loadImage('my_image.jpg')

# allocate the output, with half the size of the input
imgOutput = jetson.utils.cudaAllocMapped(width=imgInput.width * 0.5,
                                         height=imgInput.height * 0.5,
                                         format=imgInput.format)

# rescale the image (the dimensions are taken from the image capsules)
jetson.utils.cudaResize(imgInput, imgOutput)
C++
#include <jetson-utils/cudaResize.h>
#include <jetson-utils/cudaMappedMemory.h>
#include <jetson-utils/imageIO.h>

// load the input image
uchar3* imgInput = NULL;

int inputWidth = 0;
int inputHeight = 0;

if( !loadImage("my_image.jpg", &imgInput, &inputWidth, &inputHeight) )
	return false;

// allocate the output image, with half the size of the input
uchar3* imgOutput = NULL;

int outputWidth = inputWidth * 0.5f;
int outputHeight = inputHeight * 0.5f;

if( !cudaAllocMapped(&imgOutput, outputWidth, outputHeight) )
	return false;

// rescale the image
if( CUDA_FAILED(cudaResize(imgInput, inputWidth, inputHeight, imgOutput, outputWidth, outputHeight)) )
	return false;
2.3 裁剪
cudaCrop() 函数的作用是:使用GPU将图像裁剪到特定的感兴趣区域(ROI)。下面的Python/C++ +代码加载图像,并将其剪裁在图像的中心一半。有关更全面的示例,请参见cuda-examples.py.
请注意,ROI矩形是作为(左、上、右、下)坐标提供的。
Python
import jetson.utils

# load the input image
imgInput = jetson.utils.loadImage('my_image.jpg')

# determine the amount of border pixels (cropping around the center by half)
crop_factor = 0.5
crop_border = ((1.0 - crop_factor) * 0.5 * imgInput.width,
               (1.0 - crop_factor) * 0.5 * imgInput.height)

# compute the ROI as (left, top, right, bottom)
crop_roi = (crop_border[0], crop_border[1], imgInput.width - crop_border[0], imgInput.height - crop_border[1])

# allocate the output image, with the cropped size
imgOutput = jetson.utils.cudaAllocMapped(width=imgInput.width * crop_factor,
                                         height=imgInput.height * crop_factor,
                                         format=imgInput.format)

# crop the image to the ROI
jetson.utils.cudaCrop(imgInput, imgOutput, crop_roi)
C++
#include <jetson-utils/cudaCrop.h>
#include <jetson-utils/cudaMappedMemory.h>
#include <jetson-utils/imageIO.h>

// load the input image
uchar3* imgInput = NULL;

int inputWidth = 0;
int inputHeight = 0;

if( !loadImage("my_image.jpg", &imgInput, &inputWidth, &inputHeight) )
	return false;

// determine the amount of border pixels (cropping around the center by half)
const float crop_factor = 0.5
const int2  crop_border = make_int2((1.0f - crop_factor) * 0.5f * inputWidth,
                                    (1.0f - crop_factor) * 0.5f * inputHeight);

// compute the ROI as (left, top, right, bottom)
const int4 crop_roi = make_int4(crop_border.x, crop_border.y, inputWidth - crop_border.x, inputHeight - crop_border.y);

// allocate the output image, with half the size of the input
uchar3* imgOutput = NULL;

if( !cudaAllocMapped(&imgOutput, inputWidth * crop_factor, inputHeight * cropFactor) )
	return false;

// crop the image
if( CUDA_FAILED(cudaCrop(imgInput, imgOutput, crop_roi, inputWidth, inputHeight)) )
	return false;
2.4 归一化
cudaNormalize() 函数的作用是:使用GPU改变图像中像素强度的范围。例如,将像素值在[0,1]之间的图像转换为像素值在[0, 255]之间的图像。像素值的另一个常见范围在[-1,1]之间。
注意:jetson inference和jetson utils中的所有其他函数都需要像素范围在[0, 255]之间的图像,因此通常不需要使用cudaNormalize(),但在处理来自其他源或目标的数据时,它是可用的。
下面的Python/C++ +代码加载一个图像,并将它从[0255 ]规范化为[0,1]。
Python
import jetson.utils

# load the input image (its pixels will be in the range of 0-255)
imgInput = jetson.utils.loadImage('my_image.jpg')

# allocate the output image, with the same dimensions as input
imgOutput = jetson.utils.cudaAllocMapped(width=imgInput.width, height=imgInput.height, format=imgInput.format)

# normalize the image from [0,255] to [0,1]
jetson.utils.cudaNormalize(imgInput, (0,255), imgOutput, (0,1))
C++
#include <jetson-utils/cudaNormalize.h>
#include <jetson-utils/cudaMappedMemory.h>
#include <jetson-utils/imageIO.h>

uchar3* imgInput = NULL;
uchar3* imgOutput = NULL;

int width = 0;
int height = 0;

// load the input image (its pixels will be in the range of 0-255)
if( !loadImage("my_image.jpg", &imgInput, &width, &height) )
	return false;

// allocate the output image, with the same dimensions as input
if( !cudaAllocMapped(&imgOutput, width, height) )
	return false;

// normalize the image from [0,255] to [0,1]
CUDA(cudaNormalize(imgInput, make_float2(0,255),
                   imgOutput, make_float2(0,1),
                   width, height));
2.5 覆盖
cudaOverlay() 函数的作用是:使用GPU将输入图像合成到特定位置的输出图像之上。覆盖操作通常按顺序调用,以形成多个图像的组合。
下面的Python/C++ +伪代码加载两个图像,并将它们并排堆放在输出图像中。
Python
import jetson.utils

# load the input images
imgInputA = jetson.utils.loadImage('my_image_a.jpg')
imgInputB = jetson.utils.loadImage('my_image_b.jpg')

# allocate the output image, with dimensions to fit both inputs side-by-side
imgOutput = jetson.utils.cudaAllocMapped(width=imgInputA.width + imgInputB.width,
                                         height=max(imgInputA.height, imgInputB.height),
                                         format=imgInputA.format)

# compost the two images (the last two arguments are x,y coordinates in the output image)
jetson.utils.cudaOverlay(imgInputA, imgOutput, 0, 0)
jetson.utils.cudaOverlay(imgInputB, imgOutput, imgInputA.width, 0)
C++
#include <jetson-utils/cudaOverlay.h>
#include <jetson-utils/cudaMappedMemory.h>
#include <jetson-utils/imageIO.h>

#include <algorithm>  // for std::max()

uchar3* imgInputA = NULL;
uchar3* imgInputB = NULL;
uchar3* imgOutput = NULL;

int2 dimsA = make_int2(0,0);
int2 dimsB = make_int2(0,0);

// load the input images
if( !loadImage("my_image_a.jpg", &imgInputA, &dimsA.x, &dimsA.y) )
	return false;

if( !loadImage("my_image_b.jpg", &imgInputB, &dimsB.x, &dimsB.y) )
	return false;

// allocate the output image, with dimensions to fit both inputs side-by-side
const int2 dimsOutput = make_int2(dimsA.x + dimsB.x, std::max(dimsA.y, dimsB.y));

if( !cudaAllocMapped(&imgOutput, dimsOutput.x, dimsOutput.y) )
	return false;

// compost the two images (the last two arguments are x,y coordinates in the output image)
CUDA(cudaOverlay(imgInputA, dimsA, imgOutput, dimsOutput, 0, 0));
CUDA(cudaOverlay(imgInputB, dimsB, imgOutput, dimsOutput, dimsA.x, 0));


 93
93

 被折叠的 条评论
为什么被折叠?
被折叠的 条评论
为什么被折叠?
 到【灌水乐园】发言


