


🔥DEIM创新改进目录:全新DEIM有效涨点改进目录 | 包含各种最新顶会顶刊:卷积模块、注意力模块、特征融合模块、有效特征聚合提取模块,上采样模块、下采样模块,二次创新模块、独家创新,特殊场景检测等最全大论文及小论文必备创新改进点
🔥全新DEIM创新改进专栏地址:全网独家DEIM创新改进高效涨点+永久更新中(至少500+创新改进🗡剑指小论文、大论文)+小白也能简单高效跑实验+容易发各种级别小论文
本文目录
第四步:直接复制以下所有命令到控制台“终端里面粘贴回车运行”
4.3 windows系统上第一次训练,需要解决这个源码bug!
一、下载CVPR2025 DEIM官方源码
DEIM项目源码地址:点击链接自动跳转!
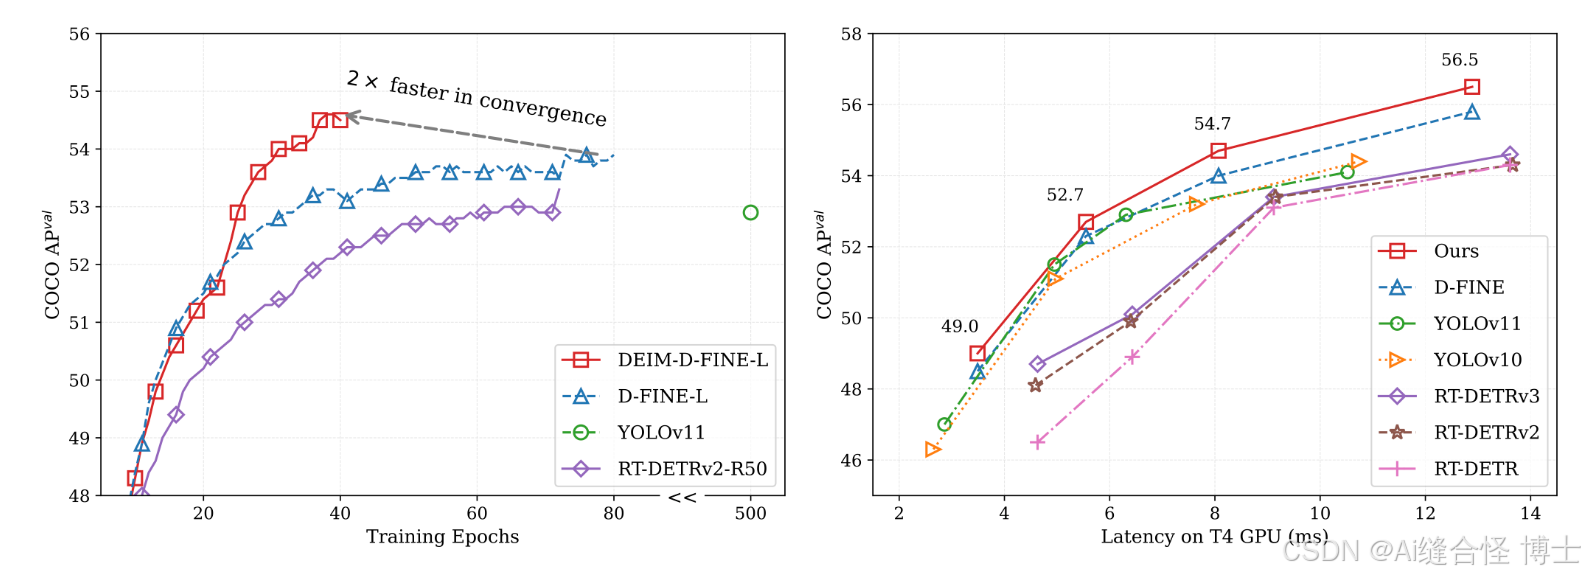
[CVPR 2025] DEIM: DETR with Improved Matching for Fast Convergence

二、创新DEIM项目虚拟环境
如果有的小伙伴是Windows系统,订阅后可以私信怪导,可以直接将Windows系统的deim虚拟环境包发给你,自己按照pdf文件操作步骤几分钟搞定!
下方是自己创建DEIM虚拟环境的详细步骤:
第一步:创建一个自己的虚拟环境:
conda create -n deim python=3.10第二步:进入到自己的虚拟环境:
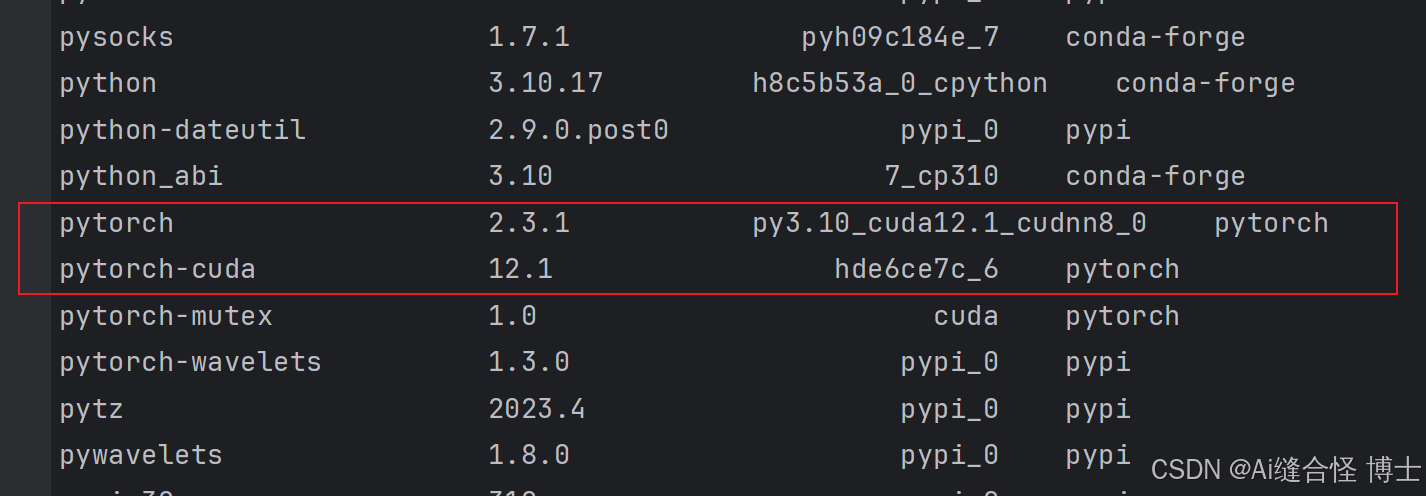
conda activate deim第三步:安装pytorch,建议不要安装太新版本
pytorch官网:Previous PyTorch Versions
conda install pytorch==2.3.1 torchvision==0.18.1 torchaudio==2.3.1 pytorch-cuda=12.1 -c pytorch -c n比如下面截图是我的deim虚拟环境pytorch和torchvision版本举例:

第四步:直接复制以下所有命令到控制台“终端里面粘贴回车运行”
安装所需要的包!
pip install ultralytics -i https://pypi.tuna.tsinghua.edu.cn/simple
pip install torchsummary -i https://pypi.tuna.tsinghua.edu.cn/simple
pip install onnx==1.14.0 -i https://pypi.tuna.tsinghua.edu.cn/simple
pip install onnxruntime==1.15.1 -i https://pypi.tuna.tsinghua.edu.cn/simple
pip install pycocotools==2.0.7 -i https://pypi.tuna.tsinghua.edu.cn/simple
pip install faster-coco-eval==1.6.5 -i https://pypi.tuna.tsinghua.edu.cn/simple
pip install PyYAML -i https://pypi.tuna.tsinghua.edu.cn/simple
pip install tensorboard -i https://pypi.tuna.tsinghua.edu.cn/simple
pip install scipy -i https://pypi.tuna.tsinghua.edu.cn/simple
pip install calflops -i https://pypi.tuna.tsinghua.edu.cn/simple
pip install transformers -i https://pypi.tuna.tsinghua.edu.cn/simple
pip install onnxsim==0.4.36 -i https://pypi.tuna.tsinghua.edu.cn/simple
pip install onnxruntime-gpu==1.18.0 -i https://pypi.tuna.tsinghua.edu.cn/simple
pip install timm==1.0.7 thop efficientnet_pytorch==0.7.1 einops grad-cam==1.4.8 dill==0.3.6 albumentations pytorch_wavelets==1.3.0  PyWavelets -i https://pypi.tuna.tsinghua.edu.cn/simple
pip install -U openmim -i https://pypi.tuna.tsinghua.edu.cn/simple
mim install mmengine -i https://pypi.tuna.tsinghua.edu.cn/simple
pip install mmcv==2.2.0 -f https://download.openmmlab.com/mmcv/dist/cu121/torch2.3/index.html
三、准备自己的数据集和配置自己数据集步骤
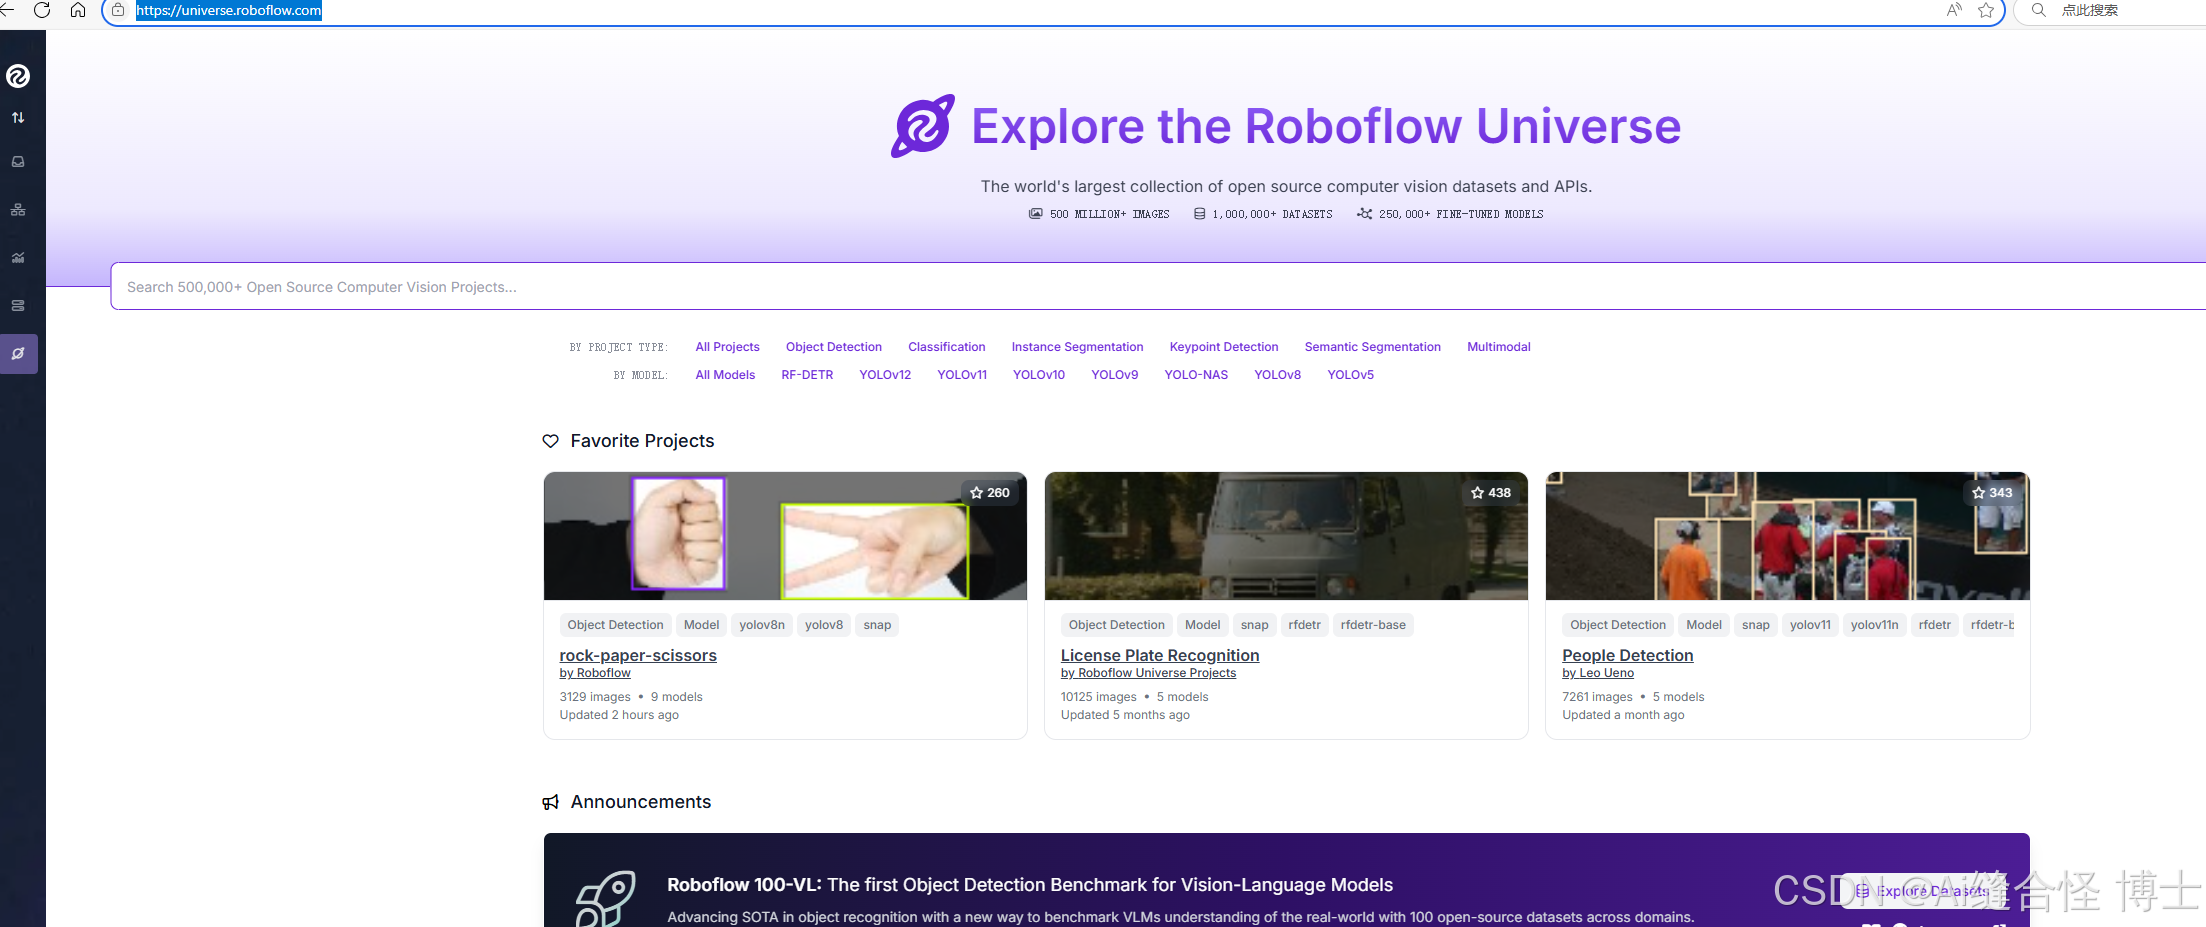
如果自己没有数据集,可以去这个官网上找公共数据集去练习:Roboflow Datasets
3.1 本文以训练Visdrone2019无人机数据集为例
VisDrone数据集是由天津大学等团队开源的一个大型无人机视角的数据集,官方提供的数据中训练集是6471、验证集是548、测试集1610张。数据集共提供了以下12个类,分别是:‘忽略区域’, ‘pedestrian’, ‘people’, ‘bicycle’, ‘car’, ‘van’,‘truck’, ‘tricycle’, ‘awning-tricycle’, ‘bus’, ‘motor’, ‘others’,其中忽略区域、others是非有效目标区域,本项目中予以忽略,只使用’pedestrian’, ‘people’, ‘bicycle’, ‘car’, ‘van’,‘truck’, ‘tricycle’, ‘awning-tricycle’, ‘bus’, 'motor’10个类。
Visdrone2019-COCO格式数据集下载链接:https://aistudio.baidu.com/datasetdetail/226107/0
Visdrone2019-YOLO格式数据集下载链接:https://aistudio.baidu.com/datasetdetail/295374
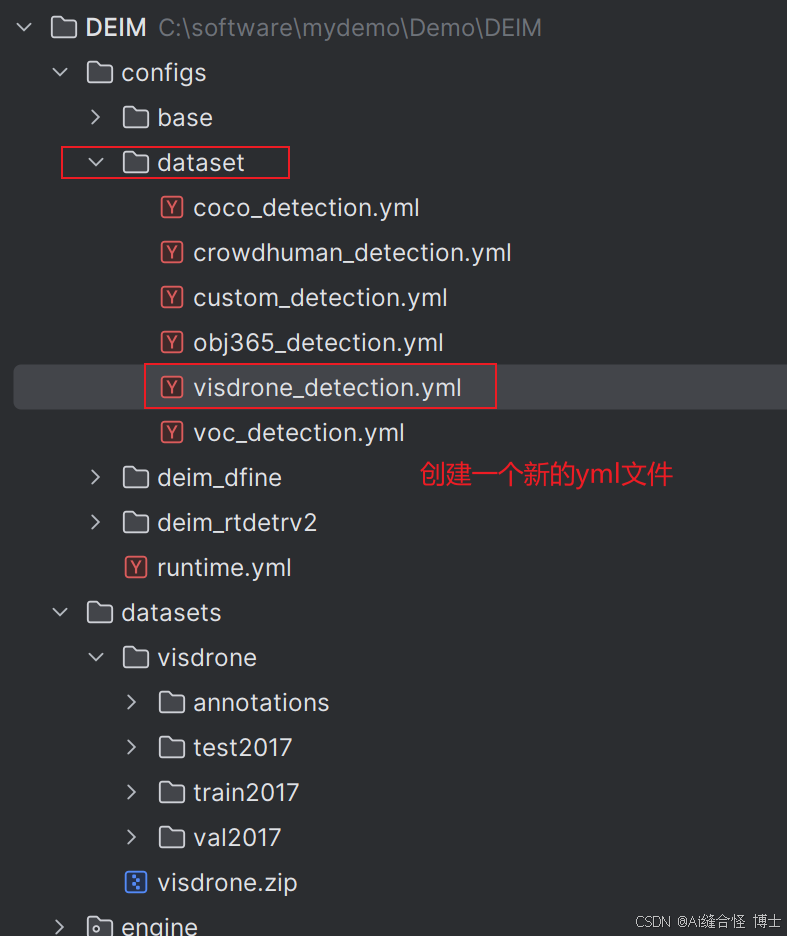
3.2 将自己数据集放到datasets文件夹里
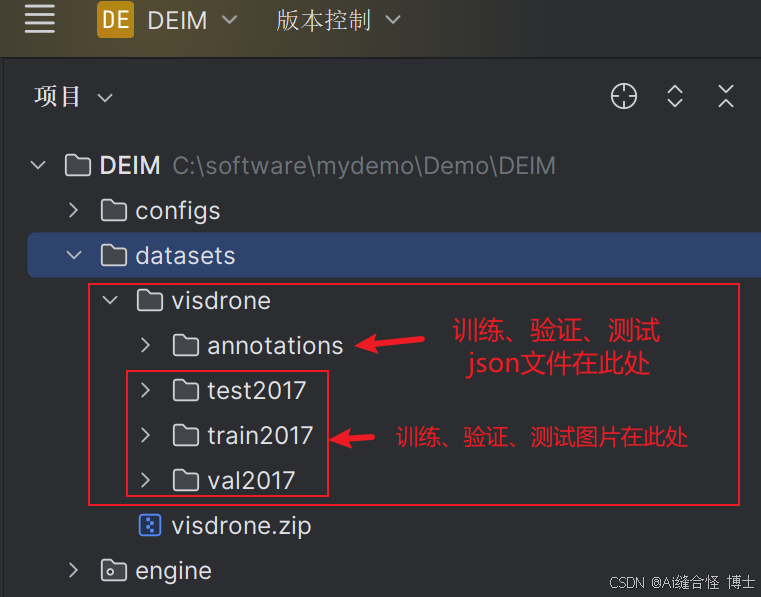
3.3 配置数据步骤
第一步:在DEIM/configs/dataset文件中创建visdrone_detection.yml文件
第二步:修改visdrone_detection.yml文件

完整visdrone_detection.yml文件的代码:
task: detection

evaluator:
  type: CocoEvaluator
  iou_types: ['bbox', ]

num_classes: 10 # your dataset classes
remap_mscoco_category: False

train_dataloader:
  type: DataLoader
  dataset:
    type: CocoDetection
    img_folder: C:/software/mydemo/Demo/DEIM/datasets/visdrone/train2017
    ann_file: C:/software/mydemo/Demo/DEIM/datasets/visdrone/annotations/instances_train2017.json
    return_masks: False
    transforms:
      type: Compose
      ops: ~
  shuffle: True
  num_workers: 4
  drop_last: True
  collate_fn:
    type: BatchImageCollateFunction


val_dataloader:
  type: DataLoader
  dataset:
    type: CocoDetection
    img_folder: C:/software/mydemo/Demo/DEIM/datasets/visdrone/val2017
    ann_file: C:/software/mydemo/Demo/DEIM/datasets/visdrone/annotations/instances_val2017.json
    return_masks: False
    transforms:
      type: Compose
      ops: ~
  shuffle: False
  num_workers: 4
  drop_last: False
  collate_fn:
    type: BatchImageCollateFunction
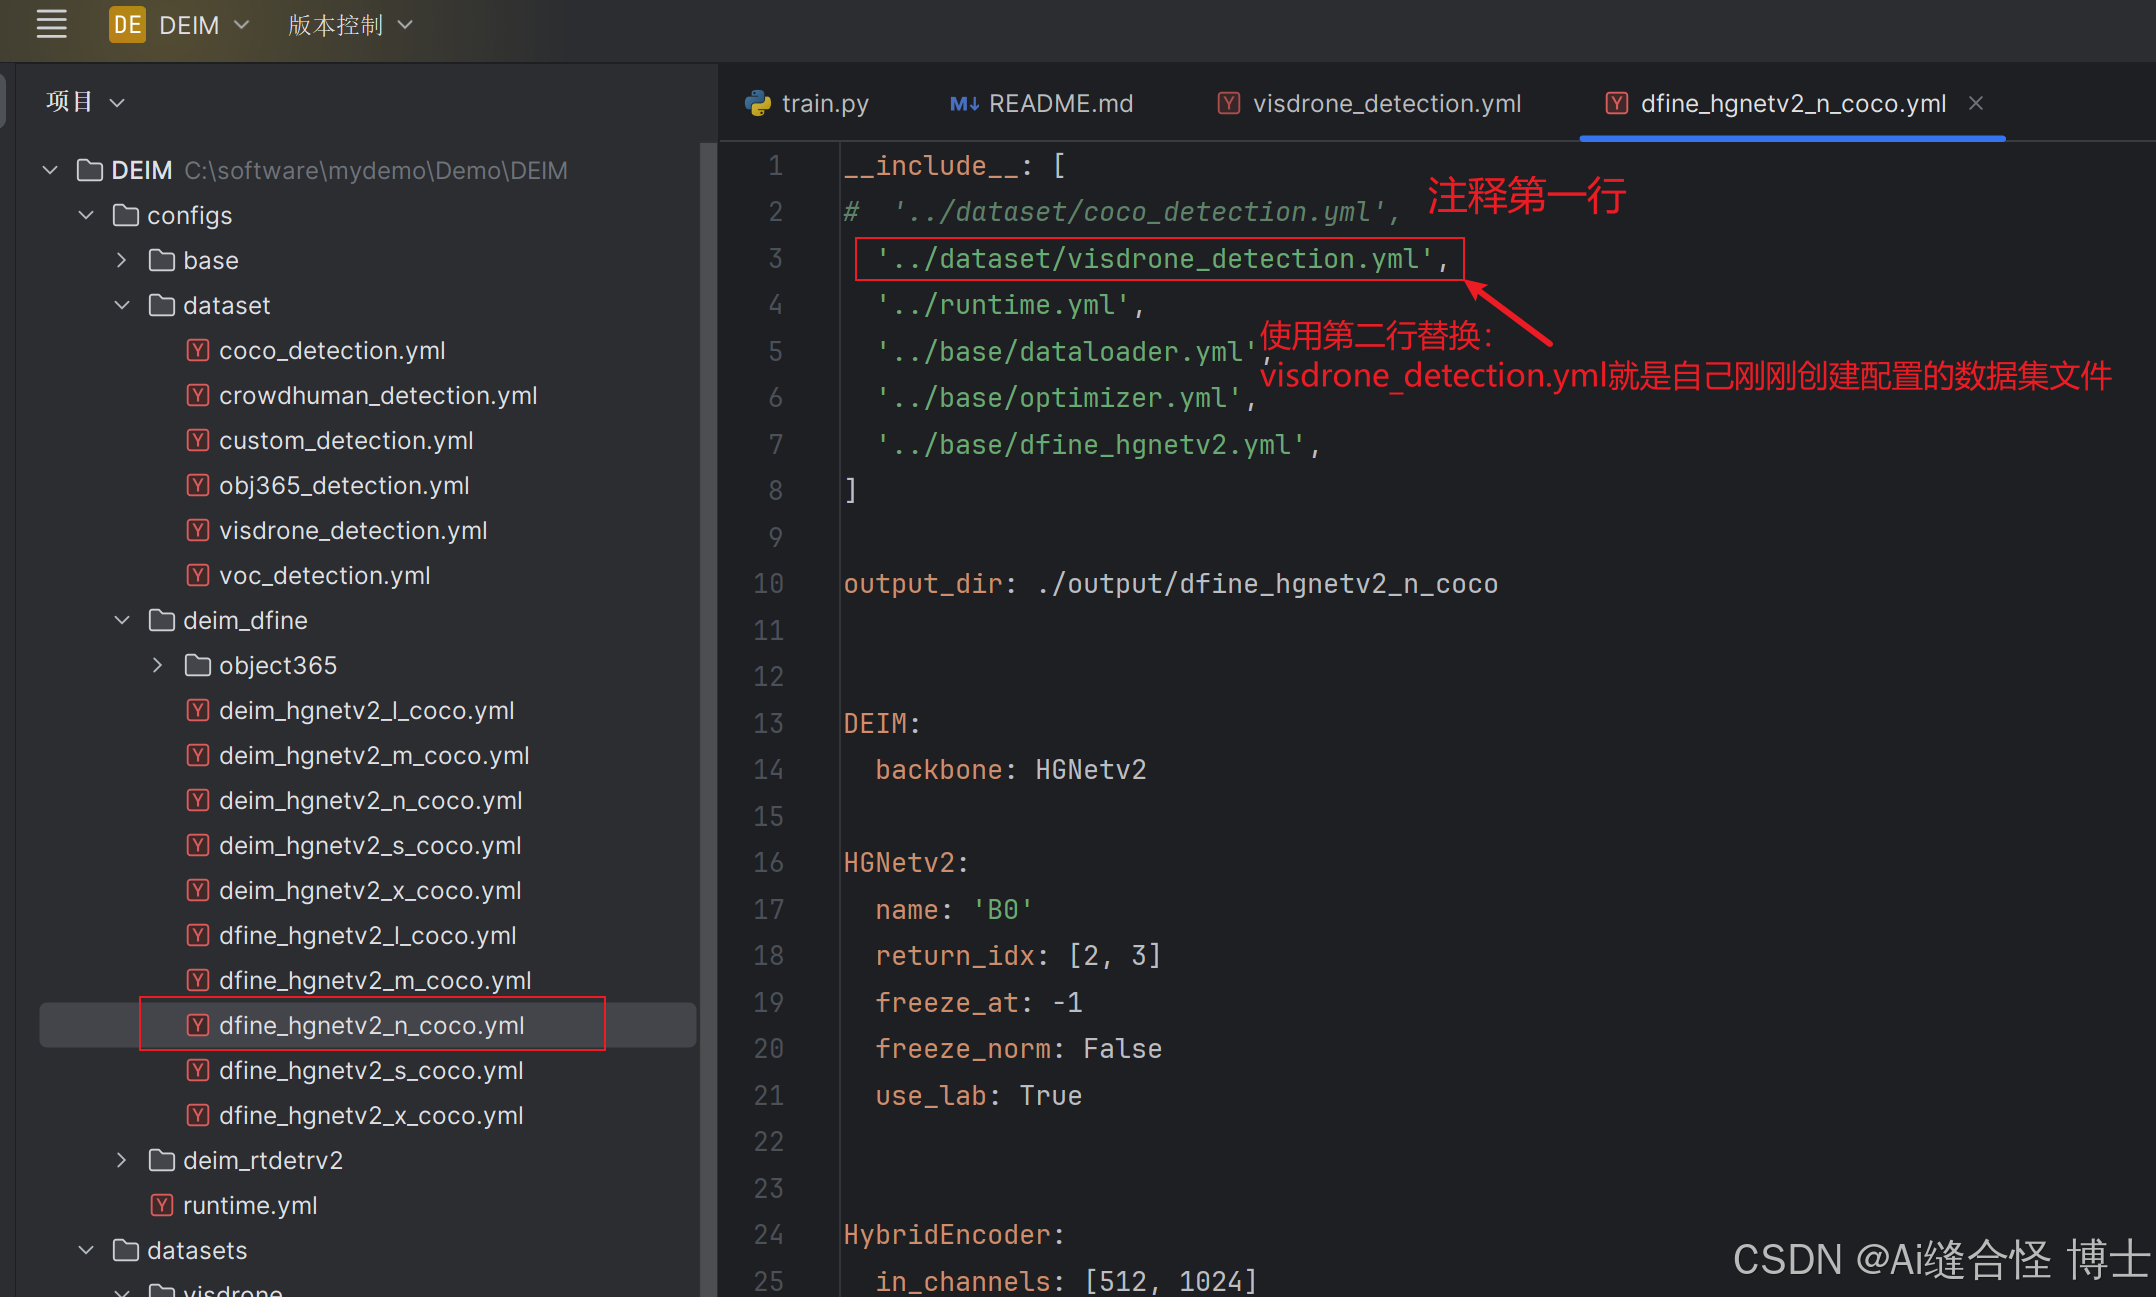
第三步:修改DEIM\configs\deim_dfine\dfine_hgnetv2_n_coco.yml文件
我们跑deim_hgnetv2_n_coco.yml为例子,所以我们就修改dfine_hgnetv2_n_coco.yml文件!
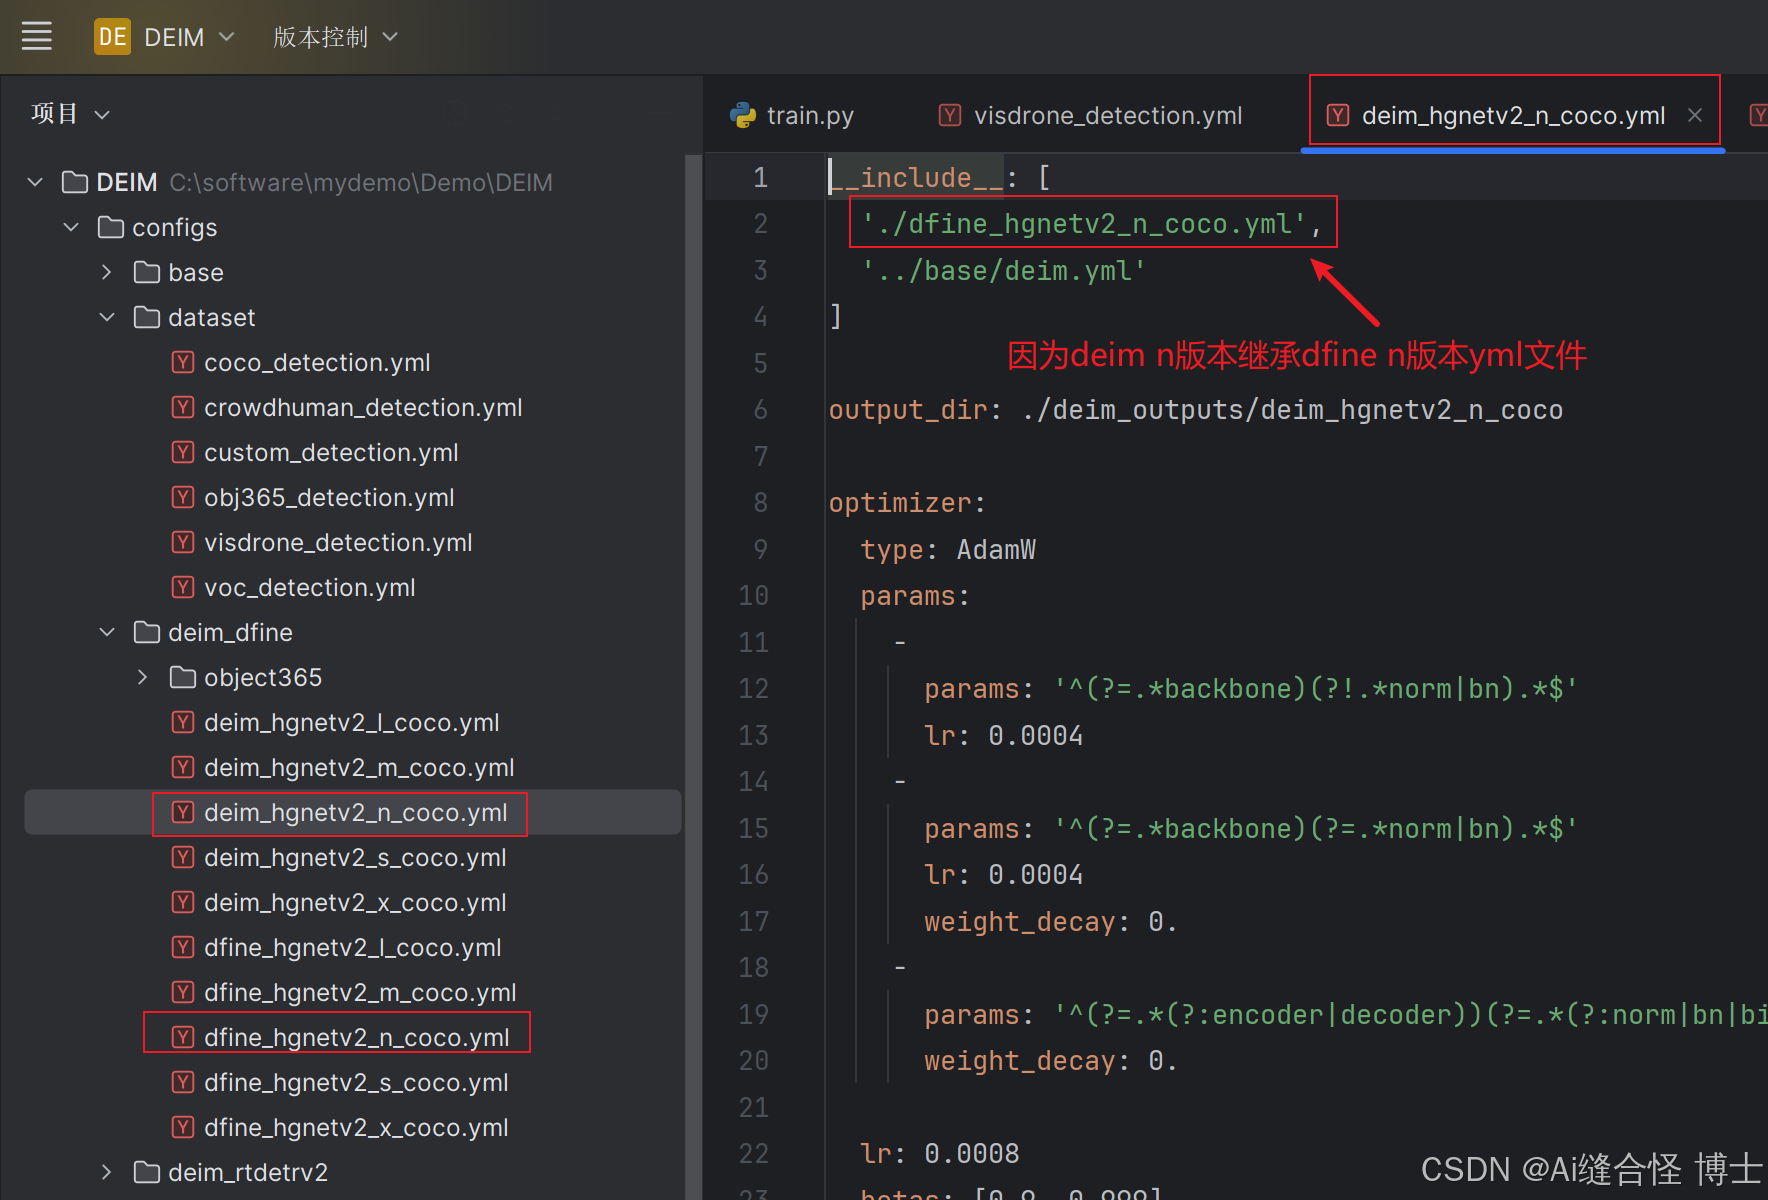
接下来只需要修改dfine_hgnetv2_n_coco.yml文件中的一行代码即可1
__include__: [
#  '../dataset/coco_detection.yml',
  '../dataset/visdrone_detection.yml',
  '../runtime.yml',
  '../base/dataloader.yml',
  '../base/optimizer.yml',
  '../base/dfine_hgnetv2.yml',
]
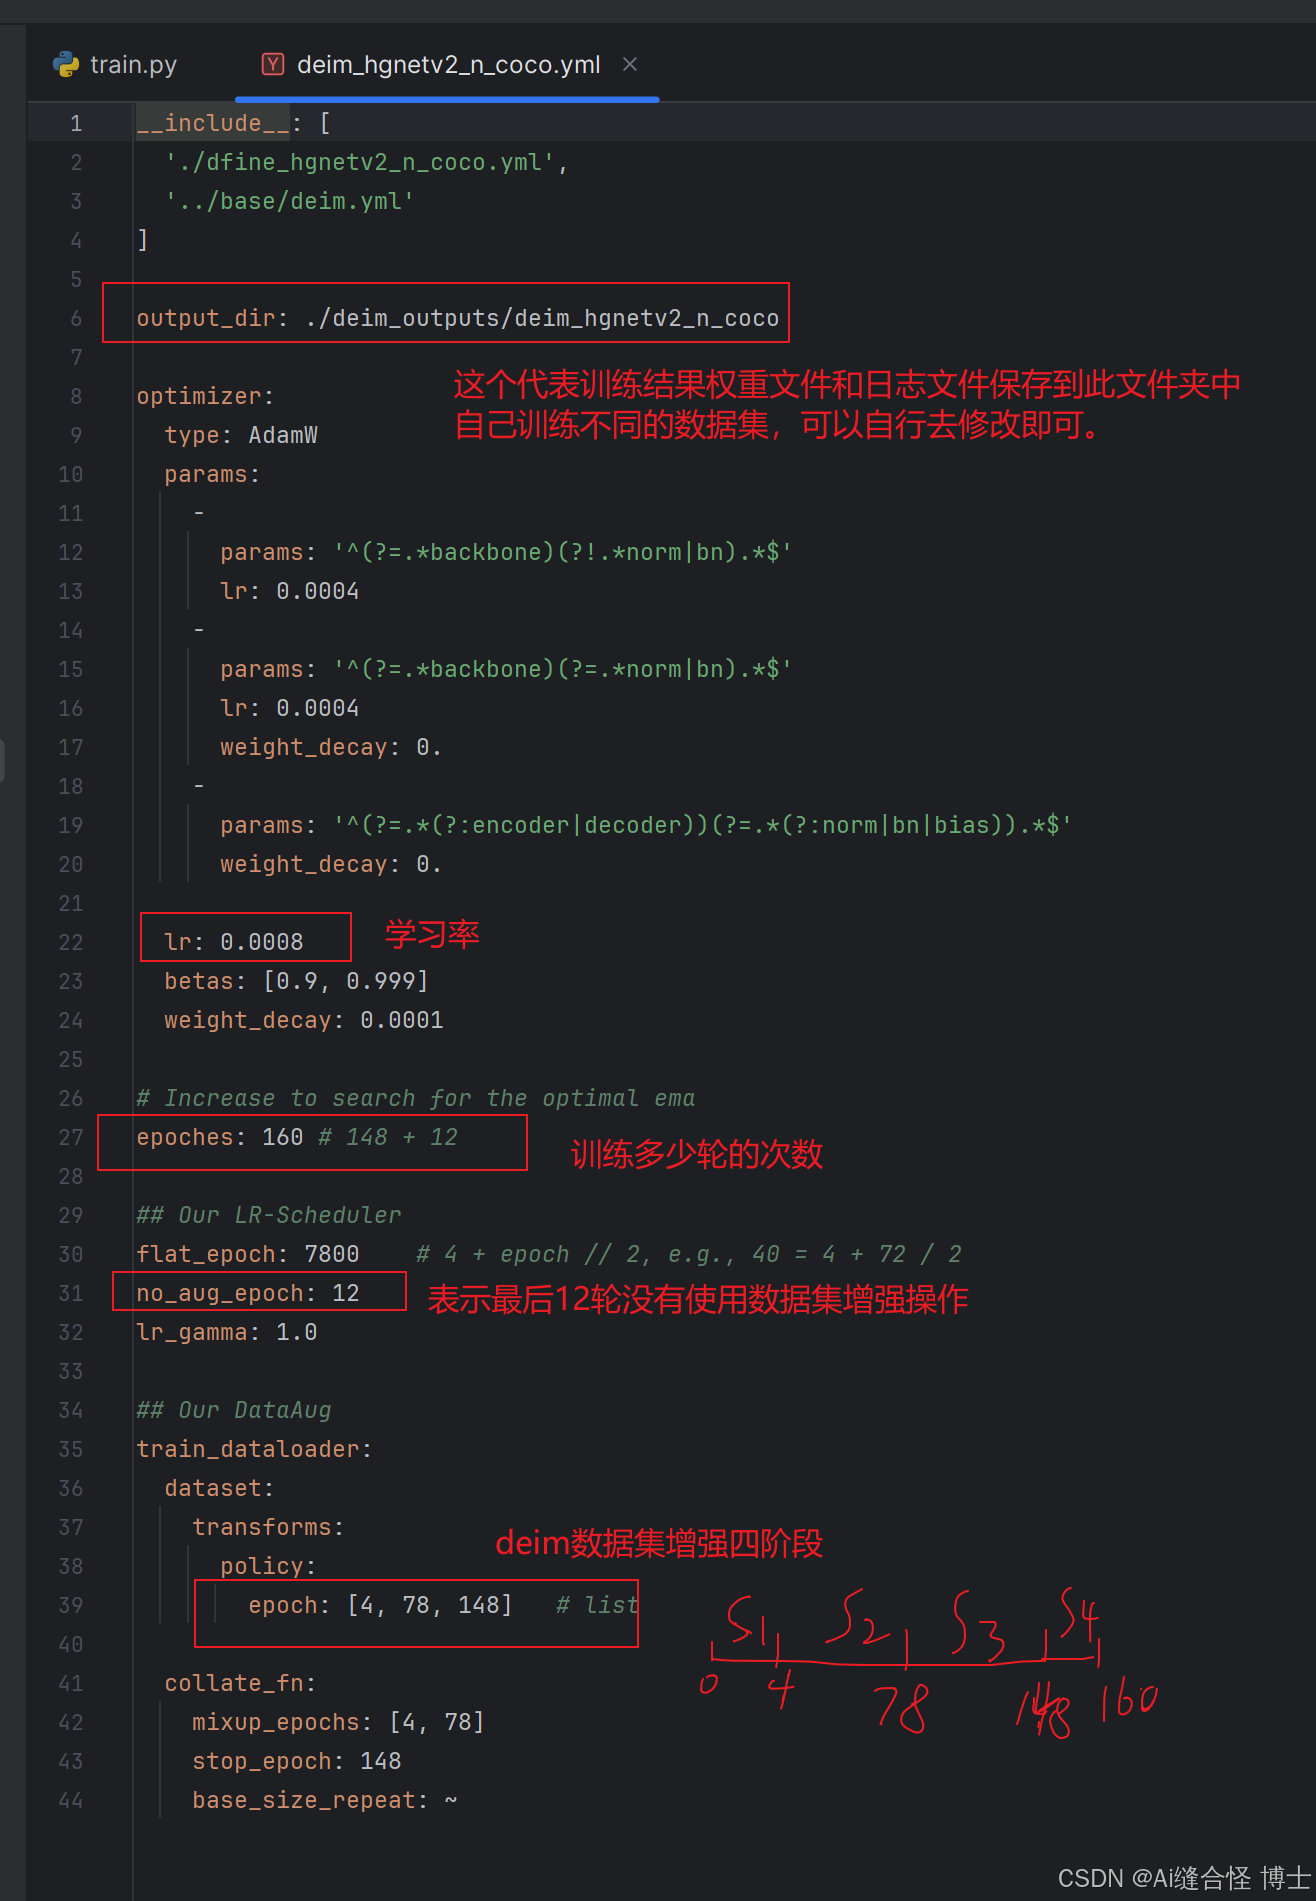
第四步:修改deim_hgnetv2_n_coco.yml文件
当自己使用不同数据集训练,保存结果文件夹需要重新创建一下,否则第二次训练后的结果权重文件会覆盖第一次训练后的权重文件。
第四步:训练前,记得修改batch_size大小,根据自己设备显存大小去灵活设置。
修改configs/base/dataloader.yml中的total_batch_size

同时也修改DEIM\configs\deim_dfine\dfine_hgnetv2_n_coco.yml中的total_batch_size

第五步:修改DEIM\configs\runtime.yml文件中的参数,方便观察
checkpoint_freq: 1

到此为止,配置自己的数据集操作已经完成!
四、使用DEIM训练自己的数据集
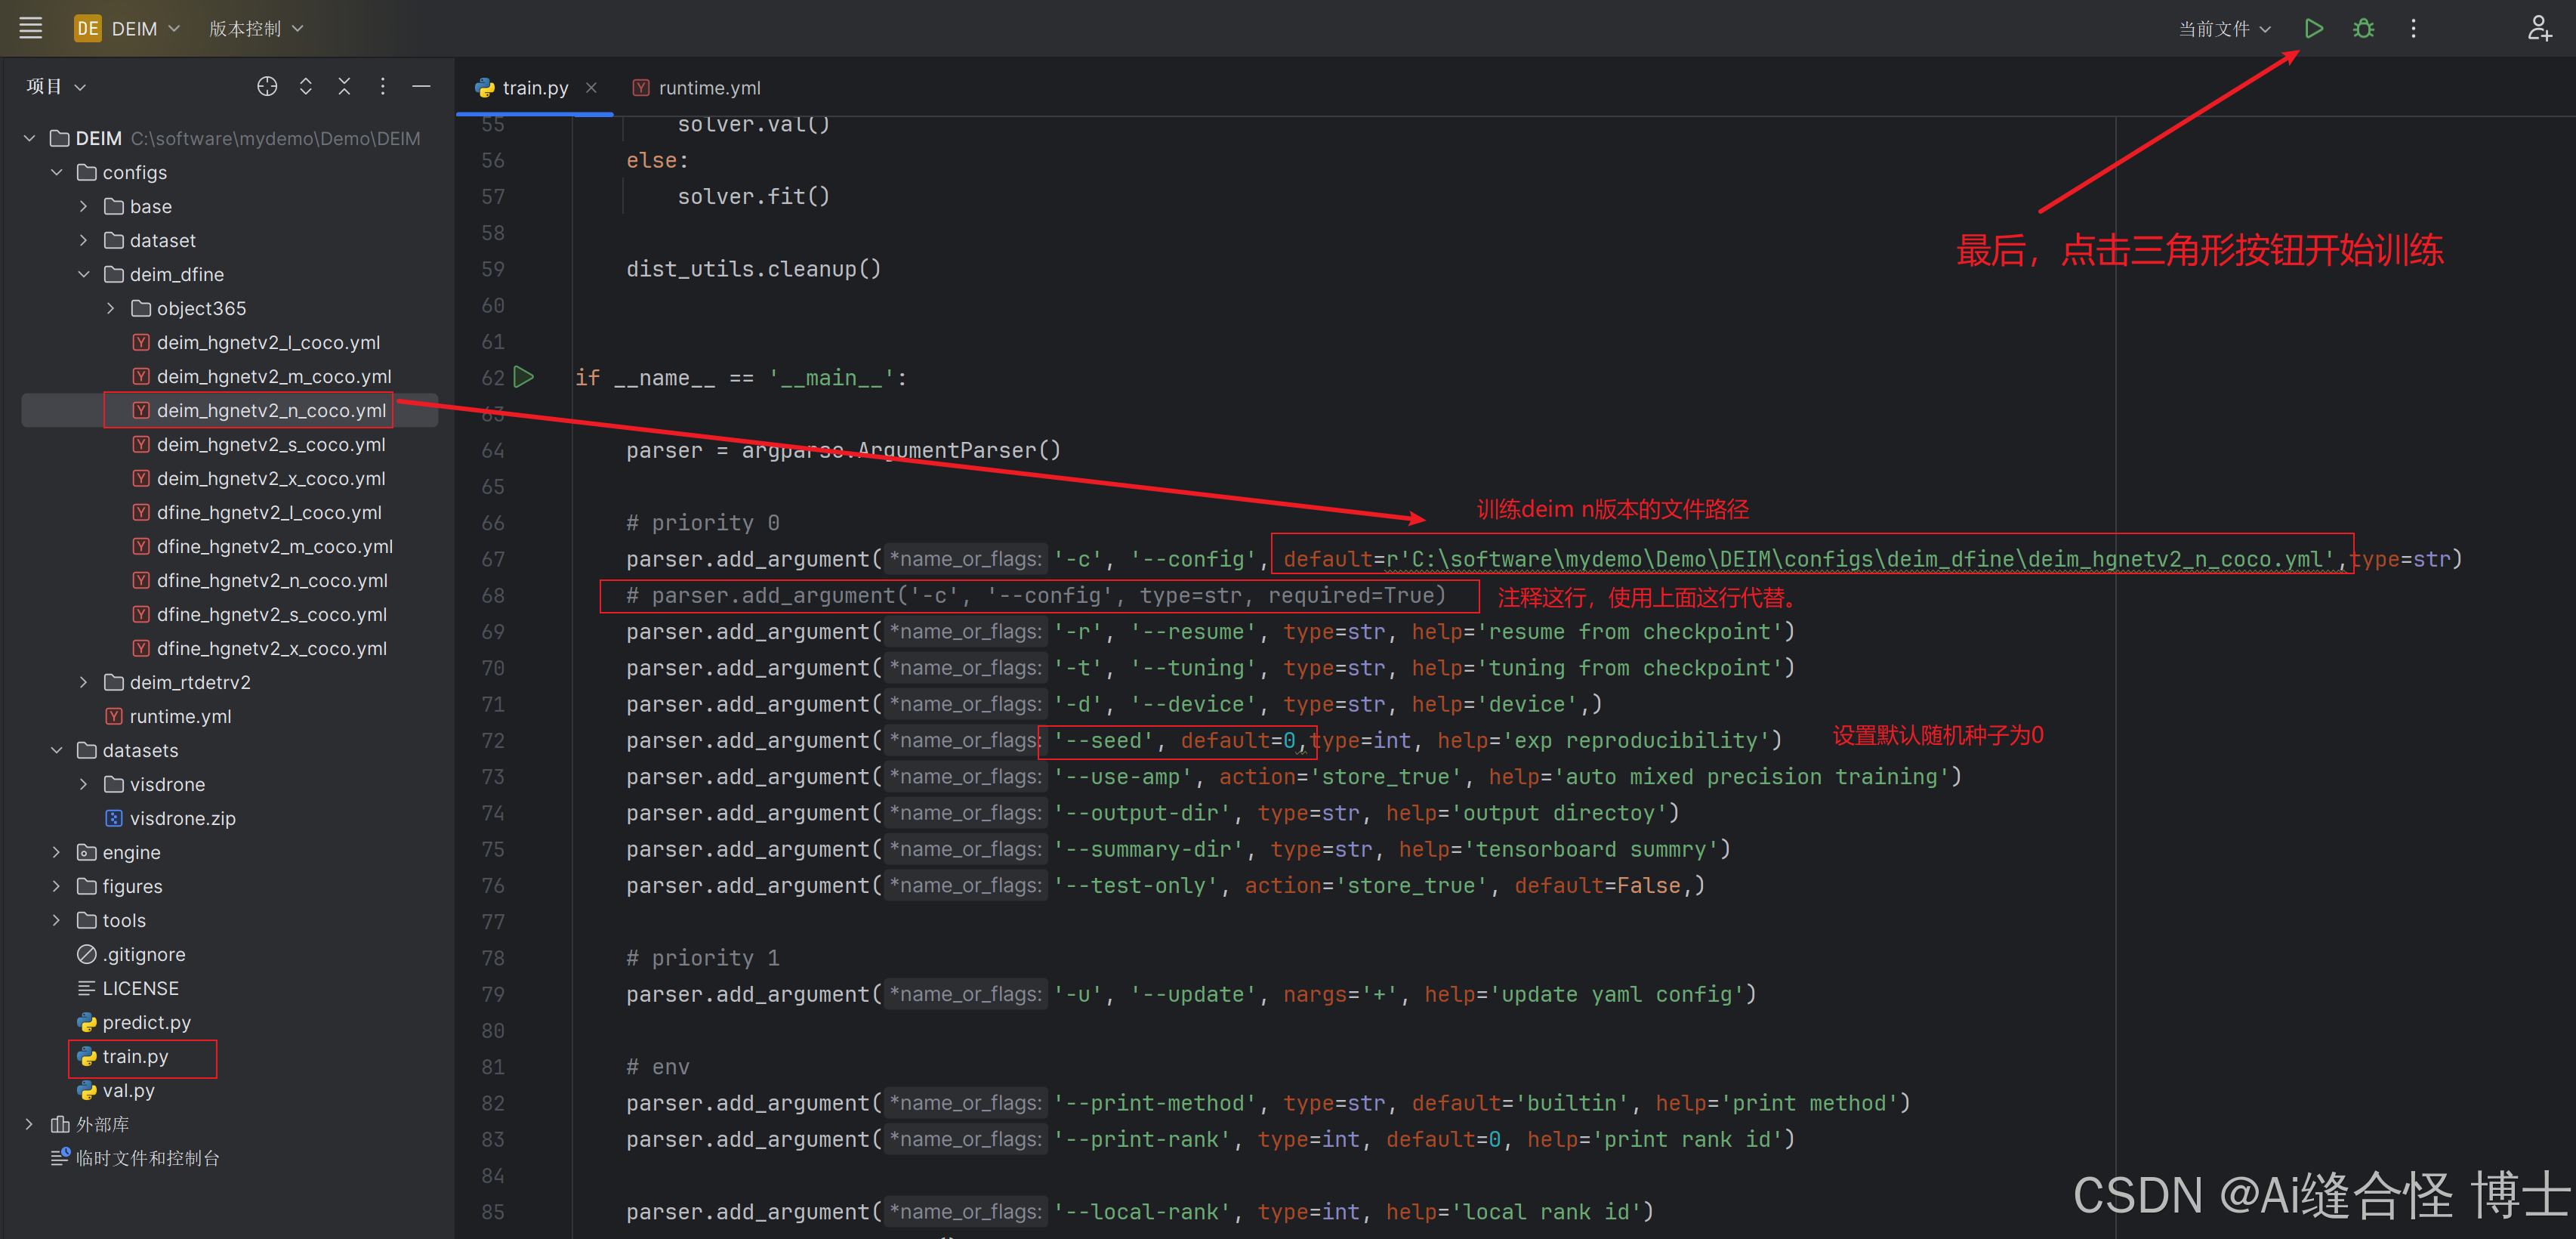
4.1 训练前先修改一下train.py训练脚步里的参数
4.2 train.py脚本代码完整代码
"""
DEIM: DETR with Improved Matching for Fast Convergence
Copyright (c) 2024 The DEIM Authors. All Rights Reserved.
---------------------------------------------------------------------------------
Modified from RT-DETR (https://github.com/lyuwenyu/RT-DETR)
Copyright (c) 2023 lyuwenyu. All Rights Reserved.
"""
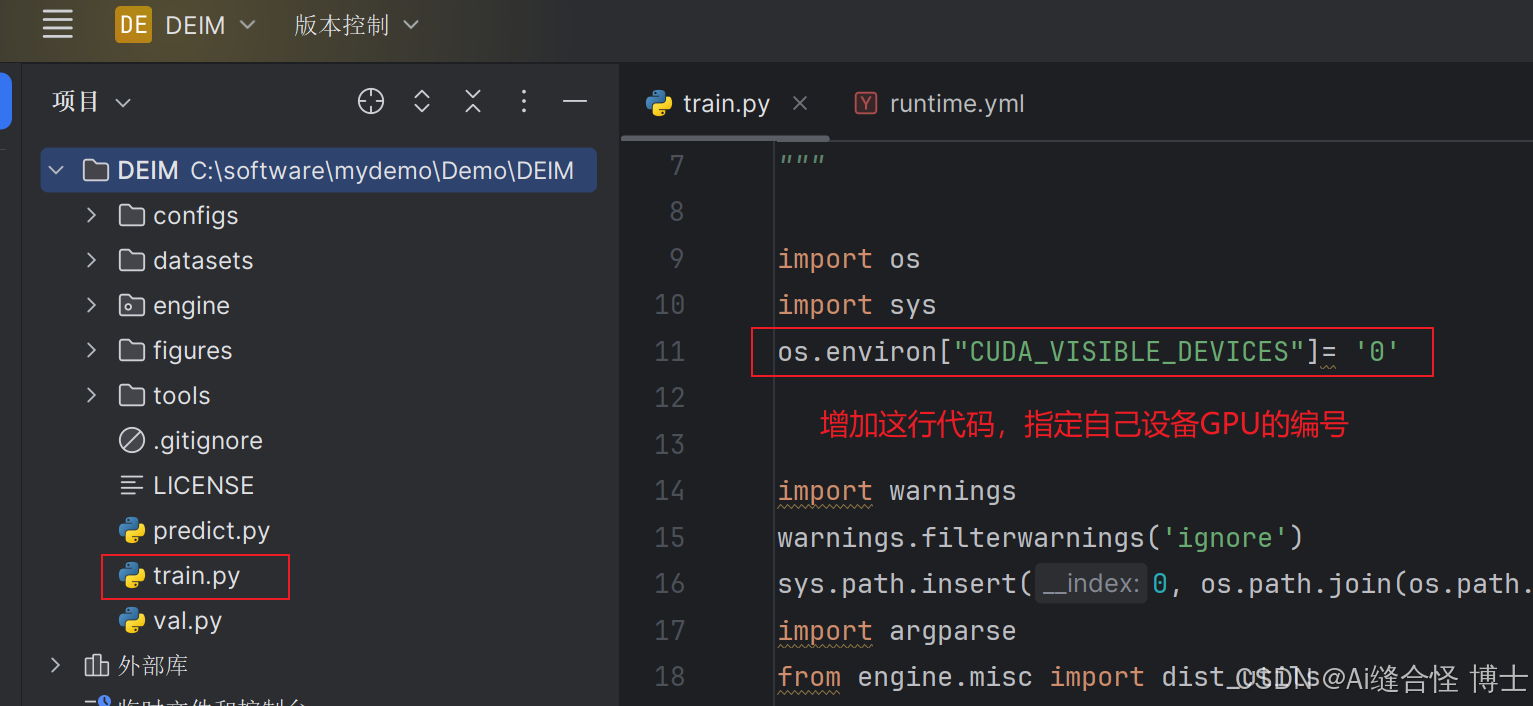
import os
import sys
os.environ["CUDA_VISIBLE_DEVICES"]= '0'
import warnings
warnings.filterwarnings('ignore')
sys.path.insert(0, os.path.join(os.path.dirname(os.path.abspath(__file__)), '..'))
import argparse
from engine.misc import dist_utils
from engine.core import YAMLConfig, yaml_utils
from engine.solver import TASKS
debug=False
if debug:
import torch
def custom_repr(self):
return f'{{Tensor:{tuple(self.shape)}}} {original_repr(self)}'
original_repr = torch.Tensor.__repr__
torch.Tensor.__repr__ = custom_repr
def main(args, ) -> None:
"""main
"""
dist_utils.setup_distributed(args.print_rank, args.print_method, seed=args.seed)
assert not all([args.tuning, args.resume]), \
'Only support from_scrach or resume or tuning at one time'
update_dict = yaml_utils.parse_cli(args.update)
update_dict.update({k: v for k, v in args.__dict__.items() \
if k not in ['update', ] and v is not None})
cfg = YAMLConfig(args.config, **update_dict)
if args.resume or args.tuning:
if 'HGNetv2' in cfg.yaml_cfg:
cfg.yaml_cfg['HGNetv2']['pretrained'] = False
print('cfg: ', cfg.__dict__)
solver = TASKS[cfg.yaml_cfg['task']](cfg)
if args.test_only:
solver.val()
else:
solver.fit()
dist_utils.cleanup()
if __name__ == '__main__':
parser = argparse.ArgumentParser()
# priority 0
parser.add_argument('-c', '--config', default=r'C:\software\mydemo\Demo\DEIM\configs\deim_dfine\deim_hgnetv2_n_coco.yml',type=str)
# parser.add_argument('-c', '--config', type=str, required=True)
parser.add_argument('-r', '--resume', type=str, help='resume from checkpoint')
parser.add_argument('-t', '--tuning', type=str, help='tuning from checkpoint')
parser.add_argument('-d', '--device', type=str, help='device',)
parser.add_argument('--seed', default=0,type=int, help='exp reproducibility')
parser.add_argument('--use-amp', action='store_true', help='auto mixed precision training')
parser.add_argument('--output-dir', type=str, help='output directoy')
parser.add_argument('--summary-dir', type=str, help='tensorboard summry')
parser.add_argument('--test-only', action='store_true', default=False,)
# priority 1
parser.add_argument('-u', '--update', nargs='+', help='update yaml config')
# env
parser.add_argument('--print-method', type=str, default='builtin', help='print method')
parser.add_argument('--print-rank', type=int, default=0, help='print rank id')
parser.add_argument('--local-rank', type=int, help='local rank id')
args = parser.parse_args()
main(args)
4.3 windows系统上第一次训练,需要解决这个源码bug!
windows系统上第一次训练,100%会出现这个bug问题。怪导教你如何解决这个bug!
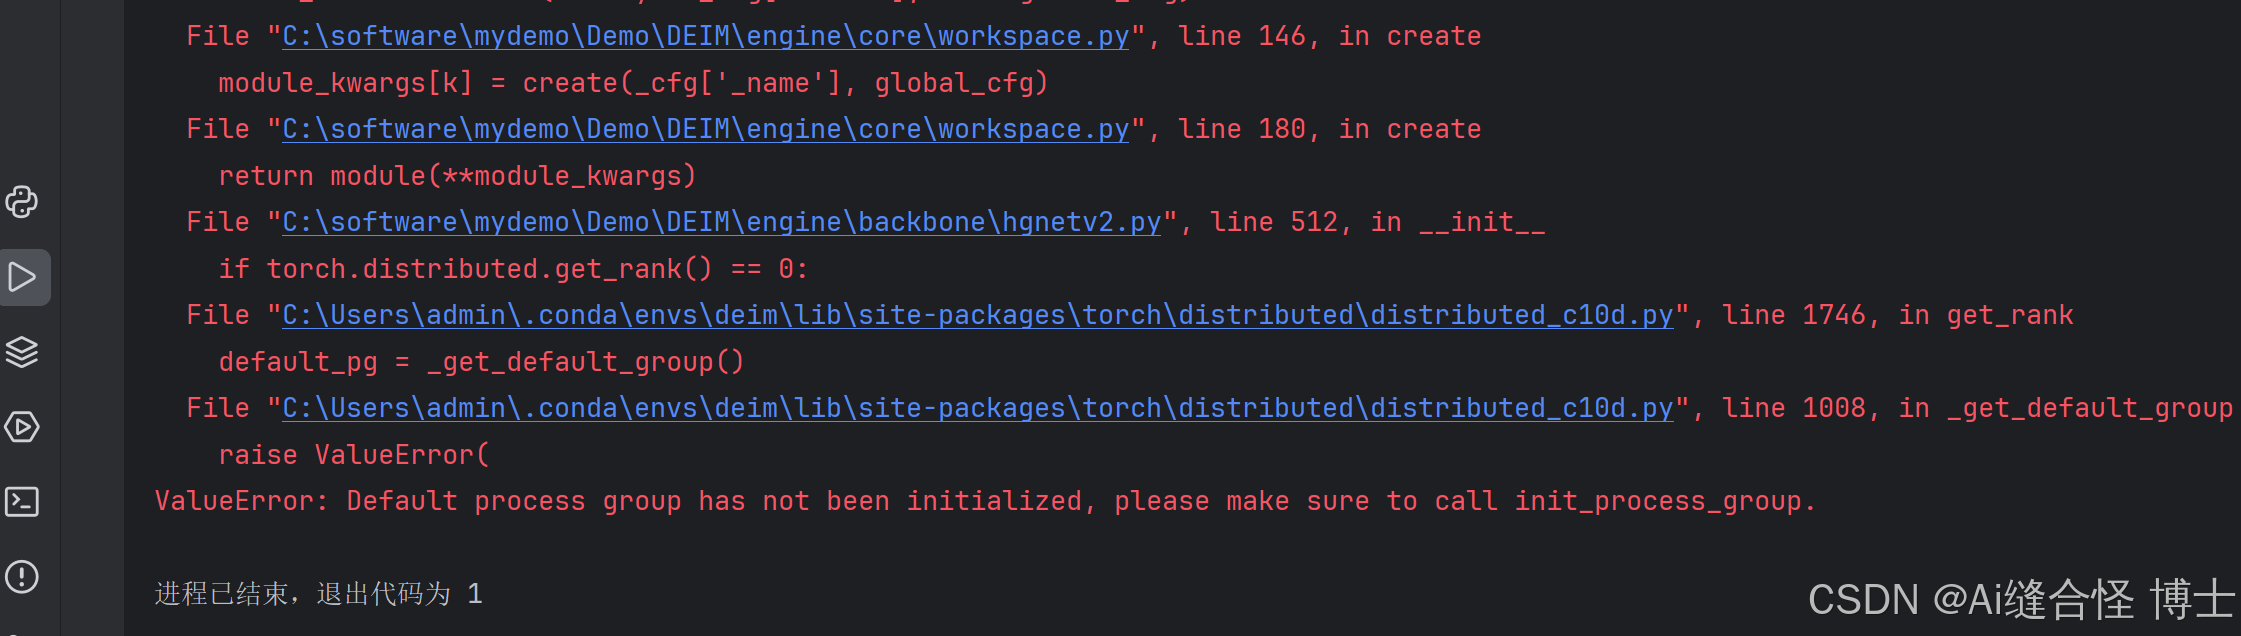
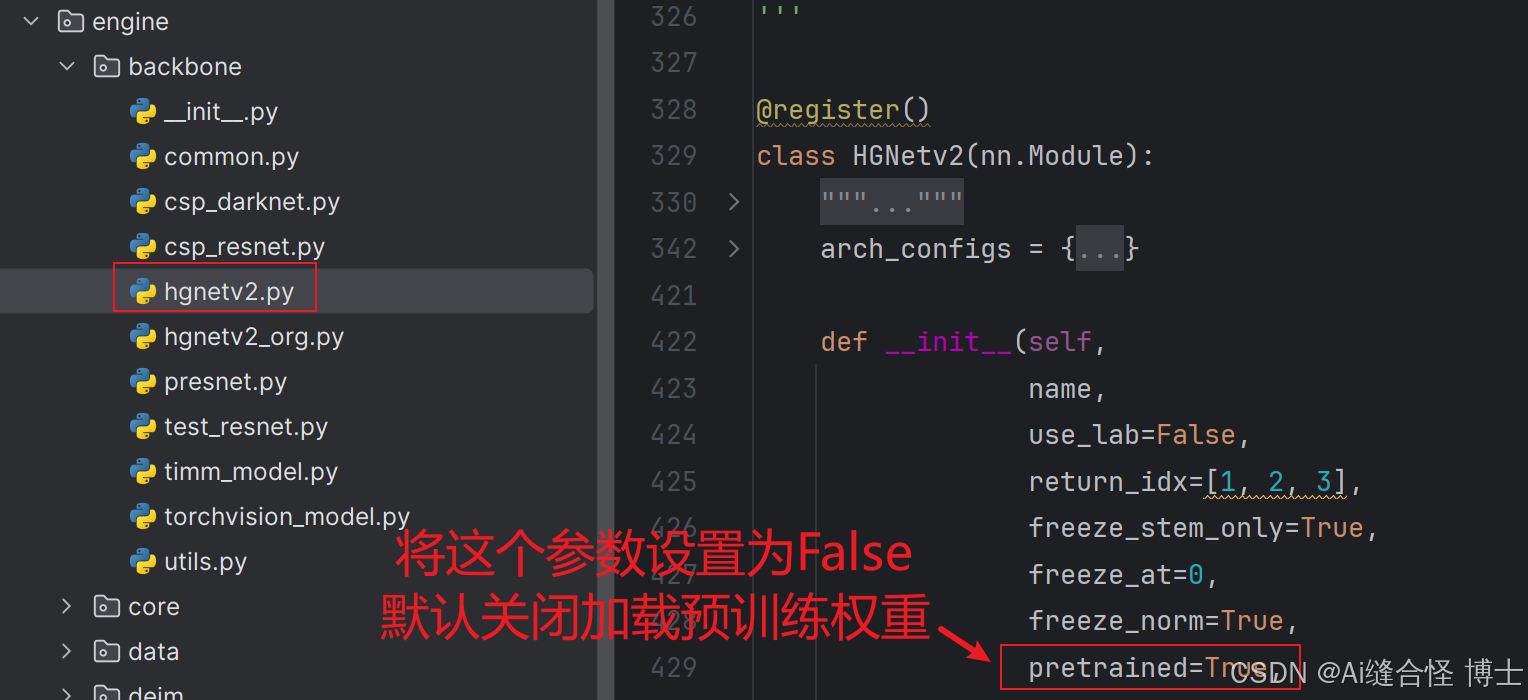
解决方法:修改这个文件DEIM\engine\backbone\hgnetv2.py
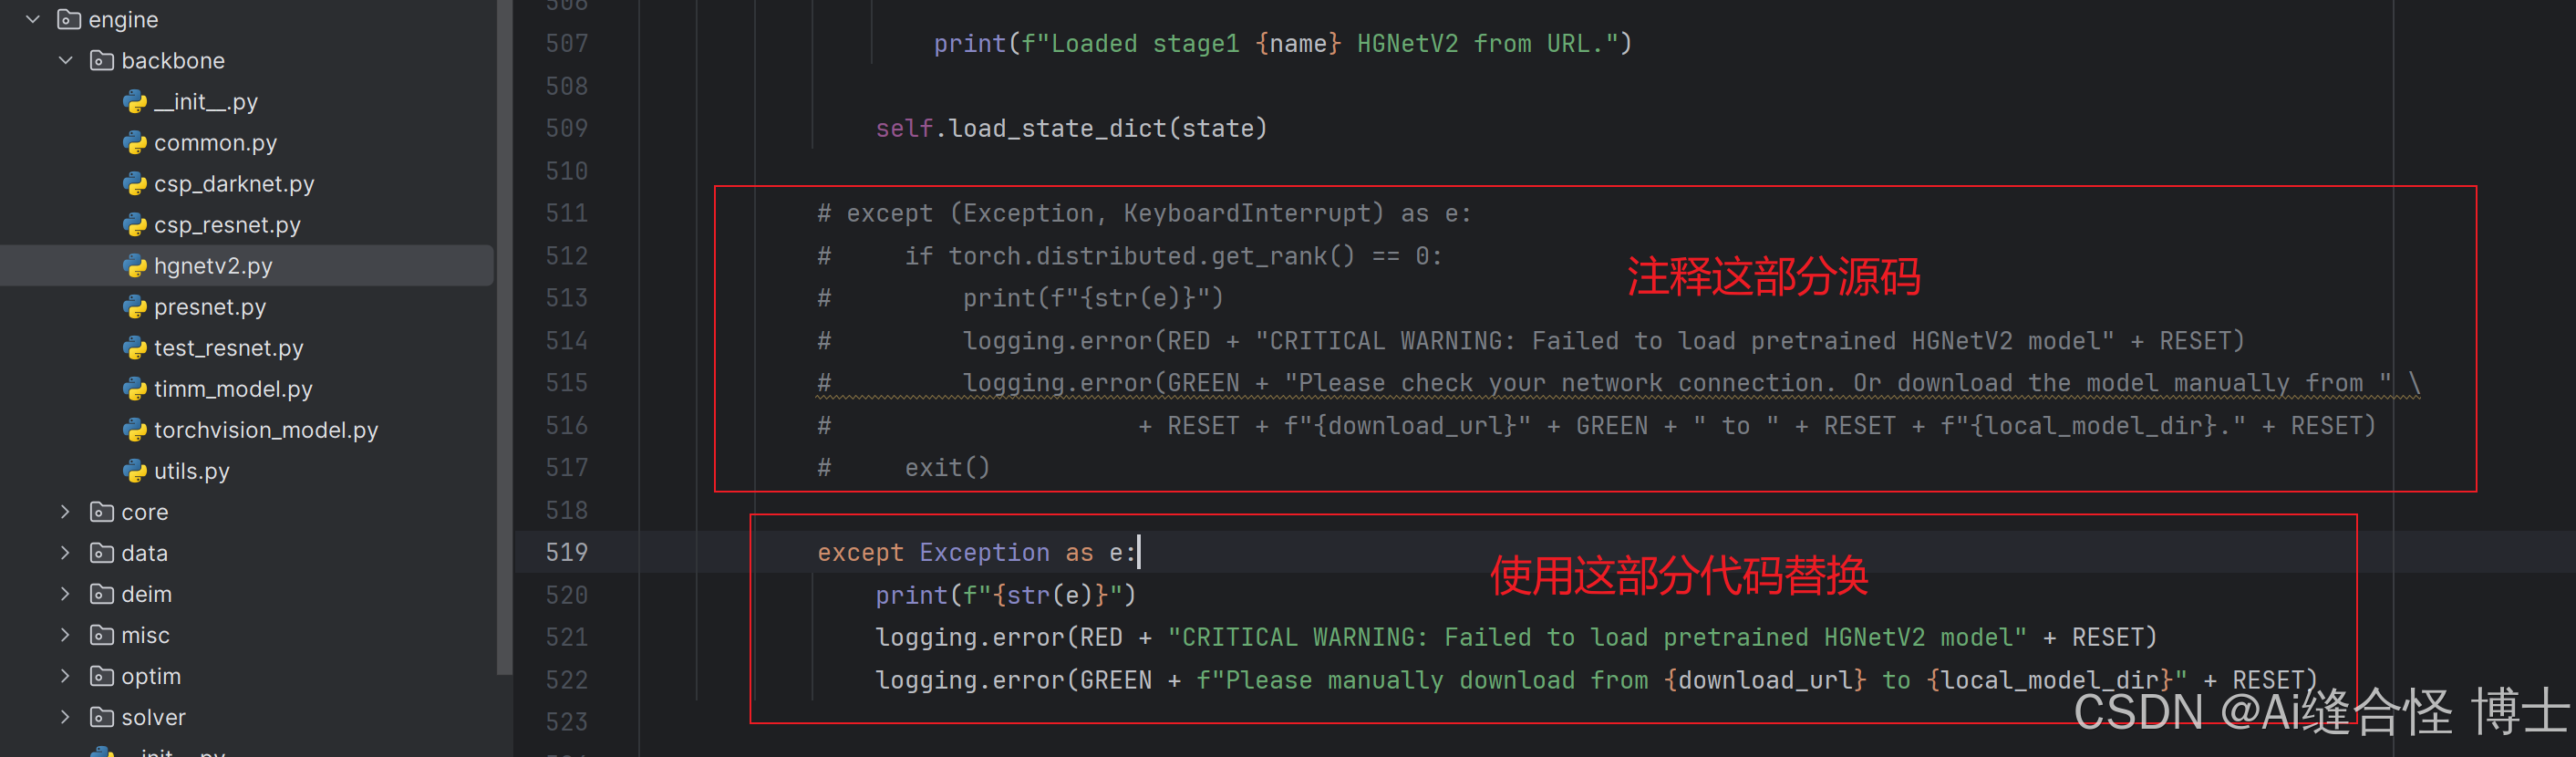
except Exception as e:
print(f"{str(e)}")
logging.error(RED + "CRITICAL WARNING: Failed to load pretrained HGNetV2 model" + RESET)
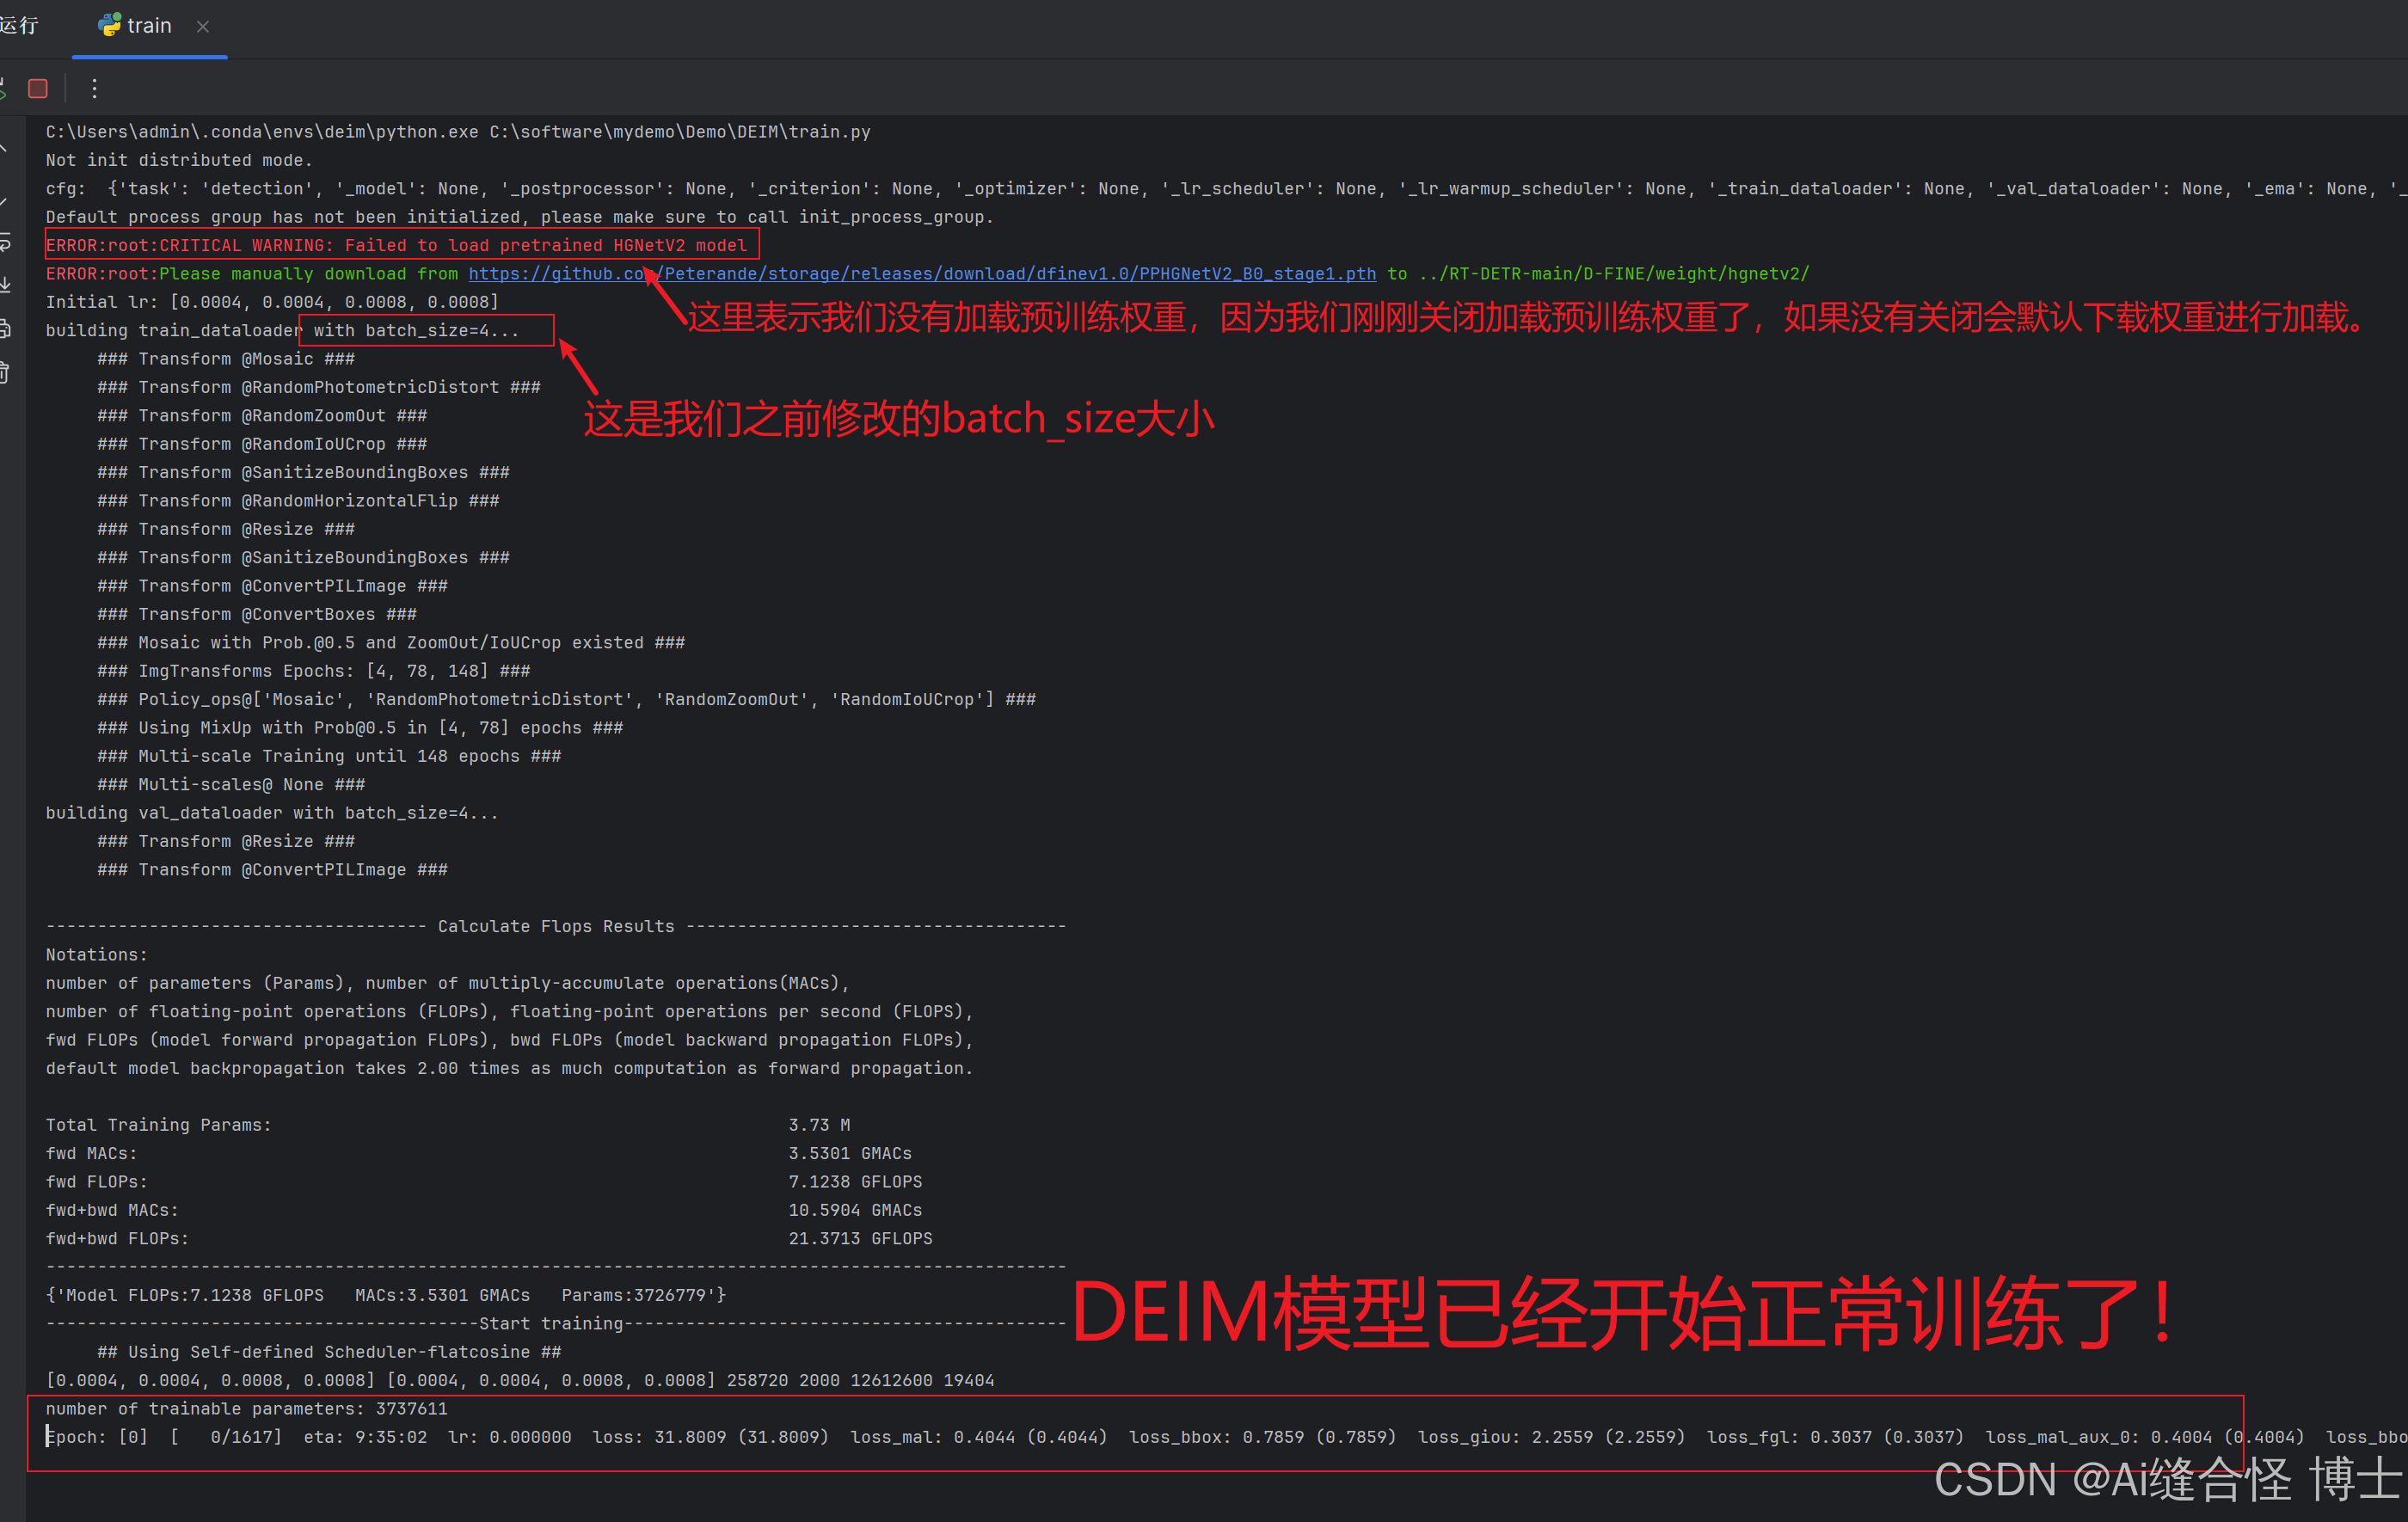
logging.error(GREEN + f"Please manually download from {download_url} to {local_model_dir}" + RESET)到此,现在可以正常训练使用DEIM官方模型了,助力大家高效去发小论文、完成毕业大论文!

第一次运行,默认是加载预训练权重,所以需要下载。(建议大家自己离线下载比较快,或是等它自动在线下载完,在线下载慢一些),在此处演示我关闭了加载预训练权重变量。
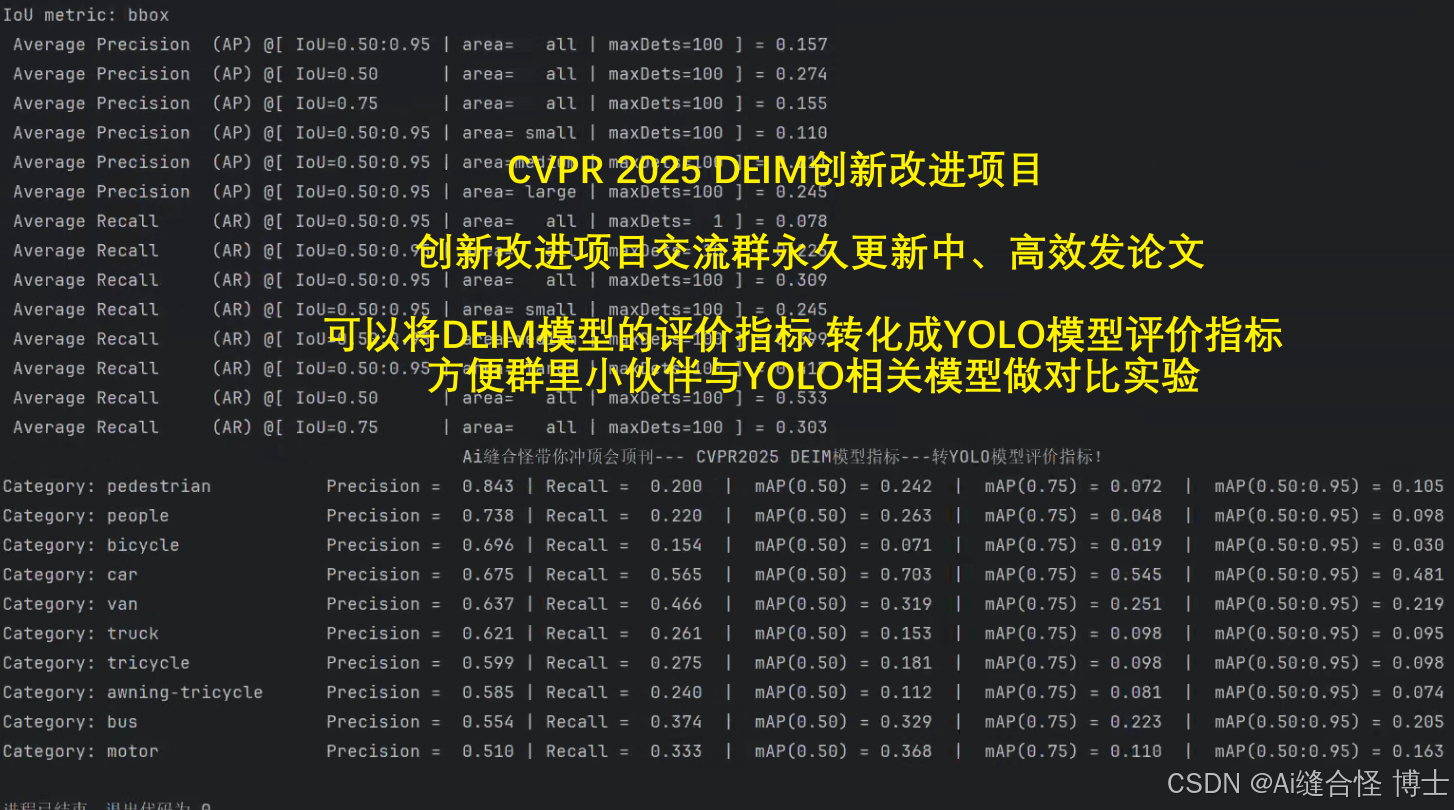
五、验证自己的模型效果
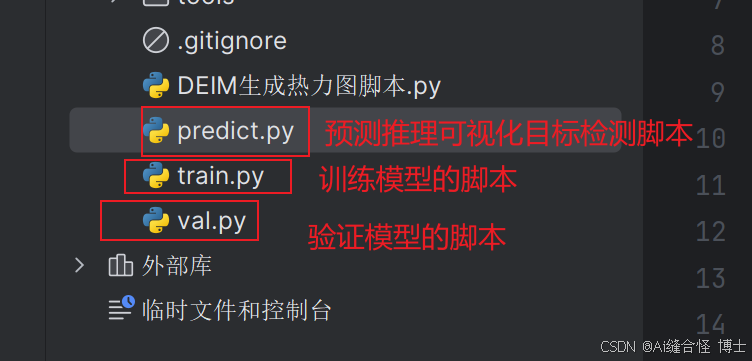
使用val.py脚本

DEIM训练部分epoch,给大家演示一下使用val.py在验证集或是测试集上的效果。
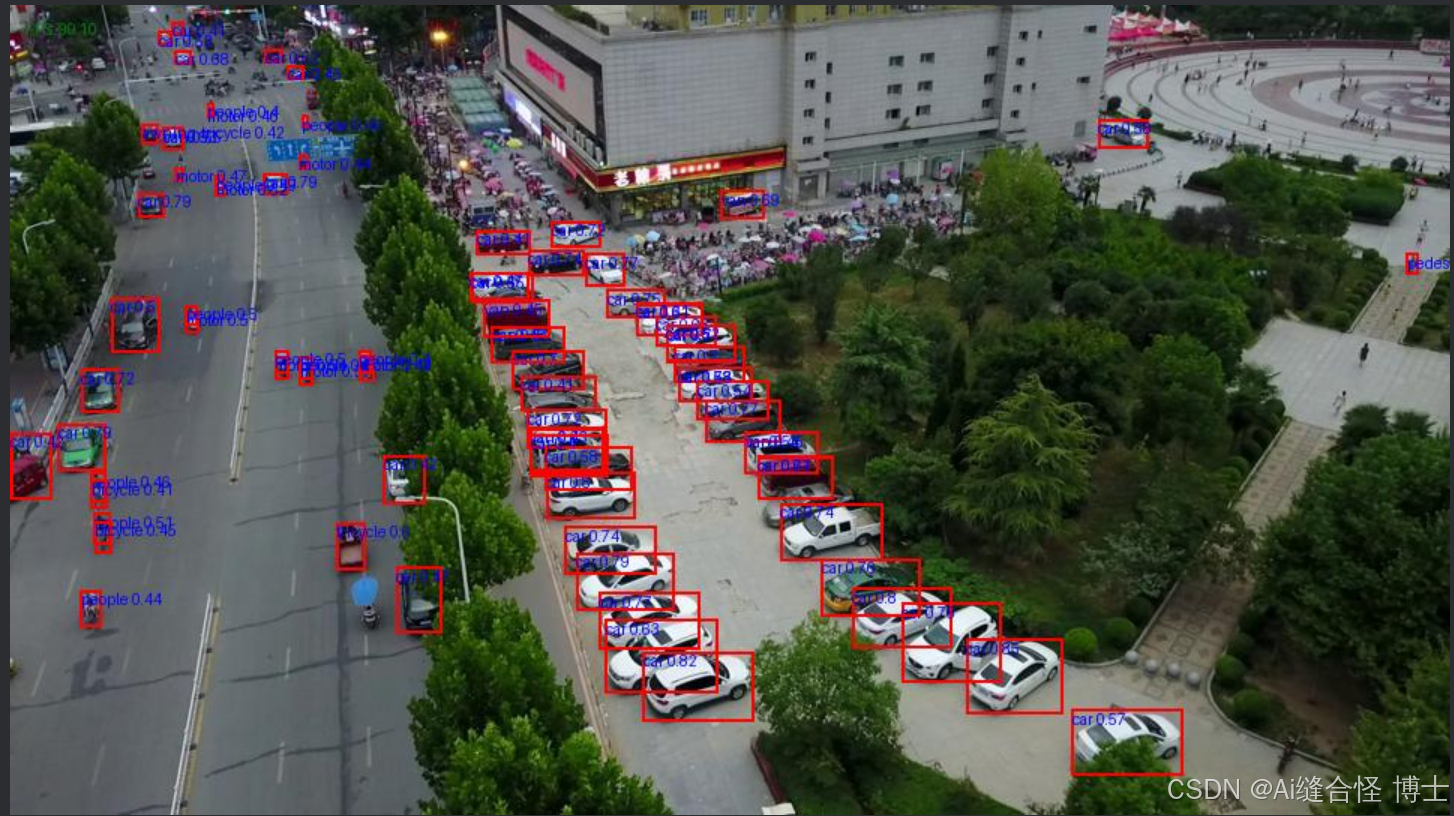
六、推理测试自己的模型
使用predict.py脚本
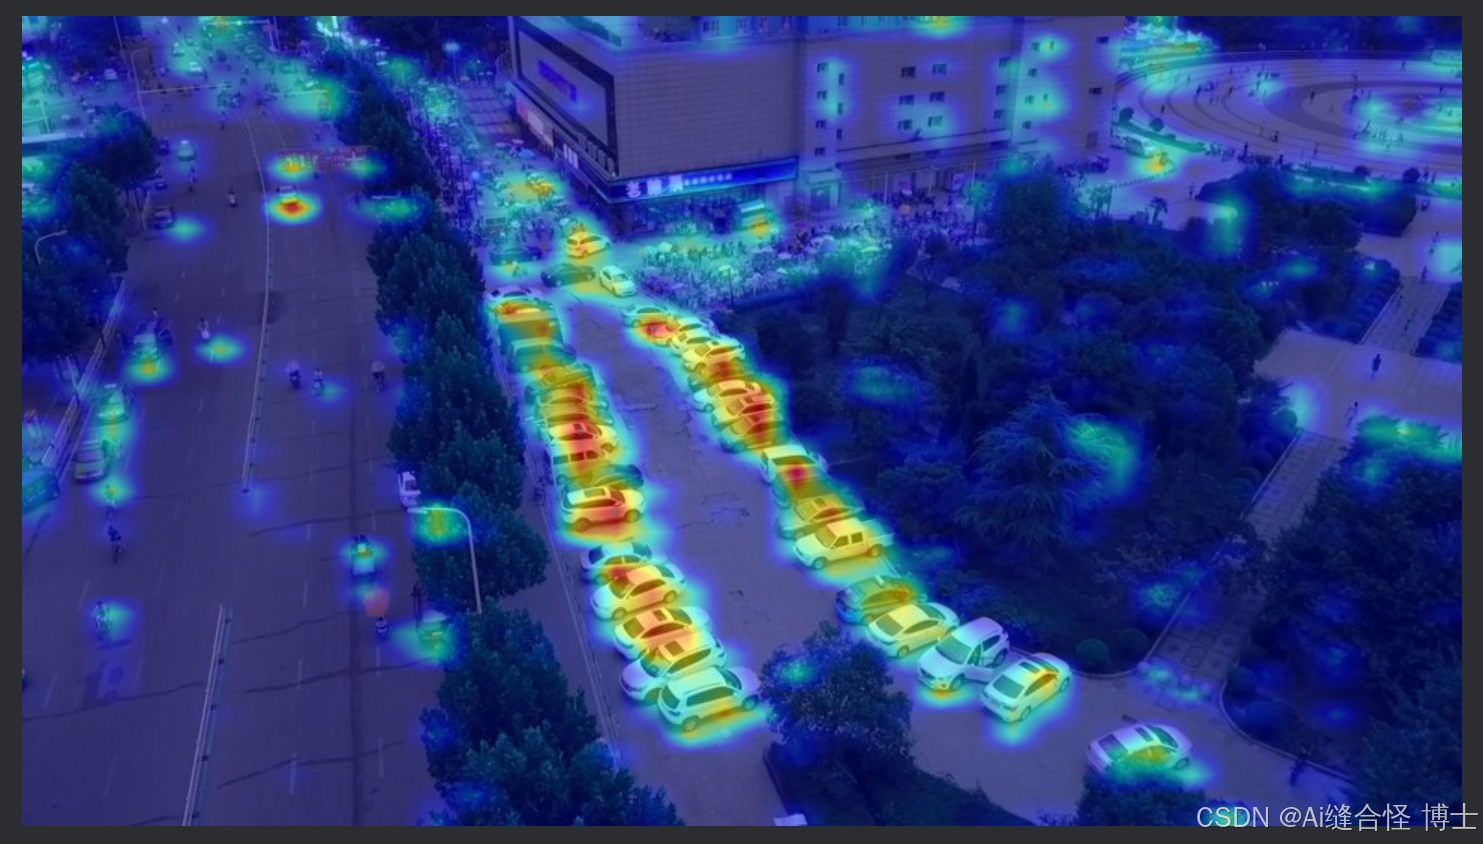
七、DEIM模型生成论文实验热力图
使用DEIM生成热力图脚本.py生成热力图,论文实验部分增加可视化热力图分析,提高论文的质量,增加小论文录用率。

八、本文总结
本文详细介绍了CVPR2025 DEIM目标检测模型的完整使用流程。内容包含:1)源码下载与虚拟环境配置;2)Visdrone2019数据集准备与配置文件修改;3)训练参数设置及Windows系统常见问题解决方案;4)模型验证、推理测试及热力图生成方法。特别针对Windows用户也提供了本地虚拟环境配置,并详细说明了数据集路径设置、参数调整等关键步骤。通过本文的指导,小伙伴可以快速掌握DEIM模型的使用方法,用于学术论文研究和实验分析。


 2144
2144

 被折叠的 条评论
为什么被折叠?
被折叠的 条评论
为什么被折叠?
 到【灌水乐园】发言


